TADY JSTEProblémy a symptomy rostlin konopí | Nutriční nedostatečnost konopí
Problémy a symptomy rostlin konopí | Nutriční nedostatečnost konopí
Nezapomeňte, že udržování správného pH zabrání množství nedostatků živin, protože kořeny mají přístup k živinám, pouze pokud je pH ve správném rozmezí
.
Jak mohu zkontrolovat pH a jak to souvisí s nedostatkem živin v konopí?
Pokud pěstujete v půdě, zaměřte se na kořenové pH mezi 6,5 - 7,0. Při hydroponickém pěstování konopí (včetně pěstování v inertních prostředích, jako je kokosové vlákno), se zaměřte na nižší kořenové pH mezi 5,5-6,5.
Prohlédněte si níže uvedené obrázky a popisy všech běžných
nedostatků živin u konopí
a dalších problémů spojených s rostlinami.
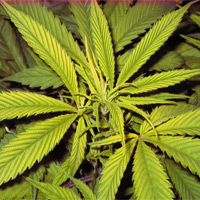
Nedostatek Bóru
Problém: Nedostatek bóru v konopí je relativně vzácný a je obvykle doprovázen jinými typy problémů s výživou nebo pH.
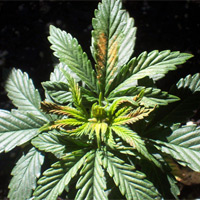
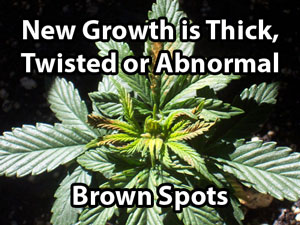
Prvními příznaky nedostatku boru u konopí jsou neobvyklé nebo silné růstové špičky spolu s hnědými skvrnami na nových listech.
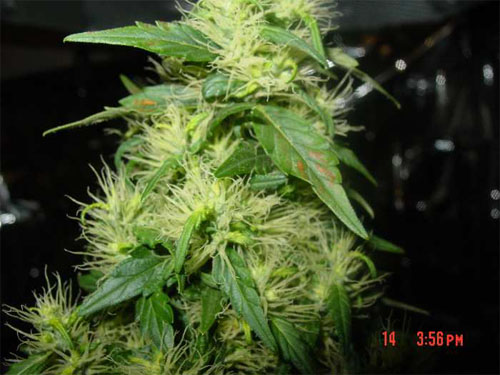
S nedostatkem bóru vykazují listy horního konopí neobvyklý a / nebo zpomalený růst. Špičky listů nemusí růst správně, mohou se vyznačovat zkroucením a nebo mohou dokonce odumřít. Nové listy se mohou mačkat a nebo krčit.
Kořeny rostlin mohou být také ovlivněny nedostatkem bóru, který vykazuje nezdravý nebo pomalý růst. Stonky mohou být drsné a nebo duté.
Rostlina s nedostatkem bóru může vypadat, jako by měla nedostatek vápníku protože bór je potřebný pro to, aby rostlina správně dokázala využít vápník. Mladé rostliny a nový růst u rostlin je ovlivněn nejvíce a může dokonce vypadat, jako by byl spálený nebo popálený.
Nedostatek bóru je často také doprovázen zjevným nedostatkem draslíku nebo dusíku, protože obě tyto živiny jsou potřebné pro to, aby rostlina používala bór. Nedostatkek bóru se častěji objevuje, když je rostlina pod vodou nebo je v jejím okolí velmi nízká vlhkost (suchý vzduch).
Řešení
pro Nedostatek Bóru v Rostlině Konopí
1.) Použijte kvalitní zdroj živin
Většina pěstitelů konopí nemusí přidávat více extra živin. Ve skutečnosti většina pěstitelů již svým konopným rostlinám dodala dostatek boru, ať už chtěli nebo ne. Pokud používáte kvalitní půdu nebo živiny šetrné k konopí, pravděpodobně se nemusíte starat o přidávání dalšího boru. Nedostatky bóru se obecně častěji objevují, když pěstitel používá na hnojení rostlin filtrovanou vodu nebo vodu z reverzní osmózy (RO). Bór se nachází ve většině vodovodní vody, ale ve skutečnosti to není nejčastější důvod, proč pěstitelé zaznamenávají u svého konopí nedostatky boru! Pokud už dáváte rostlinám kvalitní hnojiva, budete tedy ještě pravděpodobně muset ...
2.) Upravit pH na správný rozsah
V půdě kořeny bór nejlépe absorbují při pH mezi 6.0 - 7.0.
Při hydroponickém pěstování se bór nejlépe aborbuje při rozsahu pH mezi 5.5 - 6.2 (v případě hydra se obvykle doporučuje udržovat pH mezi 5.5 - 6.5, ale bór se obvykle nejlépe absorbuje pod 6.2).
Bór není dobře absorbován konopím bez dostatečného množství draslíku a dusíku, nebo pokud není v okolí dostatek vlhkosti (například pokud je rostlina nedostatečně zalitá nebo je příliš nízká vlhkost). To je důvod, proč se doporučuje zavlažovat svou rostlinu pravidelnou dávkou živin níže.
Rostlina s větší pravděpodobností vykazuje známky nedostatku boru, je-li vlhkost velmi nízká (pod 25% relativní vlhkosti vzduchu), takže můžete pomoci zvlhčovači, pokud je vaše pěstební místnost velmi suchá.
Pokud máte podezření, že vaše rostoucí konopná rostlina má nedostatek bóru,propláchněte systém čistou vodou s pH, která obsahuje obvyklou dávku živin. Starý poškozený růst se pravděpodobně nezotaví. Sledujte rostlinu několika dalších dnech, abyste se ujistili, že se problém přestane objevovat i v novému růstu.
Pokud se nemůžete zbavit nedostatku bóru, obraťte se na našich 7 kroků nápravy pro vyřešení 99% problémů s konopím.
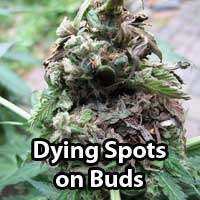
Plíseň palic (květů)
od Nebula Haze
Jak zabránit a zastavit Plesnivění Palic (krátké shrnutí)
-
Proudění / Cirkulace vzduchu - Ujistěte se, že se v okolí všech palic a listů na rostlině neustále pohybuje vzduch. To může vyžadovat pečlivé naplánování.
-
Nevystavujte rostliny chladu, pokud je to možné - Teploty vyšší než 20° C pomáhají zabránit klíčení spór plísní.
-
Vyhněte se vysoké vlhkosti - Nedovolte, aby květy byly dlouho vystaveny vlhkému prostředí. Hniloba palic je houba a stejně jako všechny houby potřebuje k vyklíčení mokré místo.
-
Odstraňte všechny zasažené květy - Opatrně odstraňte a vyhoďte všechny palice s plísní a všechny paličky v okolí - to je extrémně důležité pokud nechcete ztratit celou sklizeň! Nedovolte, aby se žádná plíseň dotýkala jiných částí vaší rostliny.
“Když jsem musel vyhodit většinu své rostliny kvůli plísni, někde tam uvnitř jsem trošku brečel.”
~ Pěstitel
Obsah
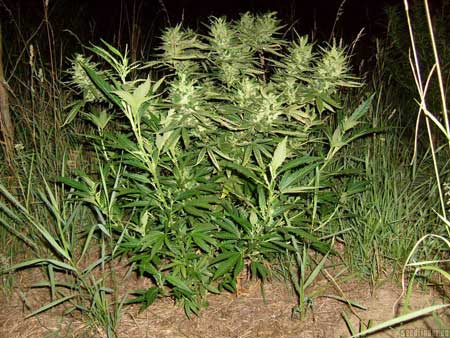
Obvykle se infekce plísně stává viditelnou jen v určitých částech rostliny. Někdy jsou ovlivněny pouze větší a hustší palice, ale jindy dostanete zásah po celé rostlině, zejména se dokáže rozšířit po pár deštivých dnech.
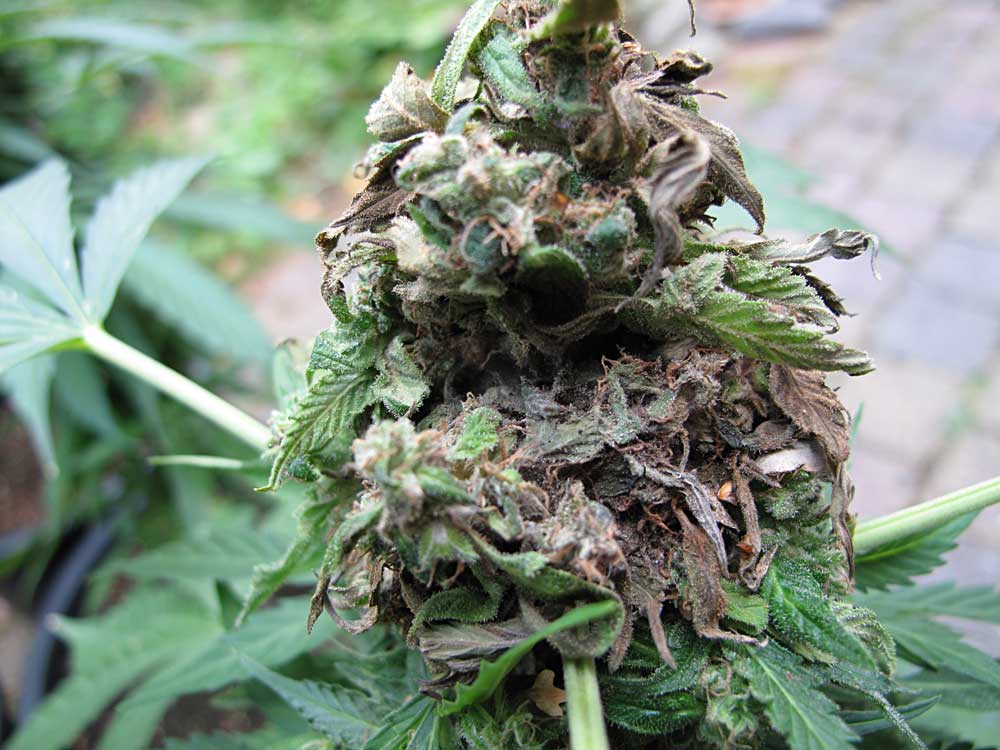
Na hlavním stonku můžete vidět oblasti, kde vše (palice, pestíky a / nebo listy) ztmavne, na rozdíl od zbytku rostliny se zbarví a / nebo vyschnou.

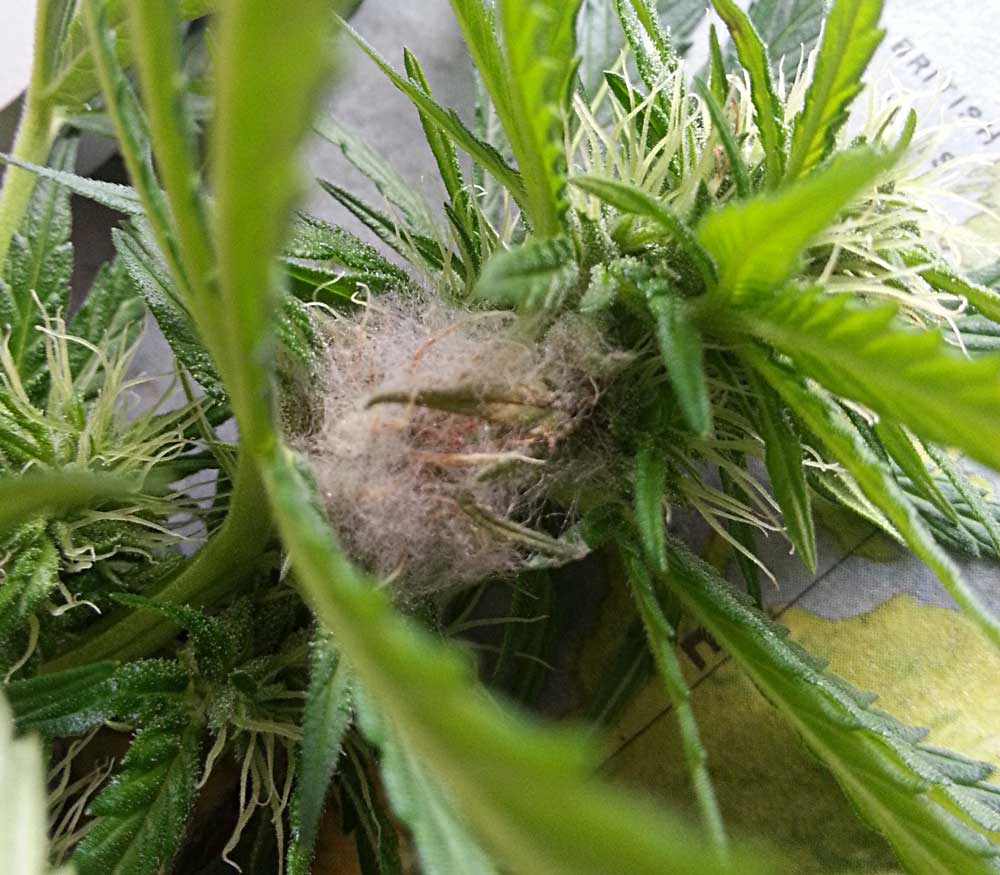
Kromě plísně samotné můžete na vnější straně květů vidět nejprve bílou plíseň - to je první fáze a znamená, že rostliny musí být ošetřeny co nejdřívě! Díky pokračující plísni v palicích se pupen snadno odtrhává, takže můžete vidět i dovnitř. Když je zasažená palice zkoumána, bude uvnitř tmavá - obvykle šedá nebo nahnědlá a pravděpodobně i zaprášený (tento „prašek“ jsou spory plísní).
V závislosti na životní fázi může plíseň palic vypadat…
-
bílý a načechraná
-
tmavě šedá nebo hnědá (někdy i tmavě fialová)
-
palice mohou být plné tmavě skvrnitého prachu, který se snadno odfoukne (spory plísně)
“Minulý rok jsem ztratil polovinu svých rostlin kvůli plísni ... Po několika dnech mrholení jsem si všiml skvrn a pak jsem jen viděl, že se rozšířila na všechny mé rostliny.”
~ Pěstitel
Různé fáze Plísně - Odhalte ji zavčas!
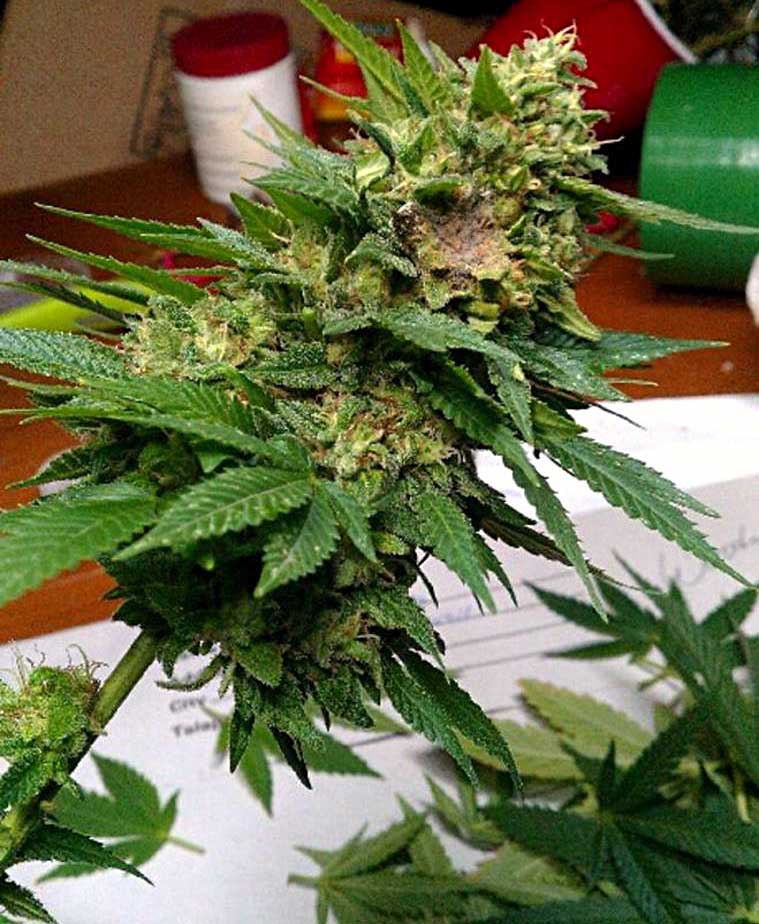
Když jsou rostliny zasaženy plísní, začíná to jako nadýchaný bílý růst uprostřed nebo po stranách palic, ale bílá plíseň rychle ztmavne na šedou nebo hnědou a dostane se až hluboko dovnitř do větších palic. Někdy uvidíte počáteční fázi jen po stranách palic, což vám dává šanci zachytit infekci brzy.
Plíseň Botrytis vypadá v počáteční fázi jako bílá a načechraná, ale pravděpodobně ji takto nikdy neuvidíte, jelikož rychle ztmavne a začne sžírat palice zevnitř ven
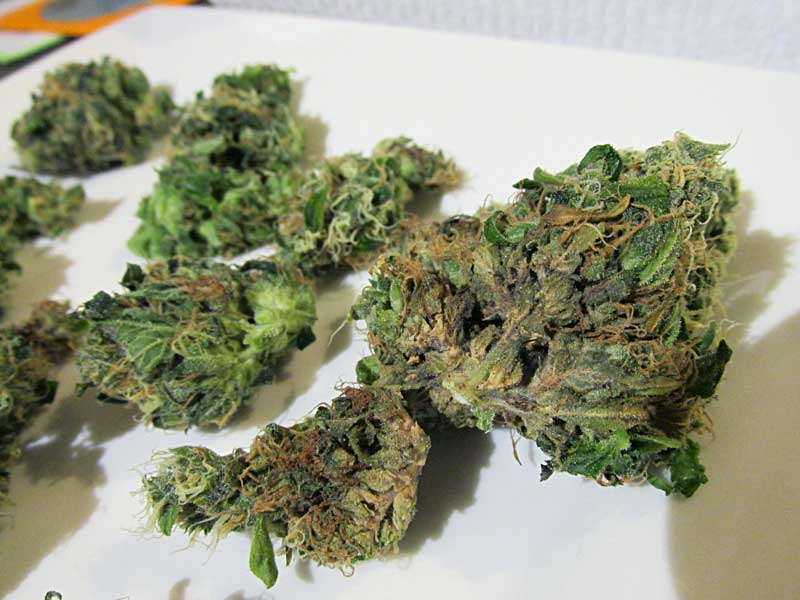
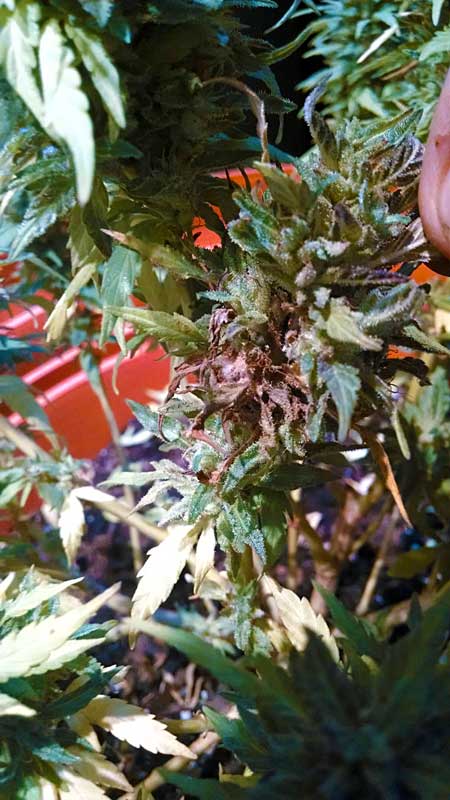
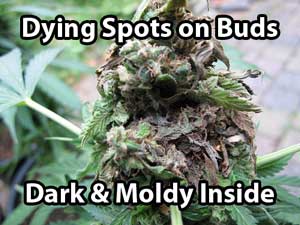
Jakmile se plíseň palic zmocní částí rostlin konopí, mohou palice někdy vypadat z vnější strany téměř stejně, ale obvykle začnou vypadat jako by umíraly v od stonku. Často oblast vyschne a snadno se odděluje. Vnitřek palic může být nahnědlý, šedý nebo dokonce fialový.
"Všiml jsem si jednoho hnědého listu a ten bohužel snadno šel oddělit a odhalil i to, co bylo uvnitř."
~ Pěstitel
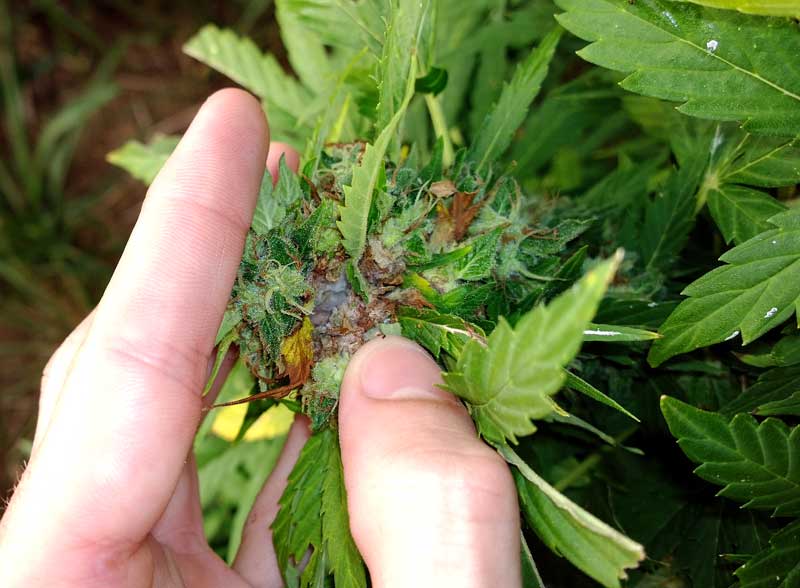
Někteří pěstitelé si mohou myslet, že tato místa sušení znamenají, že rostlina je téměř připravena ke sklizni, ale víte, že něco je rozhodně špatně, když jsou zasaženy jen části s palicemi.
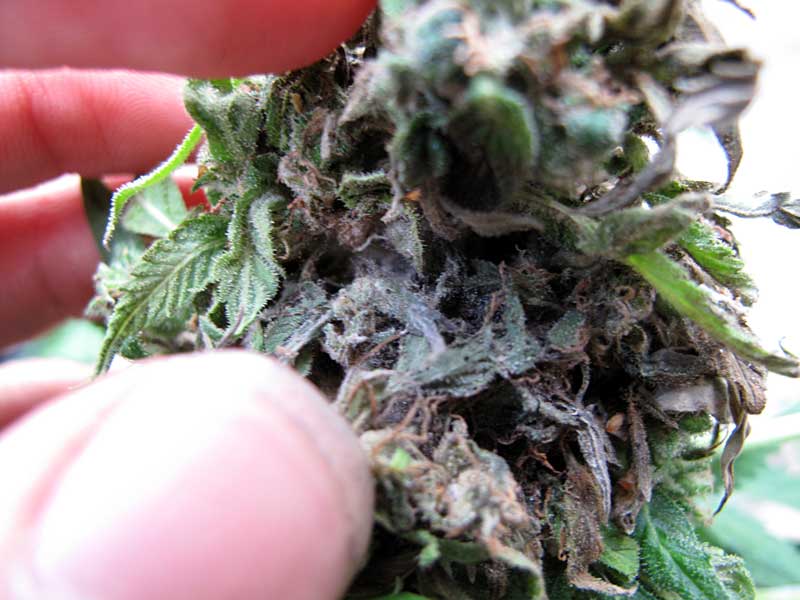
Plíseň konopí je způsobena druhem houby známé jako Botrytis cinerea.
V rostlinách konopí způsobuje Botrytis hnilobu zevnitř, proto název „hniloba palic. Pokud květ otevřete, uvnitř bude palice plesnivá tmavě šedá nebo hnědá.
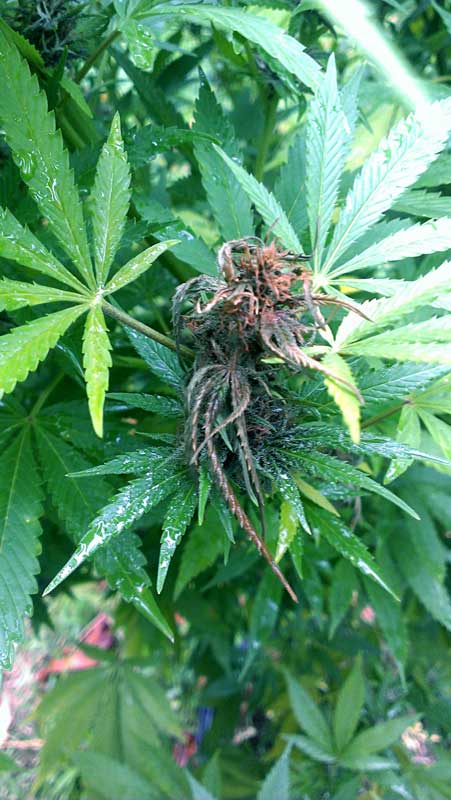
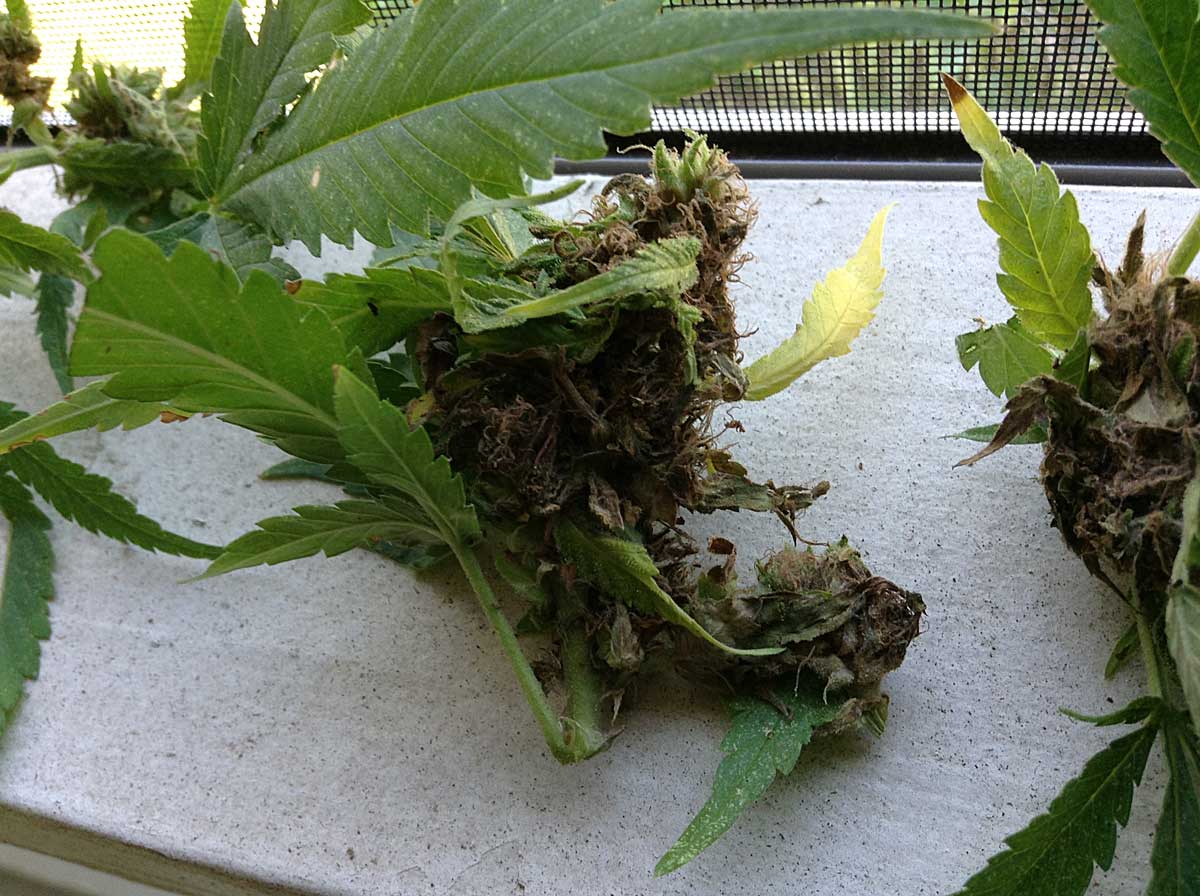
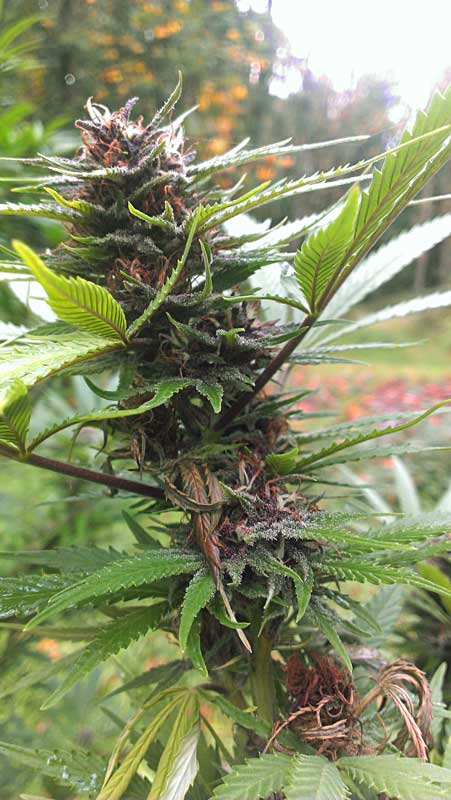
Plíseň se může projecit mnoha způsoby. Například tato větev zde reagovala na plíseň tím, že zfialověla. Listy začaly umírat a usychat. To je to, co pěstitel našel po několika dnech deště.
Věděli jste? Kromě plísně v rostlinách konopí způsobuje Botrytis problémy mnoha různým druhům rostlin, včetně vinných hroznů, jahod a pivoněk.
Houba Botrytis je někdy označována jako „hniloba botrytis“, „hniloba botrytis“, „hniloba květenství“ nebo „šedá plíseň“.
Pokud jde o konopí, často se nazývá „Bud Rot = plíseň palic“ , protože to je hlavní symptom, kterého se pěstitelé nejvíce obávají.
Jakákoli část rostliny zasažená plísní by měla být okamžitě odstraněna! To pomůže zabránit dalšímu rozšíření.
Ale především by všechny palice na kterých se tato toxická houba vyskytla neměly být nikdy kouřeny nebo jinak používány.
Vyhoďte všechny palice s jakýmkoliv znakem plísně!
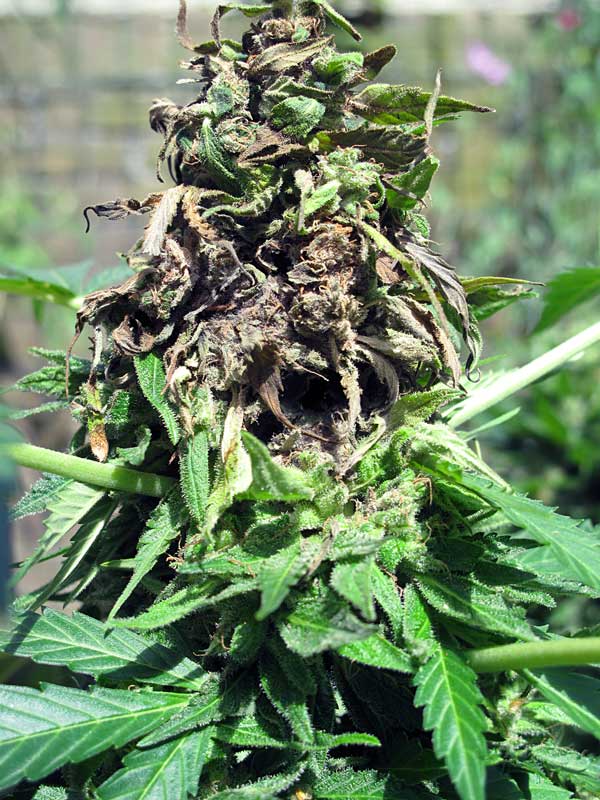
Takto vypadá plíseň palic / květů
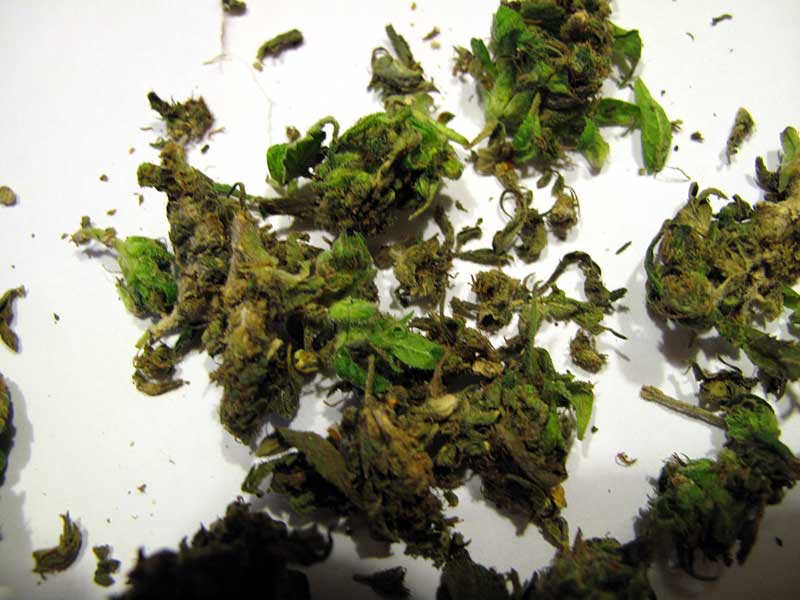
Existují různé fáze Botrytis s tím jak dozrává a pokouší se uvolňovat spory. Zasažené místo zprvu vypadá jako načechraná bílá plíseň a poté se šíří uvnitř zasažených květů. Vnitřek těchto částí ztmavne a zešedne nebo zhněde. Jakmile se usadí, plíseň se ihned snaží rozmnožovat. Vnitřky se naplní tmavým skvrnitým prachem, který se snadno vznáší a šíří. Jedná se o spóry hub, takže buďte velice opatrní a snažte se v okolí plísně dýchat co nejméně. Zkuste také zamezit tomu, aby se plíseň vůbec dotýkala dalších částí rostlin - ihned ji odstraňte.
Zdravé rostliny konopí nebudou podléhat plísni dokud nebudou po delší dobu vystaveny stojatému vzduchu a chladným či mokrým podmínkám.
Jak se houba Botrytis dostane k mým rostlinám?
Plíseň se šíří do rostlin rozprášenými šedými spóry, obvykle po větru nebo ve vodě.
Nejčastější způsob šíření plísně je:
-
Vítr
-
Dešťová voda
Pokud vaše rostliny nejsou nikdy vystaveny zdrojům těchto spórů, nikdy se u nich plíseň neobjeví.
Spóry lze bohužel snadno přenést do vaší rostliny větrem, deštěm, kontaktem se zvířaty nebo dokonce klonem z jiné pěstírny. Spící spory mohou přežít v různorodých podmínkách, čekajíce aby mohly napadnout vaše plody jindy!
Ale ... není to tak zase tak zlé. Houba se neobjeví, pokud se dobře staráte o své květy. A v každém případě vaše rostlina potřebuje být nějakým způsobem oslabená, aby se spory usadily ve vašich květech.
Možné oslabení vašich rostlin, které mohou umožňovat plíseň palic zahrnují praskliny ve stonku způsobené větrem nebo nadměrným tréninkem, poškození od housenek, hlemýžďů, červů, plísně bílé či jiných škůdců a larev. Nebo jakýkoli další typ zranění nebo slabosti, který umožní vstup spórů plísně do rostliny.
I když vaše rostlina byla vystavena spórám, nic nebude schopno přežít a zahájit cyklus infekce květů pokud poskytnete konopí teplé a suché prostředí.
Plíseň palic potřebuje k prosperitě chladné mokré podmínky a stojatý vzduch.
Co umožní spórům, aby se rozrostly do plně rozvinuté formy plísně palic?
Studené Prostředí
-
Chladná teplota (15-20°C) je ideální pro růst plísně
Mokré Palice
-
Deštivé počasí, především pokud přetrvává několik dnů v kuse
-
Vysoká vlhkost
-
Jakákoliv situace kdy jsou palice mokré po několik hodin v řadě
Špatná Cirkulace Vzduchu
-
Nedostatek cirkulace větru nebo vzduchu přes horní část uvnitř rostliny
-
Velmi listnaté rostliny (které mají sklon shromažďovat vodu mezi listy a zabraňují cirkulaci vzduchu rostlinou)
“Můj větrák dostatečně necirkuloval vzduch za velkými větvemi s palicemi. Myslel jsem si, že to bude v pořádku, ale pak jsem si všiml bílých částí na rostlině. Další věc, kterou jsem pak bohužel viděl, byla polovina odumřelých částí palic”
~ Pěstitel Konopí
Velké větve s palicemi
-
Masivní, husté větve s velkými palicemi mají uvnitř ideální vlhké prostředí, které není vystaveno proudění vzduchu. To z nich činí hlavní cíl pro výtrusy botrytisů.
Jak Kontrolova Plíseň na Rostlinách (nejdůležitější!)
Jak Zabránit Plísni - Prevence
Tyto body jsou nejdůležitější k zapamatování...
-
Dobrá cirkulace (proudění) vzduchu - Vytvořte v okolí rostlin dobré prostředí pro cirkulaci vzduchu především do oblasti palic / květů.
-
Udržujte rostliny v teplém prostředí - Teploty pod 20°C vytváří ideální prostředí pro růst spórů plísní. Kontrola teploty okolí může být nutností.
-
Nenechte palice zůstat mokré - Nedovolte, aby květy dlouho zůstávaly ve vlhkých nebo příliš vlhkých podmínkách. Chraňte své rostliny před deštěm a kontrolujte i vlhkost prostředí.
-
Okamžitě odstraňte všechny zasažené palice - Opatrně odstraňte a zlikvidujte všechny palice, které byly pravděpodobně zasaženy plísní květů. Nedopusťte, aby se jakákoliv zasažená část dále dotýkala dalších částí vaší rostliny. To zásadním způsobem pomůže rozšíření na další květy.
Další tipy, jak zabránit ...
Vyhněte se poranění rostlin. Vyhněte se poškození rostlin, zejména ve fázi květu. Nenechávejte na rostlinách otevřené rány, ze kterých by vytékala voda a živiny - zalepte všechna otevřená zranění páskou nebo jiným „udělátkem“, dokud se zranění nezavře. Mějte také opatření proti škůdcům a udržujte rostliny zdravé. Zdravá rostlina je mnohem méně náchylná k infekcím.
Ucvikněte velké větrové listy. Odstraňte listy z velmi listnatých rostlin, ale neberte příliš mnoho. Ve skutečnosti chcete odstranit co nejméně listů, především pokud pěstujete venku.
Odstraňte pouze listy, které stíní nebo se dotýkají palic, taktéž všechny listy, které leží na sobě. Vaší rostlině nebude vadit, pokud odstraníte pouze listy z oblastí kde jich je dostatek, což zabrání navyšování vlhkosti a zároveň zlepší cirkulaci vzduchu kolem květů.
Dávejte na ně pozor. Pečlivě sledujte rostliny jestli v pozdním období květu nevykazují známky plísně květů, zejména na velkých nebo masivních palicích a zejména po chladném a nebo vlhkém počasí.
Při pěstování venku...
Opatřete si odrůdu vyšlechtěnou pro vaše přírodní pásmo. Pokud žijete na místě, které má krátká léta a brzy na podzim je chladno nebo deštivo, nepořizujte si odrůdu určenou pro pěstování na rovníku!
Existují rychle rostoucí kvetoucí odrůdy konopí, které jsou určeny pro pěstování venku v chladnějších nebo deštivějších klimatických podmínkách.. Například hodně samonakvétacích (auto-flowering) mají rychlý cyklus života - ideální na krátké léto před podzimním deštěm nebo mrazem.
A good outdoor strain for those worrying about bud rot might be Auto Frisian Dew, an award-winning, mold-resistant strain made for outdoors. This strain goes from seed to harvest in about 12 weeks. Just plant seeds after the last frost in the Spring, then harvest 3 months later.
AutoFrisian Dew is resistant to fungus like bud rot. This strain is quick to harvest and will grow in any climate which has (at least) 3 warm summer months before it starts getting cold or raining.
Breezy location - Try to plan your grow spot so your plants get a breeze, but not too much wind. This can be tricky, and it may mean visiting the grow spot a few times before planting.
Protect your buds from rain. If you know there will be drizzly conditions, cover your plants with a tarp to protect them from most of the rain. Don't put tarp directly on plants or you'll hurt you buds. Install the tarp up above the plants, and make sure it's held up by the center part, that makes it so rain runs off the sides of the tarp instead of collecting in the middle.
Shake plants. Some growers shake their plants on dewey mornings or after rain, so any water drops that form on the leaves don't become breeding grounds for spores.
Fungicides, Neem Oil & Burning Sulfur
In the flowering stage, never use fungicides, spray affected buds with Neem oil, or burn sulfer.
These common tactics are not effective at stopping bud rot, and will make your buds taste, smell and look terrible.
Some growers use fungicides made specifically for Botrytis in the vegetative stage. But when it comes to cannabis, fungicides can only be used as a preventative before any buds have formed.
If you already have bud rot and can't fix your environment (which is the best way to kill Botrytis), I highly recommend cutting your losses and taking down the plant.
-
Most fungicides are not effective for bud rot. If you do plant to spray plants, it’s recommended to get one that’s specifically been developed to combat Botrytis.
-
Any treatments for Bud Rot should be applied in the vegetative stage as a preventative.
-
There's nothing you can spray on your plants after bud rot has already formed. Unfortunately, there aren't any effective fungicides or other treatments that are safe to use with cannabis in the flowering stage
How to Stop Bud Rot from Spreading
The inside of dense buds provide a great place for Bud Rot spores to grow, and that’s the main place you’ll find developed Bud Rot on cannabis plants. Once you've spotted bud rot, it's important to act immediately.
As soon as even one part of a single bud starts showing signs of grey mold, the rot can spread to the rest of the cola and then to other buds on the plant. If triggering conditions (lack of airflow, heat, wetness) have not improved, a single point of infection can quickly ruin the harvest of an entire plant.
Never Spray Your Buds with Anything!
Bud Rot Removal
- Immediately remove all rotted parts and nearby areas. The only way to stop the spread is to remove all signs of mold from the plant, then move plants to a warm, dry area with a nice breeze.
- Be extremely careful not to let any rot touch any part of the rest of your plant.
What Happens Next?
You can either...
-
harvest the cannabis plant now
-
let it continue to ripen
If your plant have been affected by bud rot, it means they need less dampness, drier air and warmer temperatures. If you can improve the environment, you can allow the plant to continue ripening after you've removed the infected buds.
Here's how to fix the environment:
-
add additional air circulation
-
raise the temperature
-
lower the humidity
-
prevent wet spots on plant
If you can't fix the environment, I highly recommend cutting your losses at this point. If you know that it's still going to be cool, humid or wet for your plants, it's recommended you harvest immediately to prevent further buds from becoming infected. Buds harvested early are better than moldy buds!
Whenever you do harvest your healthy buds, be extremely careful during the drying process. Normally growers want to slow dry buds, but if you're worried about mold it's better to dry them faster, with plenty of air circulation and movement.
Jump to...
Controlling Humidity in the Grow Room
Air Circulation & Exhaust Tutorial
Other Cannabis Pests, Bugs & Viruses
Calcium Deficiency
by Nebula Haze & Sirius Fourside
Problem: Calcium is an important nutrient which helps provide structure to the cannabis plant and helps it withstand stress like from heat.
A cannabis calcium deficiency can sometimes be difficult to diagnose since calcium deficiencies are often accompanied by magnesium, iron, and/or other deficiencies.
Learn more about the relationship between calcium and other cannabis nutrient deficiencies
Calcium moves relatively slowly through the plant (it is a semi-mobile nutrient), which means it tends to "stay put" after it's been given to a leaf.
Because of this, calcium deficiencies tend to show up in newer growth (upper leaves) and middle vegetative growth.
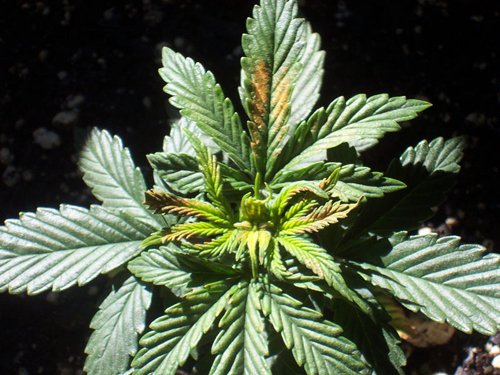
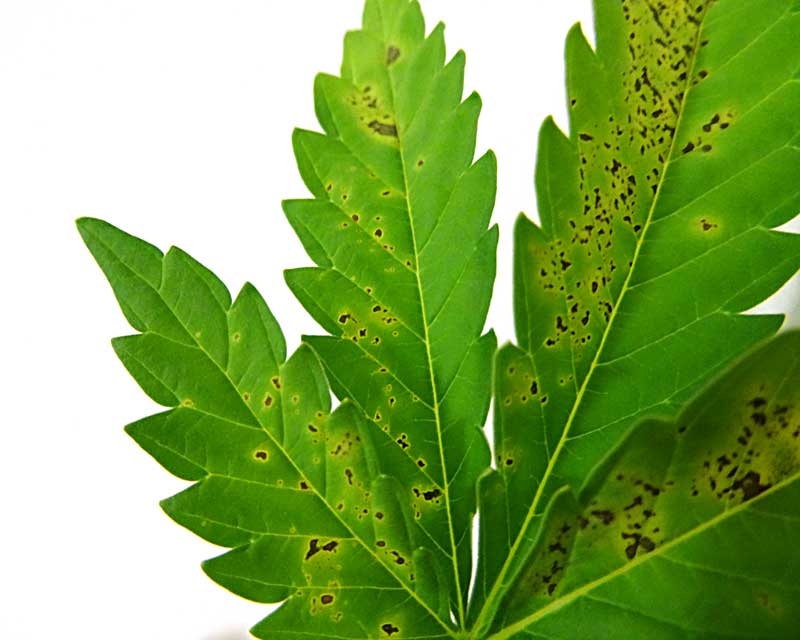
Calcium Deficiencies Appear on Relatively New Growth
Calcium deficiencies tend to appear on newer or growing leaves, which means calcium deficiencies first appear on leaves where there's rapid vegetative growth.
Some of the most noticeable signs of a calcium deficiency will appear on newer or growing leaves which may display:
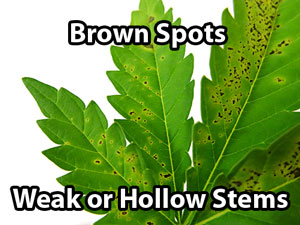
- Dead spots
- Crinkling
- Spotting / Mottling
- Small brown spots
- Stunted growth
- Small or distorted new leaves
- Curled tips
- Leaf die-off
- Affected leaves may appear dark green besides the spots
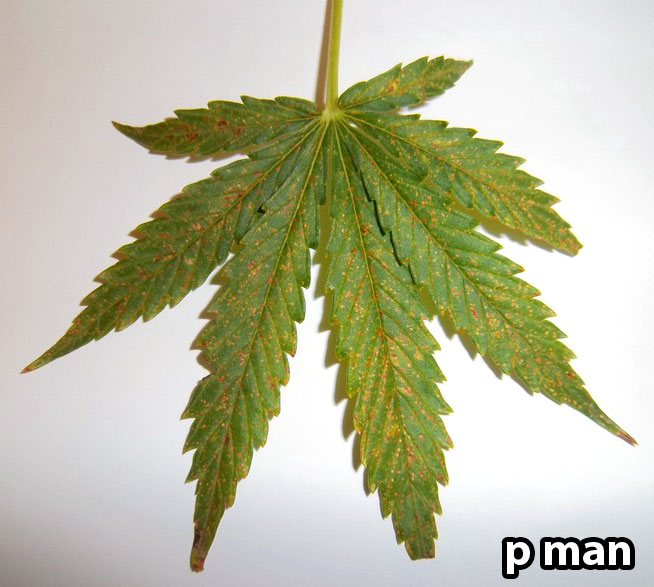
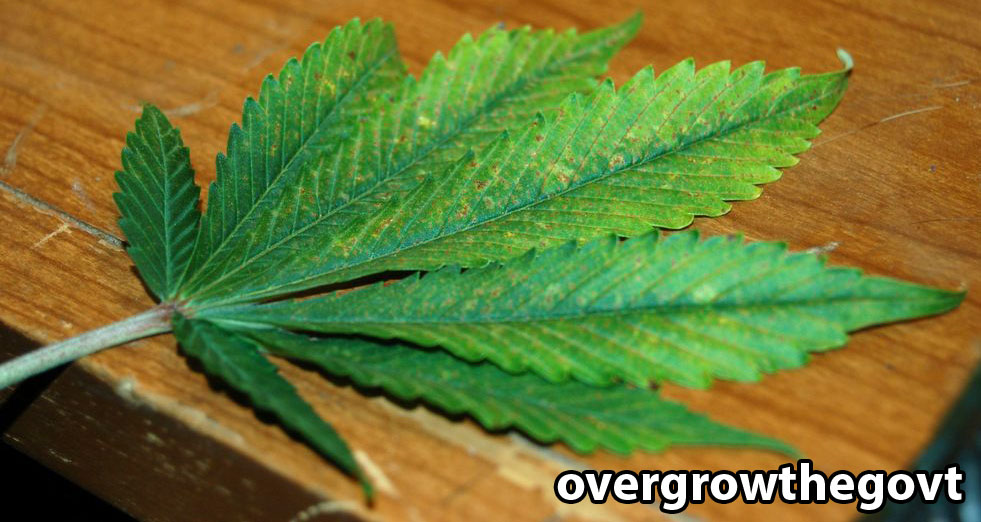
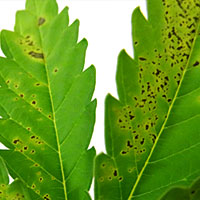
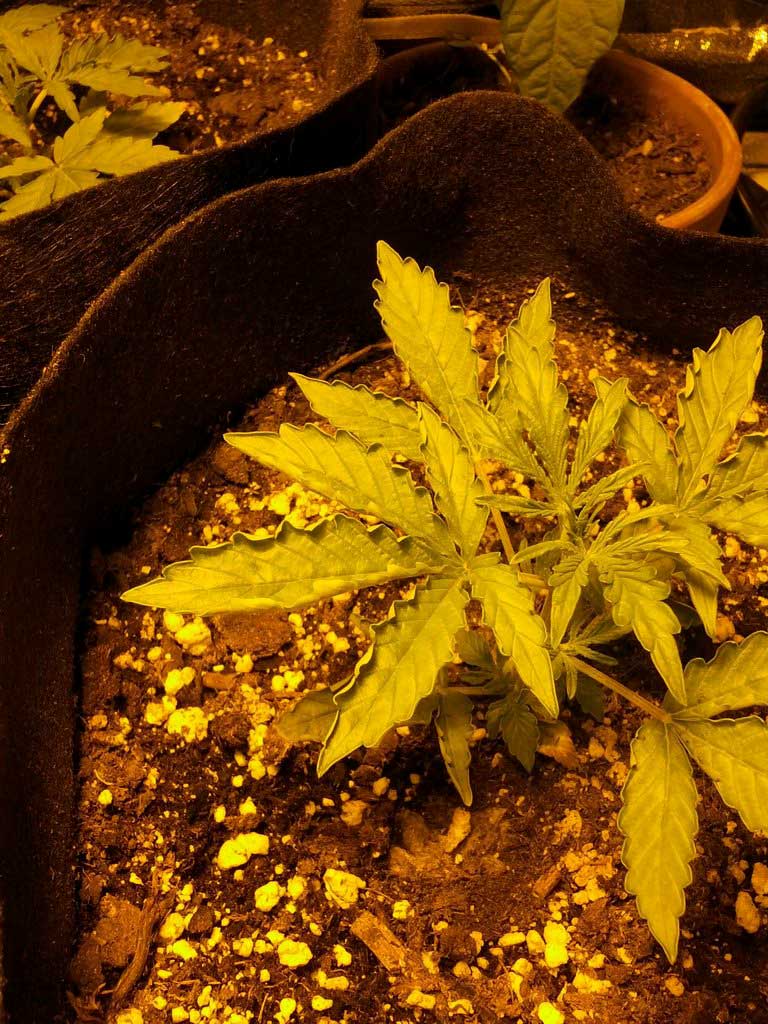
Different leaves
showing a cannabis calcium deficiency
(the leaf all the way to the right may also have a touch of a phosphorus deficiency)

Click pic for closeup!
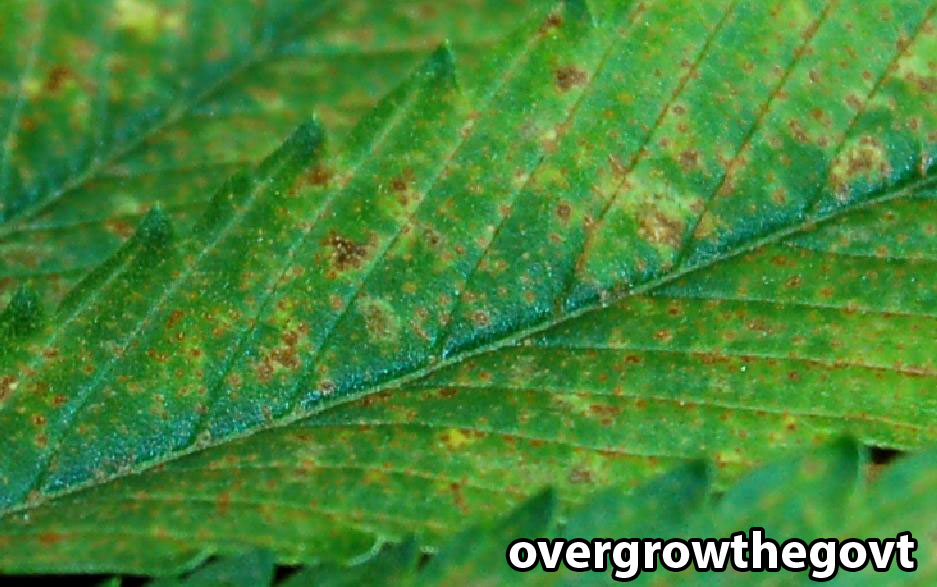
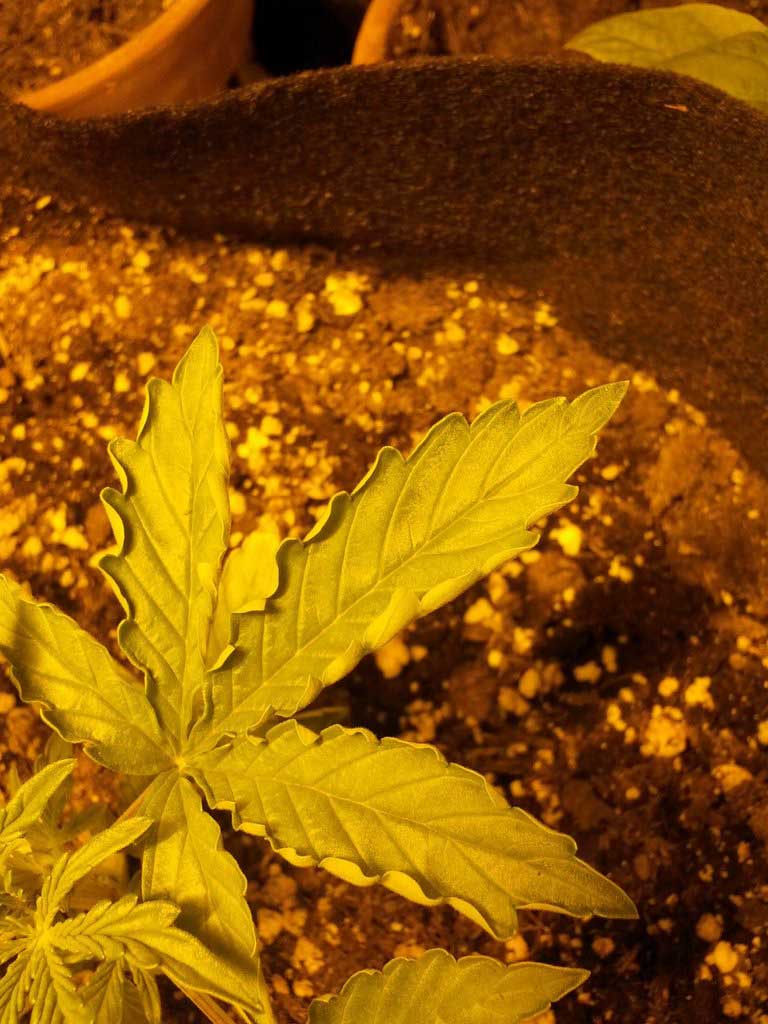
Here's a close-up of a calcium deficiency that appeared on leaves towards the top of a cannabis plant grown in coco coir:
Other Symptoms of Calcium Deficiency
If a cannabis plant is affected by a calcium deficiency for too long, it may begin to show the following symptoms due to the lack of calcium.
- Stems become weak or flimsy and may crack easily
- Stems become hollow or show inner signs of decay
- Plant does not stand up well to heat
- Flowers/buds do not develop fully, or development is slow
- Roots appear weak or under-developed
- In severe calcium deficiencies, parts of roots may even die off or turn brown
- Roots are more susceptible to root problems like slimy root rot
Cannabis tends to like high levels of calcium, so it is unusual to feed too much calcium when using normal amounts of nutrients and/or regular soil. There are not many known cases of cannabis calcium toxicity (too much calcium), however too much calcium can cause the plant to lock out other nutrients, so it's important not to go overboard..
Calcium deficiencies are more likely to appear when...
- Grower is using filtered or reverse osmisis (RO) water to feed plants - the amount of calcium found in tap water varies, but some tap water has enough calcium to prevent calcium deficiencies
- Growing cannabis in hydroponics with nutrients that don't supplement calcium or when growing in water that has less than 6.2 pH
- Growing cannabis in coco coir that hasn't been supplemented with calcium or below 6.2 pH
- When growing in soil or soilless growing medium that hasn't been supplemented with calcium (usually from dolomite lime) or is acidic (below 6.2 pH)
- Too much potassium can also sometimes cause the appearance of a calcium deficiency
- Outdoors - calcium deficiency is more likely to appear in acidic soil (below 6.2 pH)
Different strains of cannabis tend to have different nutrient problems. Some cannabis strains (or even specific plants) tend to use much higher levels of calcium than others, and so you may see calcium deficiency problems with one plant even when all the other plants (which are getting the same nutrients and environment) aren't showing any signs of deficiency.
Solution For Calcium Deficiency in Cannabis
Your cannabis plant may show signs of a calcium deficiency if the pH at the roots is too high or too low. That is because when the pH of your root zone is off, your cannabis cannot properly absorb calcium through its roots. Therefore the first step is to ensure that you have the correct pH for your growth medium. Learn more about pH and cannabis.
Please note: After a calcium deficiency is cleared up, the problem (brown spots and unhealthy new leaves) will stop appearing on new growth, usually within a week. Please note that leaves which have been damaged by a calcium deficiency will probably not recover or turn green, so you want to pay attention to new growth for signs of recovery.
- In soil, calcium is best
absorbed by the roots in the 6.2 - 7.0 pH
range (in soil, it's generally recommended to keep the pH between 6.0 -
7.0, but calcium specifically tends to be best absorbed above 6.2)
- In hydro, calcium is best
absorbed by the roots in the 6.2 - 6.5 pH
range (in hydro, it's generally recommended to keep the pH between 5.5
- 6.5, but calcium specifically tends to be best absorbed above 6.2)
If you suspect your growing cannabis plant has a calcium deficiency, flush your system with clean, pH'd water that contains a regular dose of cannabis-friendly nutrients that includes calcium. This will remove any nutrient salts that may be affected the uptake of calcium and help restore pH to the proper levels..
To supplement with extra Calcium... (it's very rare to give a cannabis plant too much calcium, however, too much calcium can lock out other nutrients so don't go overboard)
Calcium, magnesium, and iron deficiencies often appear together in cannabis. Many growers decide to purchase some sort of Calcium-Magnesium (often called Cal-Mag) supplement for their grow room in case this common deficiency appears.
Listed below are common cannabis Calcium supplements, along below with some general information about each one. After supplementing with Cal-Mag and correcting the pH, you should expect to see new healthy growth within a week. Remember, the old leaves will probably not recover, but new growth should be green and healthy.
Cal-Mag is Well Suited For Hydro, Coco Coir, or Soil
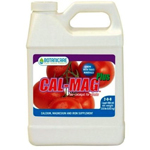

Botanicare Cal-Mag Plus is a calcium, magnesium, and iron plant nutrient supplement. General application is to mix 1 tsp (5ml) of Cal-Mag into each gallon of water. I have used Cal-Mag Plus several times with great results.
Guaranteed Analysis: Nitrogen (N) 2.0%, Calcium (Ca) 3.2%, Magnesium (Mg) 1.2%, Iron (Fe) 0.1%
Derived from: Calcium Nitrate,
Magnesium Nitrate, Iron EDTA
Dolomite Lime - For Soil Growers (Organic)
If you're looking for a way to supplement calcium in your organic or soil setup, I highly recommend a product called "Dolomite Lime."
Dolomite is a good source of calcium and magnesium and can be mixed with your soil. The great thing about dolomite is it works slowly over the course of a few months.
Dolomite has a neutral pH of about 7.0 and will help keep soil at the correct neutral pH range which is optimum for cannabis growth.
You can buy Dolomite Lime online, but with shipping it's almost always waaaay cheaper to pick up a bag at a home improvement or gardening store such as Lowes, Home Depot, gardening centers, etc. If possible, try to get a finer grade of dolomite compared to something that is more coarse.
How to Use Dolomite Lime for Cannabis: When growing cannabis indoors, add 6-7 teaspoons of fine dolomite lime to each gallon's worth of soil. So if you're mixing enough soil to fill a 5 gallon container, you want to add 30-35 teaspoons (about 2/3 cup) of dolomite lime to the mix. Mix the dolomite lime and the dry soil thoroughly, then lightly water it with water that has been pH'ed to 6.5. After getting the soil wet, mix the soil well and wait a day or two to let the soil settle before checking the pH and adding plants. When growing in an outdoor garden, follow the dolomite lime manufacturers instructions.
If you cannot get rid of your calcium deficiency, please consult our 7-Step Cure to 99% of Cannabis Growing Problems
Copper Deficiency
Problem: A cannabis copper deficiency is rare and manifests itself as leaves curling back, lack of growth, and unusual dark coloring of the leaves. Copper doesn't move easily through the plant and is considered "low-mobile."
Symptoms of New (Young) Leaves
- Dark or twisted
- Purple or blue undertones
- Metallic sheen on leaves
- Leaves turn under
- Tips may turn yellow or white
Symptoms of Older Leaves
- Older leaves may show signs of pale yellow or white
Other Copper Deficiency Symptoms
- Buds do not ripen, or grow very slowly
- Pistils (hairs) on female plants may not grow properly
- Plant may wilt or have limp leaves
- New growth has difficulty opening up
It is very unlikely that there is no copper available in your water or soil, so usually a copper deficiency in cannabis is caused by a pH problem at the roots that is restricting access to nutrients.
Often it is a problem with another nutrient or with the pH that causes the appearance of a copper deficiency.

Copper toxicity (too much copper) in cannabis plants is rare,
though
a severe case of too much copper can cause a quick death to the plant.
Solution For Cannabis Copper Deficiency
If you suspect your growing cannabis plant has a copper deficiency, flush your system with clean, pH'd water that contains a regular dose of cannabis-friendly nutrients. This will remove any nutrient salts that may be affected the uptake of copper and help restore pH to the proper levels..
Watch to make sure that the problem starts to clear up within a couple of days. Old growth may not recover, but new growth should be healthy.
- In soil, copper is best
absorbed by the roots in the 6.0 - 7.0 pH
range
- In hydro, copper is best absorbed by the roots in the 5.5 - 6.5 pH range
If you cannot get rid of a cannabis copper deficiency, please consult our 6-Step Cure to 99% of Cannabis Growing Problems


Fungus Gnats
by Nebula Haze
Table of Contents
What Causes Fungus Gnats To Attack Your Cannabis Plants? Wet topsoil!
How Do You Know You Have Fungus Gnats?
How To Get Rid of Fungus Gnats in Your Soil
Prevention: Safeguard Your Next Grow
For Composters: Get Rid of Fungus Gnats In Your Compost Pile
Fungus gnats - how do you get rid of these tiny flying pests laying eggs in your soil? This article will teach cannabis growers how to fix their current fungus gnat infestation and make sure they never get fungus gnats again.
Fungus gnats are a common problem for soil cannabis growers (especially those who overwater their plants!), but they're actually easy to get rid of once you know what to do!
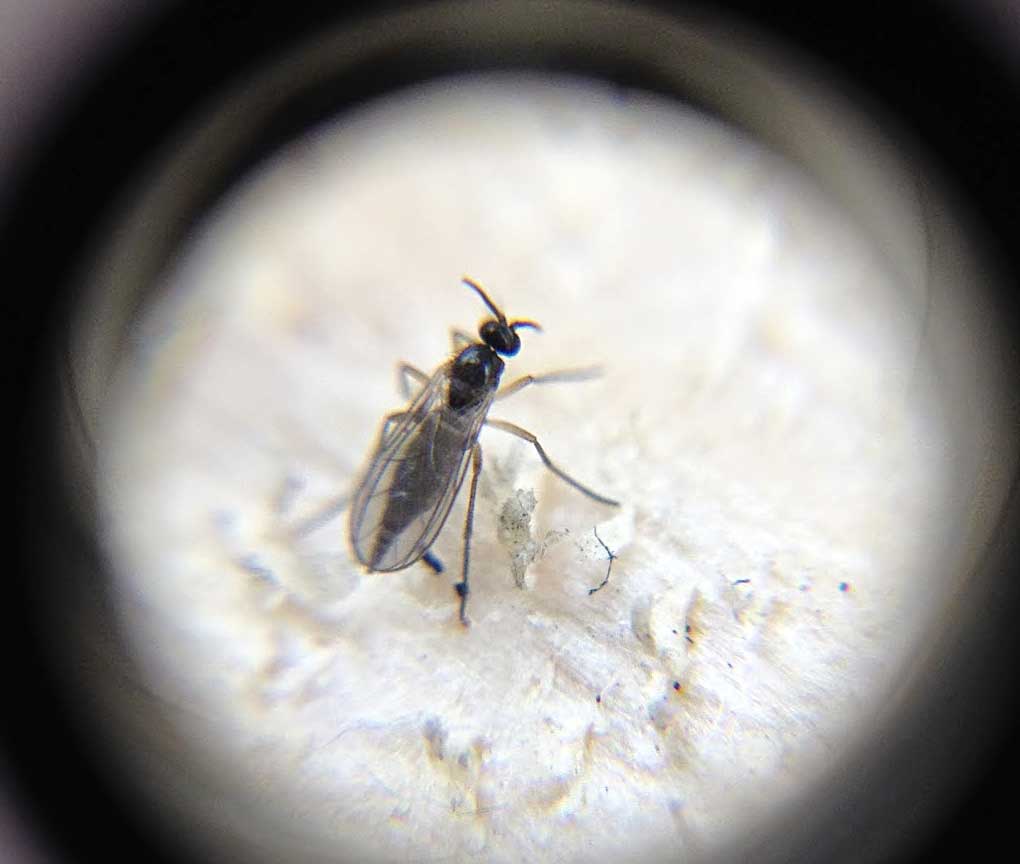
Fungus gnats (also known as “sciarid flies”) are black or dark brown flies which look like tiny mosquitoes with dark wings.
How Big Is a Fungus Gnat?
Fungus gnats are small, only about 2 mm long. To give you an idea of how big that is, 2mm is about the thickness of a quarter.

Fungus gnats can be a big nuisance in your soil cannabis grow, mostly because their tiny maggot/larvae offspring will hurt your plant roots (which will cause problems for your plants).
Why Do Fungus Gnats Attack Cannabis Plants?
Fungus larvae eat fungus or decaying matter, and need wet conditions to thrive. It is common for soil growers to overwater their cannabis plants, and wet soil is the perfect home for fungus and decaying organic matter. After fungus has grown (often invisible to the naked eye) or overwatered matter has begun to decay in the topsoil, fungus gnat lays their eggs in in the top layer of wet soil.
Warm + wet topsoil = fungus gnats (and other problems or pests in soil)
These eggs hatch into larvae that look like tiny maggots which only live in the top 2-3 inches (5-8 cm) of soil. The fungus gnat larvae are the culprits which cause damage to cannabis roots.
Cannabis roots are not the main source of food for fungus gnat larvae, but roots get caught in the crossfire. In addition to their main diet of fungus and decaying matter, the larvae happily gnaw on root hairs and young tender roots of cannabis plants.
The damage to the roots from these little suckers are what causes problems in the leaves and slowed growth. A bad fungus gnat infestation can even kill cannabis plants, especially young seedlings.
While the main problem is that fungus gnat larvae attack the roots of your cannabis plants, the adult fungus gnats can also spread diseases on their feet (such as pythium - a common cause of root rot).
Because of these problems, it is important to get rid of a fungus gnat infestation right away.
If fungus gnats need fungus and decaying matter to survive, where is the fungus coming from? Fungus grows in wet conditions and is an essential part of the environment (where it breaks down organic matter like dead leaves). Fungus spores are around us everywehere, but these spores will never start growing without moisture. Warm and wet conditions in the soil of a cannabis grow are what cause fungus to grow and matter to decay. Sometimes you won't even be able to see the fungus or decaying matter with the naked eye. But once the conditions are right, fungus gnats thrive in the top layer of you soil.
Check To Make Sure You Have Fungus Gnats
1.) Tiny flying black bugs around your plants & crawling on your soil
This video shows closeups of
Fungus Gnats on cannabis plants
(from GrowingMarijuana.com)
Even if your plant or leaves aren't showing symptoms or distress yet, if you see fungus gnats it means that you have a problem with fungus and moisture in your soil. Don't let the infestation get out of hand. It’s always recommended to get rid of any pests in the grow room as soon as you know they’re there!
The adult fungus gnat flies are just annoying (and gross), they don't bite you, and don't do much to hurt your plants directly besides spread disease. But even though the mature fungus gnats aren't a huge threat to your plants, the presence of adult gnats lets you know that your cannabis soil has been infested with their maggot offspring which cause the real problems.
2.) Tiny white or translucent larvae with black heads in the soil
Note: this picture is really big so you can see what you're looking for, but the actual larvae / maggots are TINY. If you spot them, you'll just see tiny white spots wriggling around in the topsoil.

It’s the fungus gnat larvae in the soil that damage your plant roots and cause growing problems, especially to seedlings or young plants.
How Fungus Gnat Larvae Cause Damage to Cannabis Plants
Larvae attack tender new plant roots and root hairs, which cause these problems:
- “Damping off” - seeds or seedlings are weak for no apparent reason; sometimes stems weaken and seedlings can even just fall over and die
- If the fungus gnat infestation gets out of hand, even adult cannabis plants start looking unhealthy, showing many symptoms such as wilting, yellowing, drooping, spots
- Cannabis leaves may show signs of nutrient deficiency (or deficiencies) which seem to be unrelated to pH, nutrients, or any other identifiable nutrient problem
- Plants will start growing slowly and may even stop growing altogether
- If the infestation hits in the flowering stage, yields can be reduced
Fungus Gnats vs Fruit Flies
Quick Check! Make sure you have fungus gnats and not fruit flies.
Fruit flies are brown/yellow/orange while fungus gnats are dark brown or black. Fruit flies tend to be bigger/fatter and easier to see than tiny fungus gnats. You need to take a slightly different approach with fruit flies.

Thanks to Ilona L. and Richard
Leung for
the closeup Fungus Gnat pics!
Fruit flies will keep coming back if there’s ripe or rotting fruit to eat. If you've ever left a banana or other fruit on your counter too long, you've probably noticed how fruit flies seem to be able to appear out of thin air if there’s ripe fruit around.
Fruit flies can start buzzing around poorly composted soil which contains kitchen scraps, but otherwise fruit flies are uncommon in the grow room unless there’s ripe/rotting fruit or other tasty bits for them to eat.
So once you get rid of their food, the fruit flies will disappear.
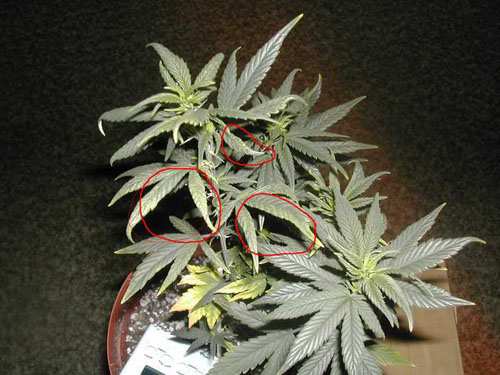
Pics of Damage to Cannabis Plants From Fungus Gnats
A fungus gnat infestation on your cannabis plants can cause all sorts of strange problems - often they look like overwatering, pH problems or nutrient deficiencies. The more fungus gnats you have, the more likely you'll see damaged leaves and reduced growth rates.
Since fungus gnats are almost always caused by overwatering and too-wet topsoil conditions, some of these symptoms may actually be caused by too-wet soil. In any case, when you see fungus gnats, it means there's a problem in your setup that needs to be addressed.
Here's some pictures of cannabis plants affected by a gnat infestation. Notice how the leaves don't look healthy (there's yellowing, spots, curling, etc). It's almost impossible to tell that you have fungus gnats just by looking at the leaves of the plant because it can cause all sorts of different symptoms.


Here's a flowering cannabis plant affected by fungus gnats

What To Do If You Have Fungus Gnats in Your Soil
Most Importantly, don’t overwater your plants! Never water cannabis plants grown in soil until the top inch of soil feels dry (up to your first knuckle). Fungus gnats need wet topsoil conditions to grow and thrive. The most common reason growers get fungus gnats is overwatering their plants.
Without Wet Topsoil, Fungus Gnats Naturally Disappear!
While the steps below will help you get rid of your fungus gnats quickly and effectively, the gnats will almost always go away on their own if you simply stop overwatering your cannabis plants. When there's no fungus, there's no fungus gnats, and both need wet conditions to grow.
Get Rid Of Fungus Gnats Quickly: What You Need
- Yellow Sticky Cards
- A larvae-killing product with bacillus thuringiensis bacteria (I recommend Mosquito Bits or Mosquito Dunks)
- A fan to blow air over the top of your soil
- (Optional) Diatomaceous earth - food grade
1.) Place yellow sticky cards in the grow area - fungus gnats love the color yellow and will fly towards it. These yellow sticky cards (found at most gardening stores) are covered with a glue that will trap adult fungus gnats, bringing down their numbers.
But the most important reason to use yellow sticky cards is to help you keep track of how bad the current fungus gnat infestation is. As the infestation is reduced, there will be less adults caught in the yellow sticky traps. That's how you know that your approach is working.

Get Yellow Sticky Cards on Amazon
2.) Get a fan blowing air over the top of the growing medium. This helps dry out the top layer of your soil, and also helps prevent the fungus gnats from being able to fly around and lay more eggs.


2b.) (Optional) Sprinkle food-grade diatomaceous earth over exposed parts of soil. This will help kill the fungus gnat larvae and will also help prevent infestations in the future. While not completely necessary, adding diatomaceous earthis a great step to take to help get rid of the fungus gnats and their larvae as fast as possible
Diatomaceous earth is an organic insect killer made of fossilized shells. It is sharp on the microscopic level and works by puncturing the exoskeleton of insects (draining them of their body fluids), but poses no harm to humans or pets and can even be eaten.

Get Food-Grade Diatomaceous Earth On Amazon
3.) Don’t water your plants for a few days. You want to begin drying out the soil to kill as many larvae as you can before you apply a treatment (which will involve watering). Fungus gnat larvae need a warm, wet environment near the surface of your soil to grow. Even after you’ve gone through all these steps and believe fungus gnats are gone, make sure to avoid overwatering plants, as this is the most common reason growers get fungus gnats in the first place. Don't do the next step until the top few inches of soil has dried out
4.) Kill the Larvae in The Soil
- (Best Option) Bacillus thuringiensis bacteria - Use a pest treatment with bacillus thuringiensis bacteria (subspecies israelensis is best). After applying your bacillus thuringiensis treatment, water your plants liberally and go to the next step. More information about bacillus thuringiensis below.
I personally recommend using crushed up Mosquito Bits or Mosquito Dunks


- If bacillus thuringiensis
products are not available,
you may want to kill the larvae with a brute force attack - Water the
plant with a mixture of one of the following, making sure to cover the
entire surface of the soil (since that’s where the fungus gnat maggots
live)
• SM-90 - Use 1 part SM-90 to 5 parts water and water your plants with this mix - brute force attack to kill larvae directly
• Can’t find bacillus thuringiensis or SM-90? Use 1 part 3% pure hydrogen peroxide to 4 parts water - another type of brute force attack to kill larvae directly.
Learn about other natural ways to kill Fungus Gnat larvae
5.) Avoid overwatering your cannabis plants from now on. Never water your cannabis plants in soil until the top inch or two of soil has dried out. From now on, you don't want to ever let the top part of soil stay wet to create a breeding ground for fungus and fungus gnats. How often do I water my cannabis plants?
6.) Keep your sticky yellow cards up until Fungus Gnats are completely gone. These yellow sticky cards will continue killing adult gnats. They're also helpful because they will alert you to whether fungus gnat numbers are rising or falling. Even after killing all the larvae, it may take a few days to a few weeks before the adult fungus gnats are completely gone and you stop seeing new gnats caught on your sticky cards.

What is bacillus thuringiensis?
This type of bacteria produces a toxin that hurts the larvae of fungus gnats and prevents them from being able to eat. Bacillus thuringiensis will not affect your plants or roots in any other way. Products that contain this bacteria are sometimes listed as “BT” or “BTi.” It is also safe for fish, pets, humans and pretty much everything besides larvae. It is safe for organic grows, even in the middle of the flowering/budding stage, and won’t hurt other microbes living in the soil.
When using pellet-type formulations of bacillus thuringiensis, you will get better results if you crush it up before sprinkling on soil. Powder and dry formulations of bacillus thuringiensis seem to work better than liquid ones.
Other Ways to Kill Fungus Gnat Larvae
While bacillus thuringiensis is probably the best way to naturally kill fungus gnat larvae, you can use other biological control method to kill these maggots. The following options will help control fungus gnat infestations but will likely not completely get rid of them unless you stop overwatering your plants.
- pathogenic nematodes (Steinernema feltiae)
- predatory mites (Hypoaspis miles) (Hypoaspis aculeifer)
- predatory rove beetle (Atheta coriaria)
Growing Organic? The “brute force” methods above (SM-90 or Hydrogen Peroxide) will kill the fungus gnat larvae, but will also kill many beneficial microbes in the soil. You can add beneficial microbes back, but it will take a while for them to repopulate your soil. This problem only really affects organic soil growers. If you’re providing nutrients to your plants with bottled nutrients, you’re already providing nutrients in a way that your plants will be able to use even if the microbe populations are down. In any case, if growing organically, an organic version of bacillus thuringiensis (subspecies israelensis) is the best option for getting rid of fungus gnats.

Prepare For Your Next Grow: Prevention
Before your next grow, make sure you thoroughly clean your growing area if you’ve been attacked by fungus gnats or other pests. Get rid of any houseplants that have any bugs flying around them. Never buy soil that has already been infested with fungus gnats or show any signs of flying bugs or larvae/maggots.
Some growers will even cook new soil to make sure any fungus gnat larvae are dead before letting their cannabis plants or clones near it.
If you’re getting cannabis clones, make sure you get them from a trusted source and inspect closely for fungus gnats (as well as spider mites or other pests). You may want to start with seeds if you’re growing in soil and worried about bugs, as clones are the most common way to introduce pests to the grow room.
Speaking of cannabis clones... I know this article is about fungus gnats, but I want to mention something else that’s very important about cannabis clones. While fungus gnats are a big nuisance, they are not the worst pests a grower can get from cannabis clones. Fungus gnat problems pale in comparison to the horrible affliction of getting cannabis-specific spidermites (aka “the borg”).
Once a grow room gets infected by the borg, it is incredibly difficult to get rid of these resilient pests which kill your plants, eat your leaves, and plants (and buds) with horrible webbing. Always check new cannabis clones thoroughly (including under leaves for bugs or eggs) before letting new clones anywhere near your grow area! You may want to dip new clones in spider mite killer to make sure they are free of spider mites. Learn more about spider mites.
Some growers will start with cannabis seeds (as opposed to clones) to reduce the chance they ever have to deal with spider mites or fungus gnats!
What To Do with Fungus Gnats in Your Compost Pile
What do you do if fungus gnats attack compost pile, where you are trying to build up beneficial microbe populations in the soil?
Here's a list of ways to control a fungus gnat infestation in your compost pile:
1.) Make Sure Compost Pile Isn't Too Wet
If you've got a fungus gnat problem, you should probably allow the compost to dry out somewhat. The most common reason for fungus gnats in a compost pile is wet conditions. Too-wet conditions also prevents proper composting, so this is something you need to address before you do anything else. Compost piles should be about as dry as a wrung-out sponge, and should not seem wet.
2.) Kill Larvae
Sprinkle food-grade Diatomaceous Earth over exposed parts of compost pile - this kills some of the gnats and larvae, but is completely harmless to humans. Diatomaceous Earth is very sharp on a micro level, and will pierce the outside of tiny bugs or larvae, killing them. Yet to macro creatures like dogs, cats and humans, Diatomaceous Earth is completely harmless and can even be eaten
If you have an extreme fungus gnat problem, use a Pest treatment with “bacillus thuringiensis” (subspecies “israelensis” is best), for example Mosquito Bits, Mosquito Dunks, etc. Sometimes known as “BT.” Dry or powder formulations work best for fungus gnats. Break it up and sprinkle over top of compost, add water to "activate" the bacteria so it starts killing fungus gnat larvae.
After you've made sure the compost pile isn't too wet, cover pile with tarp or plastic sheeting. This helps disrupt the life cycle of fungus gnats.
You also might want to consider keeping your compost in a bin with a lid so bugs can't get in or out. In some places, this is actually a requirement due to local regulations.
3.) Compost Pile Maintenance
Generally, it’s not recommended to add kitchen scraps to a compost pile for cannabis, since cannabis requires specific ratios of nutrients to provide the best growth which can’t be achieved easily with kitchen scraps. However, if you are adding new kitchen waste to your compost pile, bury it in the middle of the pile so it’s not on top for the fungus gnats (or fruit flies) to feed on. Learn about how to compost your own organic super soil (using this method, it's very unlikely you will be hit by fungus gnats or fruit flies).
Some growers will cover their compost pile with items that have a lot of carbon, such as cardboard, shredded paper, or brown leaves. This also disrupts the fungus gnat life cycle, but tarp or plastic sheeting is easier. If you’ve mixed your compost pile properly using a proven cannabis composting recipe, it is unlikely that you will need to add extra carbon to prevent fungus gnats.
Turn over the compost heap regularly if fungus gnats are a constant problem because compost pile is too wet - this helps mix everything well so compost dries out quickly, and also prevents pockets of fungus gnat larvae from taking hold
Well maintained compost piles typically become very hot during the composting process, so with all the steps above, and with no way for the larvae to escape through the plastic sheeting, the composting process should cook any remaining larvae and kill them
Jump to...
7 Ways To Fix Common Cannabis Growing Problems
List of All Cannabis Growing Problems
How to Water Plants Perfectly Every Time

Heat Stress
Problem: Your cannabis plant can only withstand a certain amount of heat and light. After a certain point, your cannabis will start exhibiting signs of stress on the leaves near the sources of light and/or heat. Your leaves will get yellow or brown brown spotting and may appear generally burnt in places when there's too much light.
Important for Hydroponic Growers! High temps can trigger root rot, a serious problem that can kill your plants.
Cannabis will also display heat stress when grown outdoors in hot, dry weather, especially when not given enough water.
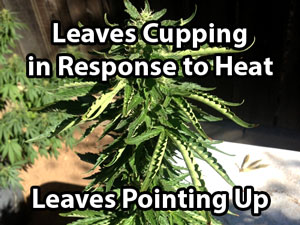
When the heat gets too high, the edges of the serrated leaves will begin to curl up even if there are no burns or other signs of light stress.
When the heat gets too high, the edges of the leaves will begin to curl up and the leaves will begin to "cup."
Heat Stress
Heat stress is even more damaging in the flowering stage since plant is no longer growing many new leaves. Indica-leaning strains are most prone to heat damage in the flowering stage. Heat damage during budding will reduce your yields by demolishing many of your most important leaves, while also causing buds to grow airy with ugly foxtails.
Even though the grow lights were turned off, this is what happened to an indica-leaning plant overnight after being exposed to 105°F (40°C) temperatures during a heat wave.
Heat during the flowering stage also causes fox-tails, which are airy and don't have much substance to them. The plant is basically "abandoning" the original heat-damaged bud to try to make a sad new one.
Example of unwanted "fox-tailing" caused by too-much heat
Solution:
Get a way to monitor temperature. Control
heat by whatever means necessary using the steps outlined below.
Indoors, find a way to lower the temperature and/or increase the circulation in the grow room or grow area if heat is the problem. Having a small fan blowing over the tops of your plants will help prevent hot spots from forming directly under your grow lights.
You may consider removing grow lights further away from the tops of the plants if heat is a problem.
When learning how to grow cannabis, it's best to try to keep things at a comfortable room temperature at all times for optimal growth. If it's too hot for you, it's probably too hot for your plants.
Many indoor setups will require that you vent out hot air using a fan and/or an exhaust system. By creating good suction with an efficient exhaust system and adding a carbon scrubber, you can also pretty much scrub all smells from the grow room. Learn more about controlling odors in the grow room.
An oscillating fan will circulate air in the room as well as provide a gentle breeze for your plants, and a small one will cost less than $20.
Learn everything you need to know about controlling temperature in the grow room
Outdoors, you have less options to reduce heat during a heat wave, but you are able to monitor your local weather via weather forecasts.
It is possible to partially shield your plants when you know the temperature is going to get hot. You can also adjust your watering schedule to make sure plants at least have plenty of water.
Some things to try when you know the weather outside is going to be hot or dry:
-
water plants in the evening or early morning to help prevent water evaporation during the hottest hours
-
kelp extract for roots - provide a small amount of liquid fertilizer that contains seaweed kelp extract (can help protect against heat stress)
-
increase shade to reduce the heat experienced by plants - you can use an old sheet or other cloth as a short term solution, or get a profesionally made "Sun Shade Sail" which is made particularly to create shade outdoors. It's important to remember that giving plants shade for more than a few days will make them less "hardened" to the sun, and you may need to reintroduce full sunlight back slowly to prevent them from getting shocked from the light intensity
-
move potted plants - luckily with potted plants, it's usually easier to move them out of direct sunlight during a heat wave
-
take extra good care of heat-stressed plants - when cannabis plants appear heat-stressed, try to baby them as best you can, and offer shade during the hottest days.
When growing cannabis outdoors, it can often take a few weeks for plant to recover after a hot or dry spell, so prevention is the best medicine for outdoor plants.
Jump to...
Air Circulation & Exhaust Tutorial
7 Tips to Growing Top-Shelf Buds
Hermies, Bananas & Male Plants
by Nebula Haze
Table of Contents
Male vs Female: Why to Avoid Males, Hermies & Bananas
Accidental Pollination Can Be Caused By Different Types of Hermies...
How
to Avoid Causing Hermies or Bananas
Male vs Female Cannabis Plants: Introduction
Cannabis Life Stages and Gender
Did you know there are “male” and “female” cannabis plants? Yes, cannabis plants are “dioecious” plants, which means each plant shows a particular gender, just like humans and many animals. There will occasionally be plants that show mixed gender and these plants are often referred to as hermaphrodites or “hermies”, which I will explain in much greater detail below.
The sex of a particular plant matters quite a bit to growers. That's because only female cannabis plants produce buds. In fact, the "buds" that we smoke are actually the female flowers of the cannabis plant.
The highest quality bud is considered to be "sensimilla" and refers to female cannabis buds that have not been pollinated by a male cannabis plant. The word "sensimilla" actually comes from the spanish phrase "sin semilla" which roughly translates to "without seeds."

Regular marijuana seeds will be about 50% male, and 50% female. That means half of the seeds will be unusable as far as growing buds. Please note that some male cannabis plants (about 70% of male cannabis plants according to some tests) may produce a small amount of THC via trichomes growing on the outside of the plant. There is no way to know for sure if a particular male plant is going to produce THC, and even if it does it will be a much, much lower amount than a female cannabis plant producing buds.
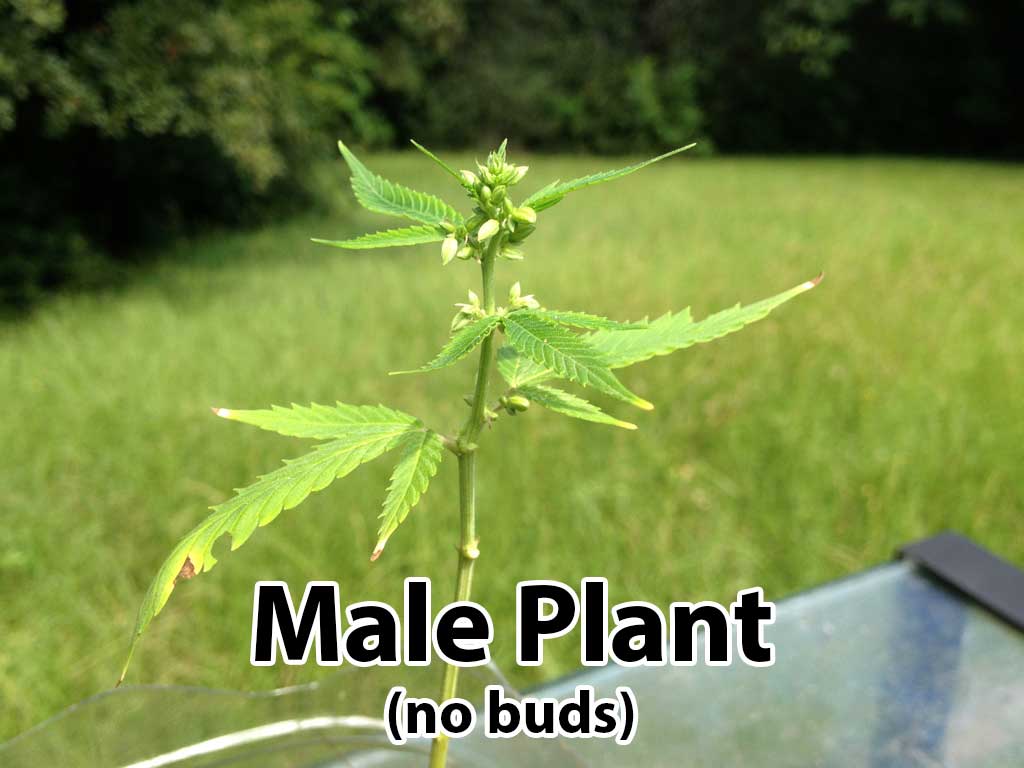
If you have a male plant and you are trying to grow bud, I strongly, strongly recommend throwing the male plant away immediately and starting another seed or focusing on your other plants. It’s a waste of time to grow male plants for THC or other cannabinoids - they don’t grow buds!
Here's a picture of a male cannabis plant - no buds or trichomes, just pollen sacs!
Quick Tip: How do you make sure you only grow female plants so all your plants produce buds?
One way around the issue of having 50% male and 50% female plants is to purchase feminized seeds online. These seeds are available from all reputable online seedbanks, and the plants produced by these seeds are always female. Get your questions about buying seeds online answered! You can also make your own feminized seeds, but you have to start with two known female cannabis plants. More information on how to ensure you grow only female plants is located in the Grower Toolbox below the main article.
It’s impossible to look at a young cannabis plant and know its gender
For the first part of your cannabis plant’s life, it will be in the first stage of growth known as the “Vegetative Stage.” In this stage your plant will only grow leaves and stems, but no buds or flowers. Think of this as the time when your plant is gaining size to prepare for the second stage of life.
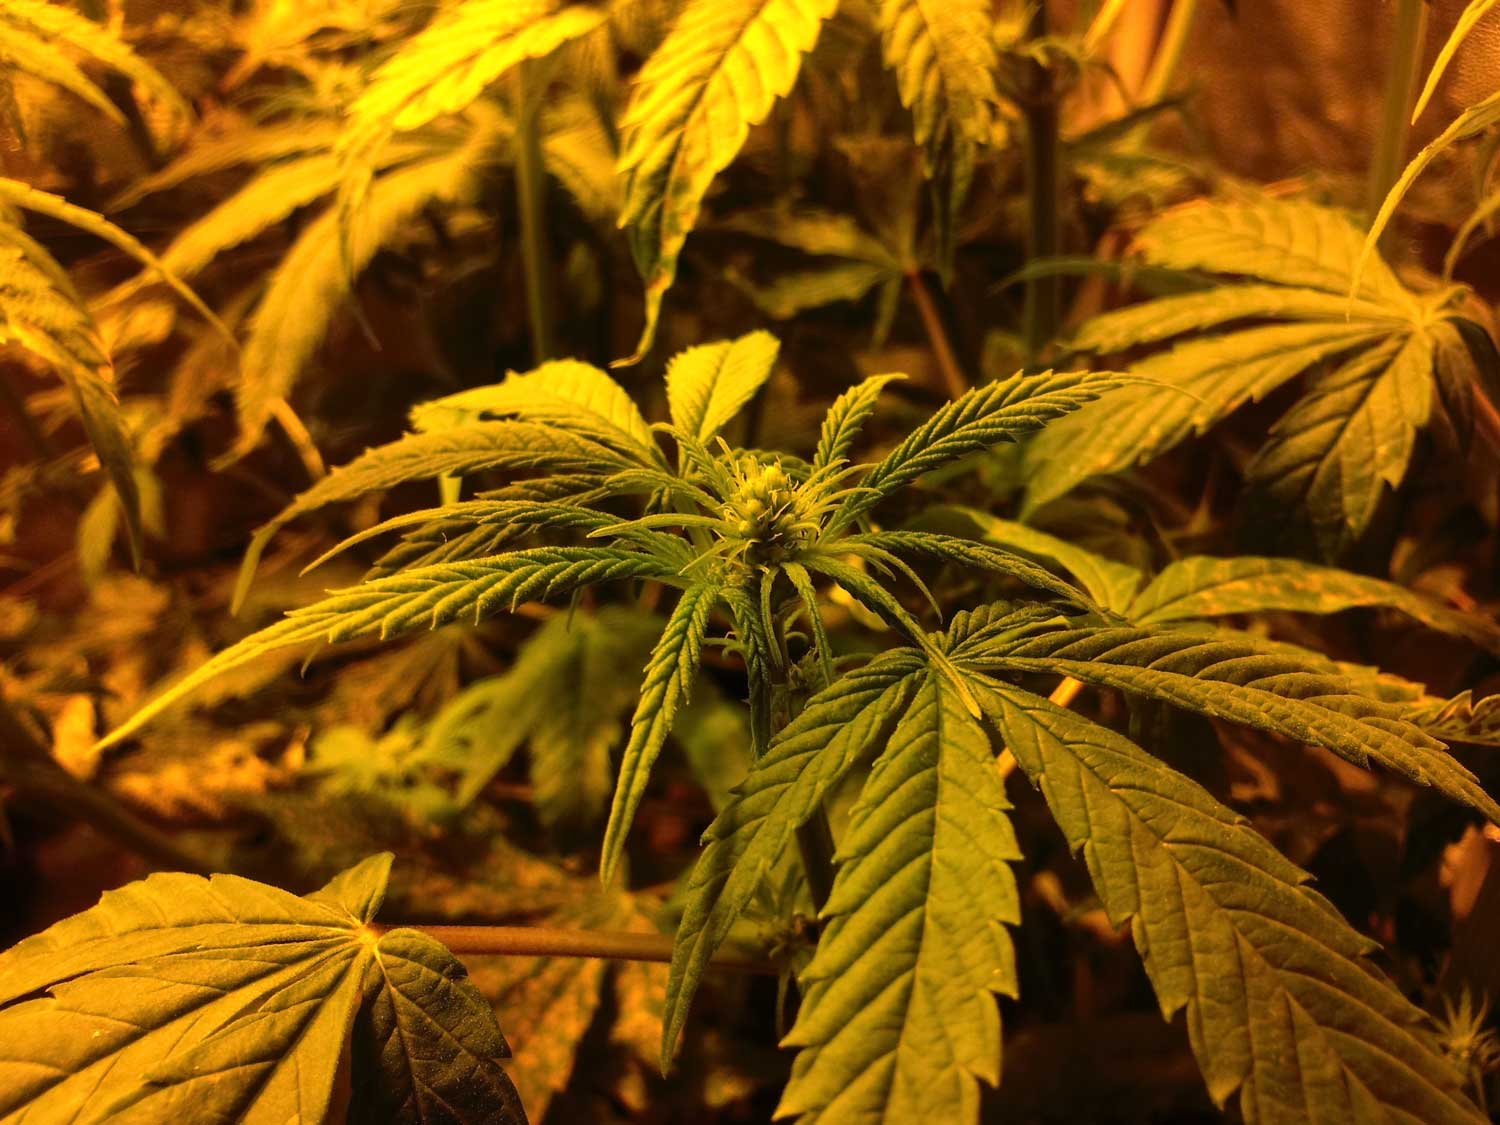
There is no way to inspect a vegetative cannabis plant (like the following) and know the gender
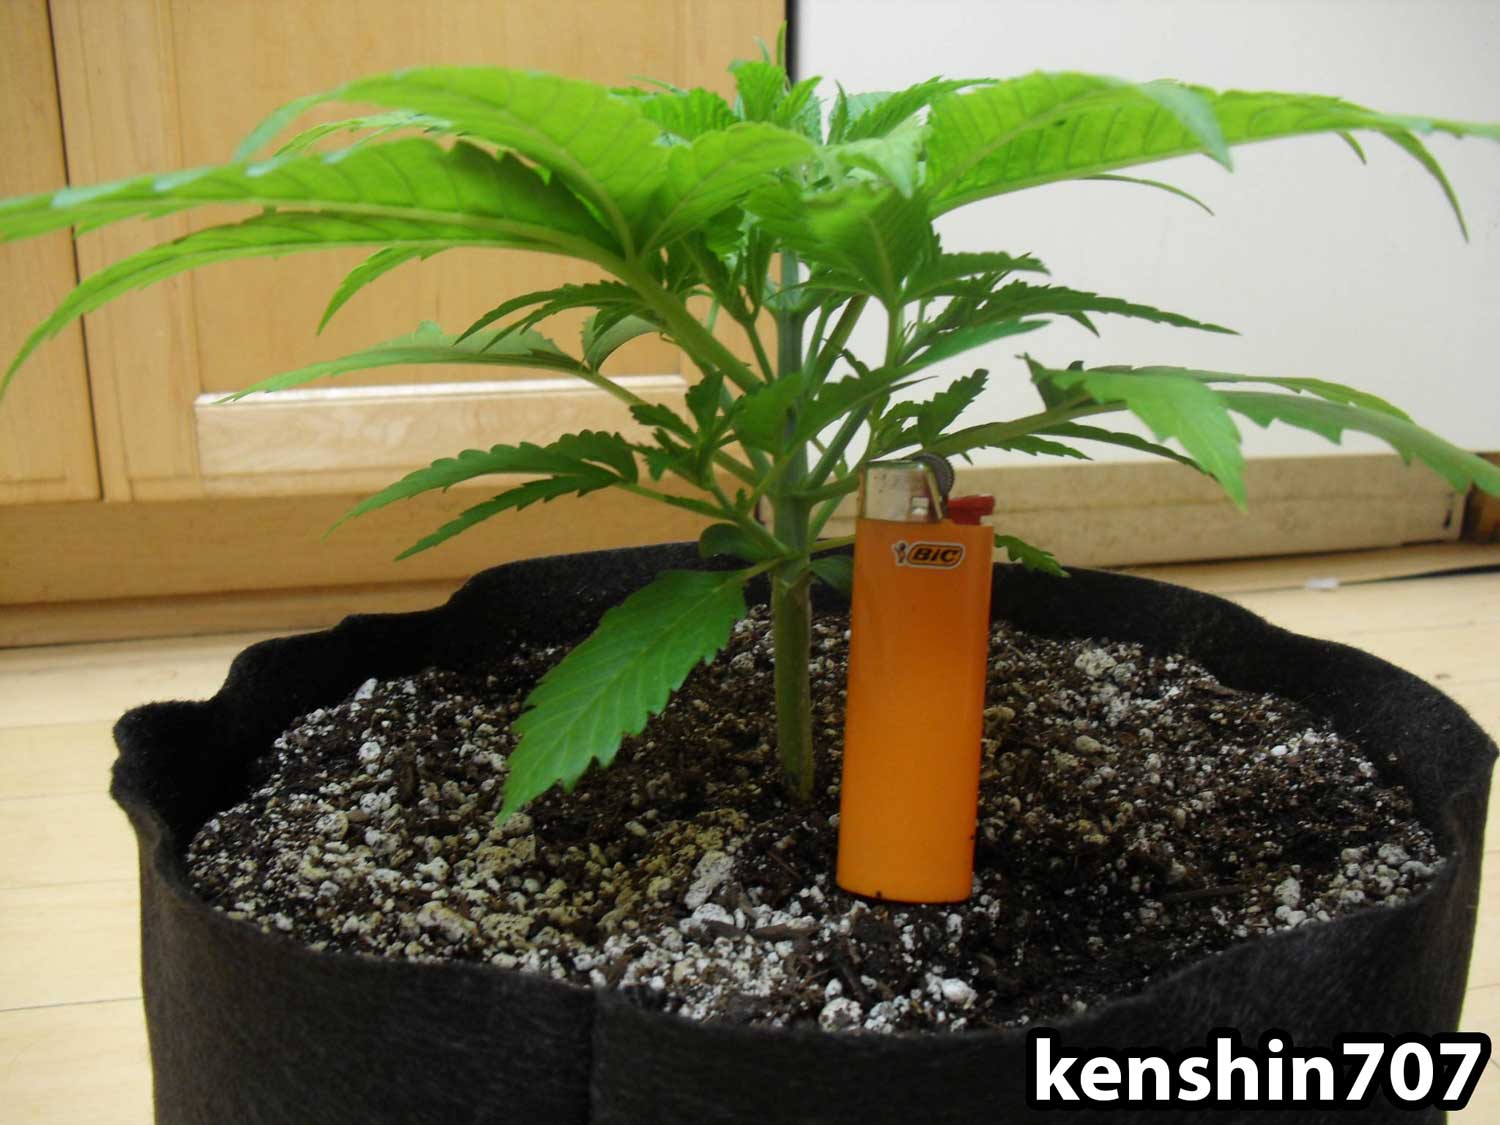
Unfortunately, there currently is no way to determine for sure what gender a plant will be when it’s just a young seedling, and throughout most of the vegetative stage. In fact, scientists still don’t fully understand exactly how gender is determined among gendered plants like cannabis. So far, no one has pinpointed a “male” chromosome or any other known factor that causes a plant to develop into a male or female.
However, we do know that cuttings (clones) taken from a female plant will always turn out to be female. We also know that when you breed two female plants together, you end up with feminized (all-female) seeds. While we know that these methods are effective for growers, the exact mechanism of why and how this happens is not yet fully understood.
So unless you start with a known female clone or feminized seeds, there’s no way to know what gender your plant will turn out until it actually starts showing signs of sex organs. This happens in the second stage of your plant’s life, known as the “flowering stage.” The first sex organs that appear are often called “pre-flowers.”
When do cannabis plants reveal their gender?
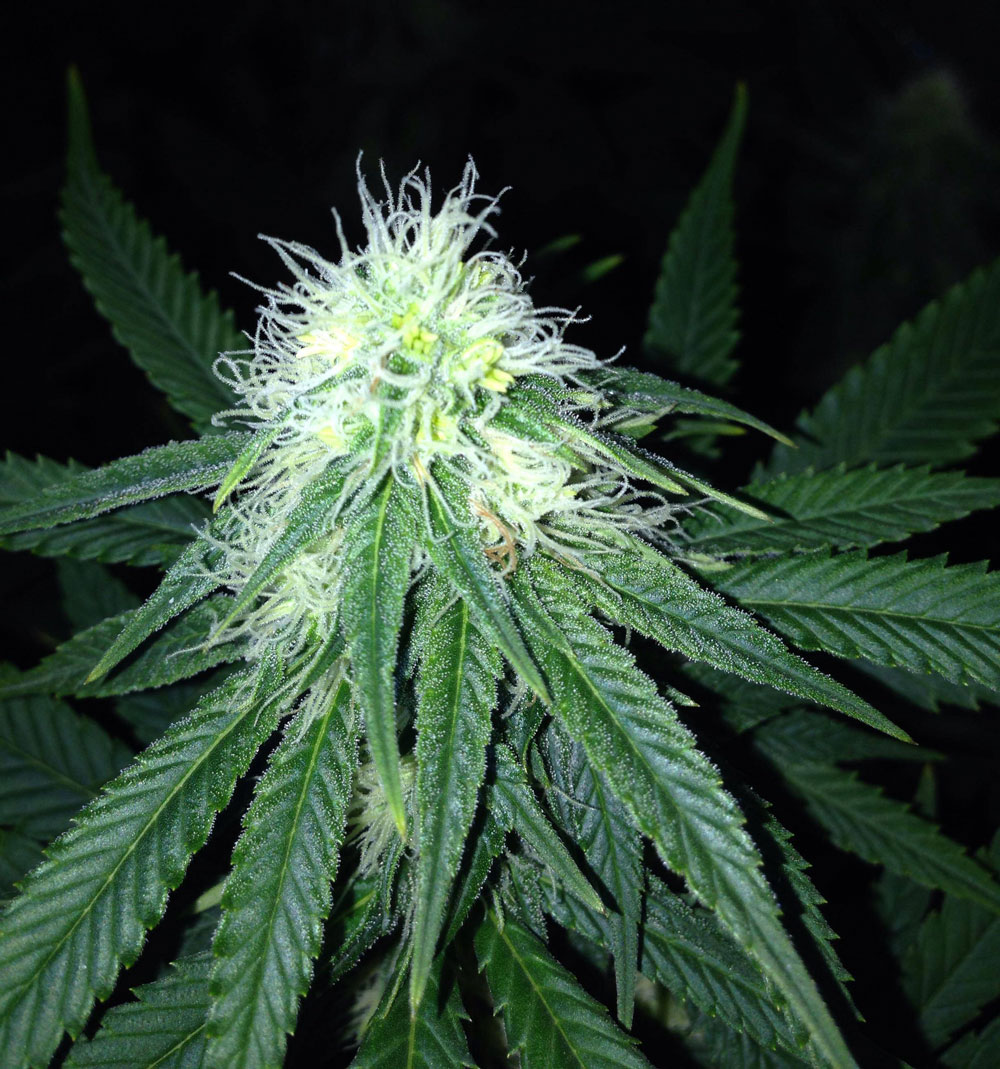
Cannabis plants reveal their gender when they reach their second stage of life, known as the “Flowering Stage”.
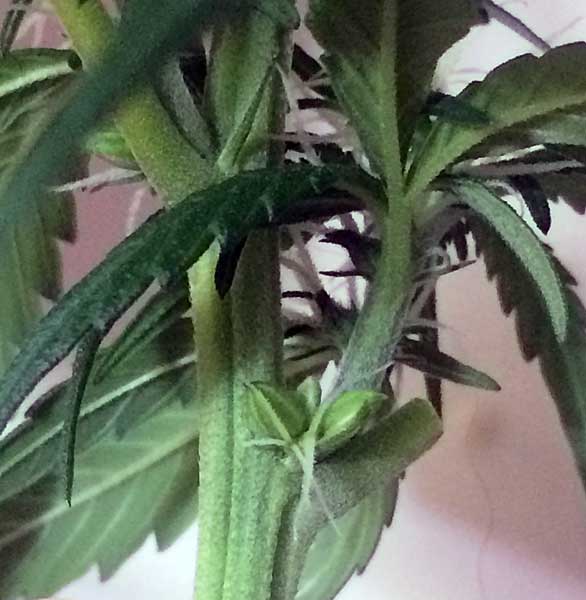
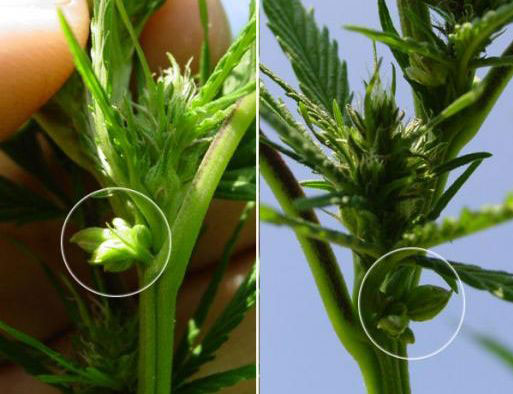
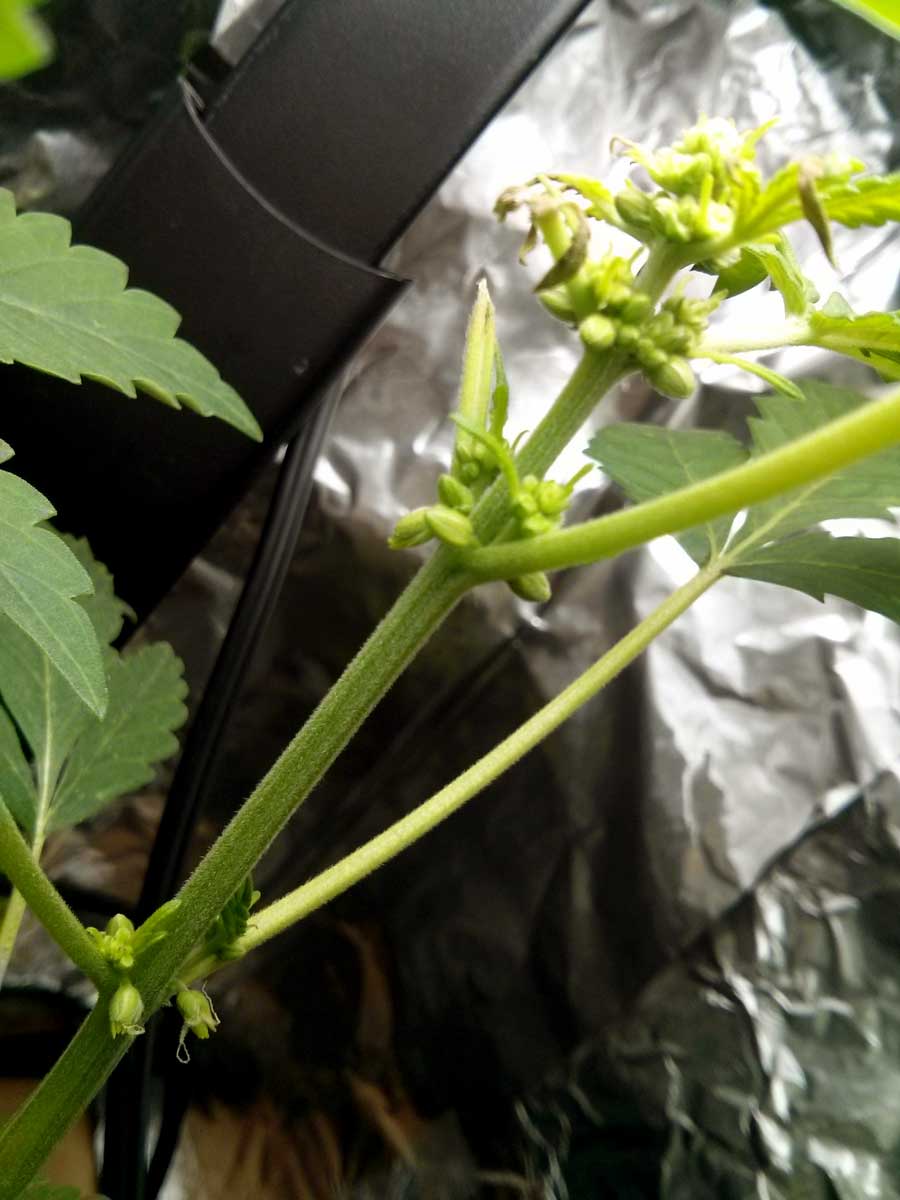
The first sign of gender almost always appears at the “V” where new growth tips form from a stem, like this….
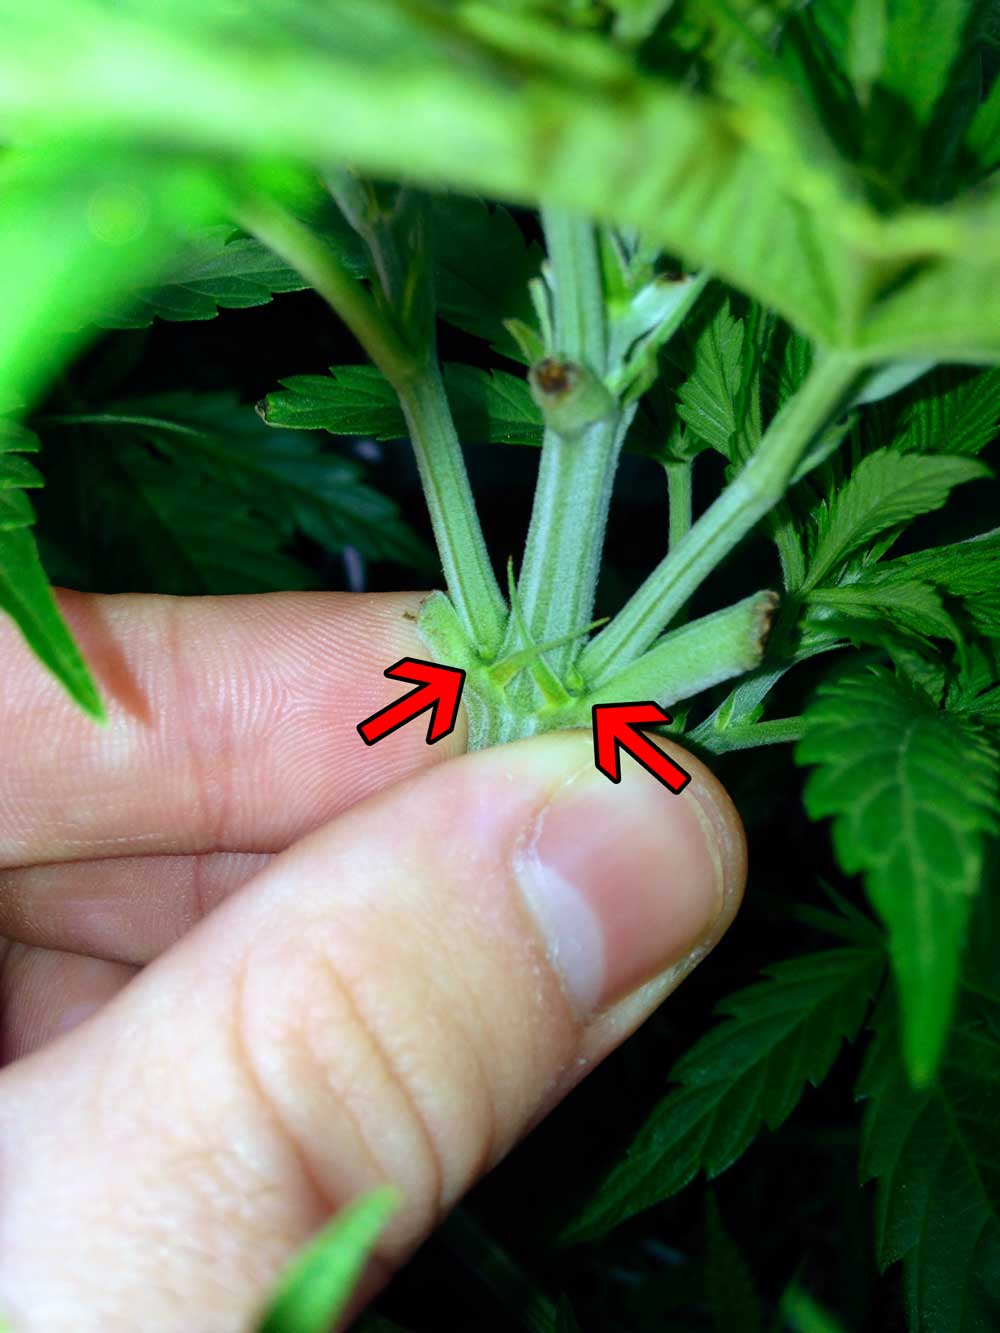
See the little growths appearing at the "V" or "crotch" where the growth node meets the stem? These are the first sign of "pre-flowers". In this case, we can see the pre-flowers are forming, but it's not certain whether this plant is going to turn into a boy or a girl quite yet.
Sometimes, when a plant is 6 weeks or older, or if the plant is a clone, it will begin to show pre-flowers while still in the vegetative stage. This is normal and is just a sign that your plant is fully mature and ready to start flowering. On the other hand, some plants never show pre-flowers no matter how long you wait, so you don’t need to wait until your plant shows pre-flowers before you initiate flowering.
Younger plants (that are less than 6 weeks old) tend to take a few days longer to switch into the flowering stage compared to older, more mature plants that have been vegetating for a while. Other than that you can pretty much force a plant to flower no matter what the age, even immediately from seed.
Read the full article about male vs female cannabis plants (and learn how to use cloning to identify the gender of young plants while they’re still in the vegetative stage - advanced only!): http://www.growweedeasy.com/marijuana-boy-girl
Myth Alert! I recently received this question:
“I was told that you want a male plant [close enough to female plants] to make the hairs sticky. Is that what makes weed sticky?? I told her I didn't think you wanted the male around your female plants while flowering. She said she's done it that way for years. So now, I'm confused! I was pretty adamant about what I thought (that male plants should be thrown away so it doesn’t pollinate your female plants) but she was just as adamant. We agreed to disagree! But what the hell do I know? :) She said she had a divider between them.. I’m pretty sure I don't want a male plant near my crop, what’s your take on this?”
Answer: This is just a myth. Getting sticky buds has almost everything to do with your genetics and the growing environment. There is no known benefit to having a male plant around while preventing the male plant from pollinating your females.
When Gender Isn’t As Certain... Avoid Accidental Pollination!
So now you know that most cannabis plants are normally considered to be either “male” and “female.” Yet sometimes you will run into plants that show both male and female characteristics, and these plant can accidentally self-pollinate, or pollinate your other female plants.
A cannabis plant that shows both male and female parts is often referred to by growers as a hermaphrodite or “hermie.” These can pollinate your plants and cause seedy buds.
There are a few different types of mixed-gender plants, and it’s important for a grower to understand some of the biggest differences so they make the best decision possible when faced with hermis.
Important: It's not advisable to breed mixed gender plants to create seeds because their offspring could be more likely to display hermie characteristics.
Although growers will refer to all plants with gender problems as “hermies,” there are technically two different kinds, hermaphrodite cannabis plants, and mixed gender buds like buds with nanners. The only reason I bother to differentiate between the two is because true hermaphrodite plants are more predictable.
With a "true" hermaphrodite plant, the male and female parts will grow on different parts of the plant. They won't grow together in the same spot such as when nanners appear in the middle of buds.
Here is an examples of a true hermaphrodite plant - notice how this hermi has both female pistils and fully formed male pollen sacs
What causes it? Stress can trigger this type of hermaphroditism, but unlike bananas, this particular type of mixed gender plant seems to be a little bit more based on the plant’s genetics. A clone of a true hermaphrodite plant will often also turn into a hermaphrodite, and offspring will often show the same traits. It does not take much stress for these plants to hermie.
It
is recommended to not breed a plant that shows
hermaphrodite
traits since this is a highly inheritable genetic trait. A good
“breeding stock” mother will not show signs of hermaphroditism even
when subjected to stress.
What should the grower do? It is recommended that you remove hermaphrodite plants from your grow room or grow area as soon as possible to prevent accidental pollination of the buds.
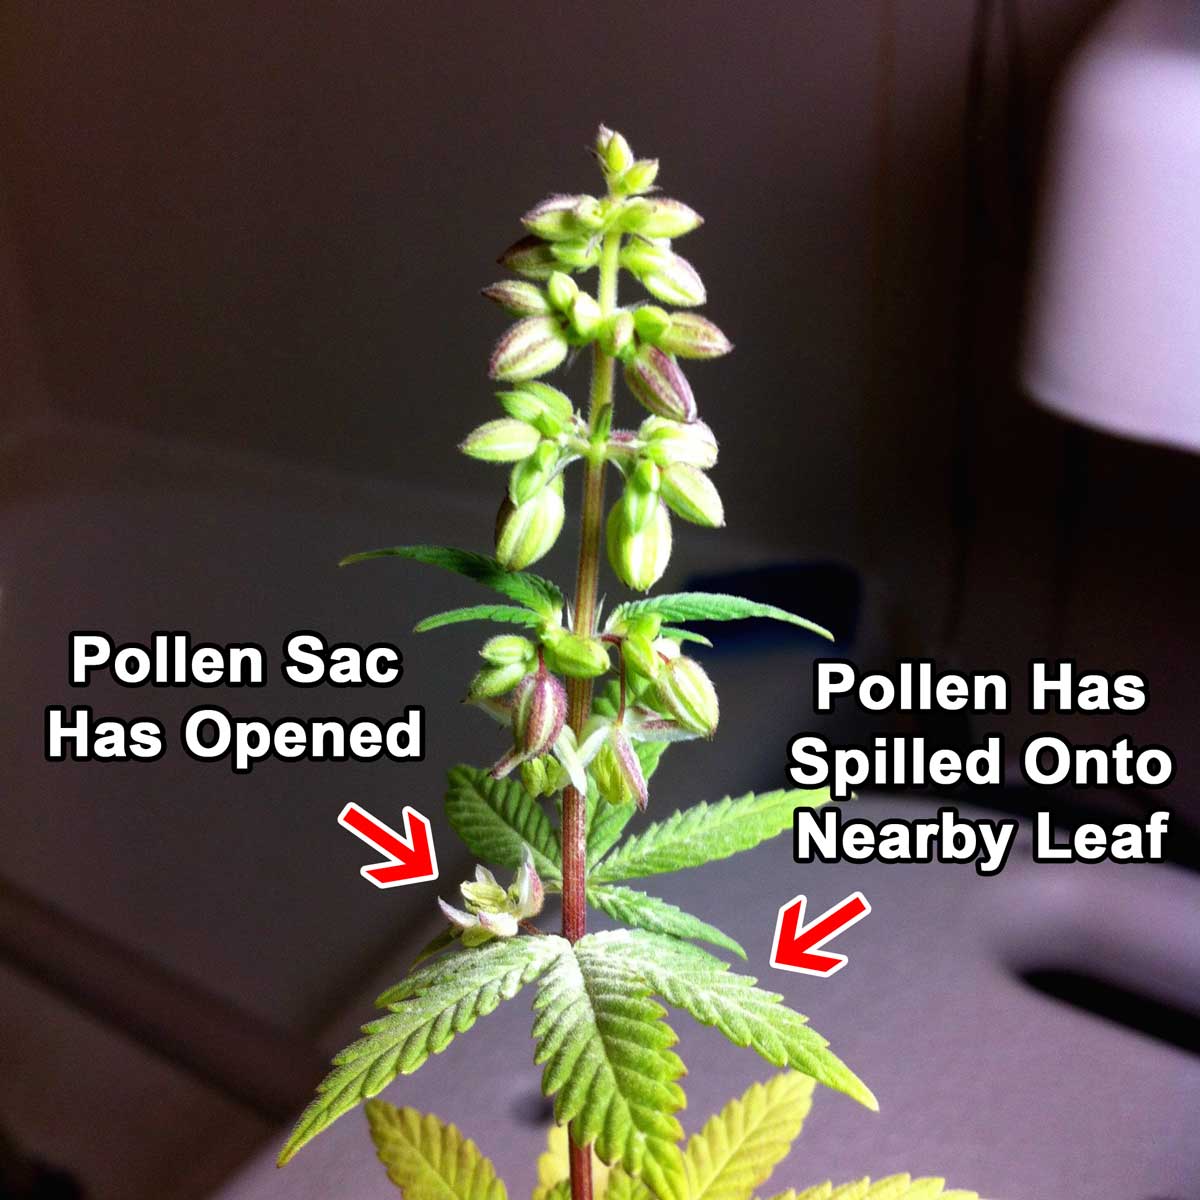
If pollen from a pollen sac is allowed to make contact with your buds, those buds will stop focusing on making more buds and will turn all their “effort” into making seeds. No one wants seedy buds and reduced yields!
Unlike bananas, hermaphrodite plants tend to be more predictable. Though it's not advisable, a grower who watches very closely can carefully pluck all pollen sacs before they’ve burst and as long as the grower keeps close watch.
Remember, while these pollen sacs can start appearing early, they may continue to appear throughout the flowering stage so stay vigilant!
The following type of hermaphrodite plant has mixed male and female parts, referred to in botany as “bisexual” flowers.
With mixed gender buds you will see plants that grow a mix of pistils and pollen sacs together, like this...
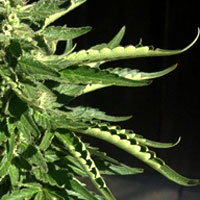
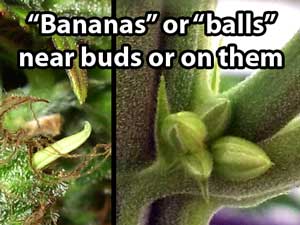
Another very common type of mixed gender buds is with the production of “bananas” (sometimes called “nanners”) which grow from the middle of female buds.
Example of a “Banana” or "Nanner" growing among buds

Bananas are rarely round and they don’t look like a normal pollen sac. Instead they’re often elongated and yellow, giving them the nickname “banana”. They also often grow together in bunches that can look like a bunch of bananas.
These can be a lot more difficult to control than actual pollen sacs, since they start pollinating everything in the area as soon as they appear. If you have a big banana problem, it may be best to harvest the plants immediately and cut your losses.
What are they? Bananas are actually the exposed “male” parts of a pollen sac, called the “stamen” which would normally be surrounded by a sac to hold all the pollen until it bursts open. If you open up a fully formed male pollen sac, you will see bananas (stamens) inside.
But when bananas appear on your plants, they don’t need to “burst” in order to spread pollen, they will immediately start making pollen and often will seed the buds that are close by even if bananas are removed right away, and sometimes the pollen can drift to other plants and pollinate them as well, too.
The yellow bunches in this bud are bananas/stamens and will pollinate everything they can - they don't have to wait for a pollen sac to burst
If a female plant is allowed to go too long without being harvested or pollinated (allowed to go past the point of optimal harvest), she will sometime produce a bunch of bananas in her buds as a last-ditch attempt to self-pollinate and create seeds for the next year. This is sometimes known as rhodelization. This is not as destructive as other types of hermies since it only happens after plants are already past the point of optimal harvest.
What causes it? While genetics does play a role in whether a plant is capable of producing bananas and mixed gender buds, environmental stress is often a big component in causing bananas to form. Luckily if you stick with high-quality genetics, you are much less likely to run into bananas even if you do accidentally stress your plants.
What type of stress can trigger bananas to form on cannabis buds?
-
Inconsistent Light Schedules & Light Leaks - When plants don't get light at the same time each day, or if they're exposed to light during their dark period (light leak)
-
Heat - When temps get too high hermies and nanner often appear.
-
Too-Bright Light - Like too much heat, light that is too bright can stress your plants and trigger hermies. This is most often caused by growers keeping their lights to close to their plants. You can light-burn your plants even when temperature is under control.
-
Major Plant Problems - Major plant problems like nutrient deficiencies, root rot, pH problems, light-burn and nutrient burn can all trigger bananas to start growing
-
Genetics - While stress plays a big role in the formation of bananas, the tendency to form them seems to be genetic. This tendency is very common in the seeds of a plant that hermied - these “feminized” seeds, while always female, are much more likely to show the same herming traits as its parent.Growing seeds that were produced this way is naturally selecting to produce more buds that grow bananas.
What should the grower do? It is recommended that you remove plants showing bananas from your grow room or grow area immediately to prevent accidental pollination of buds. If the pollen being formed is allowed to make contact with your buds, those buds will stop focusing on making more buds and will turn all their “effort” into making seeds. If the plant self-pollinates, you will end up with a bunch of sub-par seeds that are likely to have the same problem.
Of the different types of “uncertain gender” cannabis plants, plants with mixed gender buds (especially hermies with bananas) are the least predictable and most likely to cause unwanted pollination. This is partially because with bananas the pollen sac doesn’t need to burst to pollinate buds - it will start pollinating almost immediately.
A grower who watches very closely can carefully pluck all bananas, but they are unlikely to be successful and will probabably end up with at least a few seeds.
Trying to salvage a plant that has started producing tons of bananas is NOT recommended, because it's hard to get them all and you'll end up with seeds. Even worse, once a plant gets started, bananas can appear in huge bunches overnight especially when the plant is stressed.
How to Avoid Causing Hermies or Bananas
This section will explain what you can do as a grower to reduce your chances of running into hermies or bananas in your grow room...
1.) Avoid Inconsistent Flowering Light Periods & Light Leaks
-
Keep indoor lights on timer, and avoid changing the light schedule if possible
-
Prevent outdoor plants from being exposed to street lights, flood lights or other types of artificial lights during the night
-
Respect the dark period - In flowering it's important to make sure all your plants (except auto-flowering strains) get at least 12 hours of uninterrupted darkness every night. Avoid shortened dark periods and light leaks!
No matter what the strain, try to keep your plants on a consistent schedule throughout their lives, as this helps them set their circadian rhythms.
And for photoperiod plants in the flowering stage, do not interrupt the plant’s 12-hour dark period with light for any reason.
Why? During the dark period your plant is “counting” the hours until sunlight appears, and interrupting this process is one of the most common ways to stress the plant to produce bananas or hermies. It can also cause your plant to revert back to the vegetative stage.
Along with the point above, make sure you do not have any light leaks in your grow space, which could allow outside light to filter in during the dark period. During the dark period your plants like complete darkness.
If anything ever happens with your timer or power that causes your plant to get too much light or darkness, it’s important to correct your timer as soon as possible. But don’t worry about it too much if it happens just for one day. It's usually okay if it happens only once, but be careful not to let it happen again since too much messing up the light schedule can cause hermies.
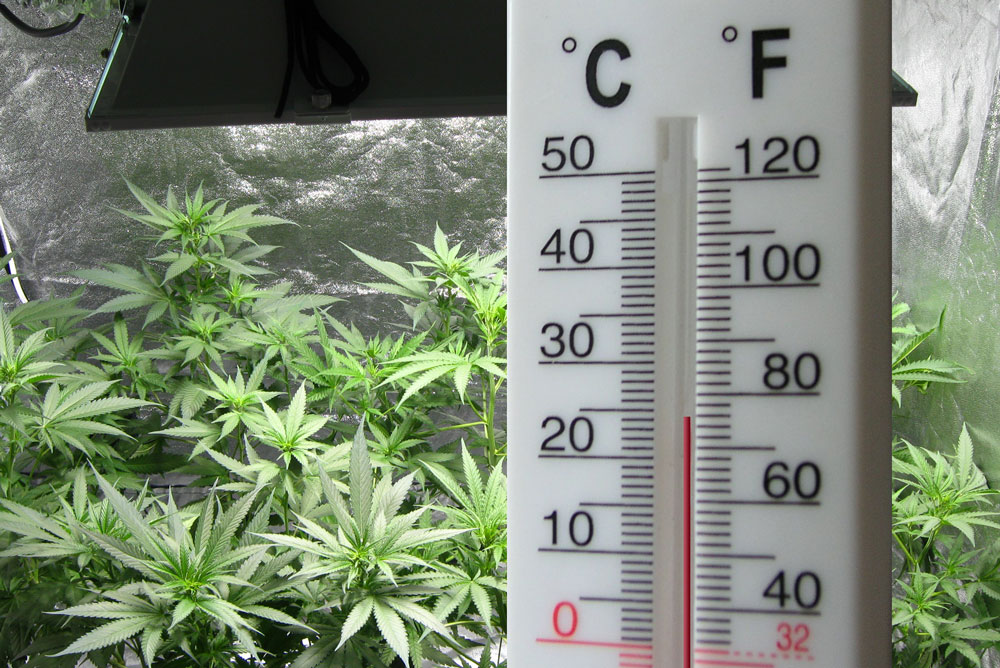
2.) Maintain Proper Temperature Through Flowering Stage
-
Maintain a comfortable temperature in flowering stage, between 65-85°F (18-30°C) - temps should be slightly cooler at night than during the day
Always use “hand-test” to make sure it doesn’t feel too hot in the top canopy of buds under the light - Put one of your hands (palm facing down) under your grow lights where the top of your plants are located and wait 10 seconds - if it feels too hot for your hand it's too hot for the plants!
Learn more about temperature here: http://www.growweedeasy.com/temperature-growing-cannabis
3.) Don’t Give Your Plants Too Much Light (Light-Burn)
While generally more light is better for your cannabis plants, very high power brightness can light-burn your plants, which stresses plants, causes unwanted bleaching, and can trigger the plant to hermie on you.
With high power LED grow lights and big HID lights, make sure to always follow the manufacturer’s specifications as far as minimum distance from the top of the plants!
Don’t keep your lights too close because even if the heat is under control, too much brightness can cause stress too.
Light-burn is only common with high power LEDs (3W chipsets and bigger, x-lens technology, etc) and big HIDs or perhaps multiple smaller HIDs (usually with an intense cooling system).
It is more difficult to “light-burn” your plants with fluorescent lights, CFLs, smaller HIDs, etc - with these lights you only need to worry about heat.
High Power LEDs or
HID Grow Lights Will Light-Burn Plants When Kept Too
Close
(yes, even if the temperature is completely under control)

Learn more about giving your plants too much light
4.) Prevent Major Plant Problems
A huge stress to the plant can cause the plant to react in unpredictable ways, including producing bananas and male pollen sacs. Huge stresses include...
-
Major nutrient deficiency
-
Nutrient Burn - given too much nutrients
-
Total leaf loss (usually as the result of overzealous defoliation or bugs)
-
Any other huge stress to the plant
 Want
to read about a real example?
Want
to read about a real example?
The plant pictured to the right was subjected to cold temperatures and then grew directly into the grow light, putting it under a lot of stress.
From the grower Saberabre: “So I left this girl (or what I thought was a girl, notice the pistils at the bottom calyx) over the weekend and came back to the plant up in the light getting burned. Yikes! I'm not too sure what happened here but it got pretty cold the last few days. I think it's a hermie...”
A few days before this pic, the plant was just showing a few white pistils and appeared to be female.
After the stress that it went through, the grower came back to a plant that was completely covered in male pollen sacs, with the first few white pistils being the only sign of this plant being female.
5.) Always Start With Trusted Genetics
Hermaproditism and mixed gender buds seems to be more common when growing plants from bagseed (seeds that you find) or seeds from an unprofessional breeder.
Do feminized seeds cause hermies?
The reason this is so is because seedy buds are worth less than sinsemilla (unseeded buds). Therefore, if you find a seed in your bud, it likely was the result of either bad growing practices (male plants weren’t removed in time) or due to some type of negligence (plants were stressed and self-pollinated, which means the next generation is most likely to do so).
When you’re buying seeds from a trusted breeder, they go to great lengths to prevent unintended pollination, and they specifically select for plants that don’t ever show mixed gender traits.
Which cannabis breeders can I trust?
And remember… even if you do everything right, sometimes you will run into hermie plants - it’s just a fact of growing. Sometimes these things just happen, for example...
“I've always felt like seeded weed was not nearly as potent as sinsemilla and I do everything in my power to KILL ALL MALES! Cannabis is so sneaky, though - last summer we had such wild weather that even a couple of clones turned out some male sex parts.”
~ Experienced outdoor grower
Jump to...
Male vs Female Cannabis Plants
What do I need to get started growing indoors?
Take a look at cannabis grow journals
Where can I buy feminized seeds?
"Cannabis has both male and female plants. When both female and male flowers are in bloom, pollen from the male flower lands on the female flower, thereby fertilizing it. The male dies after producing and shedding all his pollen. Seeds form and grow within the female flowers. As the seeds are maturing, the female plant slowly dies. The mature seeds then fall to the ground and germinate naturally or are collected for planting the next spring.
"Unpollinated, female cannabis flowers continue to swell and produce more resin while waiting for male pollen to successfully complete their life cycle. After weeks of heavy flower and cannabinoid-laden resin production, THC production peaks out in the unfertilized, frustrated sinsemilla!"
~Jorge Cervantes in Indoor Marijuana Horticulture

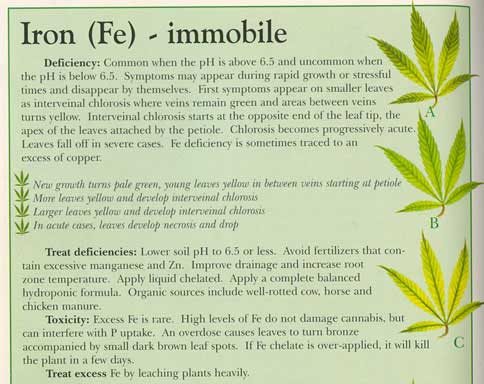
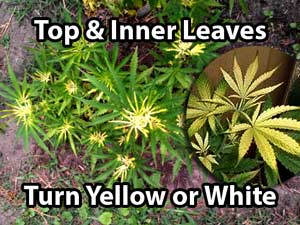
Iron Deficiency
by Nebula Haze & Sirius Fourside
Problem: An iron deficiency in cannabis is relatively rare, and the symtpoms of a cannabis iron deficiency appear most often alongside other nutrient problems or deficiencies.
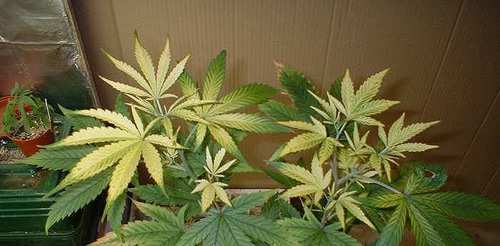
The main symptoms of an iron deficiency are:
-
Yellowing of upper fan leaves
-
Yellowing of smaller inner leaves
-
Veins of leaves stay green
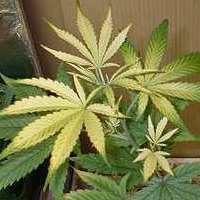
Sometimes affected leaves will even appear white. Often the symptoms appear near the top of the plant on newer leaves.
With an iron deficiency, the veins of the leaves sometimes tend to stay green even while the rest of the leaf is completely yellow. Other times there's just yellow, with no signs of green.
This nutrient deficiency can look similar to a magnesium deficiency, but an iron deficiency will affect younger/upper/inner leaves (where a magnesium deficiency affects older/lower leaves).
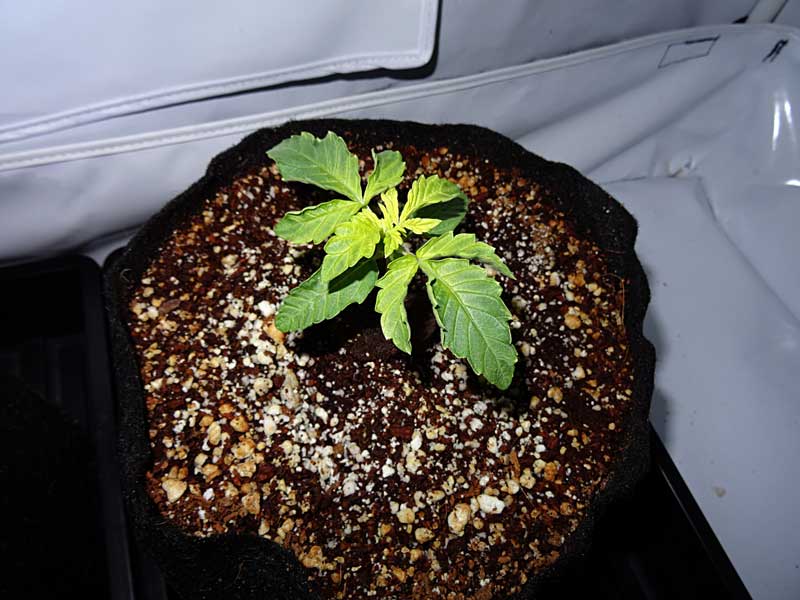
The following severe iron deficiency was actually caused by an outdoor grower using too much pure chicken manure as a fertilizer. Any time you use manure to fertilize your plants, remember a little bit goes a long way! Chicken manure tends to raise the pH of soil, which is one of the prime causes of an iron deficiency. In addition to changing the pH, the high level of nutrients contained in chicken manure may have interfered with iron uptake by the roots, causing further iron lock-out.
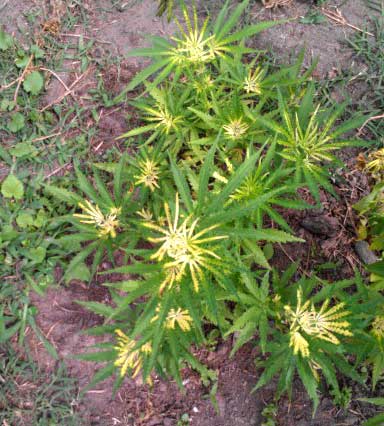
Immediately after adding chicken manure and watering, the plant started producing bright yellow, almost white leaves that immediately dried up and died. Even though this plant was showing the signs of an iron deficiency, the iron was available in the soil - the problem was that the plant just couldn't get access to the nutrients due to nutrient lock-out conditions. In this case, grower needs to dig up the manure (since that is the real cause of this problem) & replant with good soil.
Solution For Cannabis Iron Deficiency
Iron tends to get locked at at higher pH levels, especially when the pH at the roots is above 7.0, and more commonly in soil than in hydro.
Iron can also react with other nutrients, causing other nutrient lock-outs at the same time. If you are supplementing with iron, make sure you read the label to minimize any problems or interactions with your current nutrient system.
If you suspect your growing cannabis plant has a iron deficiency due to too-high pH, flush your system with clean, pH'd water. This will remove any nutrient salts that may be affecting the uptake of iron and help restore pH to the proper levels..
- In soil, iron is best
absorbed by the roots in the 6.0 - 7.0 pH
range (iron tends to get locked out when the pH is above 7.0, and if
you suspect an iron deficieny, you may wan to consider lowering your
root pH to ~6.5 just to be safe)
- In hydro, iron is best absorbed by the roots in the 5.5 - 6.5 pH range
Watch to make sure that the problem starts to clear up within a couple of days to a week, since iron moves relatively slowly through the plant.
After correcting the cause of an iron deficiency (usually too-high pH), you should expect to see new healthy growth within a week. Remember, the old leaves will probably not recover, but new growth should be green and healthy, without the yellowing of new leaves as you were seeing with the iron deficiency..
If you suspect you have a iron deficiency even though the pH is correct, flush your system with clean, pH'd water (if on schedule, you can do this alongside a dose of your regular nutrients) and add a supplement that contains Iron, Calcium and Magnesium.
Iron deficiencies often appear alongside deficiencies with calcium and magnesium, or an excess of copper. Many growers decide to purchase some sort of Calcium-Magnesium (often called Cal-Mag) supplement for their grow room in case one these deficiencies appear.

Botanicare Cal-Mag Plus is a calcium, magnesium, and iron plant nutrient supplement. General application is to mix 1 tsp (5ml) of Cal-Mag into each gallon of water.
Guaranteed Analysis: Nitrogen (N) 2.0%, Calcium (Ca) 3.2%, Magnesium (Mg) 1.2%, Iron (Fe) 0.1%
Derived from: Calcium Nitrate, Magnesium Nitrate, Iron EDTA
Watch to make sure that the problem starts to clear up within a couple of days to a week, since iron moves relatively slowly through the plant. Old growth may not recover, but new growth should be healthy.
If you cannot get rid of a cannabis iron deficiency, please consult our 6-Step Cure to 99% of Cannabis Growing Problems
Light Burn
Problem: Your cannabis plant can only withstand a certain amount of light. After a certain point, your cannabis will start exhibiting signs of stress on the leaves near the sources of light and/or heat. Your leaves will get yellow or brown spotting, often with burnt tips/edges and margins that stay green. Leaves may also appear generally burnt in places when there's too much light, especially when combined with heat
How can there be too much light? Read the full guide
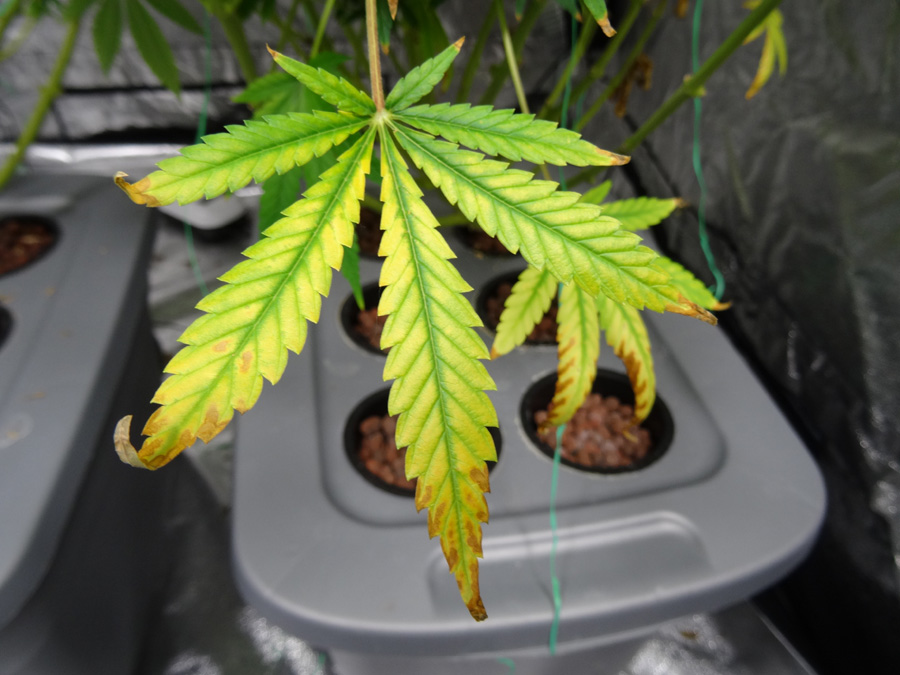
Here's more cannabis light burn pics...
Light stress often first appears around the edges of leaves, while inside veins stay green
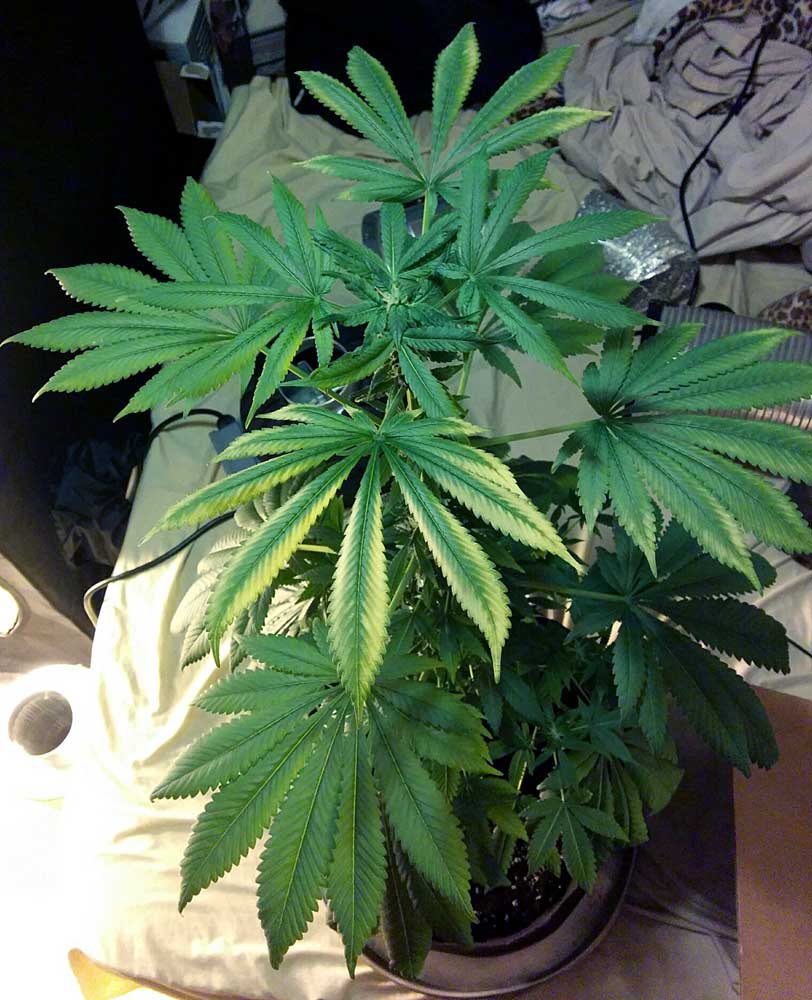
This cannabis seedling is being burned by too-close LED grow lights
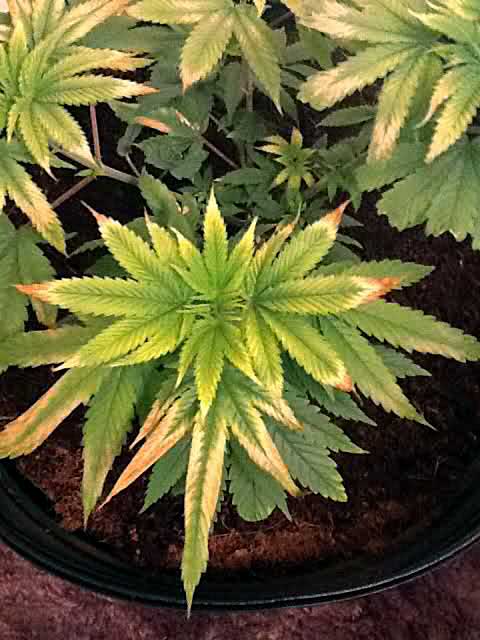
This cannabis seedling basically grew up into the grow light! The heat from the bulb caused massive burning everywhere it touched. If a plant's leaves directly touches the lights, it leaves "burns" from the heat of the bulbs.
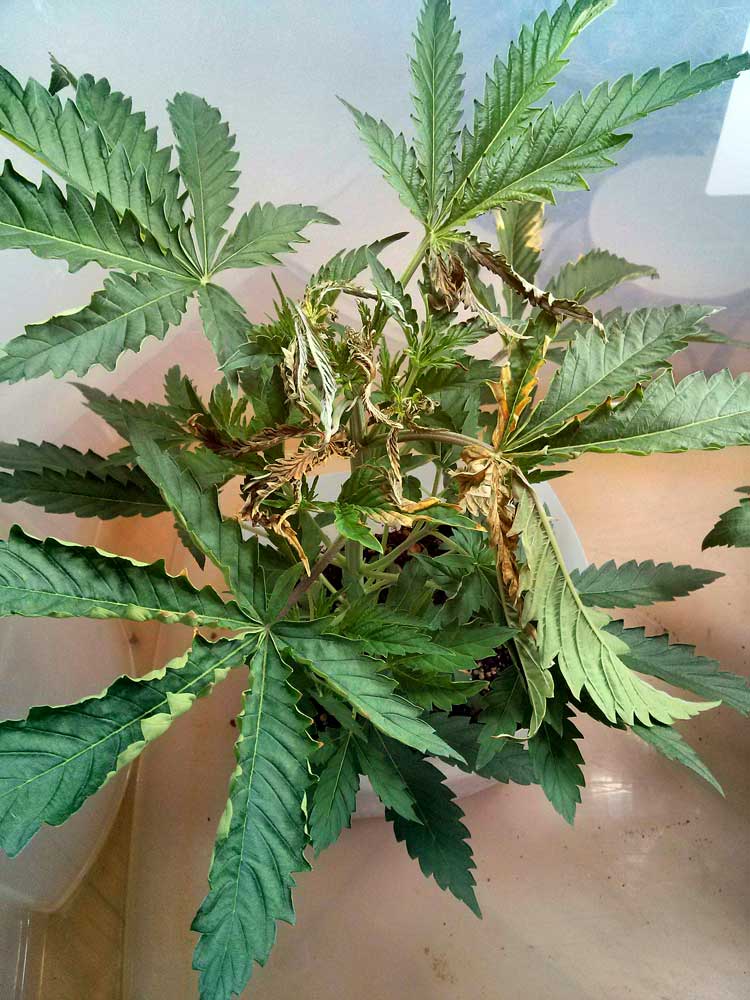
Light Bleaching Cannabsi Buds
This is how you get "albino" buds. Light bleaching is most common with high-power LEDs and HPS lights that are kept too close to the tops of the plants. Basically, this is what happens when plants get too much light, kinda like how hair on top of your head can turn lighter if you spend plenty of time in the sun, except a "sun-burnt" bud isn't as strong!


Buds which have been bleached tend to be low potency or even have no potency (no available THC or other cannabinoids). Therefore you should avoid light-bleaching your plants at all costs!

Sometimes light-bleached cannabis will get mis-labeled as “albino cannabis” or “white cannabis” but the truth is that the white color is not healthy, so this is not a desirable trait (even if it looks pretty cool).
Solution: If your marijuana plants are getting too much light, try removing some of the lights or moving your grow lights further away from the tops of the plants.
It is unlikely for your plants to get "light-burned" from the sun when growing outdoors, and they definitely can't accidentally grow into the sun. Outdoor plants can show signs of light stress if plants were used to shady conditions and moved into direct sunlight without time to get accustomed to the brigher light levels.
When making changes to your plant's environment, it's best to make changes slowly if possible. Slow gradual changes are best for preventing stress when growing indoors or outdoors.
Sometimes heat stress can look like light stress. When learning how to grow cannabis, it's best to try to keep things at a comfortable temperature at all times for optimal growth. If it's too hot for you, it's probably too hot for your plants. Outdoors, things can be a bit harder, but there are steps you can take to protect your outdoor plants from the heat. Learn more about cannabis heat stress.
Jump to...
7 Step Fix to 99% of Cannabis Growing Problems
Pictures of Cannabis Plant Problems
What does pH have to do with nutrient deficiencies?
10-Step Quick Start Guide to Growing
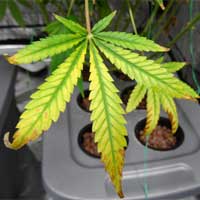
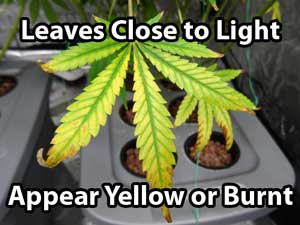
Magnesium Deficiency
Problem: A light green or yellow coloring will begin to show on the veins and edges of the lower & older leaves - this is one of the classic signs of cannabis magnesium deficiency.
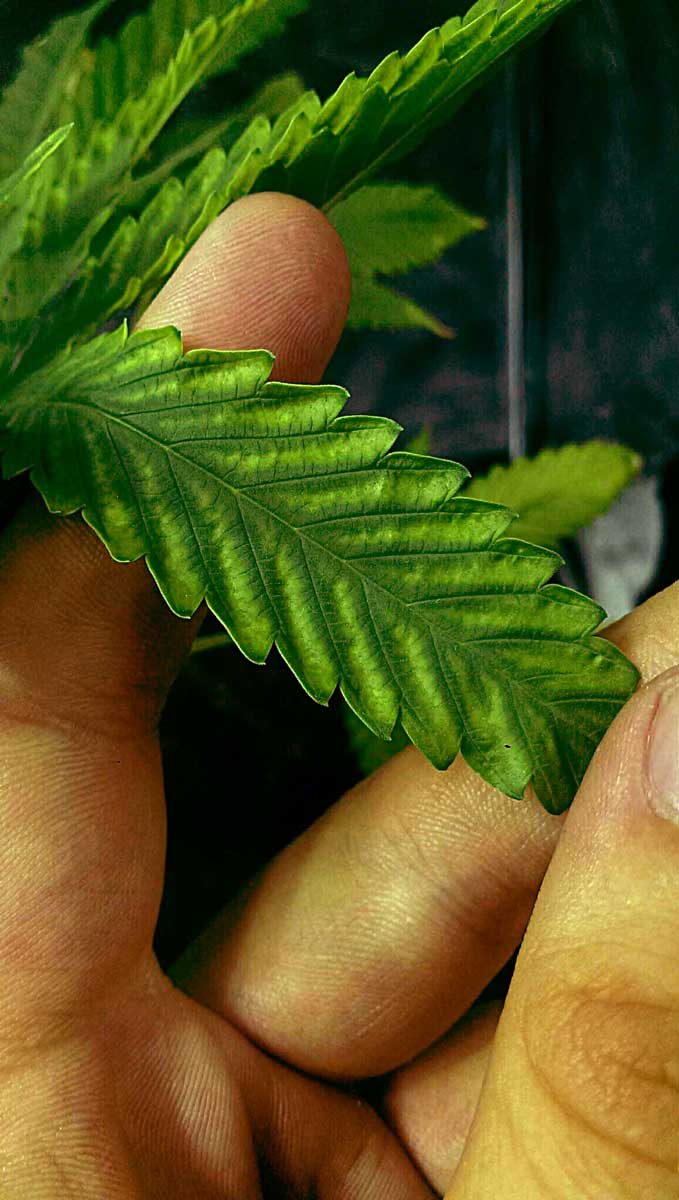 Magnesium
is a mobile nutrient, which means that the plant can move it from old
leaves to new leaves.
Magnesium
is a mobile nutrient, which means that the plant can move it from old
leaves to new leaves.
If you don't react to it promptly, a cannabis magnesium defiency can spiral out of control and cause your plant to lose a lot of lower leaves quickly. The plant will pull magnesium out of older leaves and bring them to the newer leaves. That's why a magnesium deficiency usually appears towards the bottom of the plant and on older, less important leaves.
The edges of the leaves may become yellow or bright green and may start feeling crispy to the touch. This crispiness around the edges is different from nutrient burn, which does not lighten the margins inside the leaves.
Sometimes you will also get light brown spotting within the margins or along the edges if the problem continues to get worse, though this may be partially other deficiencies, which often happen alongside a magnesium defiency.
Magnesium deficiencies are easy to prevent and fix once you know what to do. Read on below to learn how.
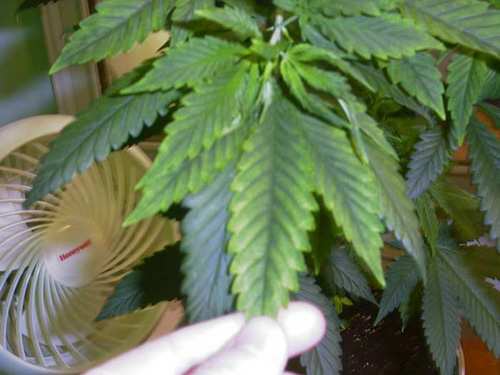
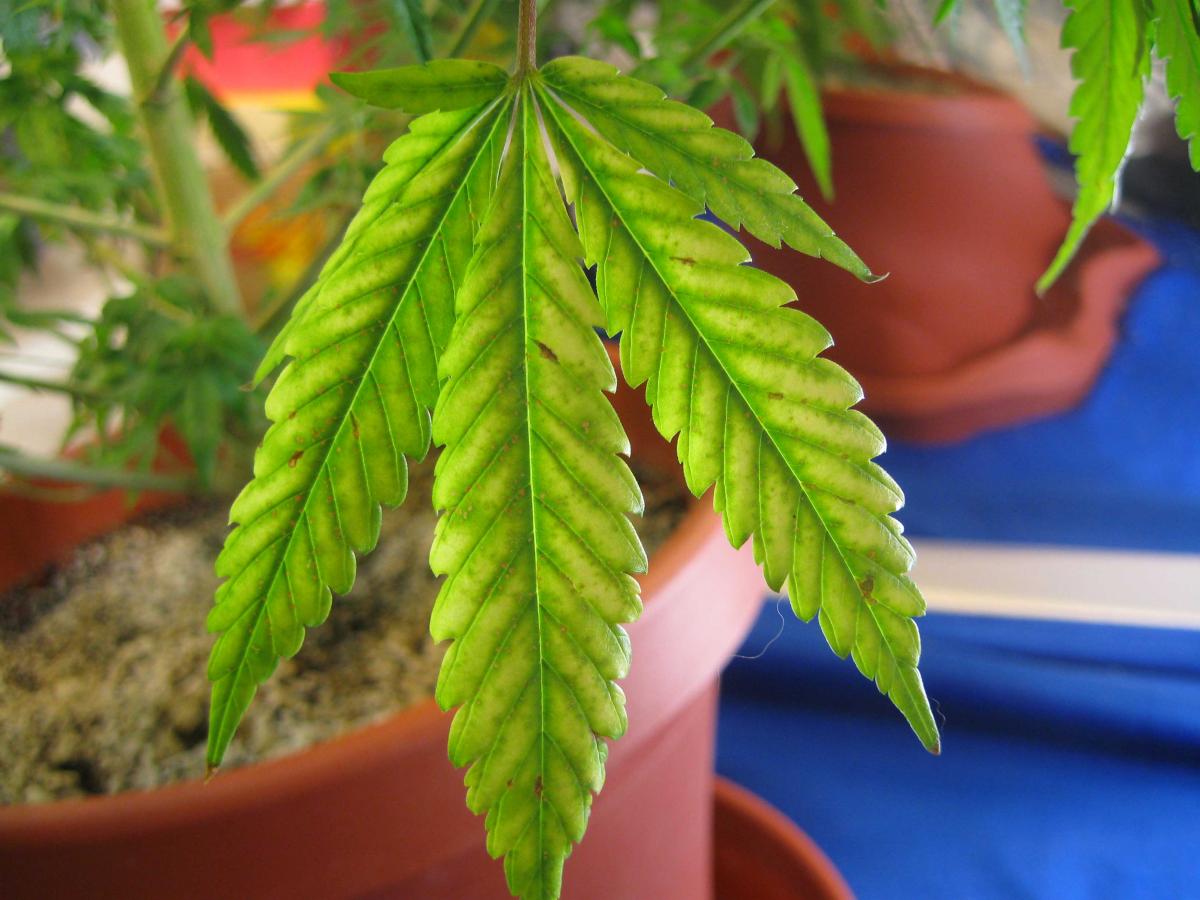
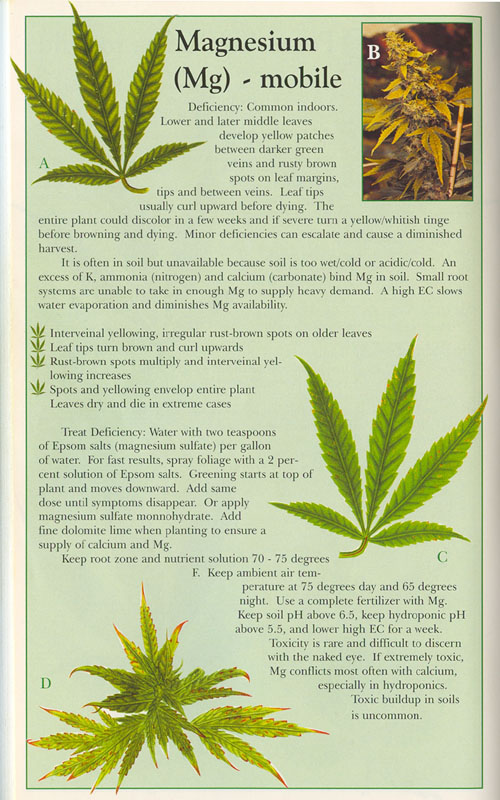
Solution For Magnesium Deficiency in Cannabis
Your cannabis plant may show signs of a magnesium deficiency if the pH at the roots is too low, especially in hydro. That is because when the pH of your root zone is not in the correct range, your cannabis cannot properly absorb magnesium through the roots.
Often with this deficiency, the magnesium is present, but the roots cannot absorb the magnesium properly due to an improper pH. Therefore it is very important to maintain the correct pH (and make sure the pH does get to low / acidic) in order to avoid a magnesium deficiency.
Growers using Coco Coir or Reverse Osmosis (RO) water usually need to supplement their plants with extra Calcium & Magnesium in addition to regular nutrients. Treating coco coir with Cal-Mag and supplying extra throughout your grow is recommended for grower in coco coir, or those using RO water.
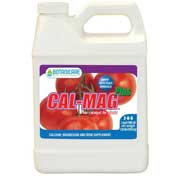
Adding more magnesium to a system when there is a pH lock-out will probably not help because the plant will not be able to absorb any magnesium until the pH has been corrected. If there's already enough magnesium, adding more can cause other apparent deficiencies by locking out other nutrients from the plant.
Please note: Once a magneisum deficiency is cleared up, the problem (yellowing lower leaves) will stop spreading to other older leaves, usually within a few days. Please note that leaves which have been damaged by a magnesium deficiency will probably not recover or turn green, so you want to pay attention to other growth for signs of recovery.
- In soil,
magnesium is best absorbed by the roots in the 6.0 - 7.0
pH range (some growers say a 6.5 - 7.0 pH is best if you
suspect a magnesium deficiency)
- In hydro, magnesium is best absorbed by the roots in the 6.0 - 6.5 pH range (in hydro, it's generally recommended to keep the pH between 5.5 - 6.5, but magnesium specifically tends to be best absorbed above 6.0)
If you suspect your growing cannabis plant has a magnesium deficiency, flush your system with clean, pH'd water that contains a regular dose of cannabis-friendly nutrients that includes magnesium. This will remove any nutrient salts that may be affected the uptake of magnesium and help restore pH to the proper levels..
To supplement with extra Magnesium...
Calcium, magnesium, and iron deficiencies often appear together in cannabis. Many growers decide to purchase some sort of Calcium-Magnesium (often called Cal-Mag) supplement for their grow room in case this common deficiency appears.
Listed below are common cannabis Calcium supplements, along below with some general information about each one. After supplementing with Cal-Mag and correcting the pH, you should expect to see new healthy growth within a week. Remember, the old leaves will probably not recover, but new growth should be green and healthy.
Cal-Mag is Well Suited For Hydro, Coco Coir, or Soil
Botanicare Cal-Mag Plus is a calcium, magnesium, and iron plant nutrient supplement. General application is to mix 1 tsp (5ml) of Cal-Mag into each gallon of water. I have used Cal-Mag Plus several times with great results.
Guaranteed Analysis: Nitrogen (N) 2.0%, Calcium (Ca) 3.2%, Magnesium (Mg) 1.2%, Iron (Fe) 0.1%
Derived from: Calcium Nitrate, Magnesium Nitrate, Iron EDTA
Dolomite Lime - For Soil Growers (Organic)
If you're looking for a way to supplement magnesium in your organic or soil setup, I highly recommend a product called "Dolomite Lime."
Note: The finer the dolomite, the more quickly it will be available to nutrients
Dolomite is a good source of calcium and magnesium and can be mixed with your soil. The great thing about dolomite is it works slowly over the course of a few months.
Dolomite has a neutral pH of about 7.0 and will help buffer pH in soil so it's easier to maintain the correct neutral pH range which is optimum for cannabis growth, especially in acidic soils.
You can buy Dolomite Lime online, but with shipping it's almost always waaaay cheaper to pick up a bag at a home improvement or gardening store such as Lowes, Home Depot, gardening centers, etc. If possible, try to get a finer grade of dolomite compared to something that is more coarse.
How to Use Dolomite Lime for Cannabis: When growing cannabis indoors, add 6-7 teaspoons of fine dolomite lime to each gallon's worth of soil. So if you're mixing enough soil to fill a 5 gallon container, you want to add 30-35 teaspoons (about 2/3 cup) of dolomite lime to the mix. Mix the dolomite lime and the dry soil thoroughly, then lightly water it with water that has been pH'ed to 6.5. After getting the soil wet, mix the soil well and wait a day or two to let the soil settle before checking the pH and adding plants. When growing in an outdoor garden, follow the dolomite lime manufacturers instructions.
Hand-watered grow - Flush the system with properly pH'ed water that contains a full set of proper nutrients that are suitable for growing cannabis. Make sure you are using the right nutrients for the stage your plant is in. Check the pH of your runoff water to ensure that nothing in the growing medium is throwing off the root pH.
Hydro grow - Check the pH and PPM of your reservoir water to make sure that pH is on target and nutrient levels are not lower than expected. If you do this and are still not certain what is causing the magnesium defiency, it is recommended that you drain your reservoir and refill with a newly mixed reservoir with fresh nutrients that has been pH'ed.
Should I add extra Magnesium? Some growers will add 1 tsp of Epsom salt/gallon of water and water plants with this mixture in response to a magnesium defiency (since epsom salt is primarily made of magnesium).
As I mentioned,
often a magnesium
deficiency is actually caused by a mix of factors, such as pH being
off. Even if the pH is on target, sometimes a magnesium defiency
appears when other important nutrients like iron or calcium are not
present in the right quantities.

A great supplement that
has all of 3 of these important nutrients is known as Cal-Mag, as this contains
Magnesium and Calcium, as well as a trace amount
of iron.
Adding extra magnesium is often not necessary if you are using tap water. However, you will likely want to supplement Cal-Mag if you are using filtered or reverse osmosis (RO) water, since most tap water already contains some amount of all 3 of these cannabis nutrients. Cal-Mag also has a small amount or iron, which is another trace cannabis nutrient that is often missing in filtered water.
How long until new growth looks better? If you fix the root of the problem, further yellowing and discoloration of the leaves should stop almost immediately. Some of the effected leaves may recover somewhat, but what's most important is to make sure the problem isn't continuing to spread to other leaves on the plant.
I generally don't remove any discolored leaves until I know for sure that the problem is completely gone and is no longer spreading to new leaves (that way any possible further discoloration will happen to the leaves that have already been affected).

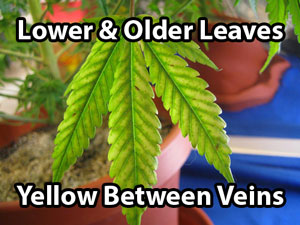
Manganese Deficiency
Problem: Leaves may become yellow in between the veins, with mottled brown spots on the affected leaves. These brown dead patches may spread and eventually kill the leaf. Leaves may also shred and fall apart.
Overall growth of the marijuana plant may be stunted. With a manganese deficiency, the yellowing will begin at the base of the leave and move outwards towards the tips.
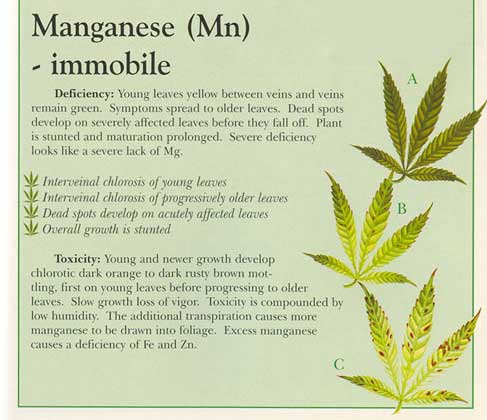
Solution for Manganese Deficiency in Cannabis
Your plant may also exhibit signs of a manganese deficiency if the pH is too high, or if the plant is getting too much iron.
Learn how to manage your pH when growing cannabis.
Please note: After a manganese deficiency is cleared up, the problem (brown spots and yellowing leaves) will stop spreading to other growth usually within a week. Please note that leaves which have been damaged by a manganese deficiency will probably not recover or turn green, so you want to pay attention to other growth for signs of recovery.
- In soil, manganese is best
absorbed by the roots in the 6.0 - 7.0 pH
range (some growers recommend keeping the pH slightly lower, from 6.0 -
6.5, if you suspect a manganese deficiency in particular)
- In hydro, manganese is best absorbed by the roots in the 5.5 - 5.8 pH range (in hydro, it's generally recommended to keep the pH between 5.5 - 6.5, but manganese specifically tends to be best absorbed below 5.8)
If you suspect your growing cannabis plant has a manganese deficiency, flush your system with clean, pH'd water that contains a regular dose of cannabis-friendly nutrients that includes manganese. This will remove any extra iron or nutrient salts that may be affected the uptake of manganese, it will help restore pH to the proper levels, and will supply the plant with any missing nutrients.
You are looking to avoid higher pH ranges, as this is where manganese deficiencies are most likely to occur.
If you cannot get rid of your manganese deficiency, please consult our 6-Step Cure to 99% of Cannabis Growing Problems
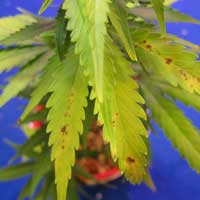
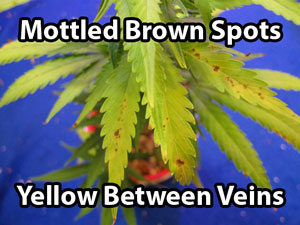
Molybdenum Deficiency
Problem: The initial symptoms may appear similar to a nitrogen deficiency (yellowing of older, lower leaves). Leaves may become mottled or spotted. However, the tell-tale sign of a molybdenum deficiency is the leaves may start to display a unique orange, red or pink color around the edges which will start to move toward the center of the leaf. Sometimes the color appears in the middle of the leaves as opposed to the edges.
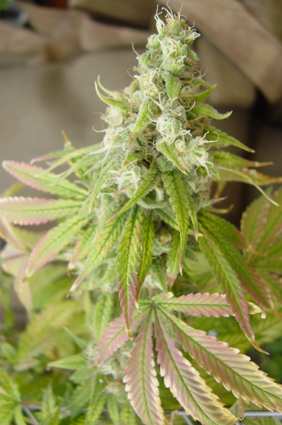
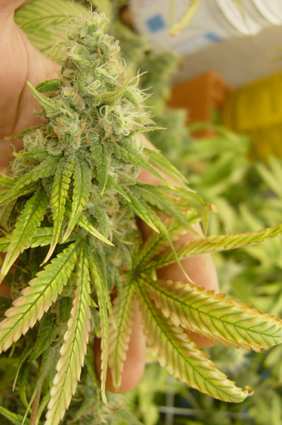
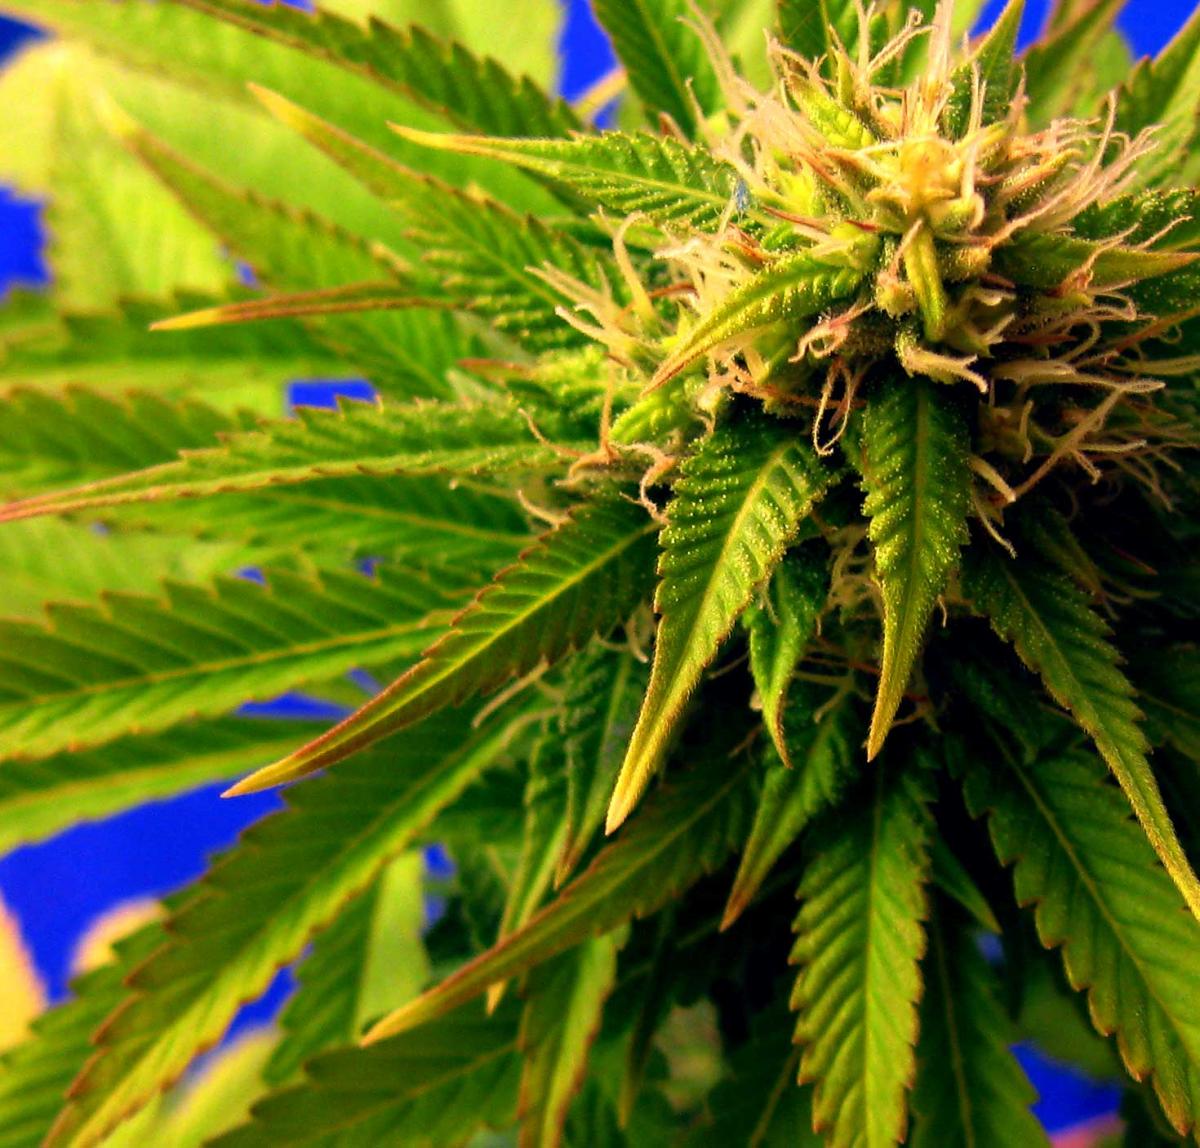
Solution:
A real molybdenum deficiency in cannabis is rare, and even scientists did not realize this mineral is needed by most plants because it is often present in low concentrations all the time.
For cannabis plants, molybdenum tends gets locked out at lower pH ranges. Your cannabis plant may show signs of a molybdenum deficiency if the pH at the roots is too low, although it is likely that molybdenum is there. That is because when the pH of your root zone is off, your cannabis cannot properly absorb molybdenum through its roots. Therefore the first step is to ensure that you have the correct pH for your growth medium. Learn more about pH and cannabis.
Please note: After a molyndenum deficiency is cleared up, the problem (pink coloring and yellowing leaves) will stop appearing on other parts of the plant, usually within a week. Please note that leaves which have been damaged by a molybdenum deficiency will probably not recover or turn green, so you want to pay attention to other growth for signs of recovery.
- In soil, molybdenum is best
absorbed by the roots in the 6.0 - 7.0 pH
range (some growers recommend avoiding a soil pH of lower than 6.5 if
you suspect a molybdenum deficiency)
- In hydro, molybdenum is best absorbed by the roots in the 5.5 - 6.5 pH range
If you suspect your growing cannabis plant has a molybdenum deficiency, flush your system with clean, pH'd water that contains a regular dose of cannabis-friendly nutrients that includes molybdenum. This will remove any nutrient salts that may be preventing the uptake of molybdenum and help restore pH to the proper levels..
If you cannot get rid of your molybdenum deficiency, please consult our 6-Step Cure to 99% of Cannabis Growing Problems
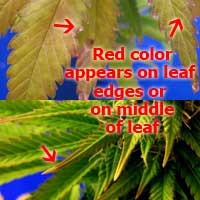
Nitrogen Deficiency
Problem: A cannabis nitrogen deficiency will cause the older, lower leaves on your plant to turn yellow, wilt away and eventually die.
The yellow leaves of a nitrogen deficiency may show signs of brown, and they will usually become soft and sort of "fold" in, before turning crispy and falling off on their own.
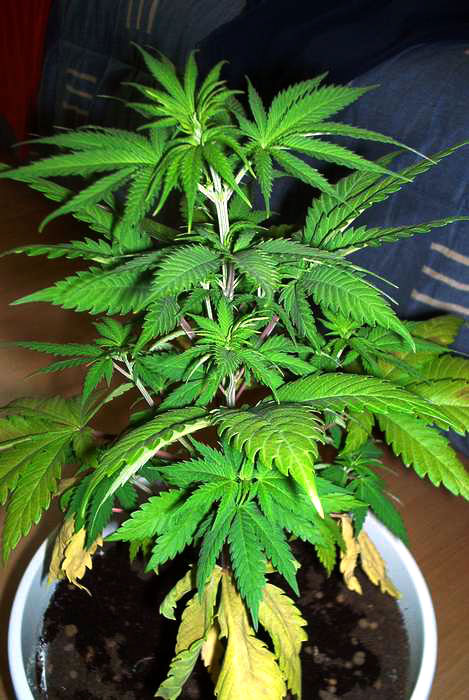
If the yellowing leaves are at the top of your plant or the yellow leaves are mostly new growth, then you probably don't have a nitrogen deficiency. Nitrogen deficiencies always affect the oldest, lowest leaves first.
Nitrogen is a mobile nutrient, which means it can move throughout the plant as needed. Cannabis needs nitrogen to keep leaves green and make energy from light. All new leaves get plenty of nitrogen to make them green and help with photosynthesis. The leaves that get the most light are the newest, youngest leaves, so the plant "wants" to give those leaves priority for getting light.
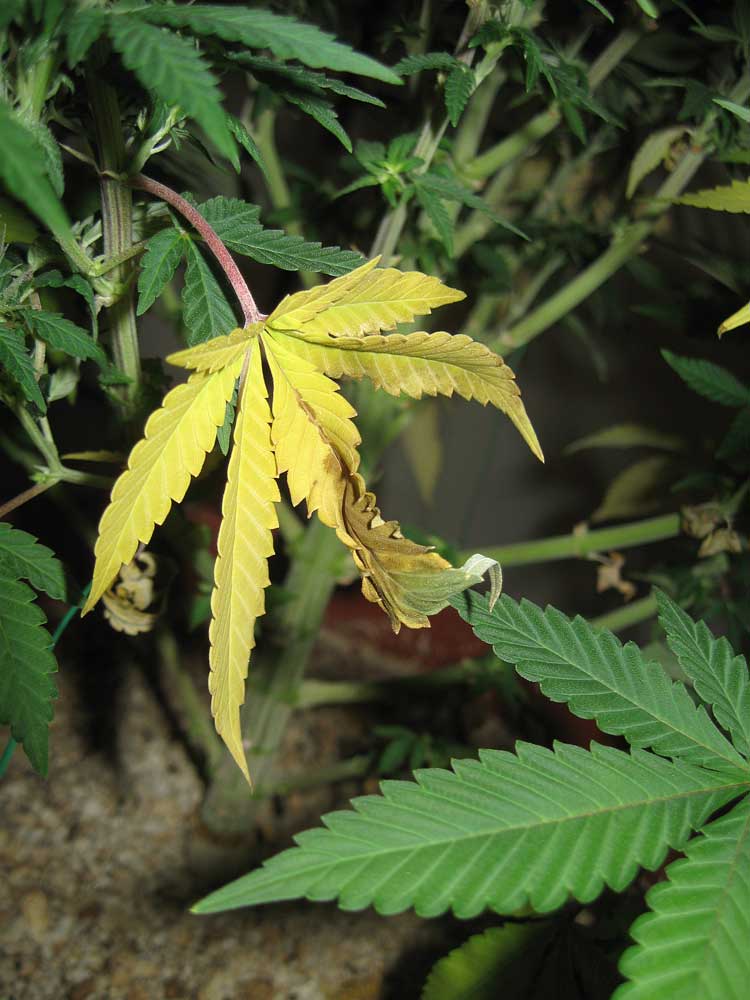
If new leaves aren't getting enough nitrogen, the plant will start to "steal" nitrogen from the older, lower leaves, so that it can give it to newer leaves. This is what causes the yellowing and wilting of a nitrogen deficiency.
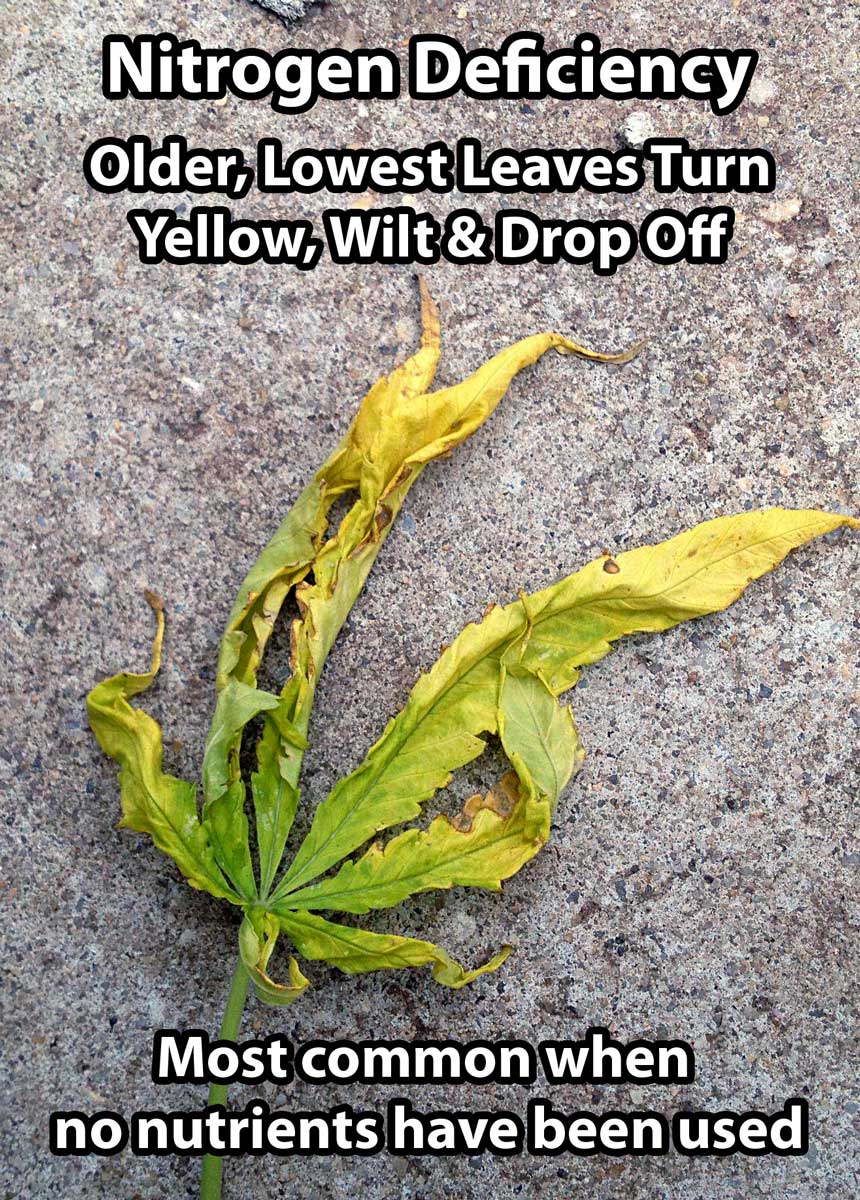
It's relatively normal for your cannabis plant's leaves to start turning yellow towards the end of your flowering cycle as the plant becomes nitrogen deficient while creating buds.
However, if your cannabis plant is losing lower leaves fast due to yellowing (if yellowing and dying leaves is "climbing" up the plant from the bottom), especially in the vegetative stage before plant is making buds, you have a problem that you will need to fix as soon as possible.
You don't want a nitrogen deficiency in the vegetative stage!
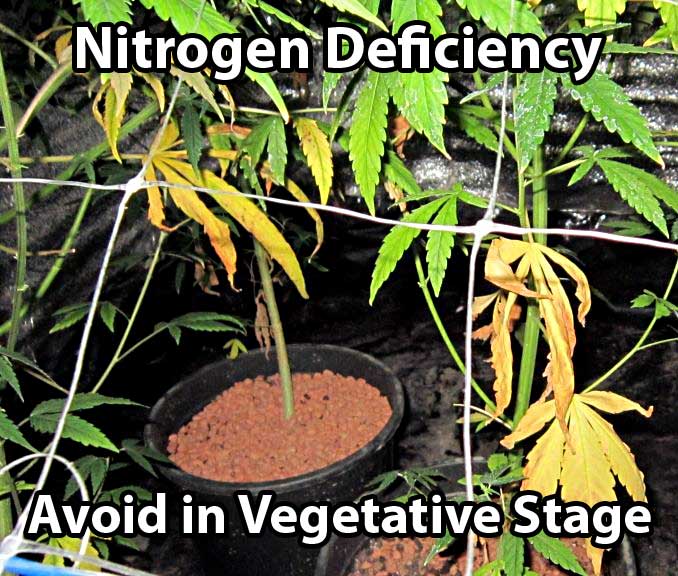
If you notice your lower cannabis leaves turning yellow in the vegetative stage or in the beginning part of the flowering stage, your plant may be experiencing a nitrogen deficiency which will need to be treated.
It is not good if your cannabis plant is showing signs of an advanced nitrogen deificiency while still in the vegetative stage. It's normal to lose a few yellow leaves off the bottom of your plant here and there, especially with very big plants. But if you are losing a significant amount of yellow leaves, and the yellowing seems to be moving up the plant quickly, then you have a problem.
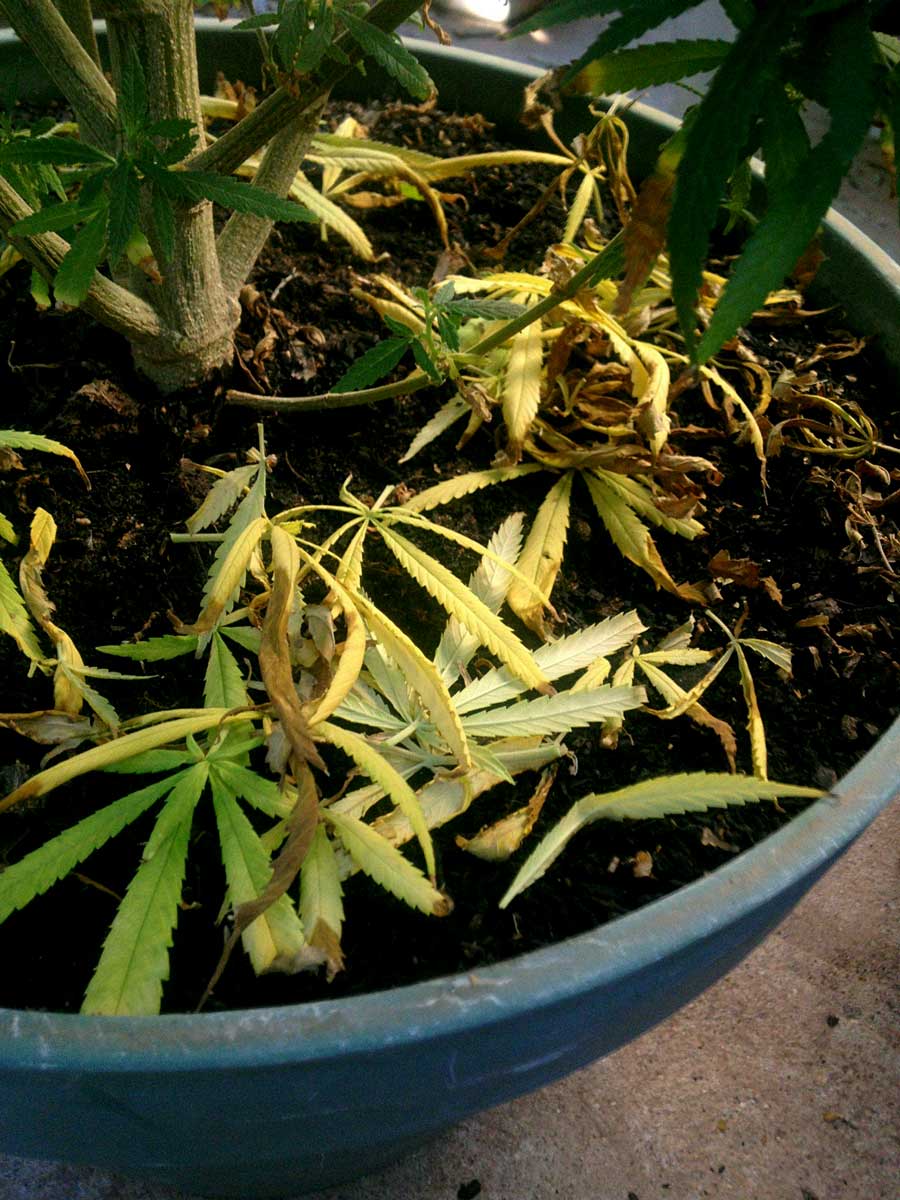
As a grower, you're interested in how much nitrogen to give your plants at what time. The ratio of nitrogen to other nutrients has a huge effect on growth and bud formation.
Vegetative Stage - higher levels of Nitrogen (pretty much any plant food will do)
Most complete plant foods that you get at a gardening store contain high levels of nitrogen (N). These nutrient system tend to work well in the vegetative stage.
Some examples of cannabis-friendly one-part Vegetative nutrient systems...
-
Pretty much any complete plant food
Flowering Stage - lower levels of Nitrogen (use "Bloom" or Cactus nutrients)
It’s extra important to find a nutrient system with lower levels of nitrogen for the last part of your plant’s life. Many “Bloom” or "Flowering" style base nutrients are just the ticket.
Some examples of good one-part Flowering nutrient systems...
-
If you can’t order online and can't find a good one-part base Bloom formula locally, you do have other choices. Though not an ideal choice, most Cactus plant foods will contain good nutrient ratios for growing cannabis during the budding stage. So in a pinch, you can use the cactus nutrients that can be found at most gardening stores.
The first cannabis plant pictured below is showing signs of nitrogen deficiency late in flowering; nitrogen deficiency in late flowering is completely normal and even desired. The last picture is an infographic about nitrogen and your marijuana plant.

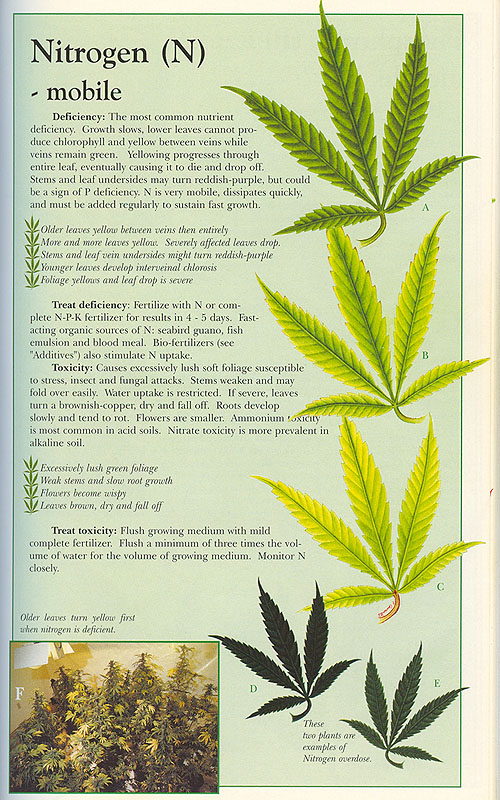
It's normal for plants to show signs of a nitrogen deficiency as the plant gets close to harvest. This is actually a good thing! Too much nitrogen can actually prevent proper budding, and can reduce the overall taste and smell of your plant. This is why all "bloom" and flowering nutrient formulas are relatively low in nitrogen.
So don't sweat it if you see your cannabis show some signs of nitrogen deficiency late in the flowering stage! Relatively low levels of nitrogen in the late flowering stage helps promote proper cannabis bud development and will increase your yields!
Don't worry about yellow leaves close to harvest!
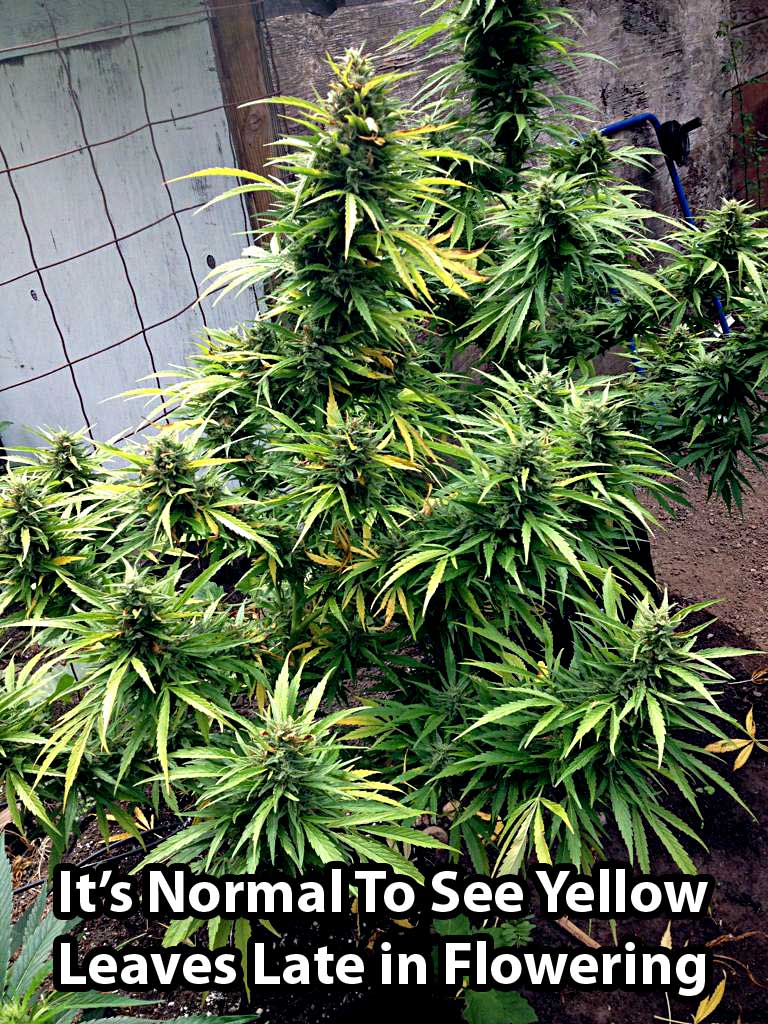
Solution: You can find many pre-mixed nutrients from the store which contain nitrogen or you could use nitrate of soda or organic fertilizer which are both good sources of nitrogen. In fact almost all plant nutrients of any kind will include nitrogen. If you haven't been providing any nutrient to your plants, try supplementing your regular nutrients with a bit more nitrogen and see if the plant starts recovering.
If you've already been using nutrients, then you probably don't have a nitrogen deficiency. If you're seeing the signs of spreading nitrogen deficiency even a week or two giving nitrogen to your plants through nutrients, then you need to figure out what else is causing the yellowing so you can stop it.
More About Nitrogen and Your Marijuana Plants
Sometimes you can get the signs of a cannabis nitrogen deficiency if the pH at the plant root zone is too low, even if the nitrogen is there. This is because when the pH at the roots is not right, your plant roots can't properly absorb nutrients. If you aren't sure about your root pH, learn more about pH & growing cannabis plants here.
Nitrogen is especially important during the vegetative stage of your cannabis plants. As your plants start flowering, they will need lower amounts of nitrogen.
 Nitrogen
is one of the 3 nutrients that is included in almost every kind of
plant food.
Nitrogen
is one of the 3 nutrients that is included in almost every kind of
plant food.
When looking at plant nutrients, you'll almost always see 3 numbers listed, like 3-12-6 or 5-10-5. These numbers represent the percentage of Nitrogen (N), Phosphorous (P) and Potassium (K) contained in the bottle. Just about all plant life on Earth needs these 3 elements to grow.
The very first number, "3" in the case of the picture to the right, always displays the proportion of nitrogen in this nutrient bottle compared to the other 2 nutrients (Phosphorus and Potassium respectively).
The reason nitrogen is in all plant nutrient formulations is because it's vital to plant processes.
Note: During the last few weeks before harvest, marijuana plants starts pulling all the remaining nitrogen from her leaves as part of the bud-making process. This causes yellowing leaves starting towards the bottom of the plant. This is part of the natural flowering process and you don't need to fight it.You may notice that marijuana leaves are yellowing in almost all pictures of marijuana plants with big buds that are close to harvest. You tend to get smaller yields from nitrogen-toxic plants with dark green leaves at harvest.
Remember: It's Normal For Marijuana Leaves To Start Turning Yellow As Harvest Time Approaches
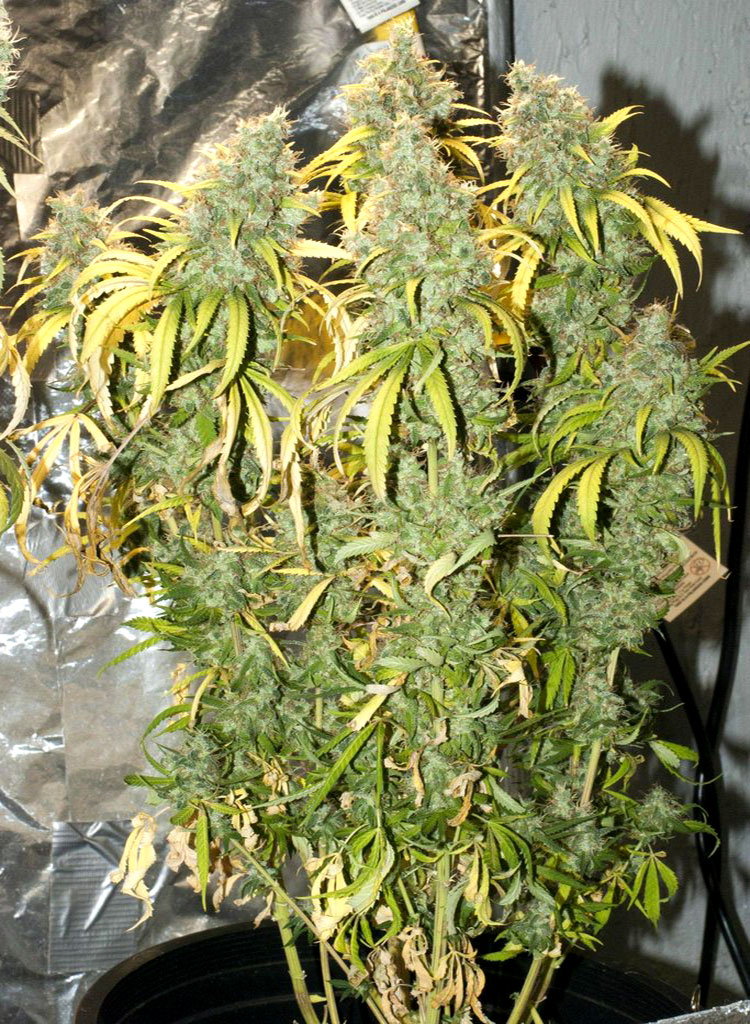
Occassionally a nitrogen toxicity is mistake for a deficiency. Could your plant actually be nitrogen toxic? (pictured below)
This picture shows a Nitrogen Toxicity
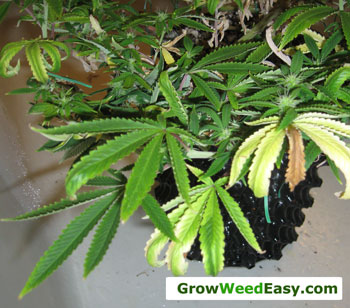
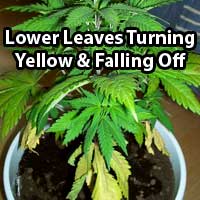
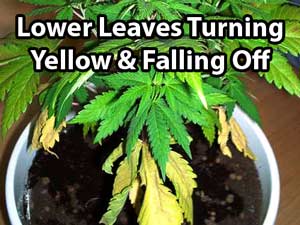
Nitrogen Toxicity
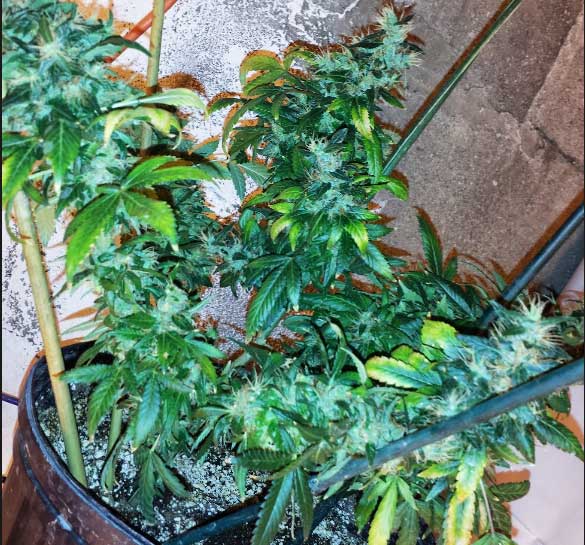 Problem:
Dark green leaves, weak stems, and overall slow growth. Marijuana
leaves that are nitrogen toxic often get "The Claw" or talon-like
leaves that are bent at the ends. They also do an odd curving
(or cupping) that is often mistaken for overwatering, but is
unique to nitrogen toxicity. You can see a "clawing"
leaf pictured to the right and more pictures below (click each
picture for a close-up).
Problem:
Dark green leaves, weak stems, and overall slow growth. Marijuana
leaves that are nitrogen toxic often get "The Claw" or talon-like
leaves that are bent at the ends. They also do an odd curving
(or cupping) that is often mistaken for overwatering, but is
unique to nitrogen toxicity. You can see a "clawing"
leaf pictured to the right and more pictures below (click each
picture for a close-up).
Leaves that turn into claws often start turning yellow and dying if the nitrogen toxicity is not treated, much like a nitrogen deficiency, only the leaves will continue to get more and more clawed. Leaves eventually turn yellow or brown and fall off. You can tell if yellowing is caused by too much nitrogen because the rest of the plant will be dark green, and the yellowing leaves will turn into claws first.
The majority of times that growers encounter problems with nitrogen, it's from giving too much of it to their plants.
Many new growers accidentally their plants give too much Nitrogen, especially in the flowering stage
Your plant needs a lot of nitrogen in the vegetative stage, and it's generally hard to give too much as long as you're not going completely overboard with nutrients. Nitrogen is a big part of what makes leaves green, and is incredibly important to the process of photosynthesis (making energy from light).
But cannabis plants need relatively low levels of Nitrogen in the second half of the flowering/budding stage. While your plants still need N (nitrogen) during flowering, too much N at this stage will prevent your plants from forming buds properly, resulting in lower yields, less potency and possibly inferior buds.
This is why it's important to avoid any type of "time-release" nutrients or soil (for example, standard Miracle-Gro soil) as they will keep giving your plant a lot of N even after its started flowering.
When it comes to nitrogen, this is what your plant needs:
Vegetative Stage - higher levels of Nitrogen (pretty much any plant food will do)
Most complete plant foods that you get at a gardening store contain high levels of nitrogen (N). These nutrient systems tend to work well in the vegetative stage.
Some examples of cannabis-friendly one-part Vegetative nutrient systems...
-
Pretty much any complete plant food
Flowering Stage - lower levels of Nitrogen (use "Bloom" or Cactus nutrients)
It’s extra important to find a nutrient system with lower levels of nitrogen for the last part of your plant’s life. Many “Bloom” or "Flowering" style base nutrients are just the ticket.
Some examples of good one-part Flowering nutrient systems...
-
If you can’t order online and can't find a good one-part base Bloom formula locally, you do have other choices. Though not an ideal choice, most Cactus plant foods will contain good nutrient ratios for growing cannabis during the budding stage. So in a pinch, you can use the cactus nutrients that can be found at most gardening stores.
Different strains react differently to nitrogen toxicity. Some plants get dark green leaves with no clawing. Some strains will get leaves that do the weird 90 degree bend at the tips, while other strains or individual plants start curling like claws and then turn yellow / brown and fall off like a deficiency. Yet these are all signs of too much nitrogen.
Signs of Nitrogen Toxicity
-
 Dark
green leaves and foliage
Dark
green leaves and foliage -
Leaf tips may turn down, without signs of overwatering.
-
You may notice yellowing on the affected leaves or other signs of nutrient deficiencies as time goes on
-
Nitrogen toxicity is often but not always accompanied by nutrient burn
-
The Claw often seems random, affecting leaves here and there
-
Heat and pH problems will make the clawing worse, as they stress out the plant and lower her defenses, and cause her to drink more water (and uptake more N)
-
As time goes on, the claw leaves will eventually start turning yellow, getting spots, and dying
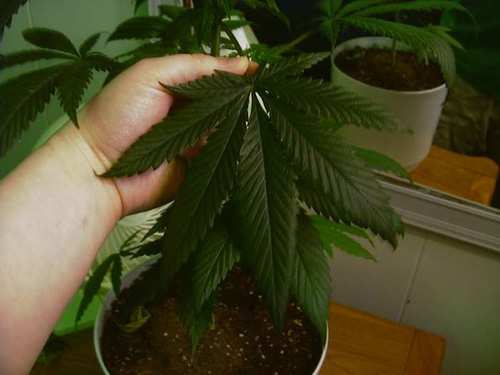
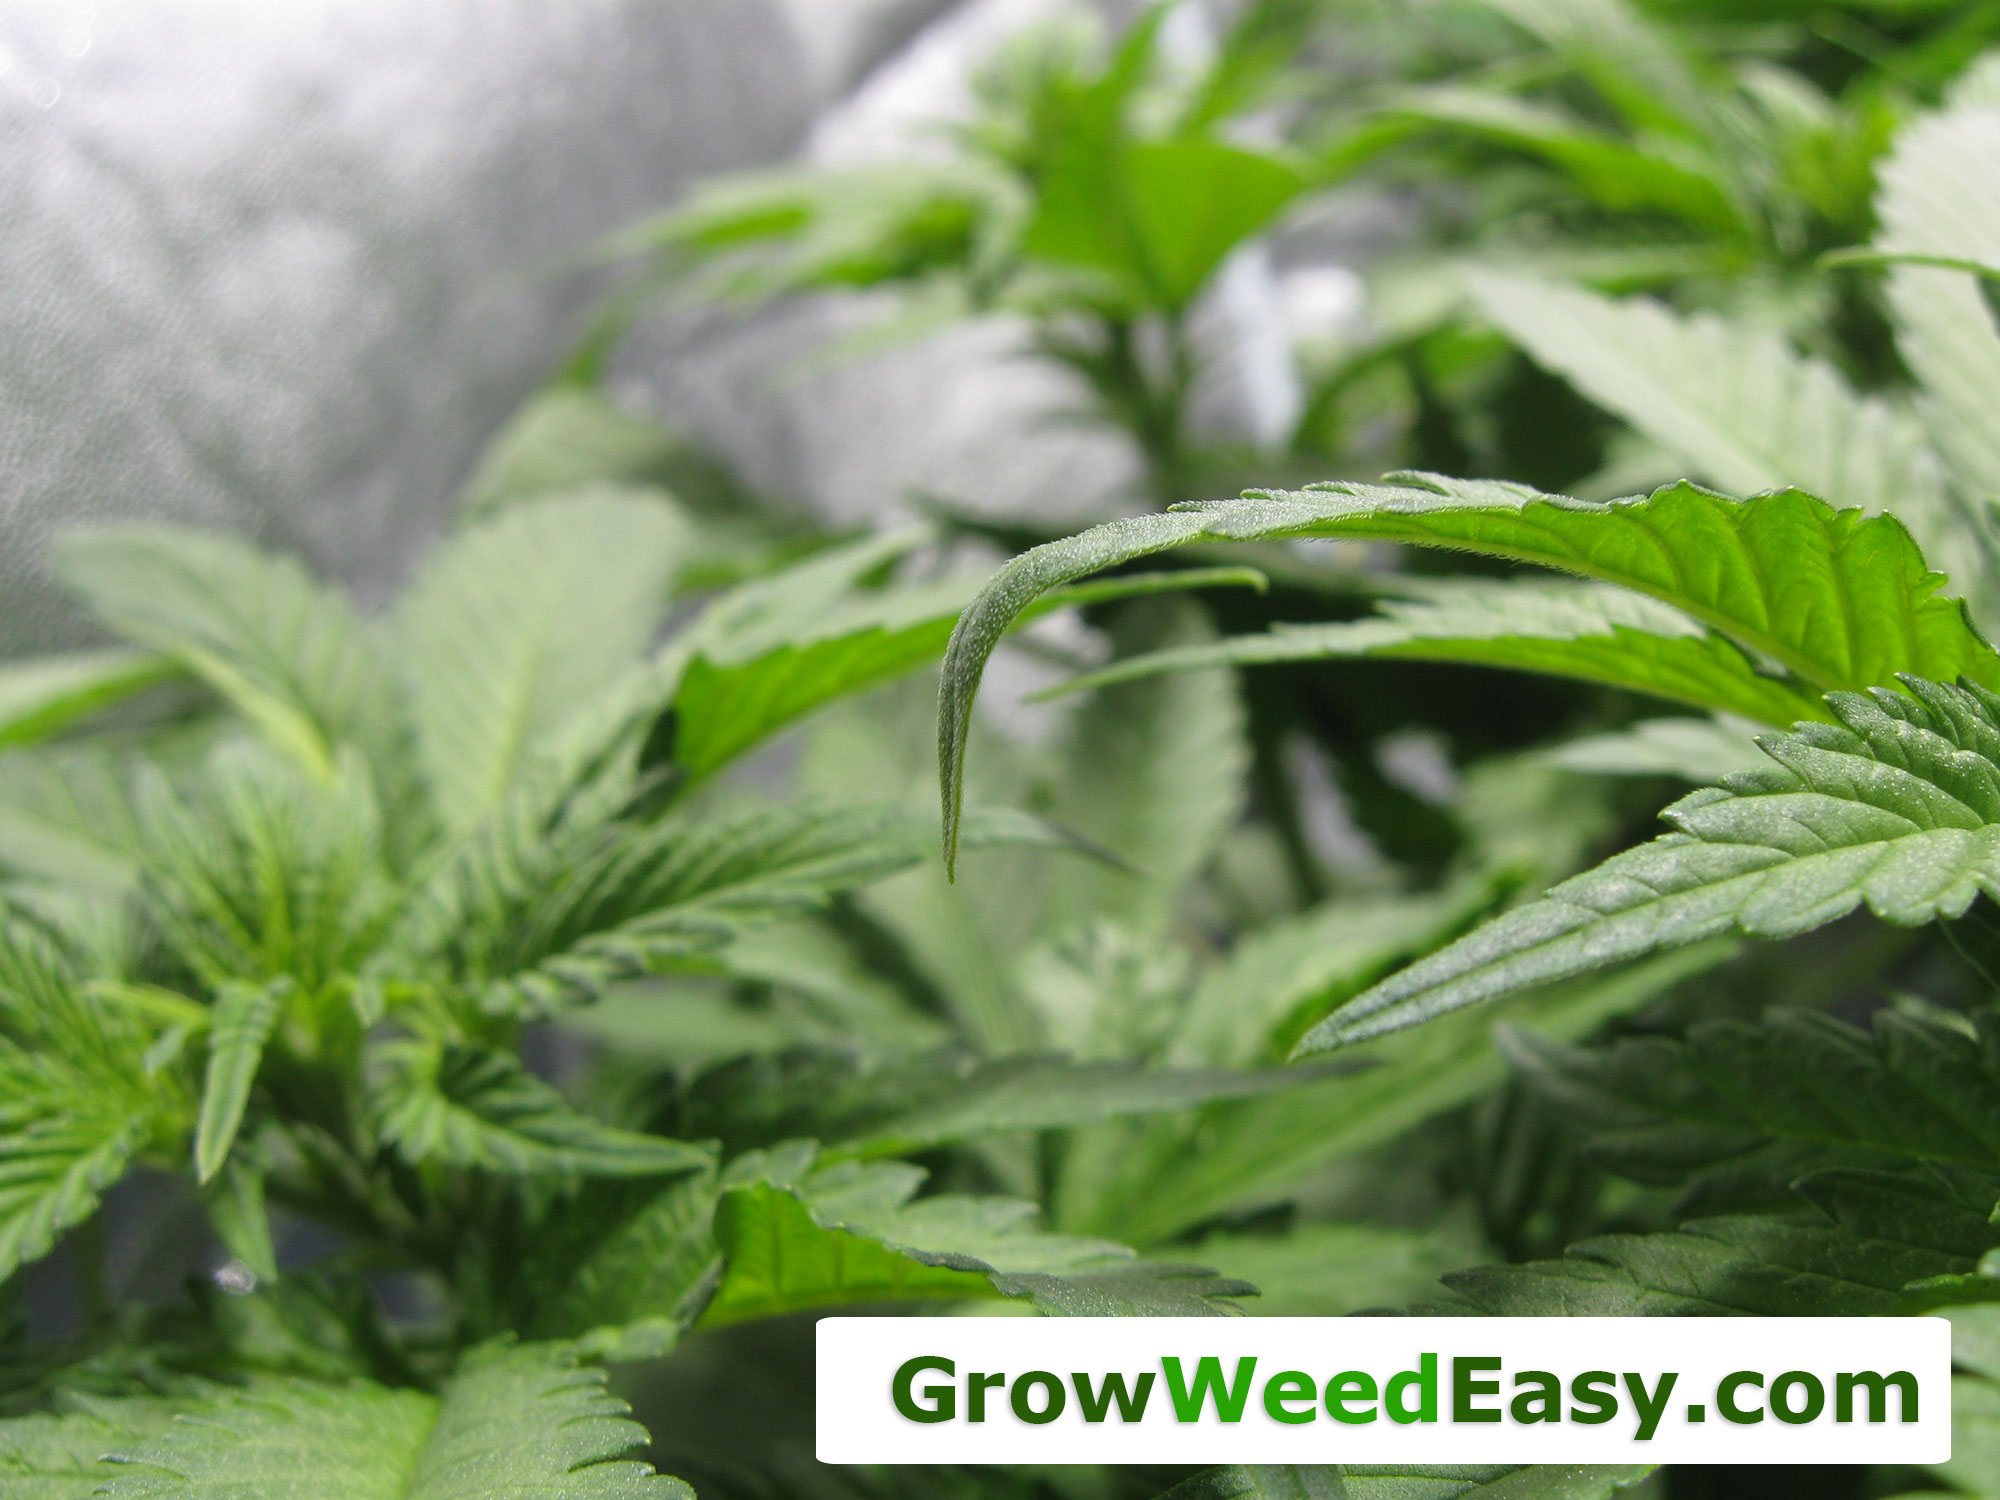
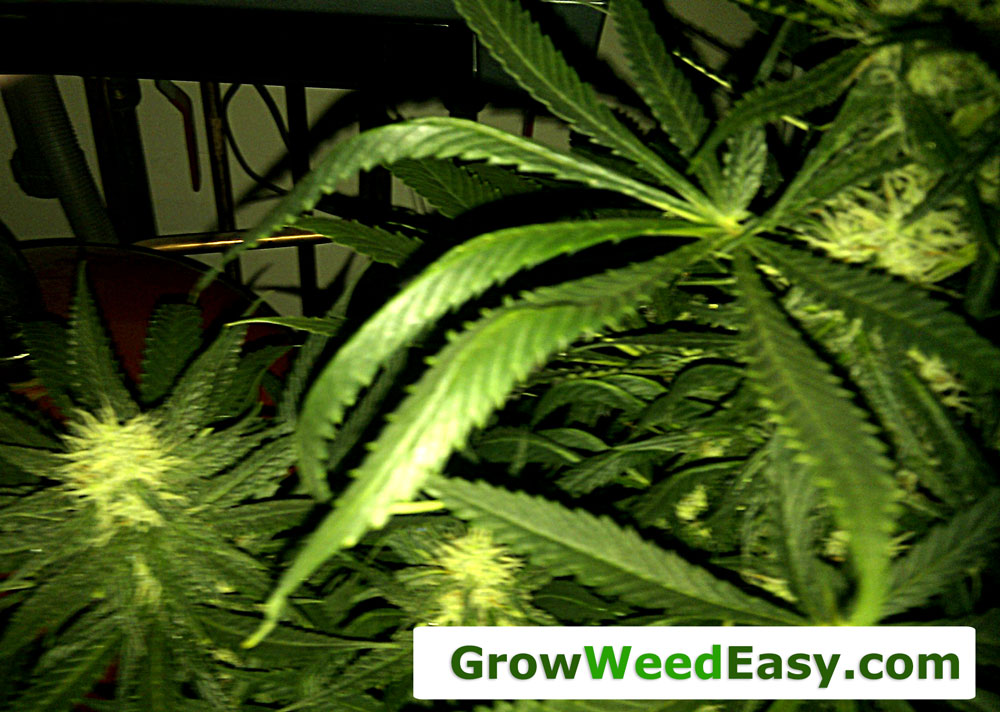
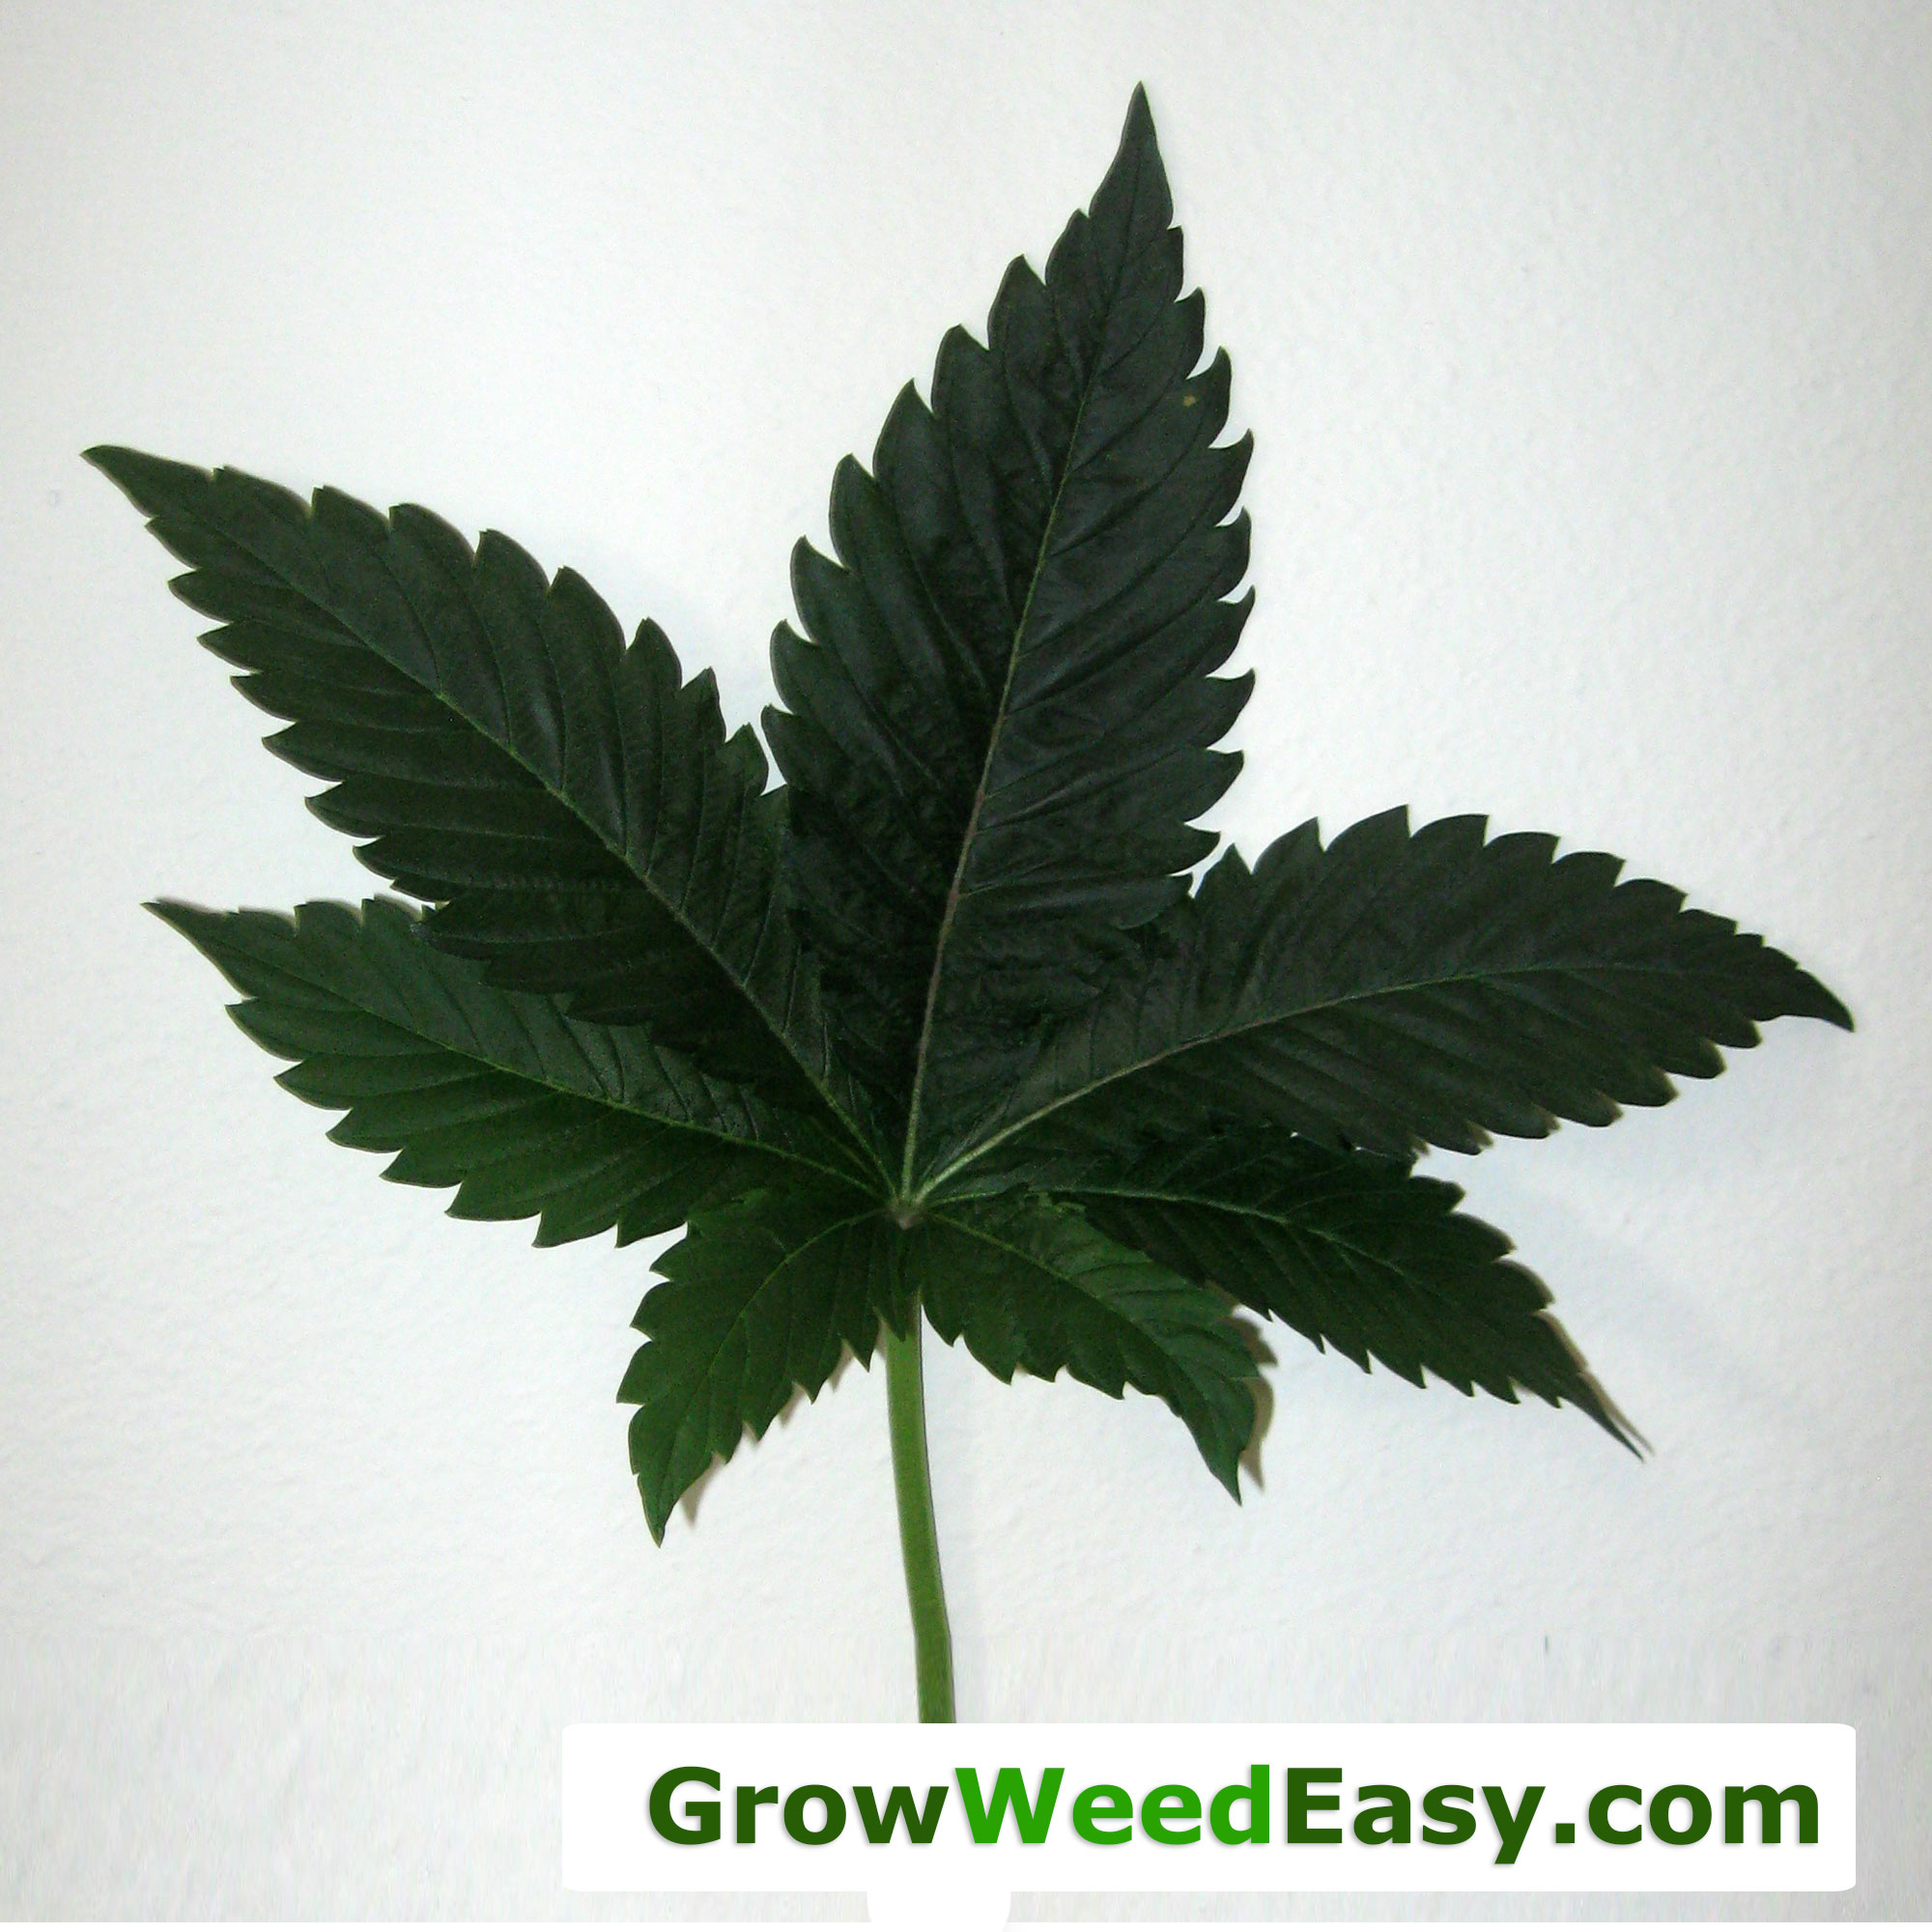
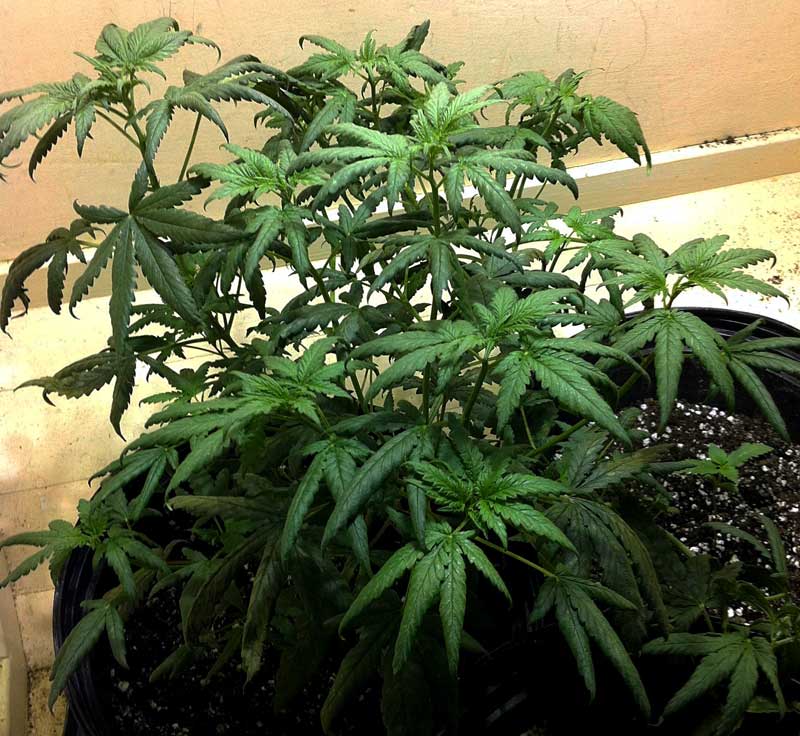
Solution: Reduce the Nitrogen your plant is getting!
Reduce the amount of nitrogen that is being fed to the plants. If you are feeding extra nutrients, cut down that amount. If you are in the flowering / budding stage, make sure you're using a formula that's specifically meant for flowering, or else it could have too much nitrogen.
If you are not feeding extra nutrients, you may have "hot" soil that has been giving your plants extra nutrients. In that case, flush your plants with filtered, pH'ed water to help clear out the extra nitrogen.
Effected leaves likely won't recover, but you should see the problem halt with no new leaves being affected.
Wait! I'm not sure if it's Nitrogen toxicity!
Ok,
you ruled out overwatering,
now what?
When I first got started growing, everyone kept telling me that this particular kind of leaf clawing was caused by under or overwatering my plants, pH problems, or heat problems.
Yet in my case, I knew that it wasn't over or under watering (I was growing in hydro, where roots grow directly in water and air stones are constantly adding oxygen). I knew it wasn't pH (my reservoir water had the right pH) and I knew it wasn't heat since the grow area was slightly cooler than room temperature.
So then what was really causing my claw leaves?
It's understandable that other growers were mistaken. It is true that many stresses will make any other problem worse.
Plus overwatering can cause a similar kind of leaf clawing (learn more below). And if you do have nitrogen toxicity, than heat or pH problems will make the problem much worse.
Now, you may or may not know that marijuana (or any plant) needs an element known as "Nitrogen" to grow.
In fact, nitrogen is one of the 3 nutrients that are included in almost every kind of plant food.
When looking at plant nutrients, you'll almost always see 3 numbers listed, like 3-12-6 or 5-10-5. These numbers represent the ratio of Nitrogen (N), Phosphorous (P) and Potassium (K) contained in the bottle. Just about all plant life on Earth needs these 3 elements to grow.
The very first number, "3" in the case of the picture to the right, always displays the proportion of nitrogen in this nutrient bottle compared to the other 2 nutrients (Phosphorus and Potassium respectively).
The reason nitrogen is in all plant nutrient formulations is because it's vital to plant processes.
For marijuana plants, when they don't get enough nitrogen, the bottom leaves start turning yellow and dying. Left unchecked, a nitrogen deficiency can cause the whole plant to eventually die.
However, this time we're the dealing with the opposite problem: nitrogen toxicity, or too much nitrogen.
Why You Should Treat And Prevent Nitrogen Toxicity
-
Marijuana plants that get too much Nitrogen in the vegetative stage don't grow as vigorously.
-
Too much nitrogen is especially harmful in the flowering stage, because this will cause your plant to produce much smaller buds.
-
If you react quickly and reduce your nitrogen levels at the first sign of toxicity, your plant will quickly recover.
Note: Some strains with the word "Claw" in the name tend to do The Claw more easily than others.
Problems with excess nitrogen are not common in the wild; it's a lot more common to see nitrogen toxicity on indoor plants, especially when overzealous growers go overboard with nutrients.
Occasionally you'll come across a strain or particular plant that likes lower levels of nutrients, and when this happens, it's important to realize the plant is showing signs of toxicity, even if all the other plants in your garden seem fine.
One of the most common signs off too-many-nutrients is "nutrient burn," or when the tips of your leaf appear brown or burned. Yet there are specific signals your plant will display when she's getting too much nitrogen...
Recap: How You Know You Have a Nitrogen Toxicity
-
Dark green leaves and foliage
-
Leaf tips turn down, without signs of overwatering.
-
You may notice yellowing on the affected leaves or other signs of nutrient deficiencies as time goes on
-
Nitrogen toxicity is often but not always accompanied by nutrient burn
-
The Claw often seems random, affecting leaves here and there
-
Heat and pH problems will make the clawing worse, as they stress out the plant and lower her defenses, and cause her to drink more water (and uptake more N)
-
As time goes on, the claw leaves will eventually start turning yellow, getting spots, and dying
Light and "The Claw"
-
The distance between the leaves to the lights or irregular light patterns from reflectors often seem to affect the condition, which is why many growers believe that light is somehow causing the problem.
-
You may notice this clawing first appears on dark green leaves that aren't getting enough light (they aren't able to use up all their nitrogen and become nitrogen toxic).
The Claw in the Flowering Stage
-
If you use vegetative plant nutrients during the flowering stage, then they'll deliver too much nitrogen. This is why you need to get special nutrients meant for the blooming / flowering stage. You'll notice that flowering nutrients always contain a smaller percentage of nitrogen (the first number) compared to nutrients for the vegetative stage. Learn more about marijuana nutrients here.
-
Many growers mistakenly keep raising nutrient levels or adding additional nitrogen when they see yellow leaves in the flowering stage, not realizing that it's natural for plant leaves to start yellowing as harvest approaches. Adding too much nitrogen in the flowering stage can cause nitrogen toxicity even when you can see yellow lower leaves. Nitrogen toxicity in flowering results in smaller yields and airy cannabis buds, so make sure to watch out!
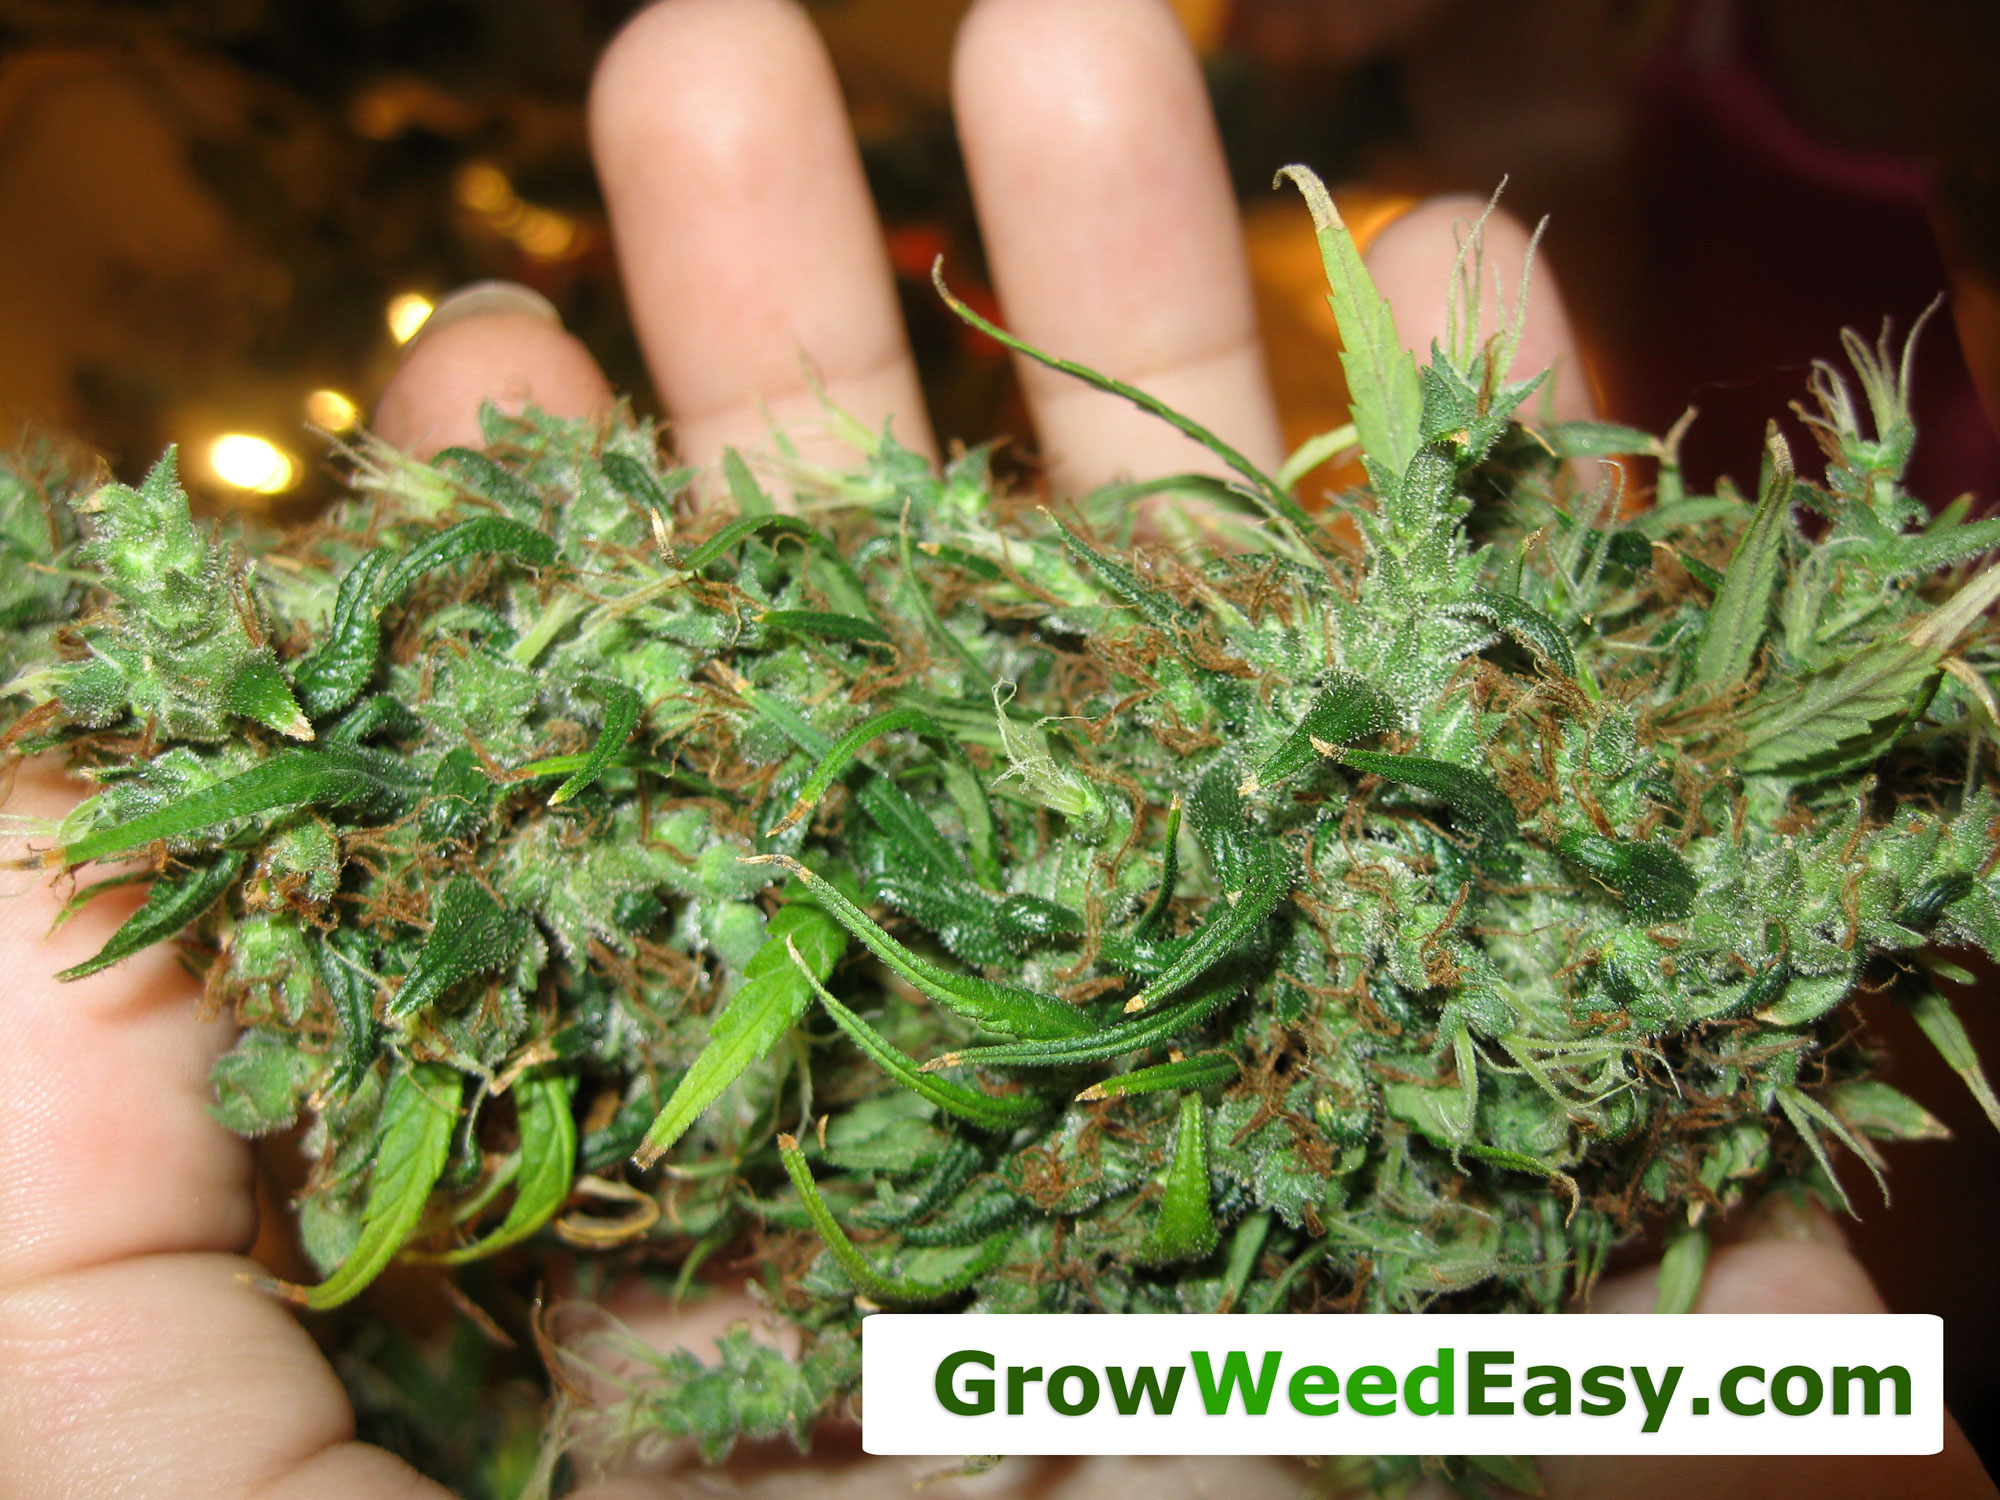
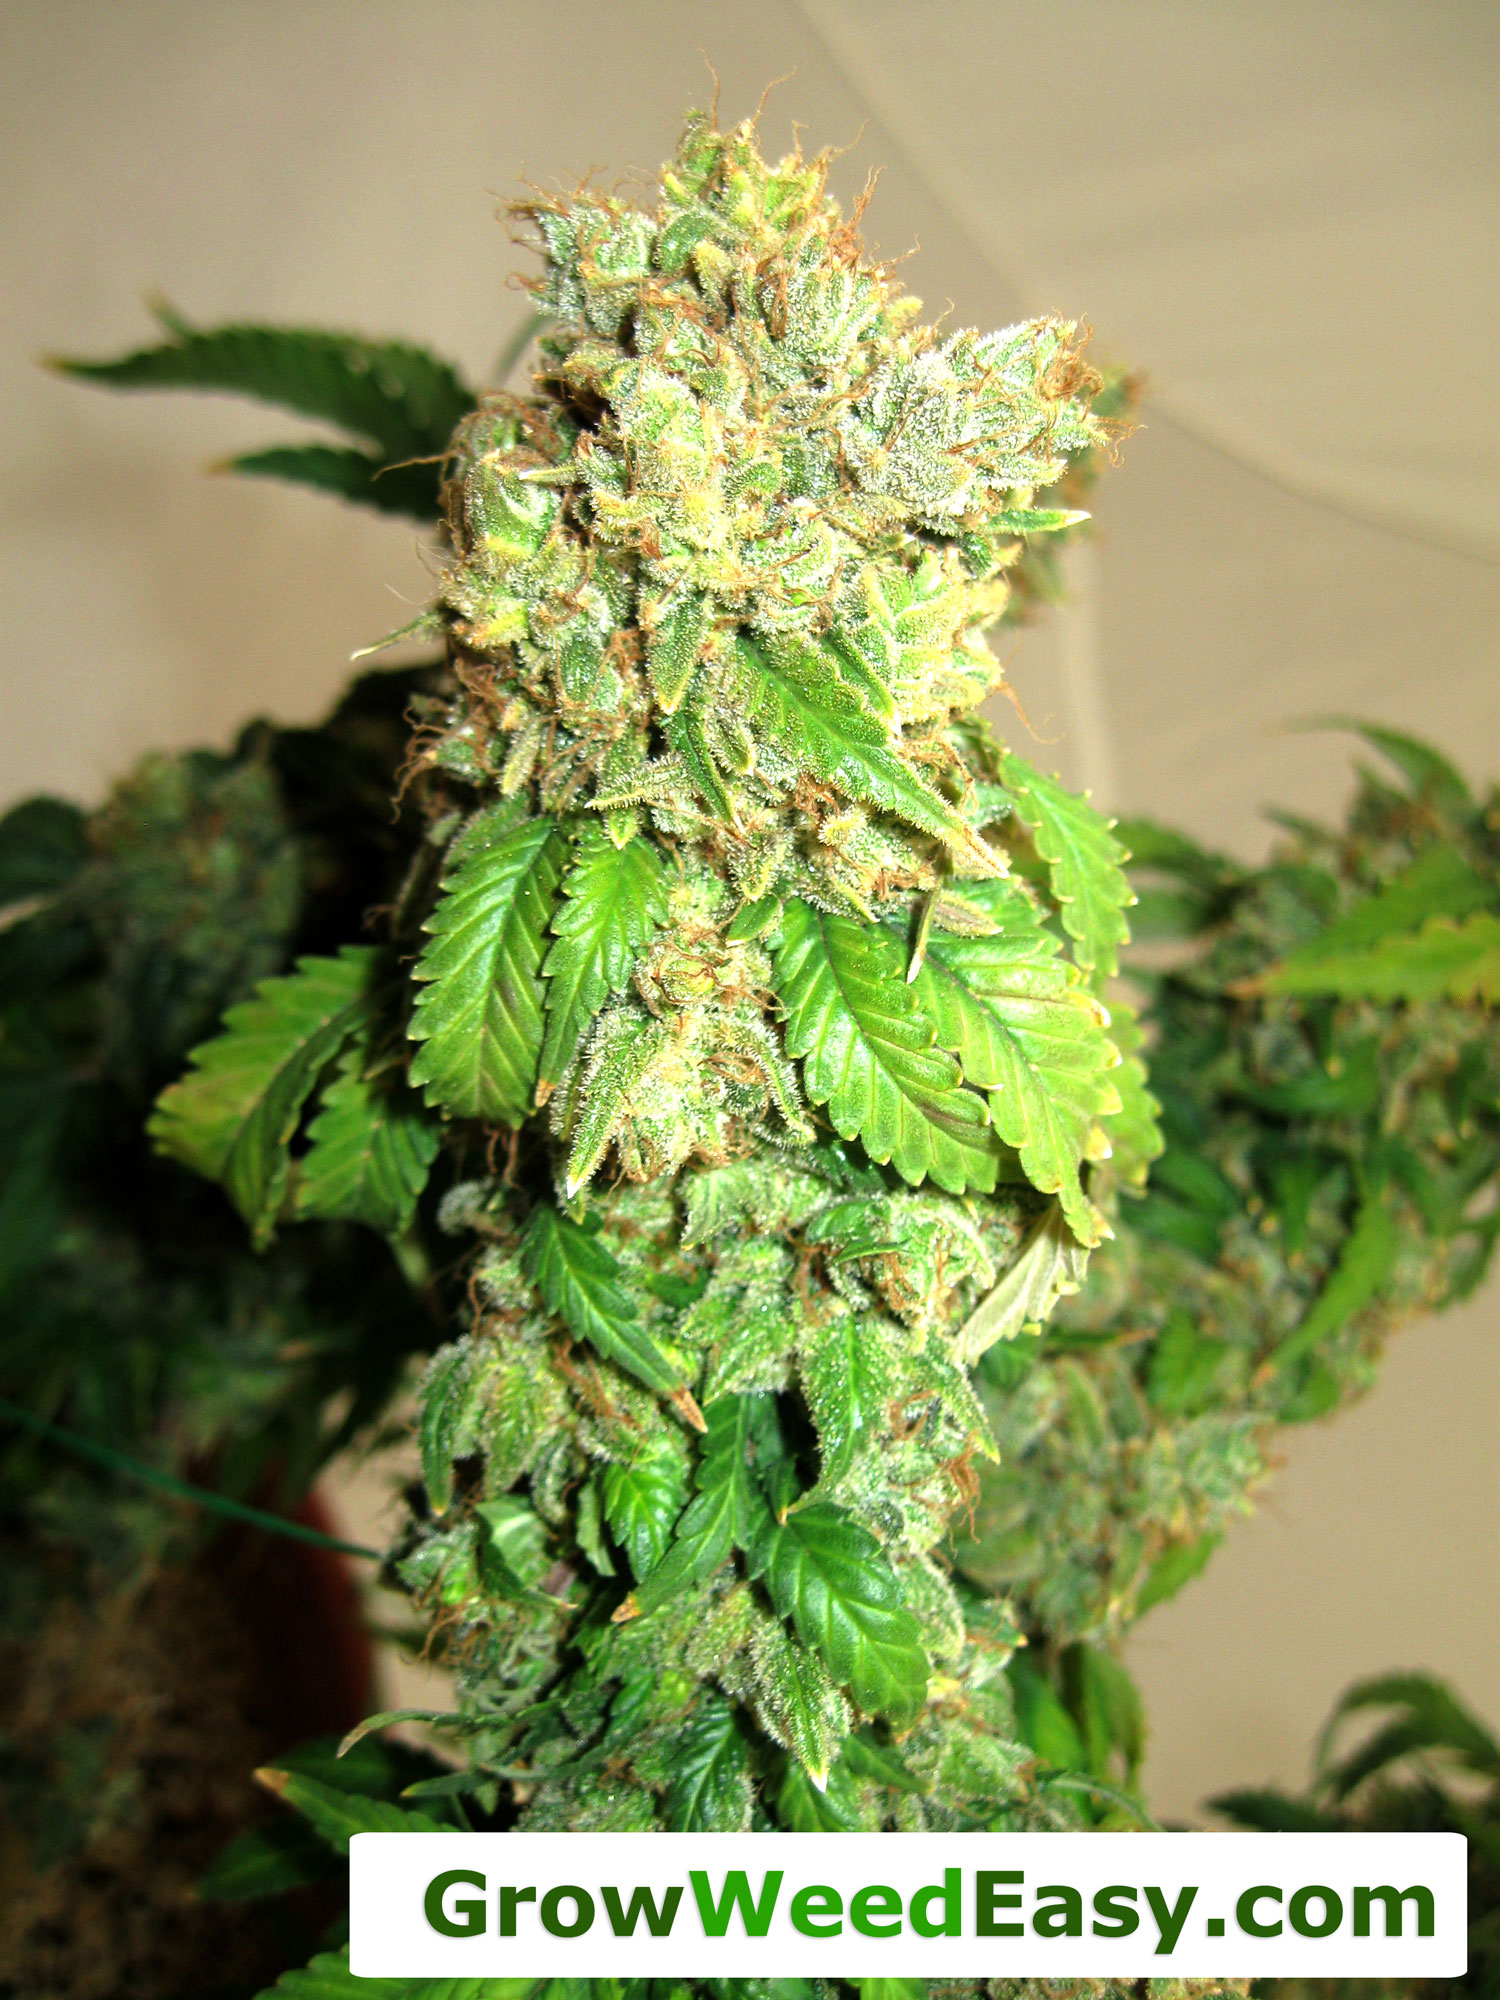
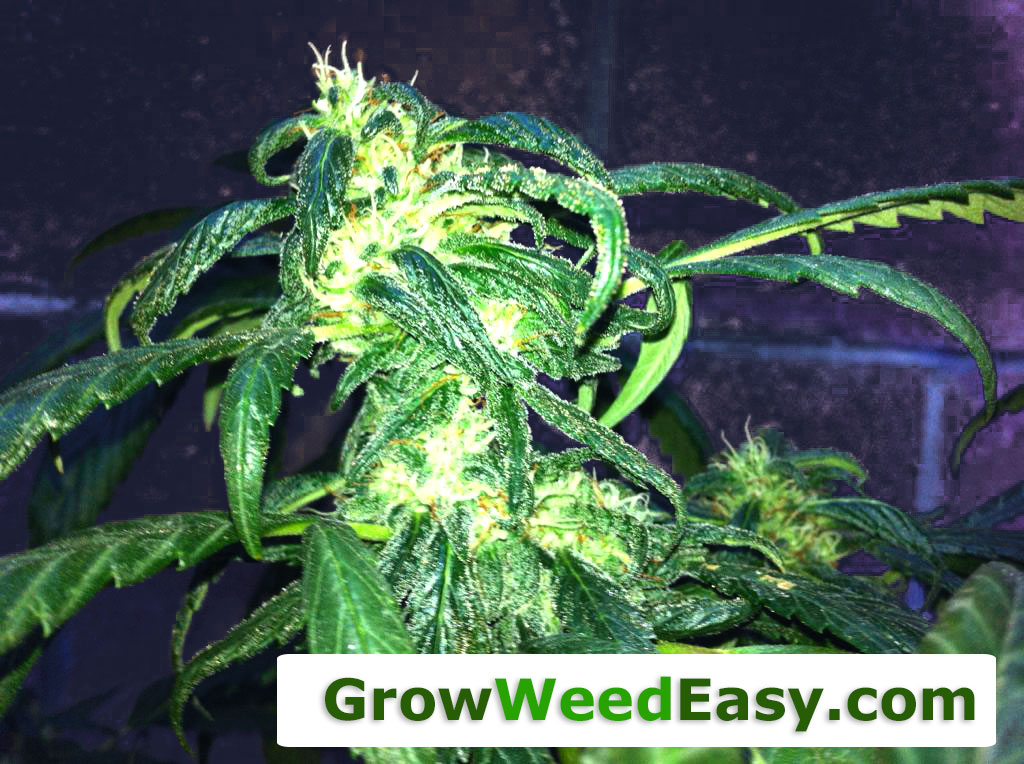
Note: During the last few weeks before harvest, marijuana plants starts pulling all the remaining nitrogen from her leaves as part of the bud-making process. This causes yellowing leaves starting towards the bottom of the plant. This is part of the natural flowering process and you don't need to fight it. You may notice that marijuana leaves are yellowing in almost all pictures of marijuana plants with big buds that are close to harvest. You tend to get smaller yields at harvest from nitrogen-toxic plants with dark green leaves.
It's Normal For Marijuana Leaves To Start Turning Yellow As Harvest Time Approaches, Don't Keep Adding More Nitrogen!
I know a lot of marijuana plant problems can look similar, but now that you're armed with the right information, you'll know exactly what to do if you see Nitrogen Toxicity affecting your marijuana plants.
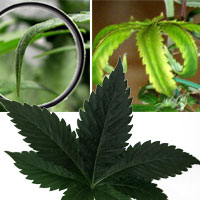
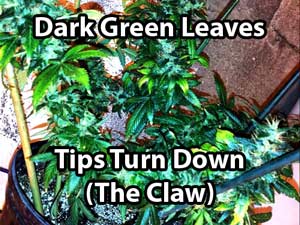
Nutrient Burn
by Nebula Haze
Is
it Nutrient Burn?
Also commonly known as
cannabis "Nute Burn"
Quick Summary: Nutrient burn is one of the most common beginner cannabis growing problems, and is a result of the roots taking in more nutrients than a cannabis plant can use.
This excess level of nutrients causes a brown or yellow "burn" along the tips of your leaves. If nutrient levels are not lowered, the burnt tips start traveling inwards and tend to get crispy and twisted.
Take me straight to the solution for nute burn!
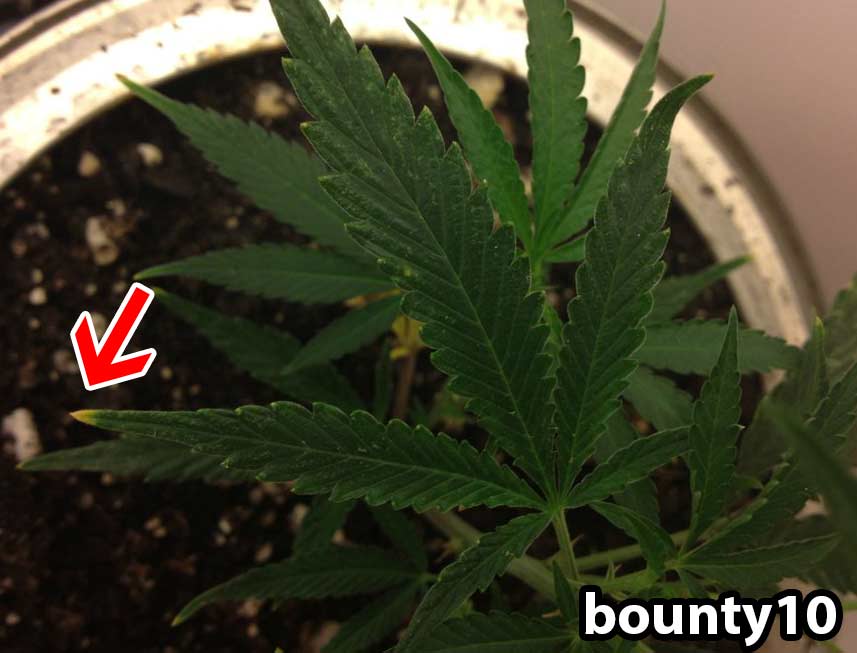
Nutrient burn is most common when feeding cannabis too-high levels of bottled nutrients and especially chemical nutrients (for example - hydroponic setups often use chemical nutrients that are easily available to plant roots because they increase potency and yields, but these nutrients are so accessible to the plant roots that they can cause nutrient burn if the grower adds too much).
Nutrient burn can also happen when plants or seedlings are grown directly in soil that has a high level of nutrients (a "hot" soil or growing medium) such as fresh compost, manure or a nutrient-amended soil mix. This usually happens to young seedlings, and they will "grow out of it" as they begin to use up all the nutrients in the soil, as long as more nutrients are not added.
Problem: You will notice the tips of your leaves showing the first signs of nutrient burn by turning yellow, tan, gold or brown. A light case of nutrient burn will only affect the tips of your leaves.
The yellow tips will eventually turn rusty brown and crispy. If you do not correct the problem, you may also notice the burn slowly spreading from the tips to the whole leaf. At this point, if you haven't done so already, you should immediately treat your plant (directions below) before there's more damage.
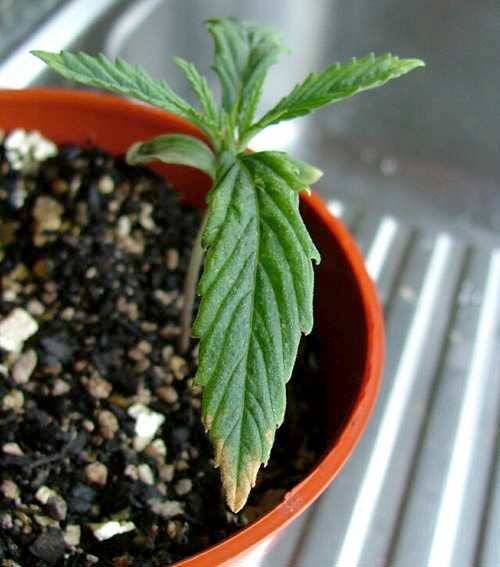
Nutrient burn can also manifest itself as brown or bronze spotting around the edges of the leaf serrations (often when there's an problem with proper absorption of potassium), or with leaf tips curling downwards (tips pointing down is often associated with too much nitrogen).
Nutrient
burn can cause burnt spots on the serrated edges - not
just the tips
(often caused by the plant absorbing too much potassium)
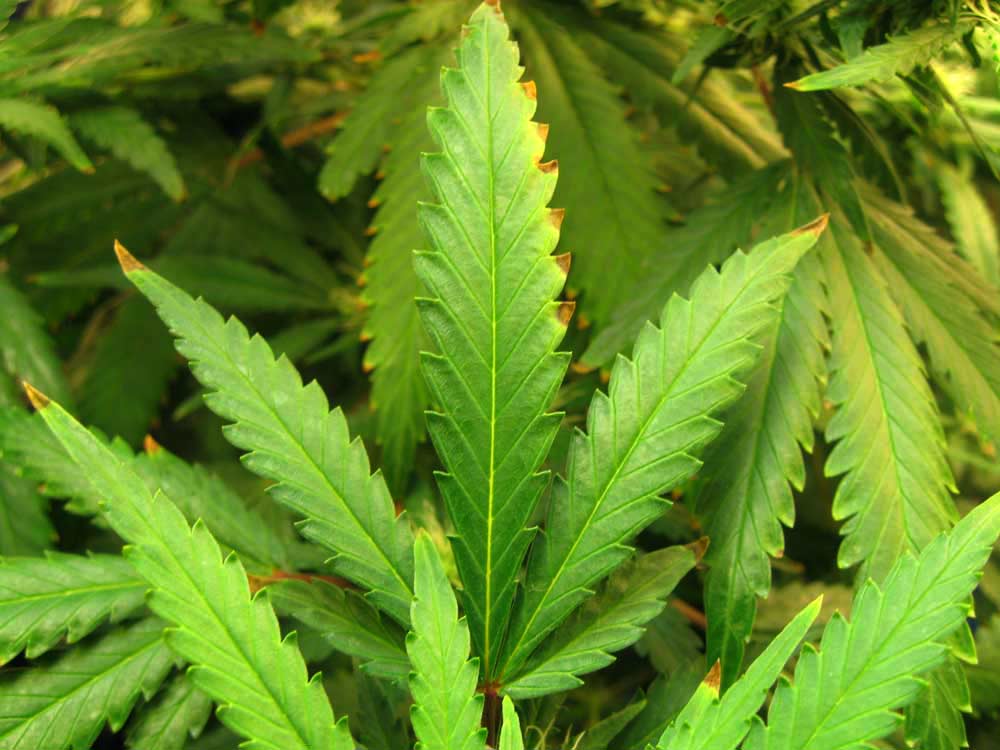
No matter which kind of nute burn you have, the solution remains the same (full instructions below)
Why Growers Should Care About Stopping Nutrient Burn
I have heard some growers say that a little nutrient burn is actually a good thing, because it means that you are giving your plant the highest level of nutrients it can use. A lot of growers have the mistaken idea that nutrients are somehow "food" for your cannabis plants, and so more food = more energy = bigger yields.
This is wrong, instead nutrients are more like a multi-vitamin for your plant. Just like you can't give a child 10 multivitamins a day to make them grow faster, you can't give your plants 10x the regular does of nutrients and exact anything good to happen.
The real "food" for your plant is light. Your plant produces energy from light through a process known as photosynthesis, which is most effective when the plant has healthy green leaves.
Your leaves are like solar panels, and the energy produced by the leaves is used as energy for the whole plant. You need the leaves to be in tip-top shape to get the most energy from the lights, so your plant has plenty of energy to grow and produce buds.
Therefore, the biggest problem with nutrient burn is the fact that you are losing leaf mass and overall leaf robustness on your cannabis plant.
A little nute burn won't slow down your plants much, if at all, but if nute burn is left out of control, you will begin to lose serious leaf mass and it will dramatically slow down plant growth and reduce your overall yields.
What's worse, if excess nutrients are not flushed out of the plant's system before harvest, the buds may contain trace amounts of extra nutrients, giving the buds an unpleasant chemical-like taste. Speaking of the flowering stage... (Wait, what's the flowering stage?)
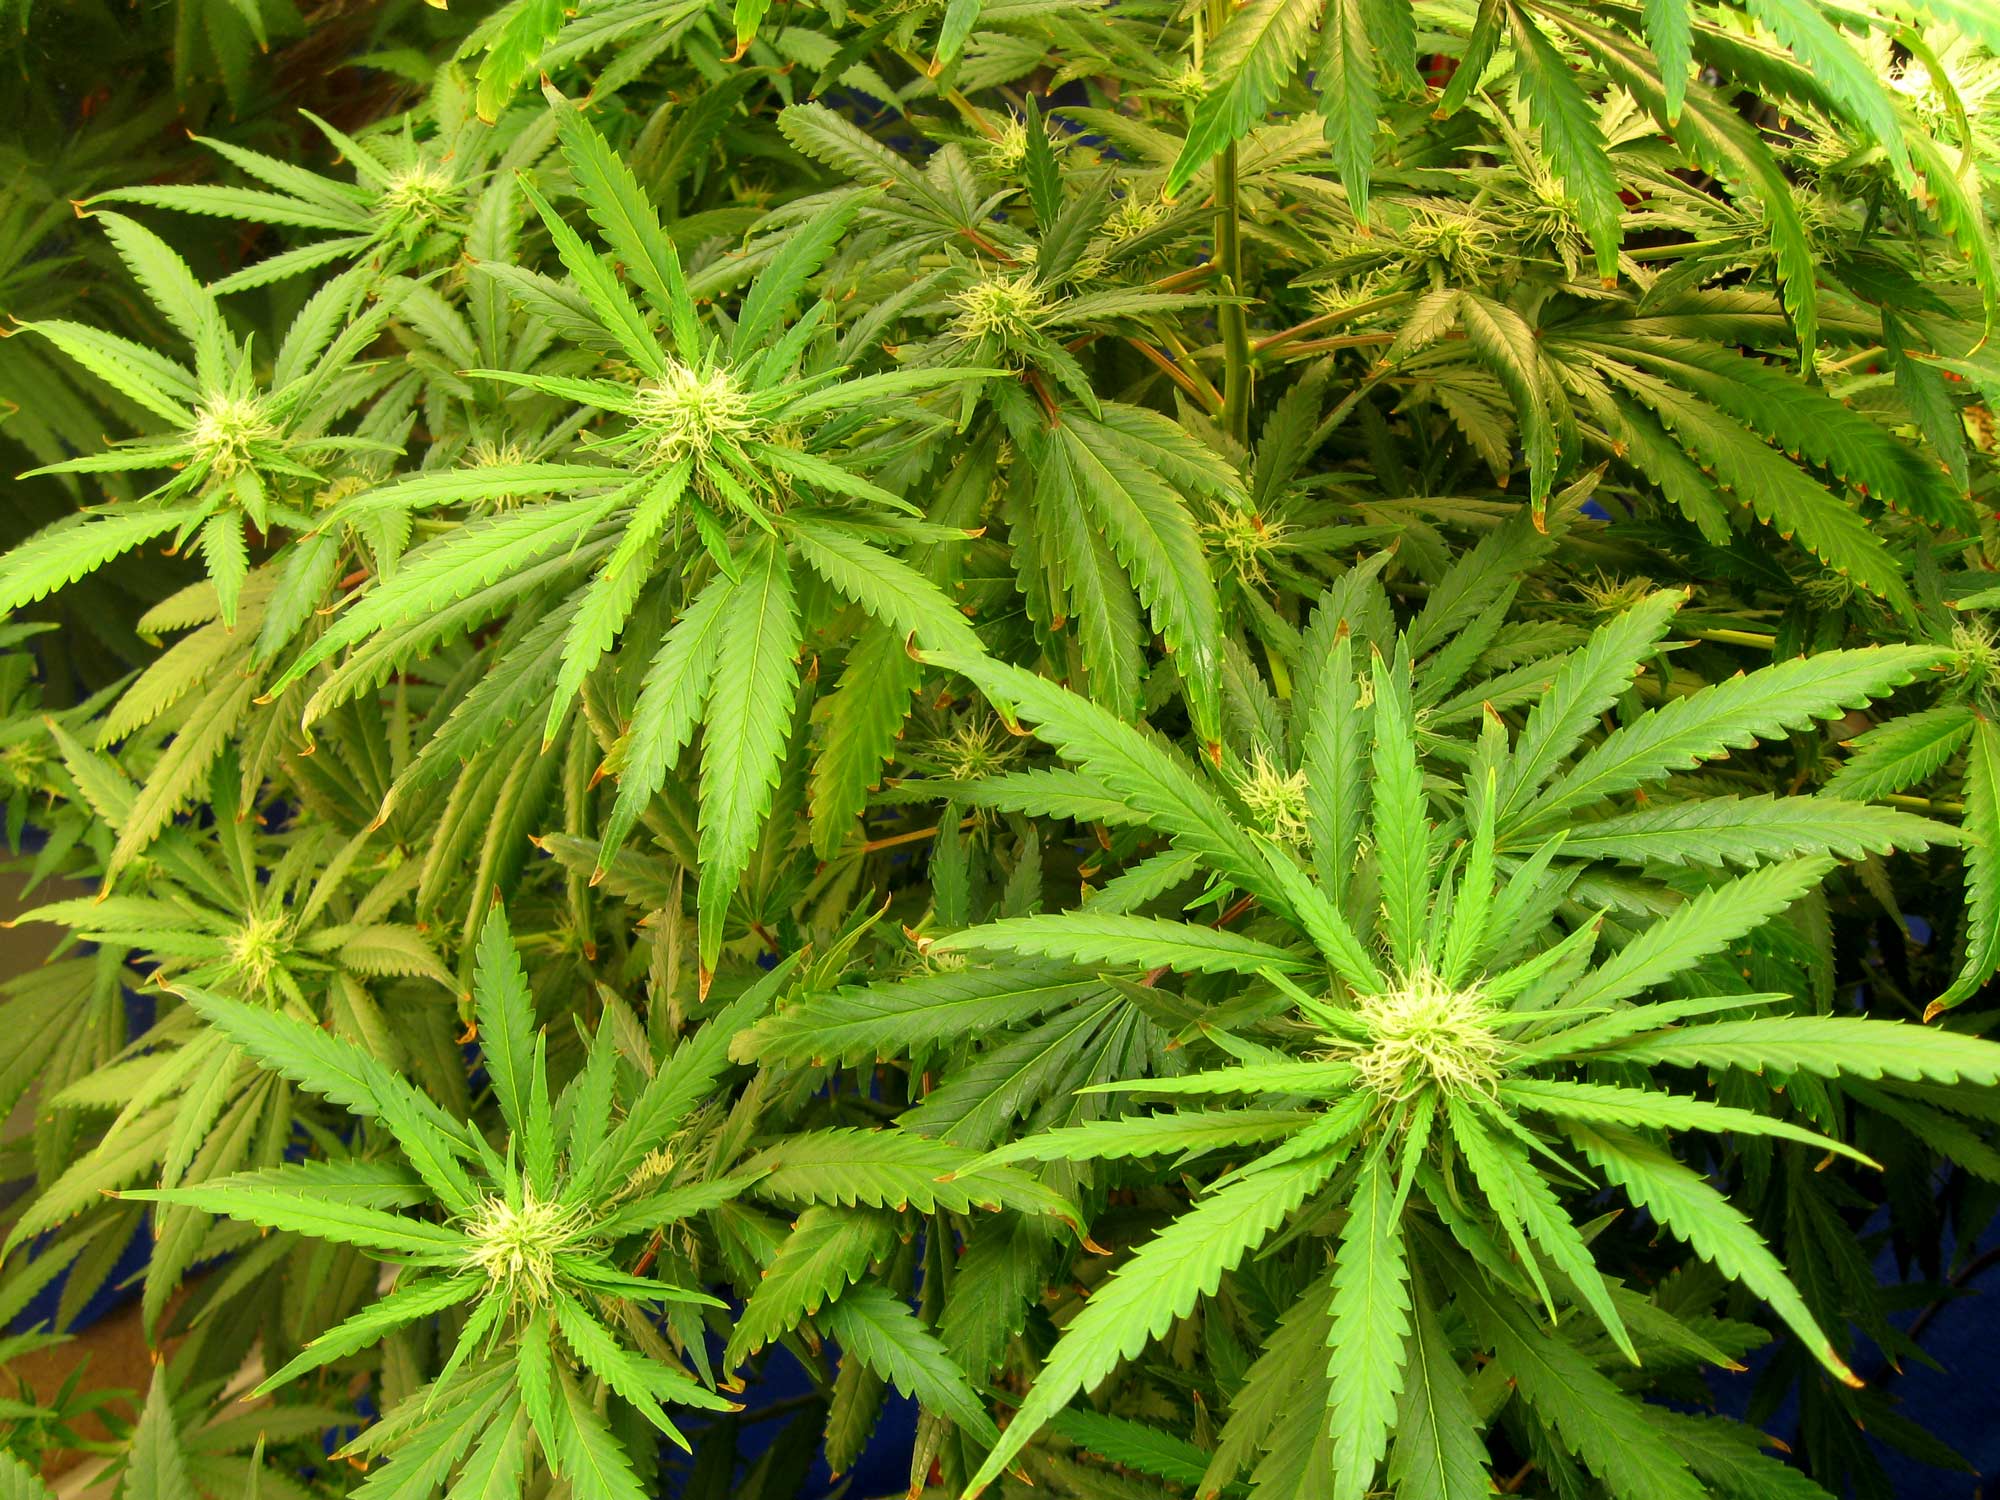
Nutrient Burn is More Serious in the Flowering Stage
Cannabis plants spend the beginning part of their life in the vegetative stage. When cannabis plants enter the second part of their life, the flowering stage, they stop focusing on making leaves and stems, and put all their focus on making buds/flowers.
The flowering stage is the most vulnerable stage for cannabis plants, because they don't have much ability to bounce back from any problems.
The further you get into the flowering stage (and the closer you get the harvest), the less likely the plant will replace a leaf that is damaged or dies. By the time harvest is around the corner, your plant basically stops making any effort to recover from leaf damage, and it's complete focus is on fattening buds.
That's why budding cannabis plants need extra care to thrive - in the flowering stage, a little bit of nutrient burn will probably be okay, but too much nutrient burn can seriously hurt yields because the plant will not be able to recover. If you are adding nutrients to your water, it can be very easy to burn your plants in the flowering stage (even with nutrient levels it was fine with before) as different strains have different needs throughout budding.
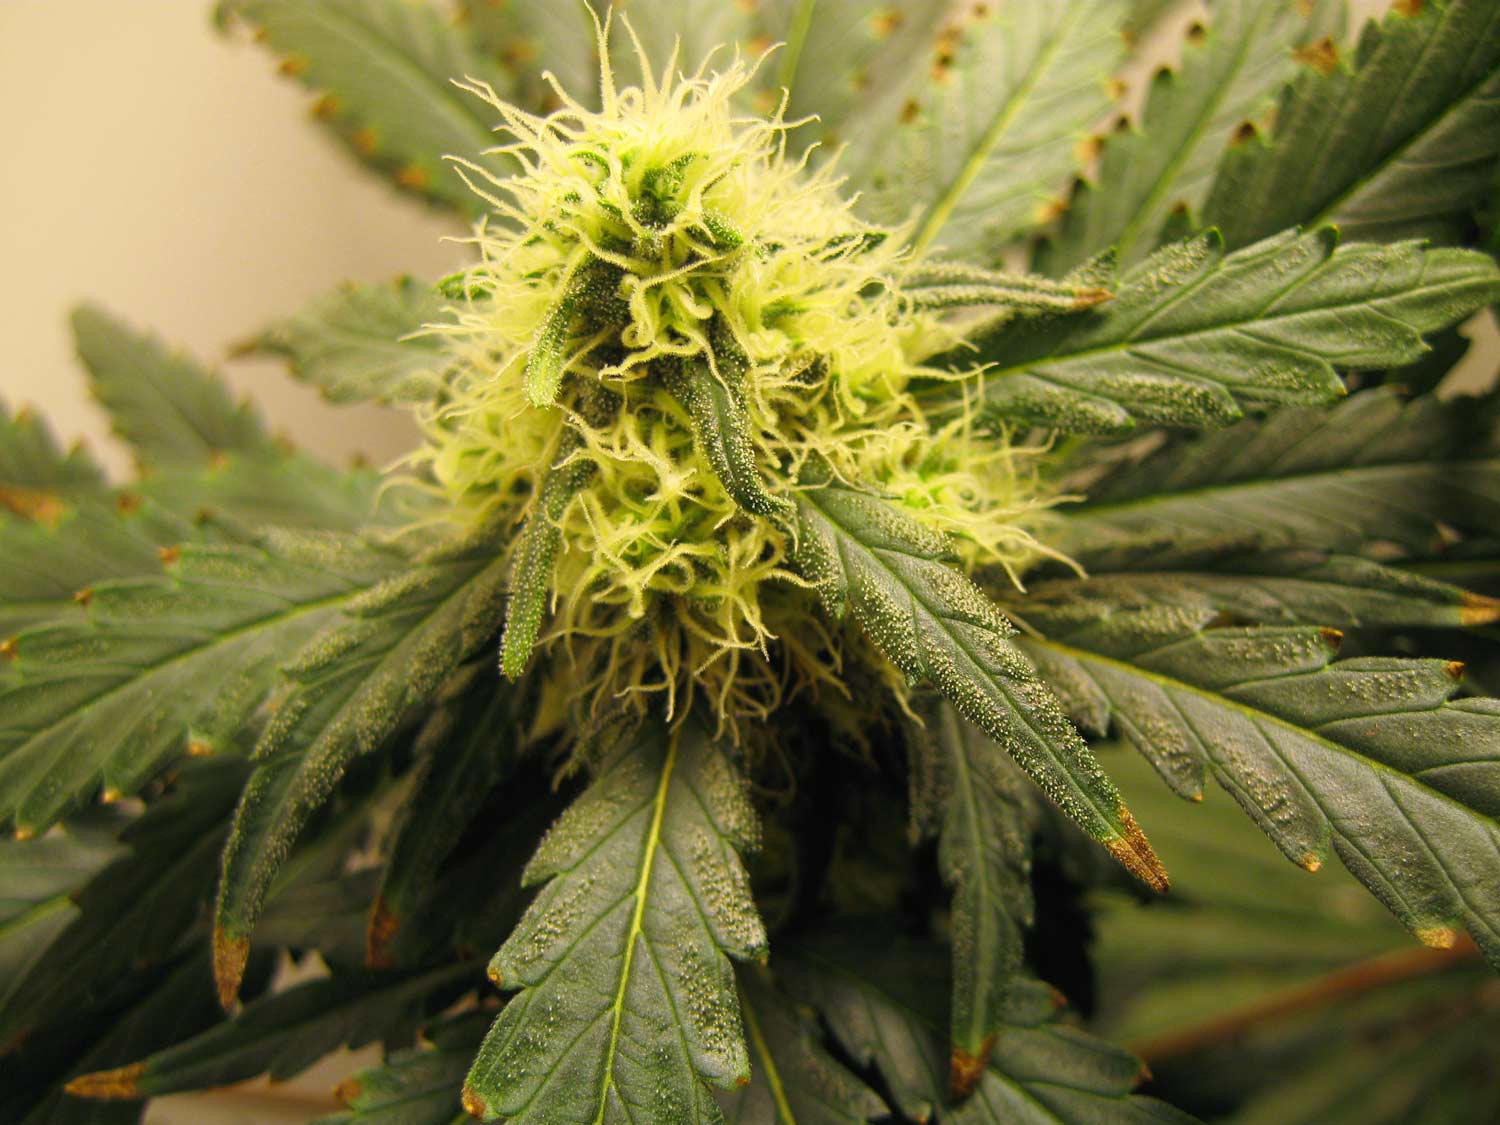
Extreme
Case of Nutrient Burn
(if you give your plants way too much nutrients
at once, this can literally happen overnight)

These plants were planted
in "hot"
Miracle-Gro soil (avoid using Miracle-Gro products for growing
cannabis!), then given high levels of bottled nutrients - resulting in
one of the worst cases of nutrient burn I've ever seen on a cannabis
plant. While the plant itself may eventually recover with time, these
leaves will never recover.

If you are using bottled nutrients - Most people who get nute burn are feeding their plants extra nutrients in the water. First off, make sure you are using a quality set of nutrients that has been specifically designed for cannabis plants. Any nutrient system designed for plants like a tomato will also work in a pinch. Also make sure you are feeding nutrients for the right growth stage - for example, all cannabis nutrient systems have you feed different nutrients for the vegetative and flowering stage. If you are feeding the wrong type of nutrients for the stage your plant is in, that is an easy way to give your plants lots of nutrient problems including nutrient burn.
If you are using the wrong type of nutrients for a plant like cannabis, you will eventually run into nutrient problems, one way or another.
Many nutrient systems come with instructions to feed your plant more nutrients than most plants actually need. It's good business for the nutrient companies if you use more nutrients. However, in my experience it's a good idea to view the feeding charts that come with any nutrient system as the maximum amount of nutrients and actually start with much lower levels. I tend to start with half the recommended amount, and slowly work my way up only if needed.
Hand-watered system - If you are growing in a handwatered system (like in soil or coco coir), flush your system with plain, pH'ed water if you notice the first signs of nutrient burn. (Learn about pH). If you are not adding any extra nutrients in your grow, then you simply need to wait until the plant uses all the excess nutrients in the soil - after the nutes have been used up, the plant will naturally get over the nute burn (old leaves won't recover, but leaves should no longer be getting new brown or burnt tips).
Hydro system - Reduce the overall levels of nutrients in your water reservoir by either adding plain pH'ed water to dilute the water, or you could also mix up a new set of nutrients (at lower levels) and completely change the water.
Be careful not to make big changes too fast, it's better to go relatively slowly in hydro.
In hydro, once you change the water and lower the nutrient levels to an appropriate level, you should immediately notice the nutrient burn stop spreading. Old leaves won't recover, but you shouldn't notice any leaves getting worse.
If you don't have a TDS meter to measure the levels of nutrients (and other extra stuff) in your water, I would normally start your plants with a fraction (perhaps 1/2) of the nutrients you were giving them before - and then work your way up to higher nutrient levels only if you notice the lower leaves are starting to yellow too quickly (nitrogen deficiency). Even then, try to move up nutrient levels as slowly as you can. If you lose leaves to a nitrogen deficiency from slightly too-low nutrient levels, you will lose a few of the least important lower leaves. But if you raise nutrient levels to fast and get nutrient burn, all the leaves on the whole plant will be affected and never recover fully.
One of the things that can be frustrating about hydro is that different plants or strains will be okay with different amounts of nutrients. You can be giving 2 plants the exact same levels of nutrients, and one might get nutrient burn while the other plant is getting a deficiency at the same level. This is because different plants absorb the nutrients at different rates.
Plus, plants drink
more or less water
depending on the temperature and humidity of your grow area, so even if
you're familiar with the nutrient levels of a particular strain, it can
be hard to keep track of the exact right nutrient levels until you get
familiar with your setup, unless...


In hydro, it is very helpful to get a tool called a TDS meter to help you regulate the amount of nutrients in your water. A TDS meter will be able to tell you how much "stuff" is in the water, and whether the levels of nutrients are getting higher or lower each time you check. You can test your reservoir at any time to see if the levels of nutrients are rising, so you'll be able to stop nutrient burn before it even affects your plants.
I use the HM Digital AP-1 TDS meter.
To find out more about using a TDS meter to measure nutrients in your water, check out out article: PPM: What It Is and How To Track It.
Could your cannabis also be suffering from Nitrogen Toxicity? - Nitrogen toxicity is common on cannabis plants with nutrient burn
Are the ends of leaves curling like a claw or pointing down like talons? If your plant is experiencing "the claw" and not just normal drooping like from underwatering or overwatering, then you may have a nitrogen toxicity (too much nitrogen).
These Plants Are NOT Overwaterd, These Leaves Show Signs of Nitrogen Toxicity
Learn
more: Nitrogen
Toxicity
("The Claw", tips bent down, curling / clawing, dark green leaves)
Nitrogen toxicity is relatively common with plants experiencing nutrient burn.
Sometimes Mistaken for Nutrient Burn
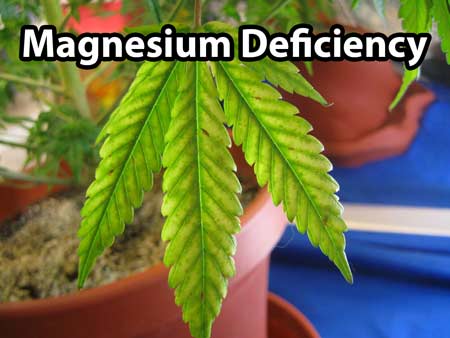


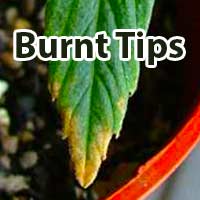
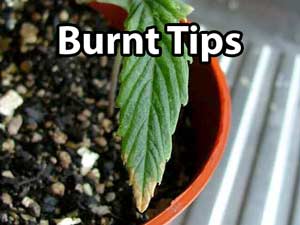
Over watering
by Nebula Haze
Problem: After watering, your plants start drooping. Usually the droopy leaves will feel firm and appear curled down (the whole leaf will be curled, not just the tips, which is often a sign of nitrogen toxicity). With overwatered cannabis plants, you may also notice Chlorosis (Leaf Yellowing).
Overwatering does not always mean you've been giving the plant too much water. It often means you've been giving the plant water too often, or growing plants in a growing medium without enough drainage.
How Often Do I Water My Cannabis Plants?
Plants use their roots to get oxygen. Oxygen is dissolved in water, and there's also air pockets in their grow medium to provide a source of oxygen. When you water your plants too often, its roots are sitting in stagnant water which no longer has any oxygen left. The reason your plants droop is because basically their roots are starving for oxygen.
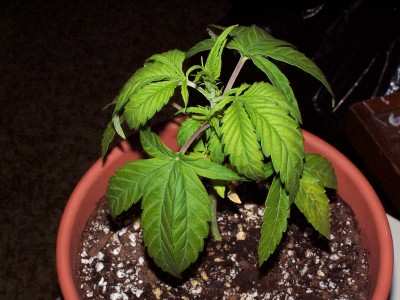


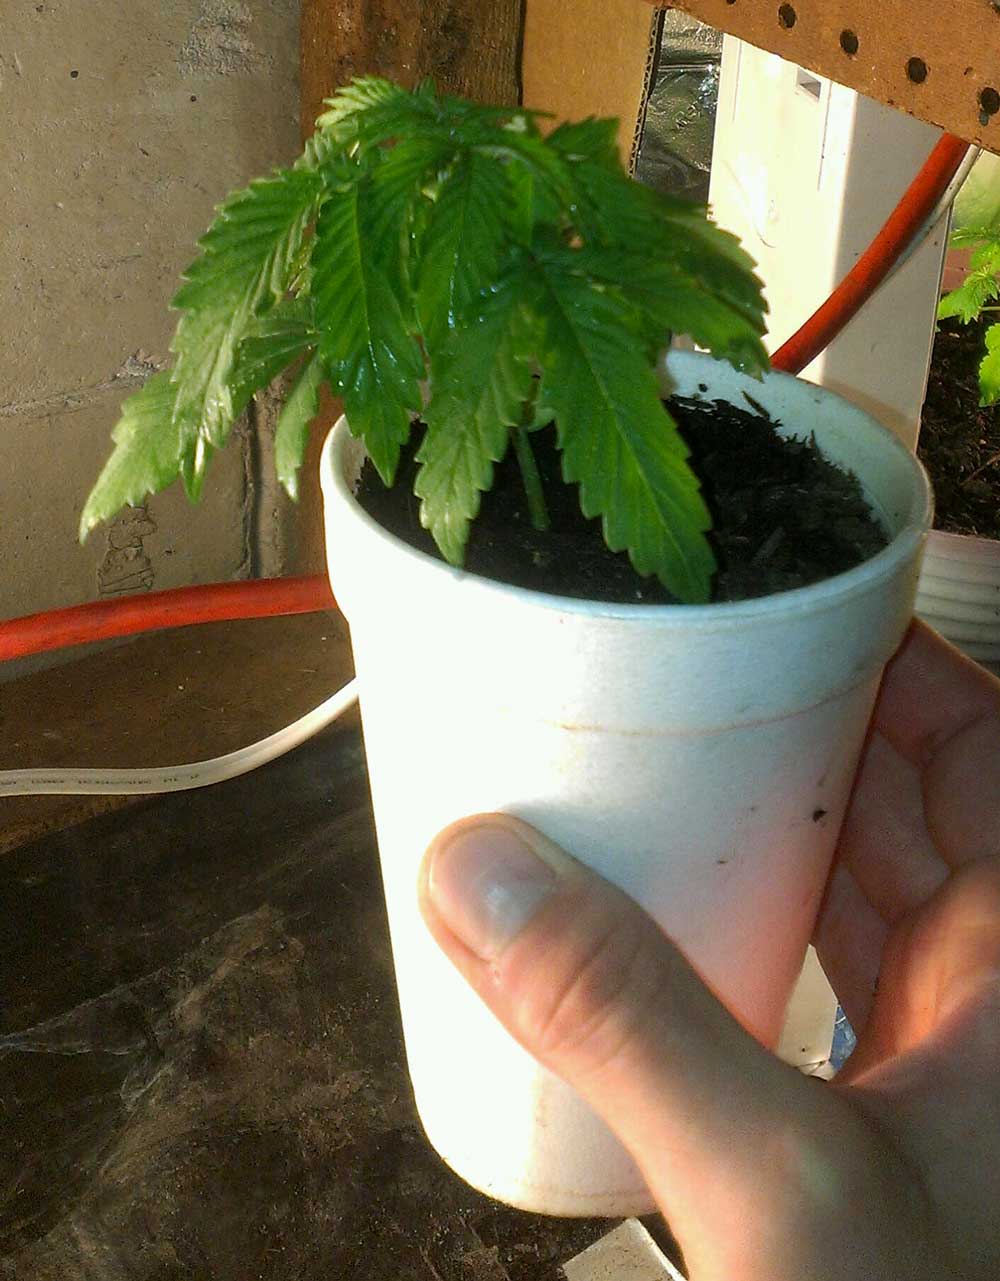
Overwatered Marijuana Plants
-
Drooping / Curling is the first sign of overwaterd marijuana plants
-
Plants start drooping after watering
-
Leaves are firm and curled down all the way from the stem to the leaf
-
Will eventually lead to leaf yellowing and other signs of nutrient problems if not corrected
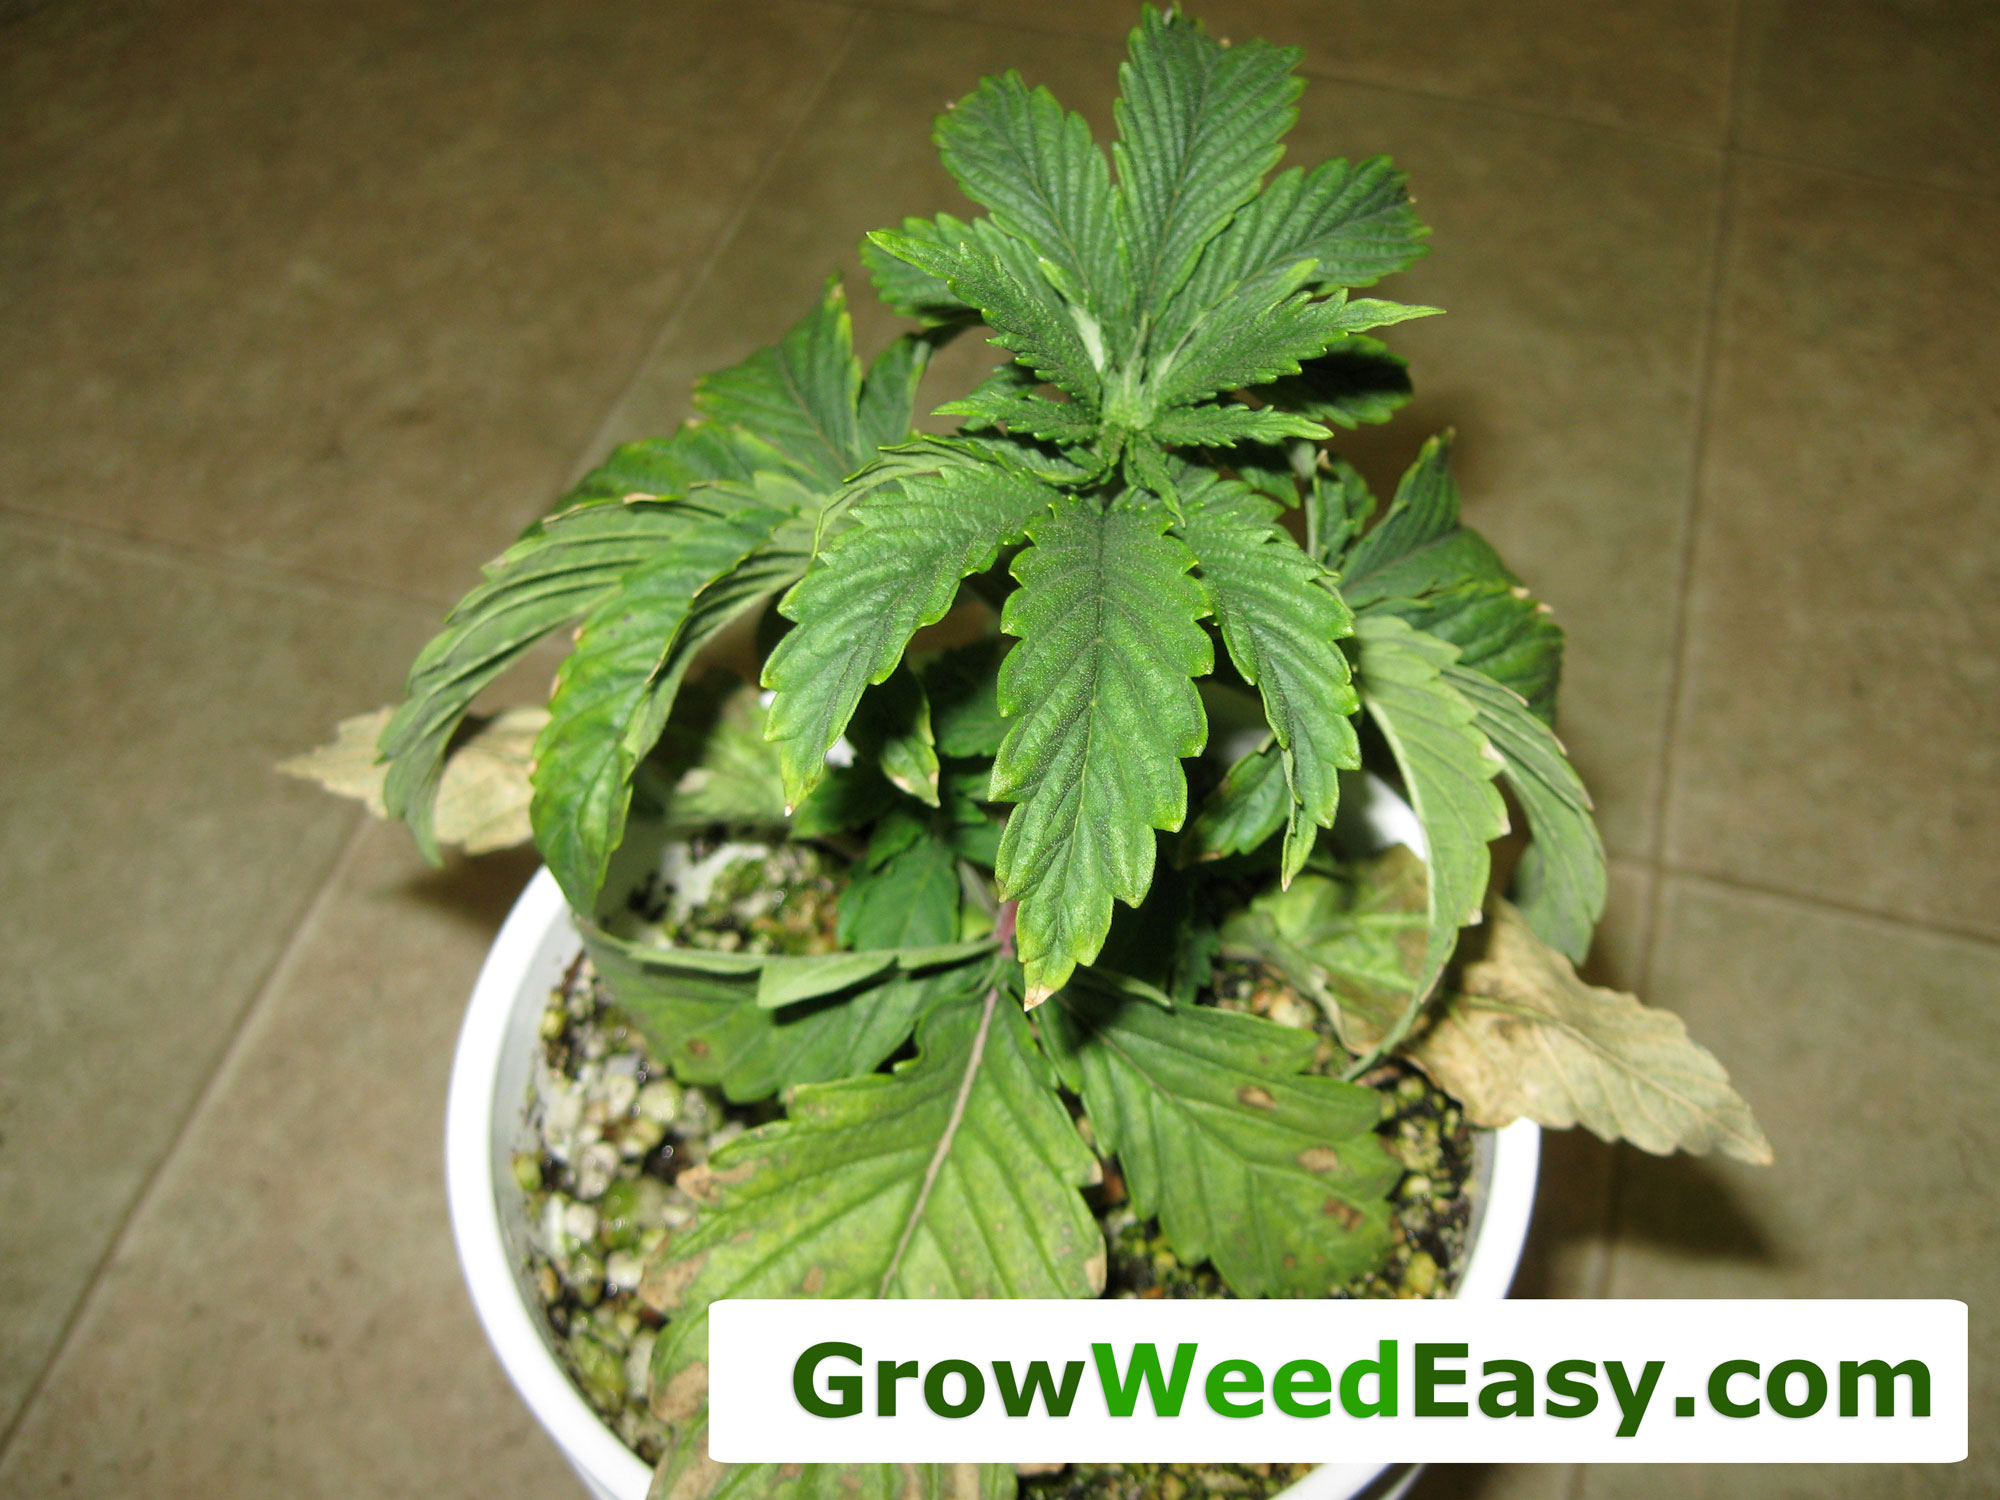
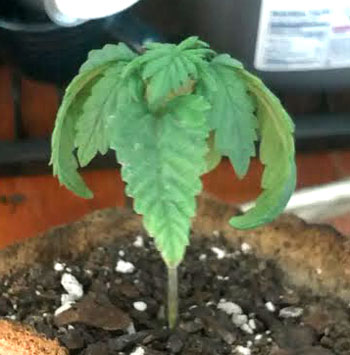
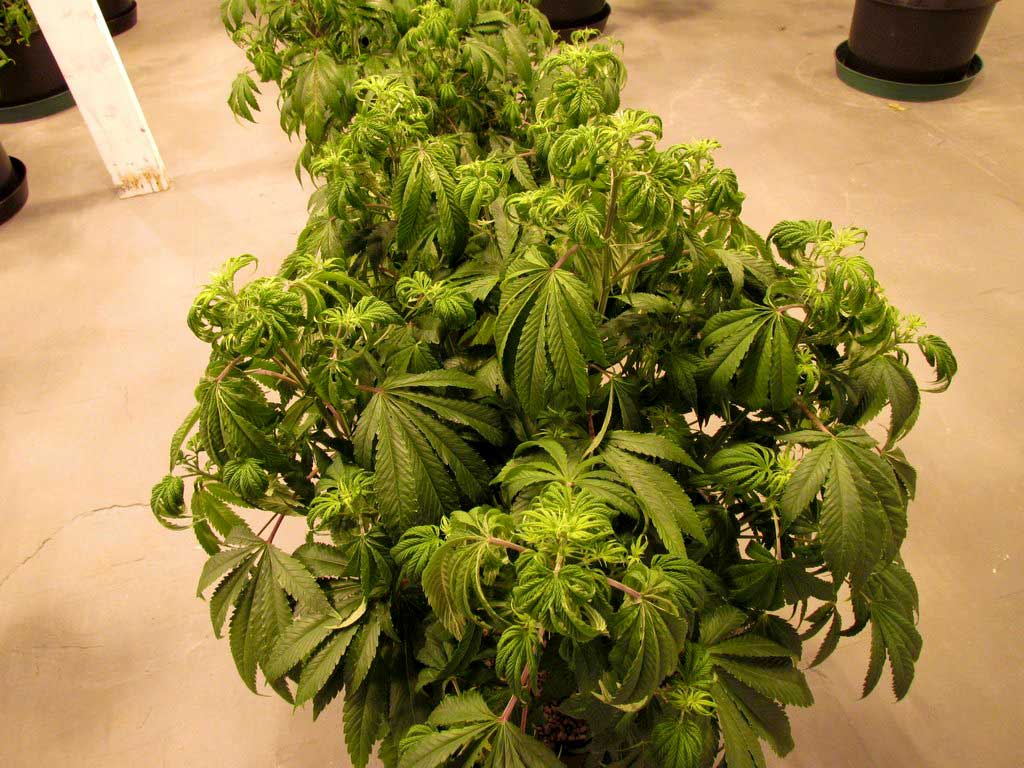
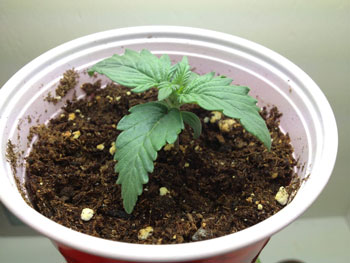
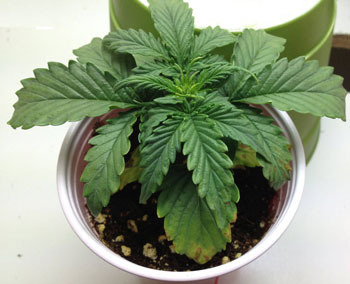
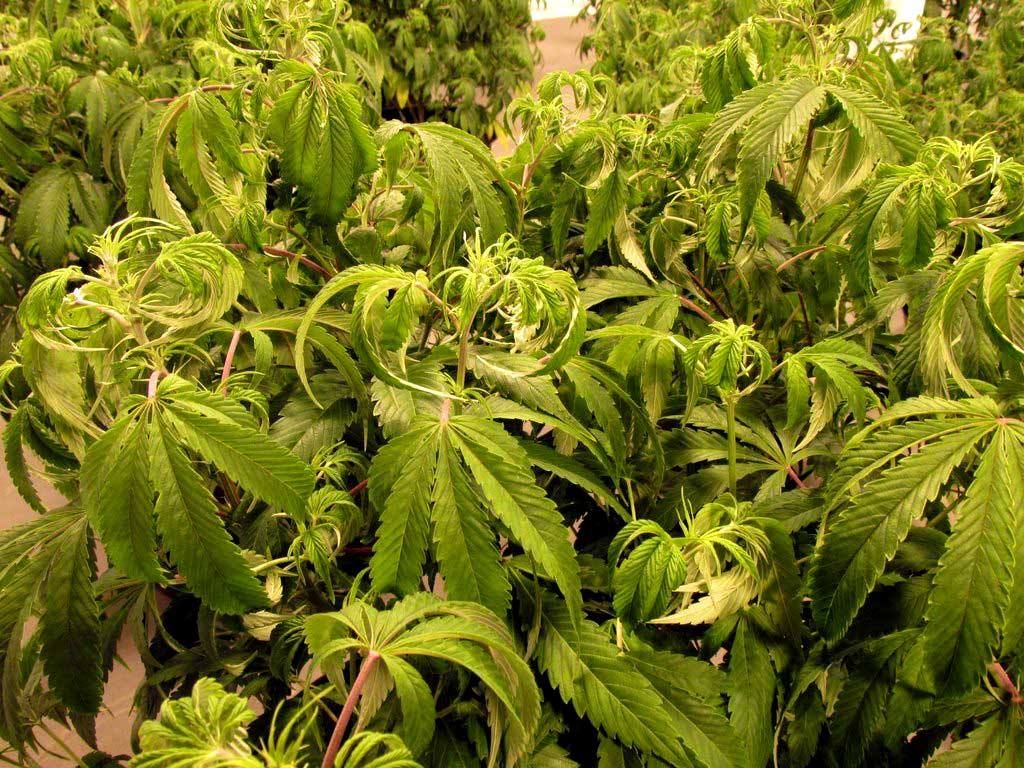
The drooping cannabis plant below did not have drainage holes (water could not drain out the bottom of the pot). After watering the plant which appeared healthy the night before, the grower came back to this drooping plant the next day - this case of overwatering was caused by too much water being held near the roots due to lack of drainage:
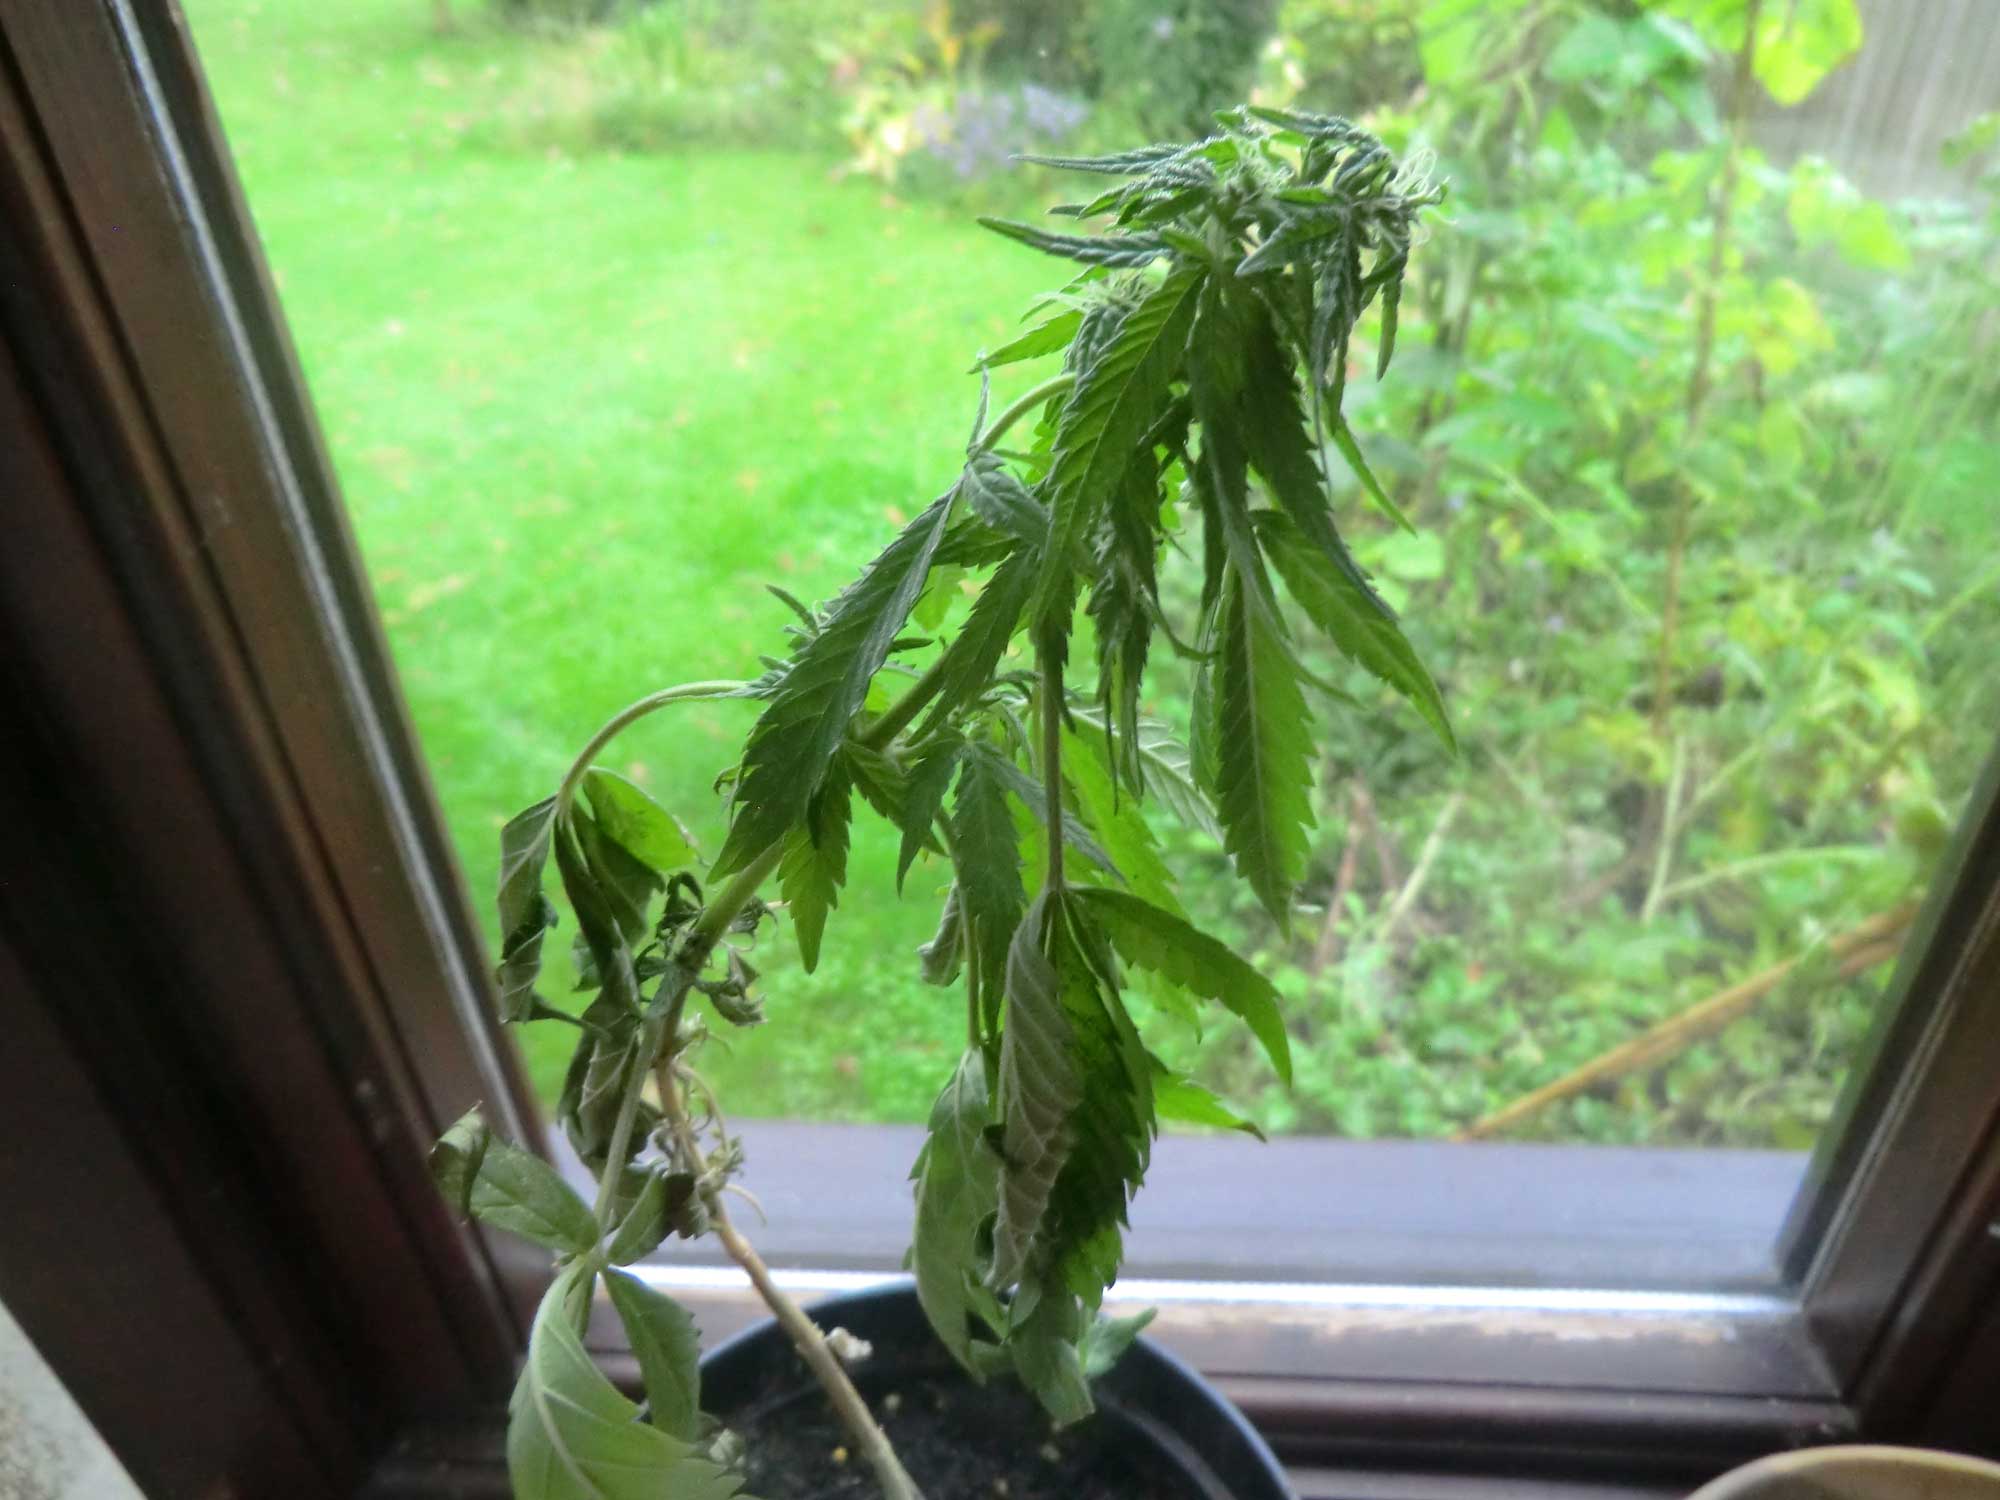
Solution: The best thing you can do for overwatered plants is give them time between waterings, and then start off watering slowly until things seem back to normal. Make sure that water is able to drain easily out the bottom of potted cannabis plants. Be extra careful with small plants in big containers.
How to water cannabis properly
-
Wait until the top of the growing medium is dry about an inch deep (up to your first knuckle).
-
Add water until you see some at least 20% extra runoff water drain out the bottom of your pot. Go back to step 1.
-
If top of growing medium stays wet for a long time, you may need to give your plants less water at a time, or improve your drainage.
Learn how to water your marijuana plants perfectly every time
Some growers also use the "lift the pot" method to decide when to water your plants (basically wait until your pot feels "light" since the plants have used up all the water). It's up to you to decide what's easier for you.
If your plant medium seems to stay wet for a long time (more than 5 days or so), you may need better drainage. This also can happen when growers put tiny plants in a pot that's way too big.
Make sure that water drains freely from the bottom of your container (it's recommended that you provide enough water to get at least 20% extra runoff every time you water your plants).
You should see water coming out the bottom within a minute or two after watering. Then don't water your plants again until the soil is dry up to your first knuckle.
If your plants are already overwatered, you can try to increase the temperature and airflow to help the water evaporate more quickly. You can also use a pencil to gently poke some air holes into the growing medium to provide extra aeration and oxygen to the roots.
For other growing mediums besides soil, your watering method will vary, but if your plants are drooping and you've been feeding them a lot of water, it's a good idea to cut back and see if that helps.
If you're growing hydroponically with your marijuana roots directly in water and you see the signs of overwatering, that means you have a problem at your roots. Either your plants have root rot which is preventing them from getting oxygen at their roots, or you are not dissolving enough oxygen into the water (you can easily increase the dissolved oxygen in your water with a quality air pump and a few air stones).
Need more help?
If your plant is experiencing "the claw" and not just normal drooping (the ends of leaves are curling like a claw or pointing down like talons), then you may actually have a nitrogen toxicity (too much nitrogen).
These Plants Are NOT Overwaterd,
These Leaves Show Signs of "The Claw" which usually indicates
a Nitrogen Toxicity
("The Claw", tips bent down, curling / clawing, dark green leaves)

Jump to...
Cannabis plant problems by picture
7 Steps to Cure 99% of Cannabis Growing Problems
Am I under-watering my cannabis?
Prevent nutrient problems by managing pH
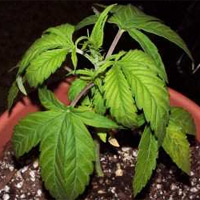
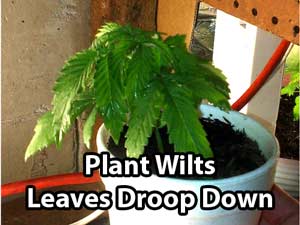
Pests, Bugs & Viruses
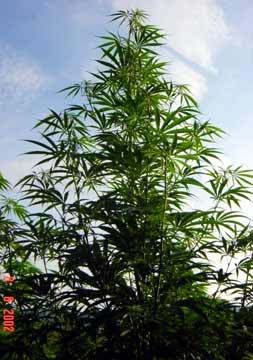
Unfortunately, bugs or pests can totally mess up your marijuana harvest.
Some bugs live in soil, while other pests are airborne. Mold can be a big problem too. But you don't have to sit back and take it.
This page aims to be a comprehensive resource on the different types of bugs / pests / mold that can affect your marijuana crop, along with tips for preventing and solving each problem.
Pests that can affect your marijuana plants include aphids, spider mites, ants, whiteflies, white powdery mildew / white powdery mold, stem rot, and even mammals such as gophers and rats.
Jump to...
- Aphids
- Spider mites
- White Powdery Mold
- Fungus Gnats
- Whiteflies/ White fly
- Thrips
- Root Rot
- Grey Mold / Bud Rot
- Damping off (young seedlings dying)
- Slugs / Snails
- Tobacco Mosaic Virus
It's time to fight back against bugs, mold and pests!
If you have anything that you would like added, please contact me!
Most pests can be erradicated with SM-90.
Mist your plants in a solution made of 1 part SM-90, 5 parts water.
When you spray the plants, make sure you get the undersides of the leaves.
You'll want to do this when the lights are about to go off(or else the leaves will get burned). You can get a sprayer like this one on amazon.com, or at Home Depot for about $12.
Diseases of Cannabis are caused by organisms or abiotic sources.
Organisms include fungi (first and foremost), nematodes, parasitic plants, bacteria, and viruses.
Abiotic (non-living) causes include nutrient deficiencies, pollutants and genetic diseases. Different diseases prevail in different crops (e.g., drug cultivars versus fiber cultivars). Disease prevalence is also modulated by geography and climate.
The claim that Cannabis has no diseases is not correct, Cannabis suffers over 100 diseases, but less than a dozen are serious.
Serious diseases include gray mold, hemp canker, damping off, assorted leaf spots, blights, stem cankers, root rots, nematode diseases, broomrape, macro- and micronutrient deficiencies, and genetic diseases.
Environmentally stressed plants become predisposed
to diseases.
Stress includes drought, insufficient light, untoward temperatures, or
growing plants in monoculture.
(McPartland, J. M., 1996. A review of Cannabis diseases.
Journal of the International Hemp Association 3(1): 19-23.)
That quote was taken from a great page on Cannabis diseases <http://www.hempfood.com/IHA/iha03111.html> that everyone should read.
Aphids
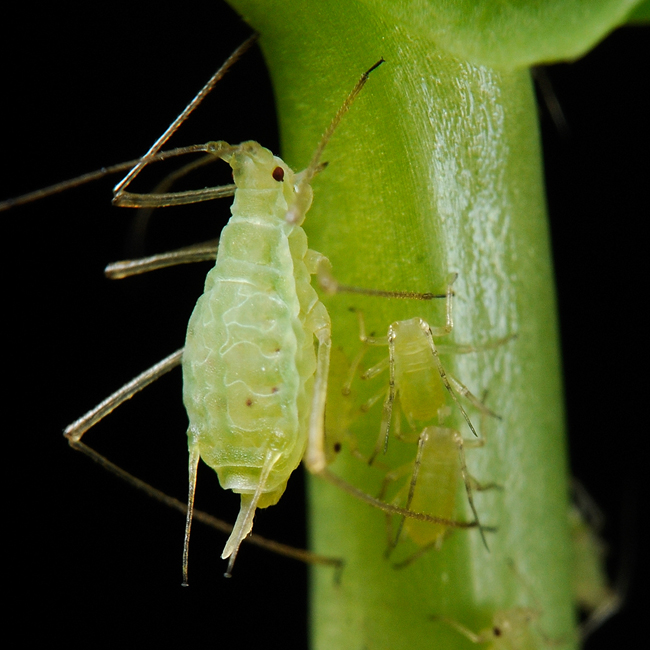 Aphids
are soft-bodied insects which can be green, yellow, black, brown or red.
Aphids
are soft-bodied insects which can be green, yellow, black, brown or red.
They are usually small and oval-shaped, and may have dicernable wings or antennae.
Aphids use their piercing, sucking mouth-parts to feed on the sap of plants and usually occur in colonies located on the undersides of stems or leaves.
If a plant becomes heavily-infested, its leaves can turn yellor or wilt due to the excessive sap removal.
Aphids produce large amounts of a substance known as "hondeydew," a sugary liquid waste.
Honeydew drops from these insects and can causes spots on the windows and finish of cars which are parked under infested plants.
A fungus called sooty mold can grow on honeydew deposits which accumulate on the leaves and branches of your plant, turning them black. Many times, an aphid infestation is only noticed after the first appearance of sooty mold.
The drops of sweet honeydew can also attract other insects such as ants.
An infestations is generally the result of a small numbers of winged aphids that fly to the plant and take it up as their new host.
Winged aphids deposit several wingless young on the tender undersides of leaves/steams before moving on to find a new plant.
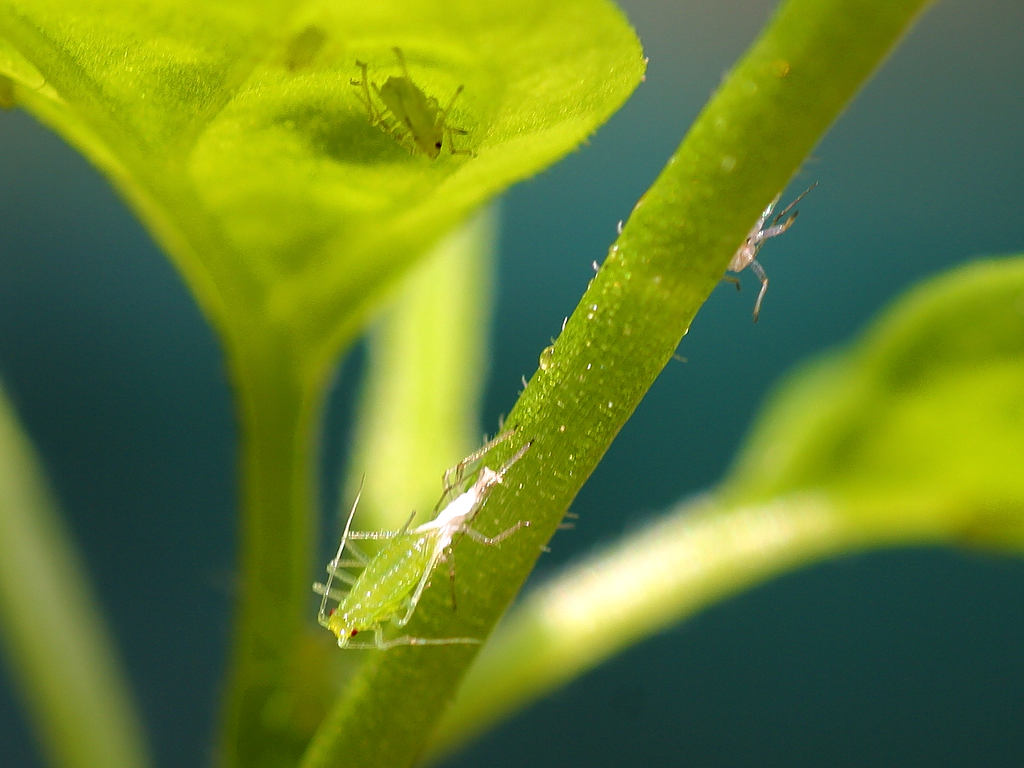 Immature
aphids, or nymphs, that are left behind, feed on plant sap and increase
gradually in size.
Immature
aphids, or nymphs, that are left behind, feed on plant sap and increase
gradually in size.
They mature in 7 to 10 days and then are ready to produce live young. Usually, all of them are females and each is capable of producing 40 to 60 offspring.
The process is repeated several times, resulting in a tremendous population explosions. Less than a dozen aphid "colonizers" can produce hundreds to thousands of aphids on a plant in a few weeks.
Aphid numbers can build until conditions are so crowded, or the plant is so stressed, that winged forms are produced. These winged forms fly off in search of new hosts and the process is repeated.
Solution: Early detection is the key to reducing aphid infestations.
The flight of winged colonizers cannot be predicted, so weekly examination of plants will help to determine the need for control.
Examine the bud area and undersides of the new leaves for clusters or colonies of small aphids. The presence of these colonies indicates that the aphids are established on the plants and their numbers will begin to increase rapidly.
Fatty acid salts or insecticidal soaps are very good against aphids. They apparently work to disrupt insect cell membranes. They require direct contact with the insects and leave no residual effect.
Nervous system insecticides, such as malathion, Dursban (chlorpyrifos), and Orthene (acephate), are labeled for use on many shade trees and ornamental plants for aphid control.
As with soaps, coverage is very important and a follow-up application may be necessary. Sevin (carbaryl) is not effective against many aphids so it is generally not a good choice for control unless recommended specifically.
In fact, applications of Sevin may reduce the number of beneficial insects, such as lady beetles, and increase the potential for aphid outbreaks.
Beneficial insects, such as lady beetles, lady bugs, and lacewings may eat large numbers of aphids but the reproductive capability of aphids is so great that the impact of the natural enemies may not be enough keep these insects at or below acceptable levels.
To keep aphids and other pests off your plants just finely chop1 onion and 2 medium cloves of garlic. Put ingredients into a blender with 2 cups of water and blend on high. Strain out pulp.
Pour liquid into spray bottle. Spray a fine mist on plants, making sure to coat both tops and bottoms of leaves.
Spider Mites
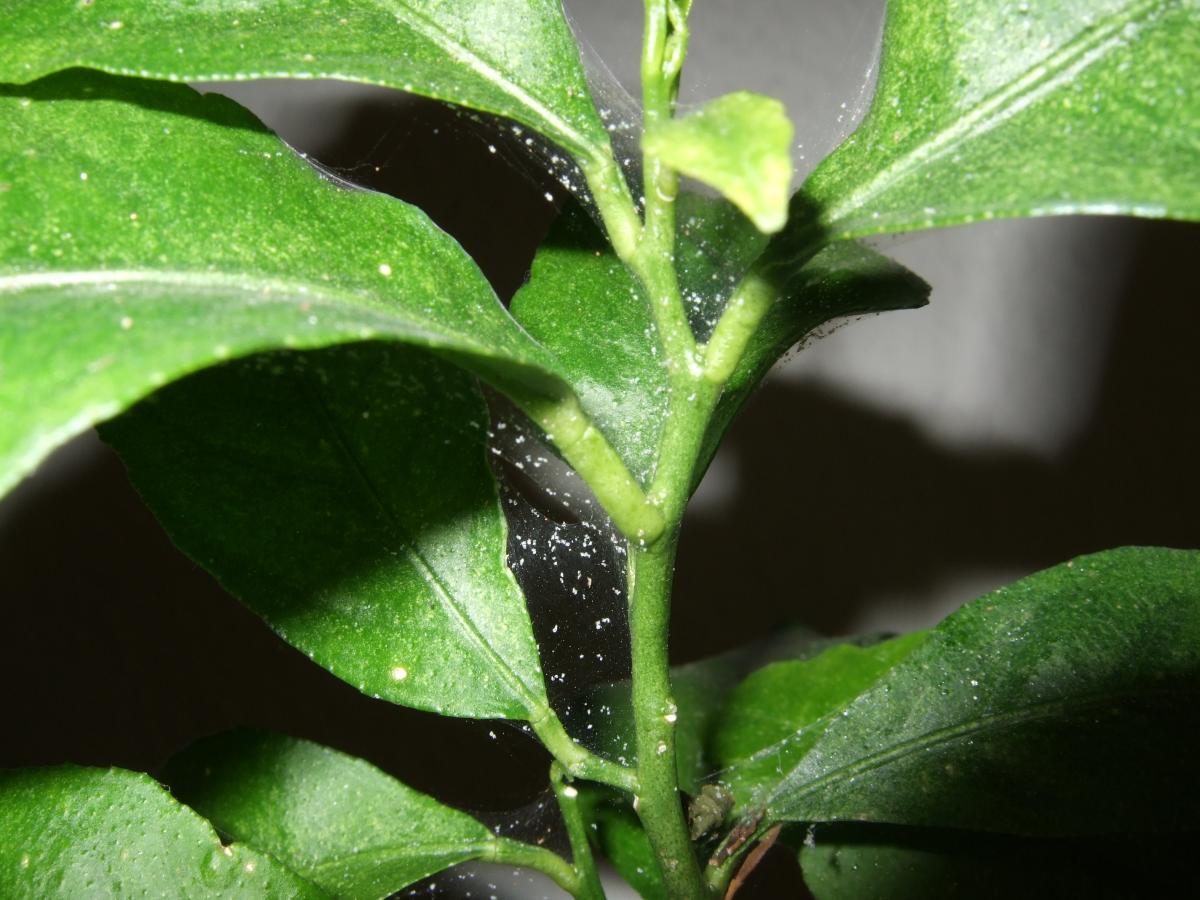 Spider
mites (also called spidermites) are not insects but are more closely
related to spiders.
Spider
mites (also called spidermites) are not insects but are more closely
related to spiders.
Read complete tutorial here:
http://www.growweedeasy.com/how-to-get-rid-of-spider-mites
These arachnids have four pairs of legs, no antennae and a single, oval body region.
Most spider mites have the ability to produce a fine silk webbing. Spider mites are very tiny, being less than 1/50 inch (0.4mm) long when adults.
Spider mites have tiny mouthparts modified for piercing individual plant cells and removing the contents. This results in tiny yellow or white speckles.
When many of these feeding spots occur near each other, the foliage takes on a yellow or bronzed cast. Once the foliage of a plant becomes bronzed, it often drops prematurely.
Heavily infested plants may be discolored, stunted or even killed.
Web producing spider mites may coat the foliage with the fine silk which collects dust and looks dirty. Spider mite species seem to be warm weather or cool weather active pests.
The two spotted, European red, honeylocust, and oak spider mites do best in dry, hot summer weather. The spruce and southern red spider mites do best in cool spring and fall weather.
All spider mites go through the same stages of development. Adult females usually lay eggs on their host plants.
The eggs hatch in days to weeks into the first stage, called a larva. Larvae are round bodied and have only three pairs of legs. The larvae feed for a few days, seek a sheltered spot to rest and then molt into the first nymphal stage. The first nymph now has four pairs of legs.
The first nymphs feed a few days, rest and molt into the second nymph. The second nymphs feed, rest and molt into the adult stage.
The males are usually the size of the second nymph and have pointed abdomens. The females have rounded abdomens and are the largest mites present. Most spider mites spend the winter in the egg stage but the twospotted spider mite over winters as adult females resting in protected places.
This cannabis leaf shows the first signs of a spider mite infestation: dozens of tiny yellow spots.
Solution: Early detection of spider mites, before damage is noticed, is VERY important.
The tiny spider mites can be detected only by a full and thorough leaf inspection (on both sides of the leaf). If you find Spider Mites you must act fast and hit them hard.
The thing about spider mites is they are very quick to take over your plant, and even quicker to evolve and adapt to whatever methods you are using to try to kill them. They will soon develop resistance to almost any method you use to get rid of them.
If you have problems with spider mites, keep a constant and varied offence for the best chance at success.
If you already have an infestation, start hitting them hard with something that will kill them on contact.
Follow up in 2-3 days with something different that kills their eggs as well as a different method to kill the remaining adults (these ones will already be more resistant to your original method).
Repeat those two step at least one more time to ensure that you have really cleaned out your grow room.
How To Get Rid of Spider Mites - Step-By-Step
Or Read the Quick Version Below
Shake the plant, then kill the spider mites with something that kills them on contact, like:
-
Azamax is a time-tested way to rid your grow room of spider mites - Spray plants 15 minutes before lights out, making sure to drench the foliage under the leaves as well as the top of your soil. Use a fan to blow on your leaves to help things dry. Treat your room more than once, even if you believe the spidermites are gone. You can also add small amounts of Azamax when watering your plants, as it will not hurt your roots but will kill spider mites in the soil.
-
Mighty Wash - use in a similar way to Azamax
-
Spinosad Products (safe & organic) - Spinosad products are organic and unlike many other spider mite pesticides, completely harmless to pets, children, and plants. Unlike many insecticides, you can spray spinosad heavily on leaves and roots with basically no negative effects.
-
Doktor Doom Spider Mite Knockout Spray - This spray is hard on spider mites, but the main ingredient Pyrethrum can also be hard on plants (espcially in tight spaces without much ventilation) so use as a last resort if possible. Use with extreme care around humans as the ingredients can be toxic.
-
NoPest Strips - these emit a vapor that kills spider mites, do NOT use if you will be breathing air from your grow room. Only get these if there will be no mammals breathing in the grow room while they're being used.
-
Floramite - Strong stuff with harsh chemicals, incredibly expensive, but it often does the job when everything else fails. Use as directed and only as a last resort!
-
Bleach solution (1 tablespoon of bleach to 1 gallon of 95°F, pH balanced, water in a spray bottle) - make sure to clean all surfaces of your room, and bleach them too if possible.
-
Alcohol and Water mixed togther will also kill the bugs on contact and shouldn't hurt the plant as long as the solution contains at least 30% water.
-
SM-90 mixed with water (1 part SM-90 to 5 parts water) kills spider mites on contact and is organic (it even smells good!)
-
Neem Oil works in a similar way to SM-90, though Neem oil doesn't smell as nice and will leave an unpleasant taste/smell on buds when used to treat flowering plants. There's some evidence Neem oil may be harmful to humans so use with care!
-
Homemade Pepper Spray (or buy Hot Pepper Wax Spray) - make at home by mixing 9 parts water, 1 part additive-free dishwashing soap, and one tablespoon of cayanne pepper. This treatment is very effective against some types of spider mites, but is ineffective against other types.
-
Nicotine tea - hit or miss like pepper spray, but can be very effective against certain types of spider mite. Take 15 gram of organic tobacco and steep it in hot water overnight to make nicotine tea. You can also add a little bit of Safer Soap. Use like any other spider mite spray.
-
Insect predators - there are also insect predators such as lady bugs that can provide some control and reduce your spider mite numbers, but it is unlikely these will get rid of your spider mites on their own. Insect predators can be effective if you have a small problem or if you need to get to harvest and chemical sprays are not a good option.
-
Dichotomous earth - Basically, this is fossil dust - sprinkle on the top of your soil, and anywhere else in your room (window sills, doorways, etc). This powder-like substance is harmless to mammals and plants, but is incredibly sharp at the microscopic level. Therefore it will tear and dehydrate spider mites on physical contact. This will not get rid of an infestation, but can help control and slow things down when used effectively.
-
Treat Entire Grow Area With Insecticide - Treat complete room with broad spectrum insecticide (only do this for a really bad problem, or one that keeps coming back) - avoid this if you can!
Note: Many growers to avoid chemical sprays or miticides which contain Abamectin or lindane because these are harmful to humans. Please take a look at anything you use to treat your grow room, follow the directions closely, and heed all warnings. Some treatments will work for some setups or types of mites, but not for others. As mentioned earlier, if you got your spider mites from another marijuana grower, chances are you will need to resort to extreme measures to get rid of your infestation.
Follow up in 2-3 days with a different method to kill them (you should also re-apply your first method)
Follow up in 2-3 days with something different that kills their eggs as well as a different method to kill the remaining adults (these ones will already be more resistant to your original method).
Repeat! Treat your grow area at least once after you think spider mites are completely gone
Spider Mite Prevention - The Clean Grow Room
Now it's all about prevention.
If you've had spider mites in the past, chances are you are unintentionally doing something to encourage or attract them.
There are many preventative products such as sprays or neem oil, which make plants less tasty to annoying spidermites. However, these should only be used to supplement good practices.
The most important aspect of spider mite (or any marijuana pest) prevention is a CLEAN GROW ROOM.
- Never move other plants from the outside world into your grow room - this is the most common way people get spider mites. If you get a clone or plant, keep that plant away from your other plants in quarantine for at least a couple weeks to ensure it has no bugs. Get a handheld microscope and use it to look for bugs on new plants, too.
- No old dead leaves in your grow room at any time - you must collect old leaves regularly and completely remove them from your growing space. It doesn't count if you put them in a neat pile or trash can in the corner, you need to keep dead plant matter out of your grow room
- Make sure that you or anyone who comes into your contact space is clean (don't ever walk into your grow room directly from outside)
- No dogs, cats, rabbits or any other pets in your grow space
White Powdery Mold / White Powdery Mildew
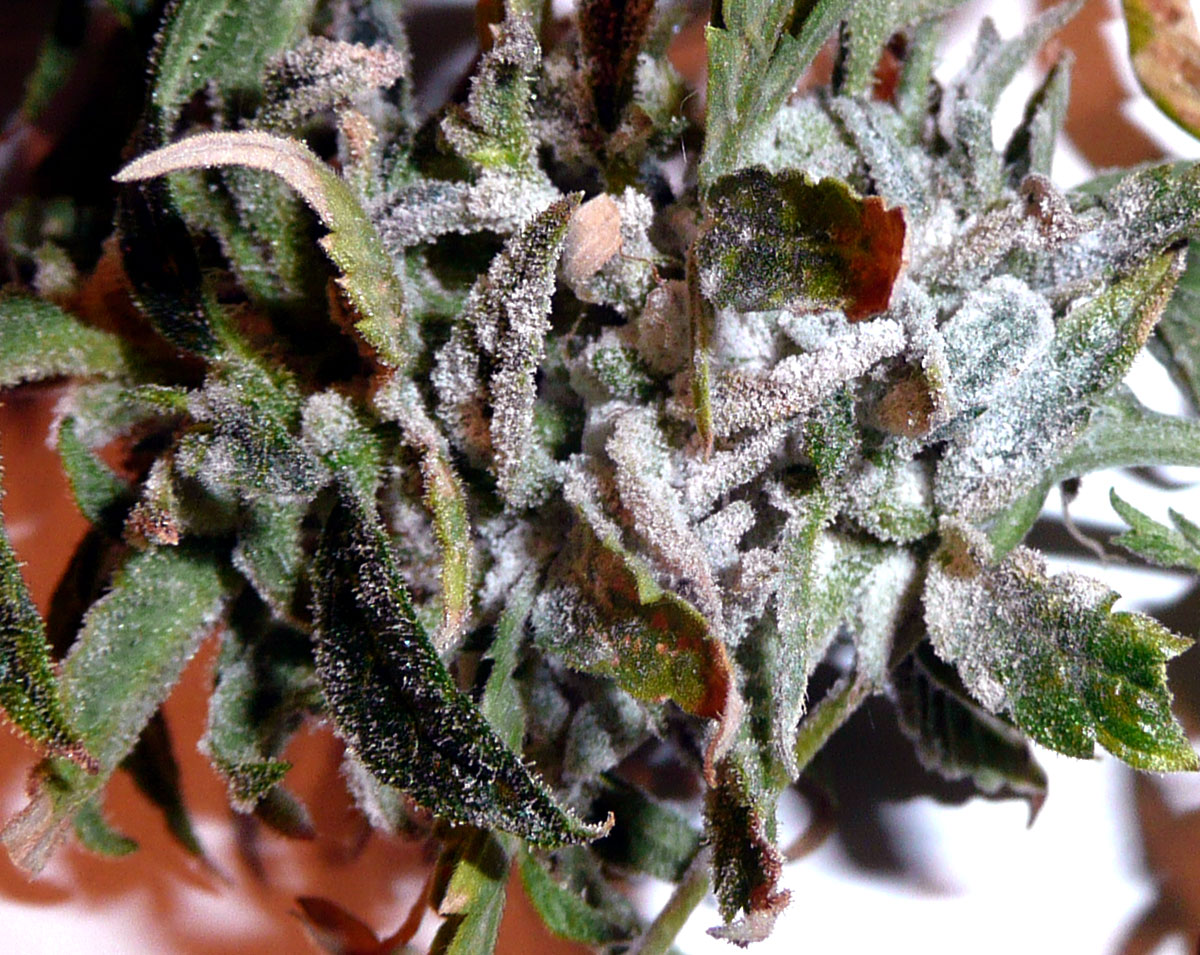
Read complete tutorial on getting rid of WPM
What causes white powdery mold?
-
White Powdery Mold is usually caused by too much humidity in a closed area or not enough airflow
-
If plants are kept close together in an enclosed space without air circulation, this can be a breeding ground for white powdery mold.
-
Plants which are very leafy, or which have lots of leaves touching each other, are more prone to WPM. Therefore pruning old leaves that are no longer needed can sometimes help prevent WPM.
Solution: ·What to do if you have WPM:
-
Carefully wipe mold off affected leaves using plain water.
-
Afterwards, make sure you have good air circulation moving over your plants(like with a fan) and a working exhaust fan. Fresh, clean, moving air will prevent powdery mold
-
Get SM-90. Mix 1 part SM-90 to 5 parts water and spray your leaves right before lights out time. You can repeat if you see further outbreaks, but SM-90 often works with just one application. If SM-90 isn't available where you live, then neem oil is a great alternative (though it doesn't smell as nice as citrusy fresh SM-90).
-
Learn more in our tutorial about white powdery mildew
More pictures of white powdery mildew
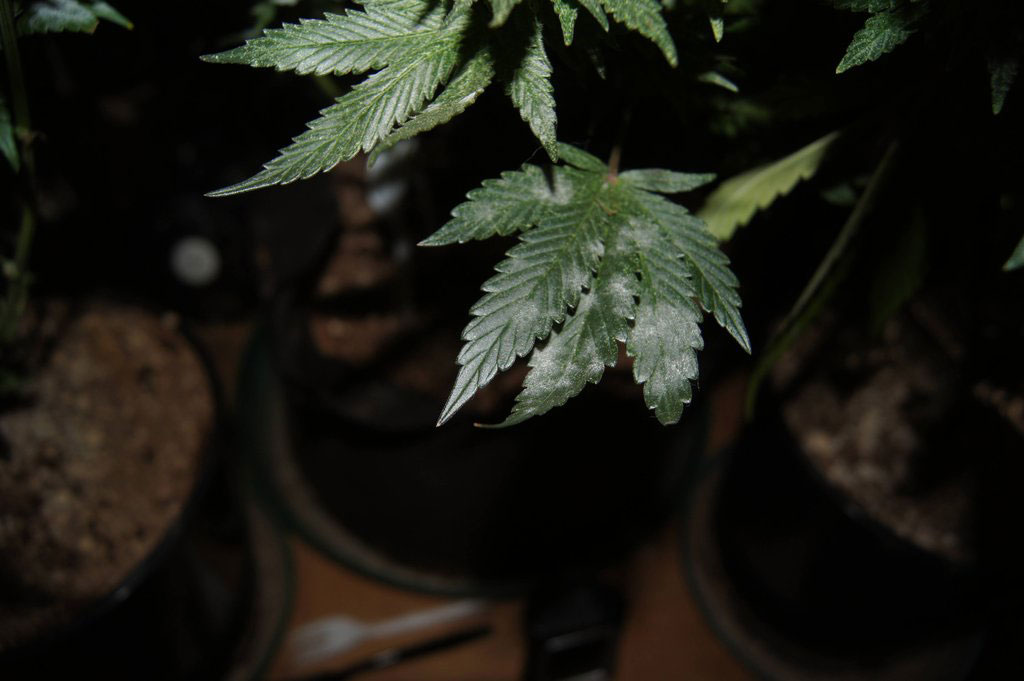

Fungus Gnats
Read tutorial on cannabis fungus gnats & learn how to get rid of them
Fungus gnats are tiny little bugs that buzz around your soil. While the adult gnats don't bother your cannabis plants much, their larvae can attack cannabis roots in the soil. This can cause all sort of unexpected problems for your plants, like nutrient deficiencies, spots, droopiness, and more.
Luckily, fungus gnats are easy to get rid of once you know what to do; soon you'll never have to worry about fungus gnats in the cannabis grow room again!
After fungus gnats get in the grow room, what causes them stick around?
-
Overwatering
-
Wet topsoil
-
Lack of air circulation
Solution: ·What to do if you have fungus gnats:
-
Make sure you're watering plants properly
-
Use yellow sticky cards to see how bad your fungus gnat infestation really is
-
Make sure air is blowing over the top of your soil
-
Learn more in our tutorial about getting rid of fungus gnats
Don't Let Fungus Gnats Get This Bad!
White Flies / Whitefly
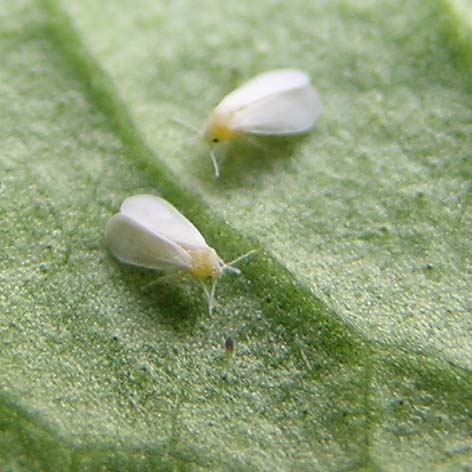 White
flies behave just like spider mites.
White
flies behave just like spider mites.
The insect hides underneath the leaf, sucks dinner from the essential nutrients in the plant.
This results in white spots on the top side of the leaf.
White flies are easily spotted with the naked eye. If you shake the plant a little, they'll fly around. They look like little white moths, around 2 millimeters in size.
Solution: ·A white fly problem can be solved basically the same way as aphids. My favorite way to get rid of them is misting your plants in a solution made of 1 part SM90, 5 parts water.
When you spray the plants, and make sure you get the undersides of the leaves(that's where they lay eggs).
You'll want to do this when the lights are about to go off(or else the leaves will get burned). You can get a sprayer like this one on amazon.com, or at Home Depot for about $12.
Thrips
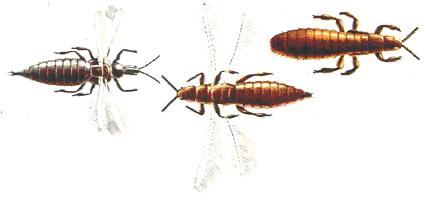 Thrips
are small, fast-moving insects with wings.
Thrips
are small, fast-moving insects with wings.
They rasp, or grate the marijuana leaves open, and suck the sap out.
Thrips prefer flowering tops, and fresh, young leaves.
Affected leaves have shiny, silvery spots. This is caused by the thrips sucking the chlorophyll out of the leaves.
In spite of the fact that they're small, you can see them marching in columns on an infested plant.
Solution: Thrips can be fought with your favorite insecticide. Or predatory insects, the thrips' natural enemy is Amblyseius cucumeris.
A thrip problem can be solved basically the same way as aphids. My favorite way to get rid of them is misting your plants in a solution made of 1 part SM90, 5 parts water.
You'll want to do this when the lights are about to go off(or else the leaves will get burned). You can get a sprayer like this one on amazon.com, or at Home Depot for about $12.
Grey Mold / Bud Rot / Fungus (Botrytis cinerea)
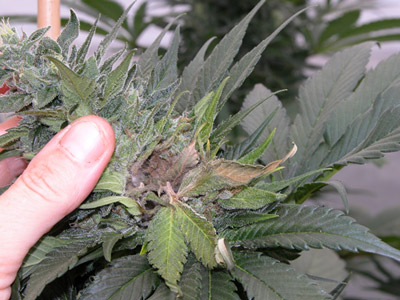 Botrytis
blight or gray mold is a common fungus disease which can cause blights;
the most common is Botrytis cinerea.
Botrytis
blight or gray mold is a common fungus disease which can cause blights;
the most common is Botrytis cinerea.
Read the Complete Bud Rot Tutorial
(with more pictures and information)
Botrytis infections often thrive in cool (60 degrees Fahrenheit or 15 degrees Celsius), rainy spring and summer weather.
Gray mold can be particularly damaging when rainy, drizzly weather continues over several days.
Look for masses of silver-gray spores on infected plant parts that are growing in humid areas.
Tiny, black, shiny specks might also be seen embedded in diseased plant tissue.
These are sclerotia of Botrytis: they allow the fungus to survive the winter.
Botrytis blight can affect leaves, stems, crowns, flowers, flower buds, seeds, seedlings, bulbs, and just about any other part of a plant with the exception of the roots.
With bud rot, your buds will actually start rotting from the inside out :(
Solution: The best way to manage this disease is keeping humidity low, maintaining good air circulation, and by regularly inspecting and removing of infected parts of the plant immediately.
Once you've learned that bud rot is affecting your plants, it's recommended you immediately remove all the affected buds (as this spreads). If plants are bushy and have lots of leaves, you may want to consider removing some of the inner and lower leaves that don't get access to the sun. This will help more air get through your plant.
If you find mold remove it immediately. Once you first find mold, you need to watch your plants like a hawk, as mold spreads quickly.
NEVER SPRAY YOUR BUDS
WITH ANYTHING
Once a bud has been infected, you need to remove the affected parts.
- Remove infected flowers, leaves, or the entire plant if it's infected at the base, and take it far far away from your grow area to dispose if it.
- Low humidity slows down and prevents mold (50% or less humidity is optimal, especially towards the end of the flowering stage). Also try to maintain lots of air circulation with oscillating fans, and lots of air exchange if possible (via Exhuast air and Supply air).
It is best not to do any mold removal while plants are wet since this could help spread fungal spores during conditions which favor infection.
Also avoid overhead watering, or misting plants, especially if you have had trouble with grey mold in the past.
To promote rapid drying of plants, try to space them to allow good air circulation, and don't hesitate to use fans to help promote good air circulation.
Sanitation and cleanliness alone is not sufficient to control this fungus.
The fungus can produce 60,000 or more spores on a piece of plant tissue the size of your small finger nail.
Even one spore can infect a plant and cause disease, so avoid injuring plants in any way.
Do not leave large stubs of stems when taking cuttings
Ventilate your grow space to prevent high humidity conditions. Even lowering the humidity slightly can have a significant effect on Botrytis. Outdoor planting should be planned to provide good air circulation patterns
Fixing the problems with the environment is the best way to prevent and control Botrytis.
Don't spray or burn Sulfer in the flowering stage! You will ruin your crop as Sulfer makes your bud taste really bad, like REALLY TERRIBLE.
However, it is safe to use sulfur in Veg to treat mold, before the buds have started forming. Sulfer seems to get right into the essence of the bud and the taste/smell is impossible to remove. Sulfure will TOTALLY ruin your crop if used in the flowering stage!
Some growers also use a fungicide or combination of fungicides during the veg stage. It's important to avoid using fungicides in the flowering stage as it creates toxic buds. Any preventative fungicides should be applied during the vegetative stage. If you do plant to spray your young plant in the vegetative stage, use a fungicide particularly made for Botrytis.
Read the Complete Cannabis Bud Rot Tutorial: http://www.growweedeasy.com/bud-rot
Root Rot / Pythium Root Rot (Pythium spp.)
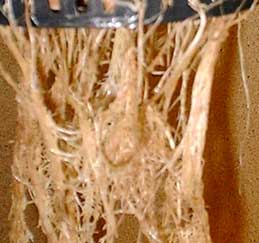 Pythium
root rot can be caused by several different species of the fungus
Pythium.
Pythium
root rot can be caused by several different species of the fungus
Pythium.
These fungi are common in field soil, sand or sediment of surface water supplies, and dead roots of previous crops.
Pythium has also been found in some commercially available soilless potting mixes.
Pythium is easily introduced into pasteurized soil or soilless mixes by using dirty tools, dirty pots or flats, walking on or allowing pets to walk on the mixes and by dumping the mixes on benches or potting shed floors that have not been thoroughly cleaned.
When introduced into pasteurized soil or soilless mixes, Pythium can cause severe root rot because it has few competitors to check its activity.
Root rot is also a common problem for those growing directly in water, such as via deep water culture or bubbleponics and this fungus poses a threat to crops grown in just about any hydroponic system.
A great way to prevent root rot in hydroponic systems is to properly aerate the water!
If the reservoir is heavily contaminated with debris or soil harboring Pythium, the fungus can spread to a large number of plants quickly.
If the fungus infests a cutting bed or if contaminated water is used in propagation, large losses usually occur.
Almost all plants are susceptible to Pythium root rot.
Root tips which are very important in taking up nutrients and water are attacked and killed. Pythium also can rot the base of unrooted cuttings.
Symptoms of Pythium include: Stunted plants, root tips are brown and dead, Plants yellow and die, Plants wilt at mid-day and may recover at night, rot may proceed up the stem, brown tissue on the outer portion of the root easily pulls off leaving a bare strand of vascular tissue exposed, and the cells of roots contain many microscopic thick-walled spores.
Solution: Pythium root rot is difficult to control once it has begun.


We HAVE NOT had good luck with Subculture B, Great White and SM-90 to treat root rot, though other growers have reported success killing root rot using those treatments.
Still, even with the amazing power of Aquashield in treating root rot, every effort should be directed toward preventing the disease before it begins.
Pasteurize soil and sand with heat (a microwave) or chemical fumigant treatments.
If the water supply is suspected of being the primary source of Pythium, it may be necessary to treat the water before use.
Slow sand filtration has been shown to be an effective, simple, and inexpensive method for removing Pythium from water.
Cover the treated soil and store it or the soilless mix in an area that will not be contaminated through the introduction of non-treated soil.
Likewise, cover ebb and flow system reservoirs. Disinfest all surfaces, tools, and equipment that will contact the potting mix.
We have also found that Hydrogen Peroxide (H2O2) will work for controlling Pythium in both dirt and hydro for short amounts of time. However, I highly recommend getting Aquashield for a more permanent solution.
Read more about getting rid of root rot attacking your marijuana plants right here
Damping-off (young marijuana seedlings dying)
Damping-off generally refers to sudden plant death in the seedling stage due to the attack of fungi.
These fungi are soil borne and are stimulated to grow and infect the seed or seedling by nutrients released from a germinating seed.
However, seedlings may be injured or killed by something other than fungi, for example, toxic materials in the soil, excess or deficient soil moisture, seed defects, temperature extremes, toxic gases in the air, etc. A correct diagnosis is the key to effective control measures.
Damping-off disease of seedlings is widely distributed and is a problem on a worldwide basis. It occurs in most soils, temperate and tropical climates, and in greenhouses.
The disease affects seeds and seedlings of various crops.
The amount of damage the disease causes to seedlings depends on the fungus, soil moisture, and temperature. Normally, however, cool wet soils favor development of the disease.
Seedlings in seedbeds often are completely destroyed by damping-off, or they die after transplanting.
Frequently, germinating seeds are killed by damping-off fungi before they emerge from the ground, which accounts for poor stands in many crops.
Older plants are seldom killed by damping-off fungi mainly because the development of secondary stem tissue forms a protective barrier and limits fungal penetration.
However, portions of the roots and stems still can be attacked, resulting in poor growth and reduced yields. When seeds are planted in infested soils, damping-off fungi may attack them at any stage.
The damping-off fungi may attack the seed prior to germination, or they may attack after the seed has germinated but before the seedling has emerged above the soil line.
Infected seed becomes soft and mushy turning a brown to black color, and it eventually disintegrates.
Seeds that have germinated and become infected develop water-soaked spots that enlarge and turn brown.
The infected tissue collapses, resulting in death of the seedling.
Penetration and death of seeds before they emerge is termed preemergence damping-off.
Seedlings that have emerged are usually attacked at or below the soil line. The organism can easily penetrate the young soft stem tissue.
The infected stem portion becomes discolored and begins to shrink.
As this occurs, the supportive strength of the stem's invaded portion is lost, and the seedling topples over. The fungi continue to invade the remaining portion of the seedling, resulting in death.
This phase of the disease is termed postemergence damping-off. Older established plants also can be attacked by damping-off fungi.
Usually the new developing rootlets are infected, resulting in root rot. Infected plants show symptoms of wilting and poor growth.
Solution: Proper conditions for seed germination and seedling emergence also favor vigorous growth of fungi that cause damping-off.
Seed and roots must be kept moist and warm until the roots have penetrated the soil and the seedlings have emerged.
As the seedlings continue to grow, moisture at the soil surface can be decreased, and the damping-off fungi then will have less of an advantage.
When watering, thoroughly saturate the soil and then apply no more water until soil approaches the point at which plants wilt.
This procedure will keep surface soil dry for a maximum time.
Pasteurization of Soils is the best way to protect yourself. Soil for growing transplants in flats can be steam pasteurized.
If steam is used, the entire soil mass should be maintained at a temperature of 160 degrees F for 30 minutes.
The home gardener obviously does not have facilities to steam soil; however, pasteurized, packaged soil mix is available from many garden centers.
To prevent soil recontamination, all items such as tools, pots, and flats, etc., must be clean. The items can be cleaned in hot water (160 degrees F for 30 minutes) or in a chlorine bleach solution (1 part bleach to 9 parts water; soak for 30 minutes).
It is important to use fresh chlorine bleach-water solutions.
Slugs/Snails
 The
common slug is too common a pest to even need much of an introduction.
Slugs attack a wide range of plants, causing anything from slight
damage to death.
The
common slug is too common a pest to even need much of an introduction.
Slugs attack a wide range of plants, causing anything from slight
damage to death.
Unfortunately, these annoying pests attack leaves AND buds, and they can do a surprising amount of damage in a short time, so you want to watch out for them and get rid of them quickly.
They often stay hidden, attacking your plants at night, so stay vigilent for slug and snail damage!
Solution: There is no foolproof method for eradicating slugs.
All one can hope for is to reduce their numbers and protect plants when they're at a vulnerable stage.
Toads, frogs, and beetles eat slugs and are worth encouraging in your garden. One of the best ways of dealing with slugs is to use physical barriers.


Slugs are attracted to saucers, orange rinds, and plastic pots of milk or beer (they drown themselves in ecstasy).
How to Make Beer Trap for Slugs and Snails: mix flour with some stale beer and use it to fill a shallow container. Place in garden with the rim 1 or 2 cm above the ground so that slugs and snails can climb in. Substitute beer for wine, sugar water, juice, or water mixed with yeast.
BE WARNED, the trap will fill up quickly so come back often to empty.
To be sure you're keeping your slimy slug population under control; collect them by hand at night or on damp days. Try collecting them under a tile or wet cardboard, and squash all eggs you find while digging. Placing a saucer of salt is another method that will kill snails and slugs.
Martha Stewart recommends coiling a piece of wire around the base of your plants to give slugs a shocking experience.
Tobacco Mosaic Virus
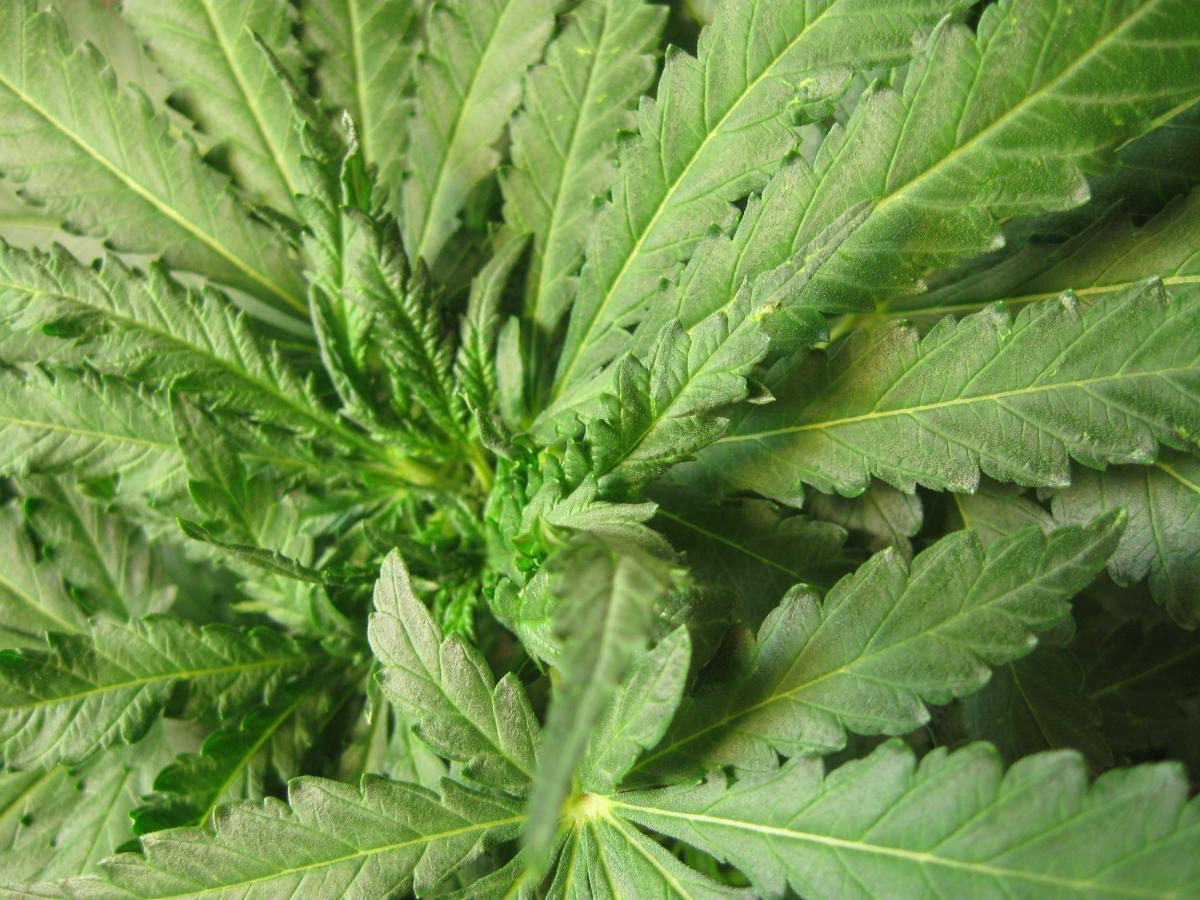 The
tobacco mosaic virus can attack a wide range of plants, including
tomato, pepper, eggplant, tobacco, spinach, petunia, marigold, and our
beloved herb marijuana.
The
tobacco mosaic virus can attack a wide range of plants, including
tomato, pepper, eggplant, tobacco, spinach, petunia, marigold, and our
beloved herb marijuana.
On marijuana the virus infection causes light and dark green mottled areas on the leaves.
The dark green areas tend to be somewhat thicker than the lighter portions of the leaf. The leaf mottling is seen more easily if the affected plant surface is partially shaded.
Stunting of young plants is common and often is accompanied by a distortion and fern-like appearance of the leaves. Older leaves curl downward and may be slightly distorted.
Certain strains of the virus can cause a mottling, streaking and necrosis of the buds. Infected plants are not killed, but they produce poor quality buds and low yields.
Tobacco mosaic, is incited by a virus. The tobacco mosaic virus is very stable and can persist in contaminated soil, in infected plant debris, on or in the seed coat, and in manufactured tobacco products. The virus is transmitted readily from plant to plant by mechanical means.
This may simply involve picking up the virus while working with infected plant material, then inoculating healthy plants by rubbing or brushing against them with contaminated tools, clothing, or hands. Aphids are not vectors of the virus, although certain chewing insects may transmit the pathogen.
Solution: Virus diseases cannot be controlled once the plant is infected.
Therefore, every effort should be made to prevent introduction of virus diseases into the garden.
Sanitation and cleanliness is the primary means of controlling virus diseases.
Infected plants should be removed immediately to prevent spread of the pathogens.
The use of tobacco products during cultural practices should be avoided to prevent inoculation of plants with the tobacco mosaic virus.
Those people using tobacco or working with infected plant material should wash their hands thoroughly in soapy water before handling your plants.
Jump to...
Marijuana Plant Problems by Picture
6 Steps to Cure Most Marijuana Growing Problems
pH Fluctuations
by Nebula Haze
Quick Summary: Managing pH is crucial for cannabis plants to be able to take up nutrients through their roots. When the pH around the roots jumps up and down, it can stress the plant and cause brown spots to appear on the leaves. Spotting on the leaves as a results of pH fluctuations is more common in hydroponic setups (where the pH tends to go up and down), but it is possible it can also happen in soil. This seems to often happen when the pH swings too high.
Note: You can also get these symptoms from root problems or root rot!
Problem: Certain leaves on the middle or lower parts of the plant show tan or brown spotting, similar to these pictures:
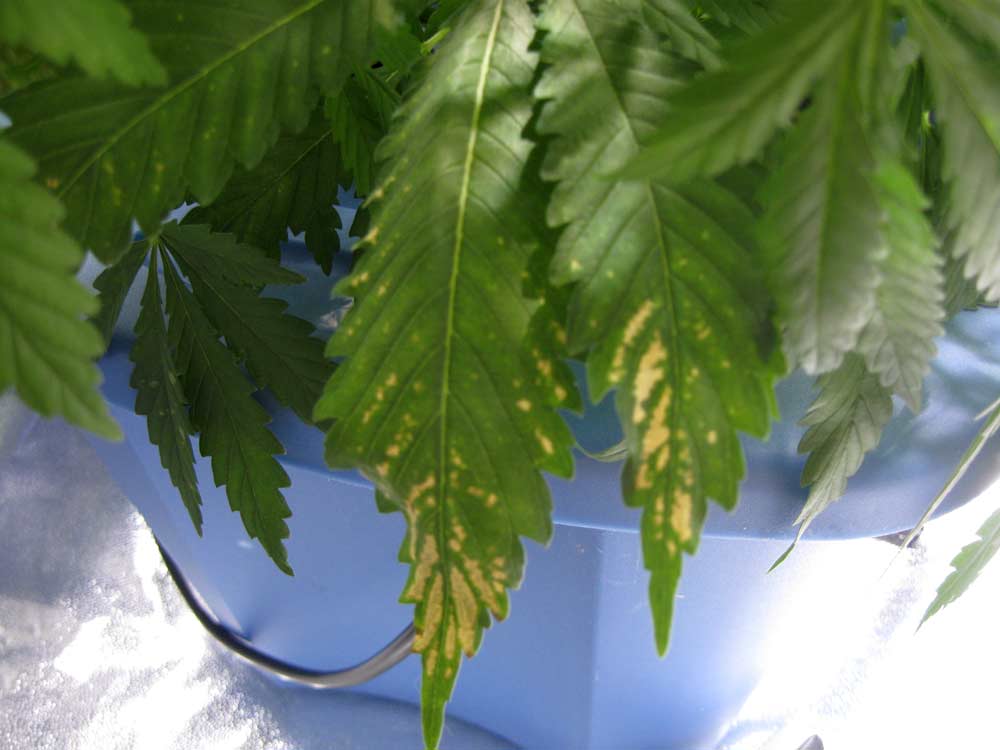
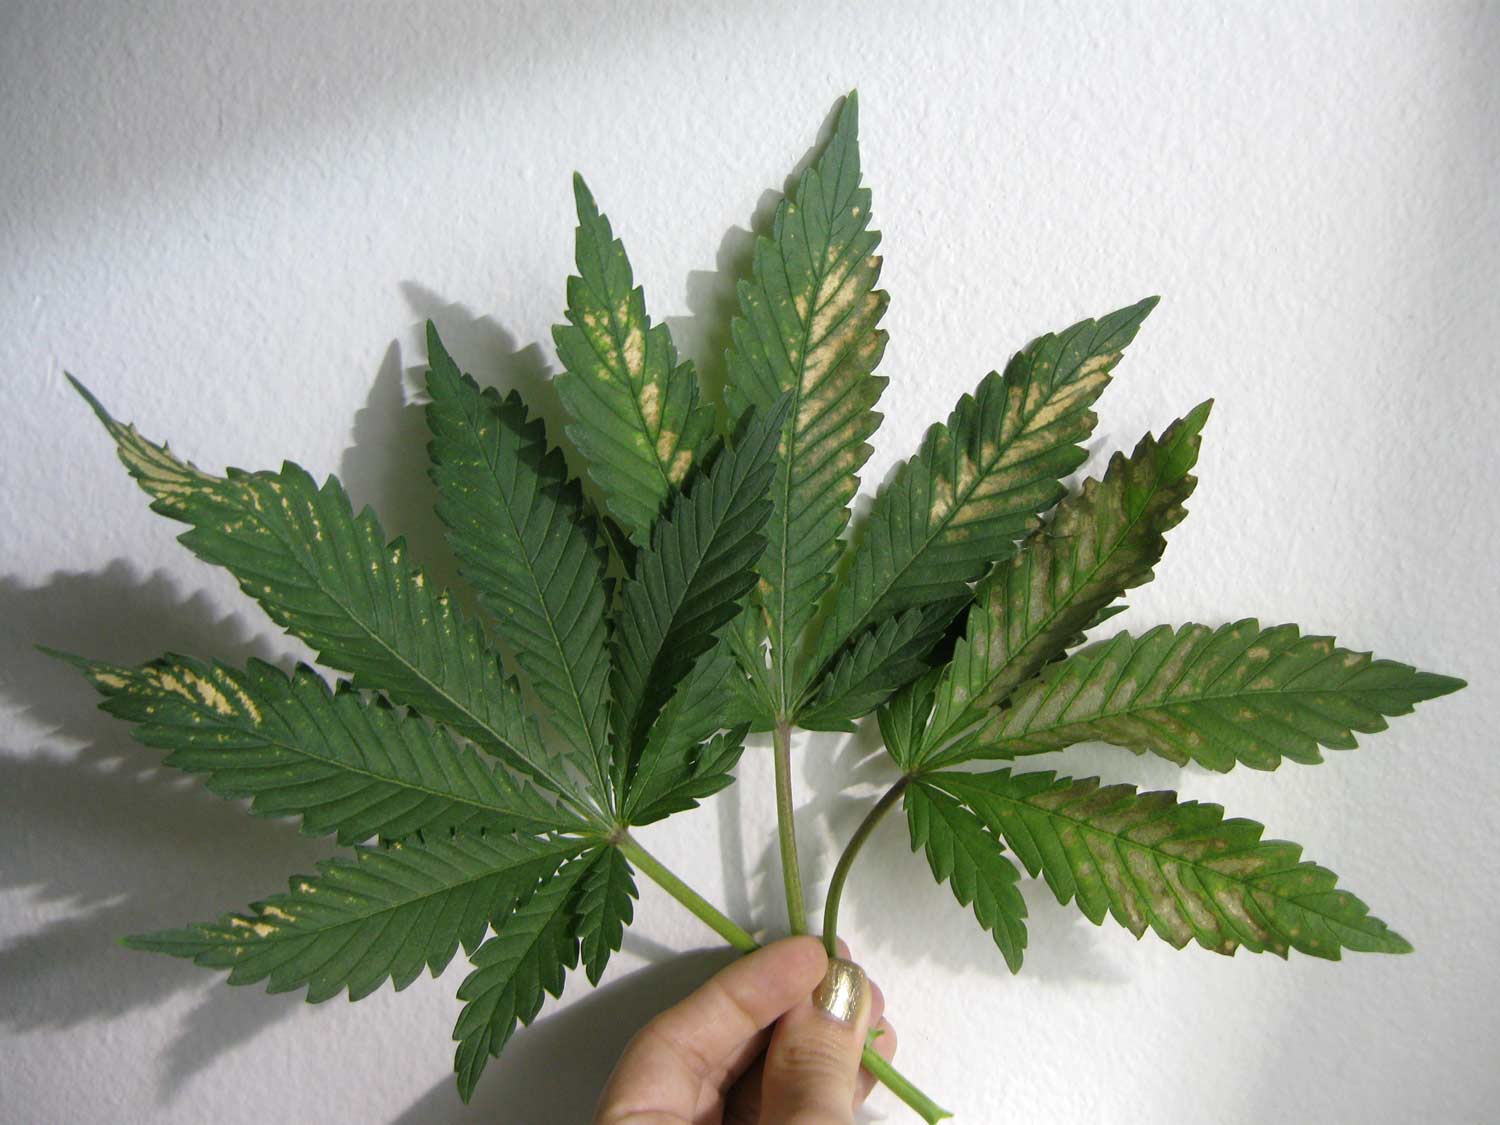
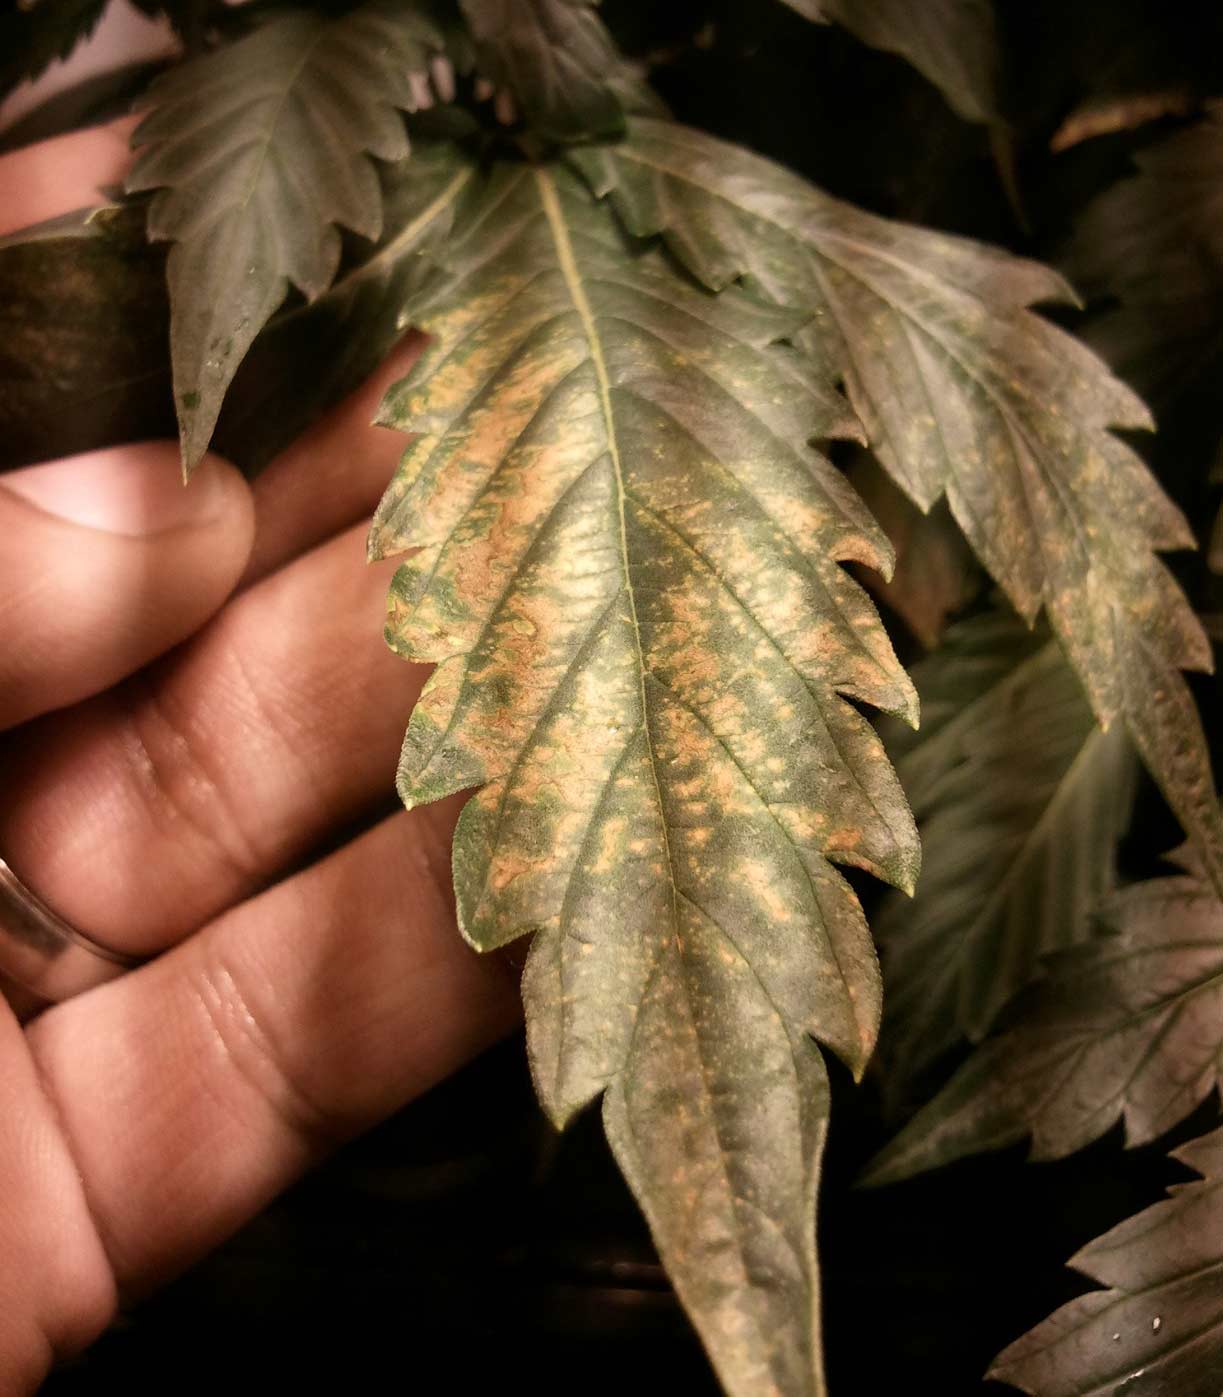
Solution: The main way to fix this problem is to fix the pH problem that caused the spotting (more info below). The leaves that are effected will not recover, but once you fix the issue, the problem should stop spreading to other leaves.
Note: You can also get similar symptoms from root problems!
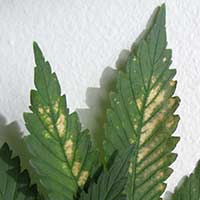
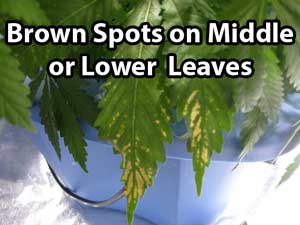
Phosphorus Deficiency
Problem: Phosphorus (P) is used by your cannabis plant in all phases of growth. It is one of the 3 major nutrients (N-P-K) listed on the front of most nutrient bottles, and phosphorus will be represented by the second number that appears.
Phosphorus is needed for overall health of cannabis plants, but is especially important for healthy roots and bud production during the flowering stage. Phosphorus is also necessary for photosynthesis to happen in plant leaves, which means a phosphorus deficiency will prevent your plant from being about to properly make energy from light.
Cannabis plants tend to love phosphorus and it is unlikely for a cannabis plant to get too much phosphorus using standard nutrients formulated for a flowering plant like cannabis.
Phosphorus deficiencies in the vegetative stage usually appear at the bottom of the plant on some of the oldest leaves, and will progressively climb up the plant if left unchecked.
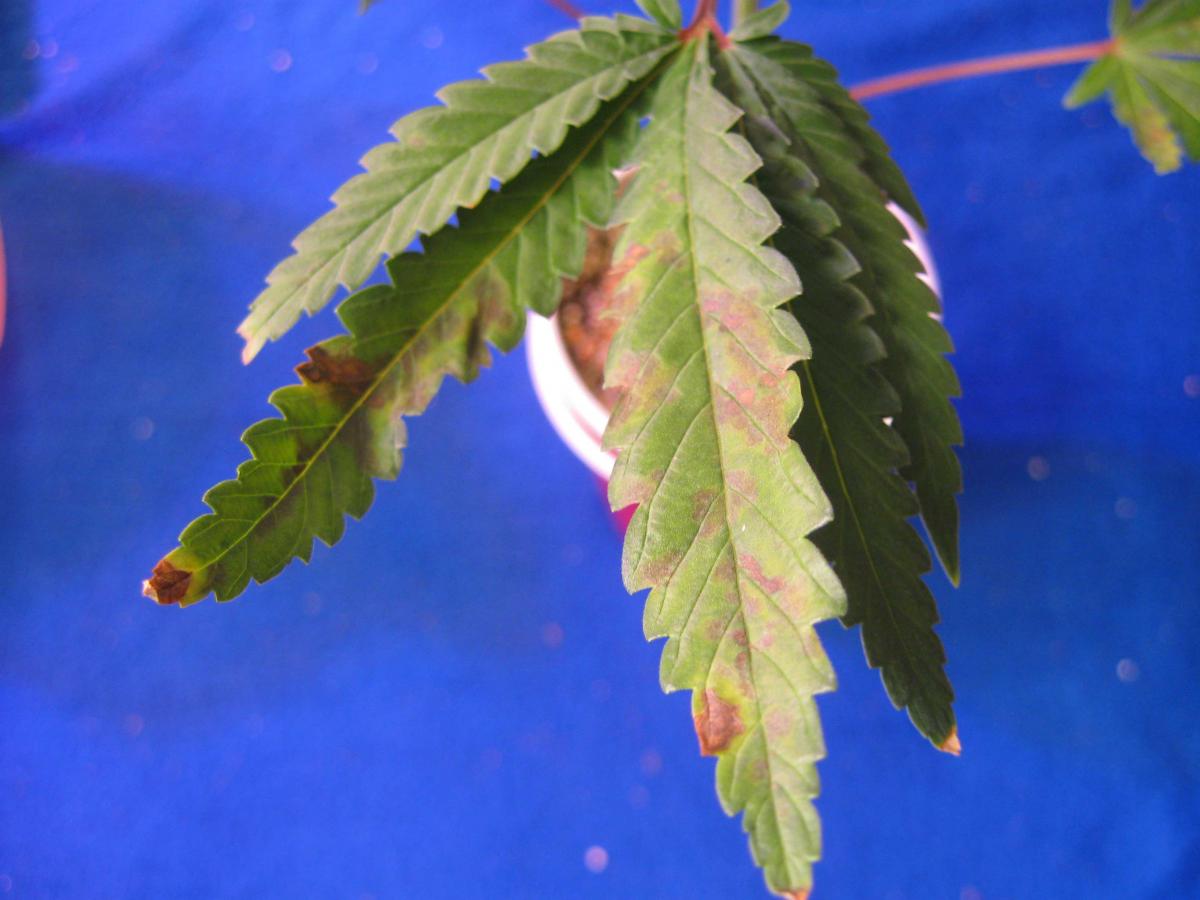
A cannabis plant which is deficient in phosphorus in the vegetative stage may have slower growth and will be more susceptible to root problems and general plant maladies. New leaves may be smaller than average or look twisted or stunted.
When there is a phosphorus deficiency, the lower (oldest) leaves will sometimes turn dark green, occasionally with a bluish or bronze tinge, and may thicken or curl downard before exhibiting dark gray, bronze or purplish splotches. Sometimes the stems of the affected leaves will turn bright red or purplish, usually starting from underneath.
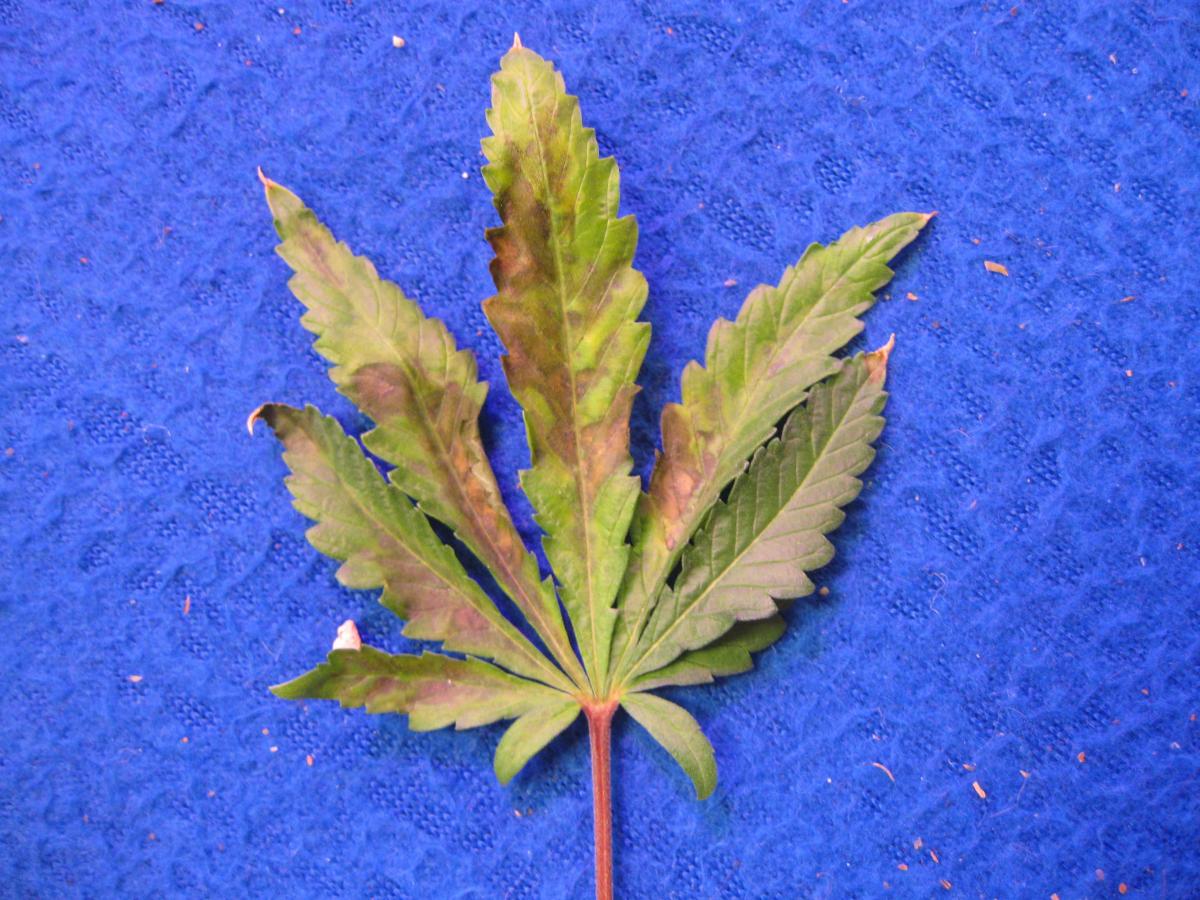
A cannabis phosphorus deficiency usually appears with some or all of the following symptoms:
-
lower /older leaves get darker (sometimes turning a dark green, blue or grayish color)
-
lower leaves may thicken and begin to form bronze, purple or brown spots
-
leaves begin to twist and/or curl downward
-
affected leaves eventually turn yellow in places not affected by splotches
-
stems may turn red or purple, starting from underneath, but not always, and some plants naturally have red or purple stems
-
new growth may be twisted or stunted
-
plant may grow more slowly or be more susceptible to problems such as mold, root disease, or pests
-
roots may grow slowly or be prone to root rot
-
in the flowering stage, leaves near buds and directly under the lights seem to be most affected, and will usually display red or purple splotches while the rest of the leaves turn yellow or pale
-
bud growth and final yields may be below average, especially if phosphorus deficiency appears in early to mid-flowering and discolors the majority of the leaves nearest the growing colas
-
pollinated female plants with a phosphorus deficiency may produce underdeveloped seeds
-
phosphorus deficiencies can sometimes appear when the temperature gets too low, because it is harder for the plant to use phosphorus at lower temps
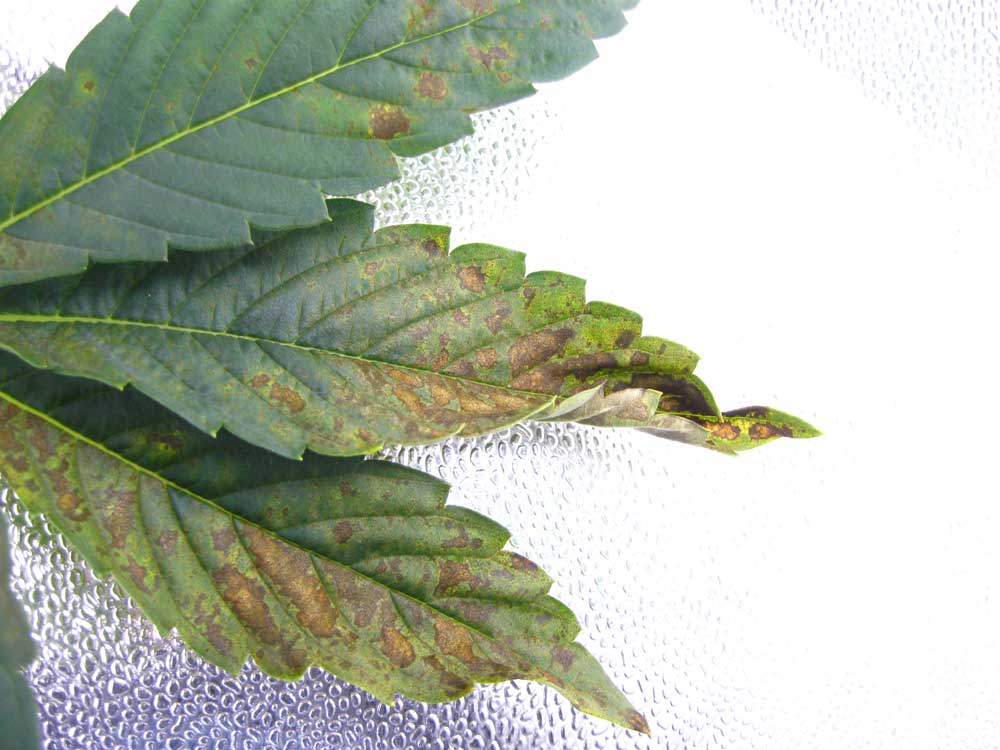
Sometimes you will get a cannabis phosphorus deficiency, and the stems do not appear red or purple at all, or the coloring may not be pronounced.
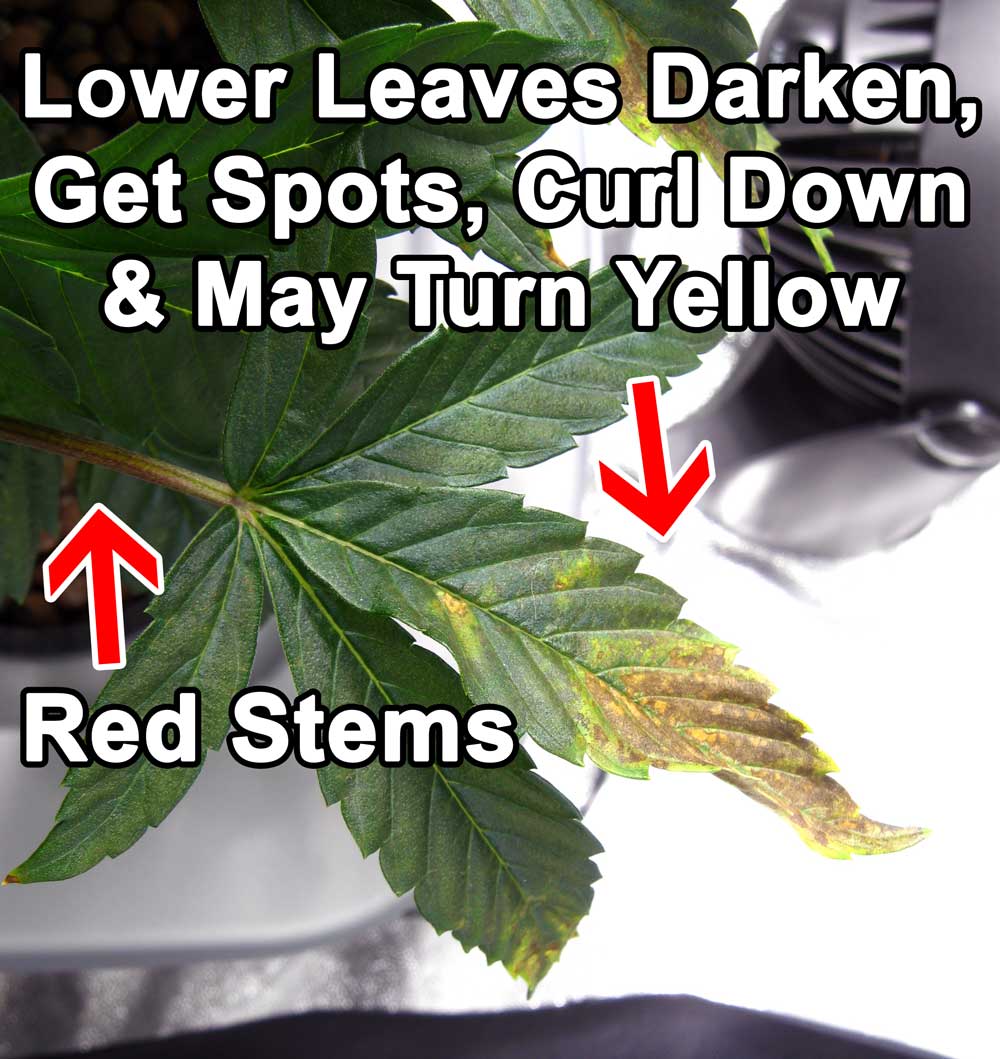
The leaf below was at the bottom of the plant and turned dark green and shiny, with a bluish tinge. The leaf then started showing the spots of a phosphorus deficiency where it was being touched by light. The leaf began to curl downwards and turn yellow.
Notice that the stems or veins never turned red or purple on this leaf, except for some parts that were actually affected by the phosphorus deficiency.
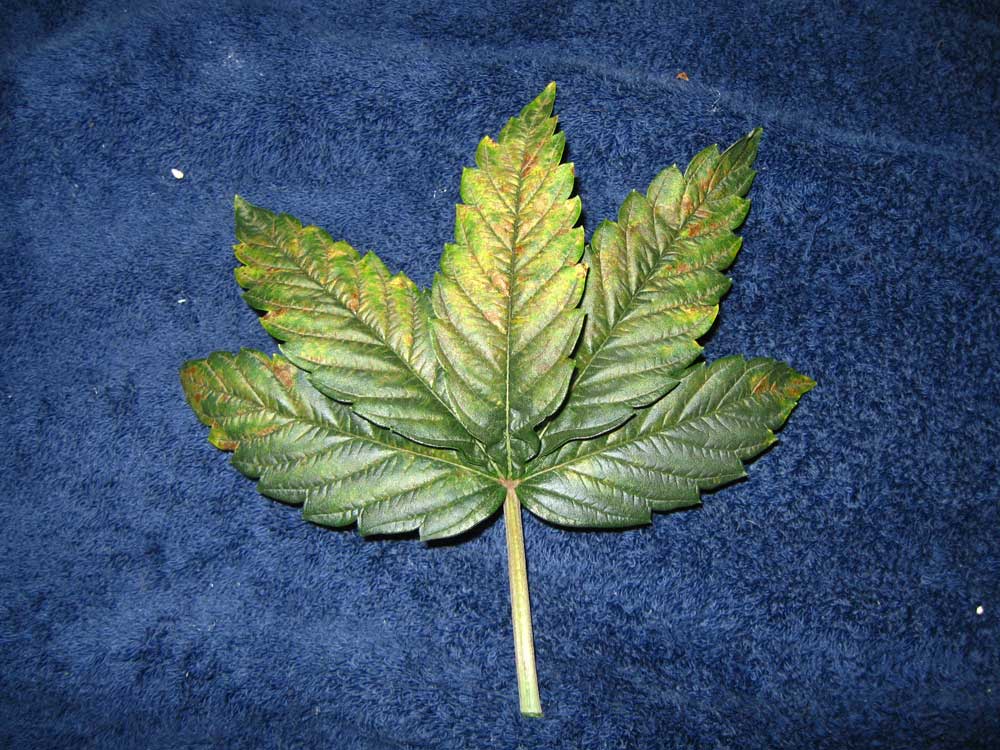
A common "symptom" of a cannabis phosphorus deficiency is red or purple stems. It's important to remember that some cannabis strains naturally grow with red or purple stems even when all their nutrient needs are being fulfilled, so red or purple stems is not a symptom to worry about on its own.
Do not mistake natural reddish-purple colored stems for a phosphorous deficiency!
When you notice that stems are turning red or purple starting from underneath, it may be a sign of a phosphorus deficiency only if accompanied by other symptoms. If the only symptom shown by your plant is red or purple stems, and you are not seeing any other signs of splotches or unhealthy leaves, the red or purple stems are likely caused by the genetics of your plant. If that's the case, you have nothing to worry about.
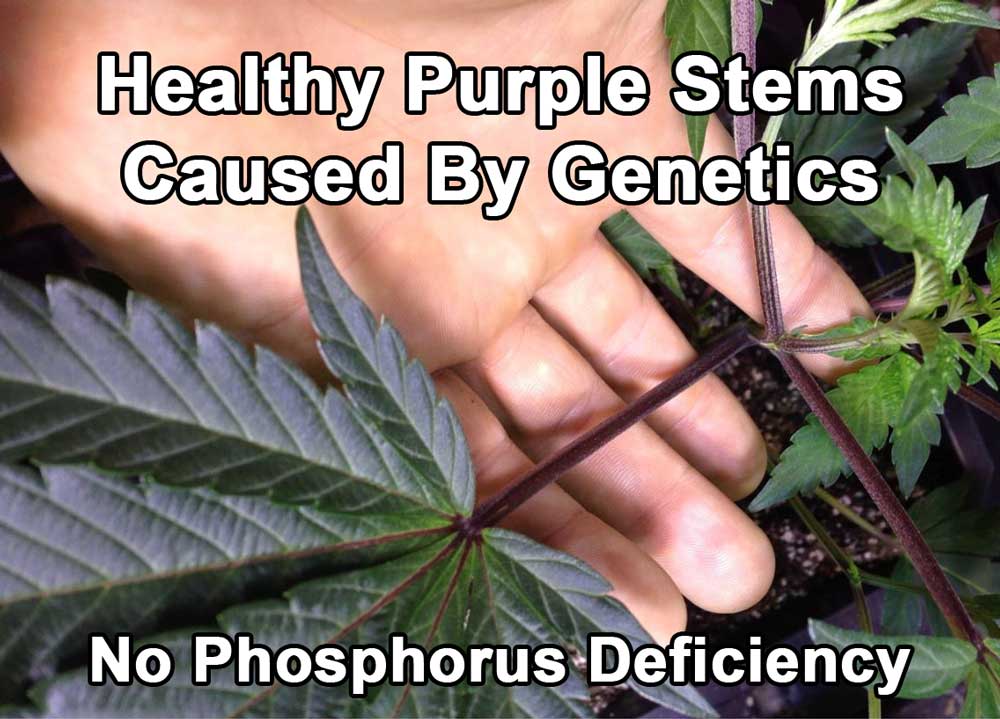
In the flowering stage, a cannabis phosphorus deficiency usually manifests near the buds that are being hit with strong, direct light.
This is because phosphorus is used heavily by cannabis plants in the flowering phase to produce buds, and is a crucial component of photosynthesis (turning light into energy for the plant).

A phosphorus deficiency is most common in the flowering stage when plants are under very bright light, and cannabis is constantly using up phosphorus in the process of building buds and making energy from light. A phosphorus deficiency is less likely to appear in lower light conditions.
In the case of a cannabis phosphorus deficiency in the flowering stage, the leaves which are not getting hit by direct light will usually remain green. The leaves directly under the light and nearest to the buds are the first to turn reddish or yellow as they display the signs of a phosphorus deficiency.
Some strains of cannabis use much more phosphorus than others, or be more susceptible to a phosphorus deficiency, and you may have many plants in the exact same setup with only some of the plants showing signs of a phosphorus deficiency.

The following example shows what happens if the Phosphorus deficiency is allowed to continue in the flowering stage. Some strains are especially prone to turning dark purple or reddish when hit with a phosphorus deficiency in the flowering stage, especially "blue" strains.

A big problem with a major phosphorus deficiency like this, especially early in the flowering stage, is the affected leaves are not good at photosynthesis and won't provide nearly as much energy to the plant as they would if they were green. It's important to keep leaves near the buds green and healthy during the majority of the flowering stage to help ensure you get the best yields possible.
Because phosphorus is so important to the proper development of buds, a plant with a major phosphorus deficiency early in the flowering stage will not develop buds as big as they could be.
If just the parts of your plants under direct light are showing purple/red/yellow leaves in the flowering stage, and the rest of the plant is mostly green and healthy, this is a big sign that it may be a phosphorus deficiency.

Solution: Your cannabis plant may show signs of a phosphorus deficiency if the pH at the roots is too high or too low. That is because when the pH of your root zone is off, your cannabis cannot properly absorb phosphorus through its roots. Therefore the first step is to ensure that you have the correct pH for your growth medium. Learn more about pH and cannabis.
Phosphorus is best absorbed by cannabis in soil at a root pH of 6.2 - 7.0. Phosphorus is best absorbed by cannabis in hydro at a root pH of 5.5 - 6.2. If you believe you have a cannabis phosphorus deficiency, it's important to check the pH of your root zone to make sure the deficiency isn't caused by the pH being too high or too low.
Please note: After a phosphorus deficiency is cleared up, the problem (brown spots, unhealthy lower leaves, red/purple stems, red/purple/yellow coloring on leaves near buds) will stop appearing on new leaves, usually within a week. Please note that leaves which have been damaged by a phosphorus deficiency will probably never recover or turn green, so you want to pay attention to other leaves for signs of recovery. After you're sure the deficiency has stopped spreading, you may want to remove damaged leaves, especially at the tops of colas, to expose green healthy leaves to the light and aid with bud development for the rest of the flowering stage.
- In soil, phosphorus
is best absorbed by the roots in the 6.2 - 7.0 pH range
(in soil, it's generally recommended to keep the pH between 6.0 - 7.0,
but phosphorus specifically tends to be best absorbed above
6.2
and below 7.0)
- In hydro, phosphorus is best absorbed by the roots in the 5.5 - 6.2 pH range (in hydro, it's generally recommended to keep the pH between 5.5 - 6.5, but phosphorus specifically tends to be best absorbed below 6.2)
If you suspect your growing cannabis plant has a phosphorus deficiency, flush your system with clean, pH'd water that contains a regular dose of cannabis-friendly nutrients that includes phosphorus. This will remove any nutrient salts that may be affected the uptake of phosphorus and help restore pH to the proper levels.
Wet, compact soil or overwatering can trigger a phosphorus deficiency to appear even when all other factors are perfect. So make sure you water your plants properly every time to help prevent a phosphorus deficiency.
Cooler temperatures lower than 60°F (15°C), as well as large temperature swings, can make it harder for the plant to absorb phosphorus. Cannabis plants are therefore more likely to show signs of a phosphorus deficiency when the temperature drops too low, or if they go through a cold spell.
Some growers will try to get their plant to artificially display colors by shocking the plant with very cold temps. The reason this can work is because it disrupts the uptake of phosphorus, and in some plants this will cause the upper leaves under the light (and the adjacent buds) to turn red or purple. This does not work with all strains. The type of reddening or purpling caused by low temps will often result in smaller yields becasue non-green leaves are not good at photosynthesis, and the plant needs phosphorus to produce buds properly.
The leaves of this plant turned purple over night after that plant was exposed to chilly temps.
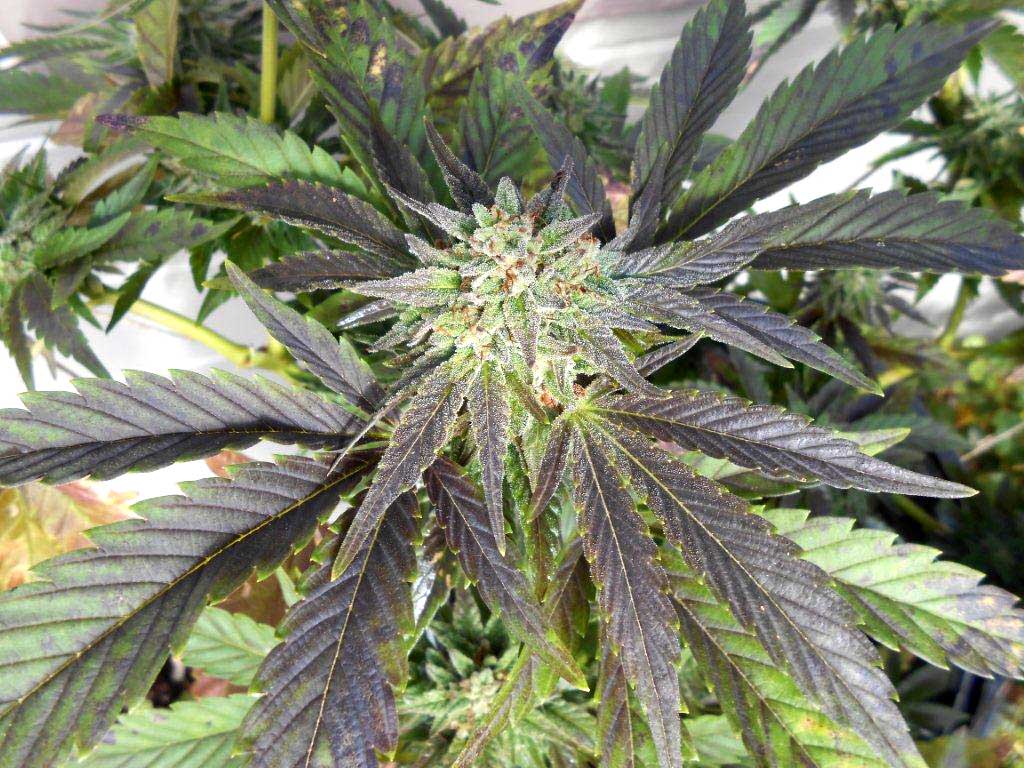
Cold temps may help the plant purple up, but it will also likely slow plant growth and hinder almost every single aspect of a flower's development. It's generally not recommended for growers to turn down the temps just to achieve colored buds - you may be doing more harm than good! If you are looking for purple buds, you'll get the best results by finding purple genetics that look/smell/taste the way you like. A "true" purple cannabis phenotype with turn purple no matter what you do in the environment.
If you do plan to use cold temps to shock your plant into producing colors, at least to wait until just before harvest so you don't accidentally reduce your yields. It's also important to note that just because the buds have turned red or purple, it has nothing to do with their final potency. Purple buds are not any more potent than green buds.
Leaves near the colas may turn pretty colors after being exposed to dark temps, but it also slows down growth and inhibits proper bud production. You need green healthy leaves for the best bud production in the flowering stage, not purple and yellow leaves that don't have the phosphorus they need to complete photosynthesis and make energy to product buds. A leaf like the following looks neat but will deliver very little energy to your plants.
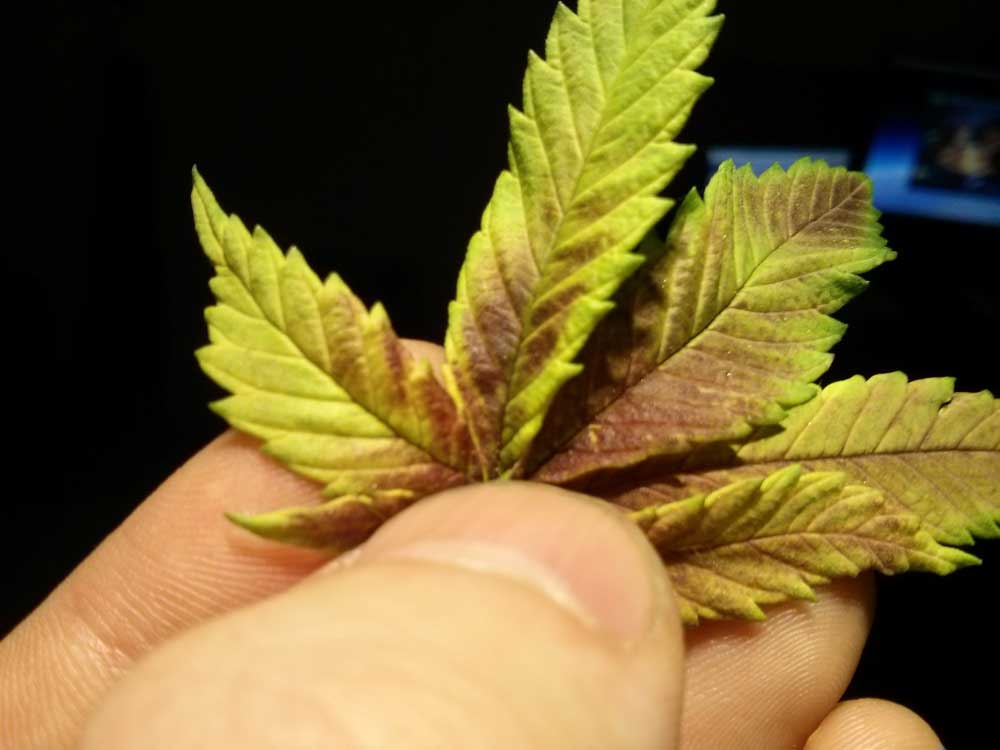
An excess of Fe and Zn may cause the symptoms of a phosphorus deficiency by preventing the plant from being able to absorb phosphorus properly. If you believe there may be a buildup of nutrient salts in your growing medium (or if you are growing in hydro and have not recently flushed or changed your reservoir) you should make sure it's not an excess of other nutrients that is actually causing the phosphorus deficiency to appear. Flush your plant thoroughly with properly pH'ed water containing a regular dose of cannabis nutrients including phosphorus, or completely change your reservoir if you believe that an excess of nutrient salts may be causing the phosphorus deficiency.
Sources of phosphorus:
-
Bat guano (phosphorus is readily available, especially if made into a teat)
-
Bone or blood meal (takes quite a bit of time to break down in soil unless made into a tea first)
-
Worm castings or worm tea
-
Soft Rock Phosphate
-
Fish meal
-
Crabshell
-
Most cannabis-friendly "bloom" or "flowering" nutrients contain high levels of phosphorus to aid in flower production, and phosphorus from a liquid nutrient is one of the most readily available forms of phosphorus you can provide to your cannabis plants
If you've tried everything else, then you may try adding a higher percentage of phosphorus to your feeding schedule and see if that helps clear up the problem for your plant. Cannabis plants love phosphorus, and therefore it is unlikely that you will give your cannabis too much phosphorus.
Most nutrient systems that are formulated for a plant like cannabis will carry and abundance of phosphorus, especially in budding/flowering formulas, so it is unlikely that you will see signs of a phosphorus deficiency before other nutrient problems when using nutrient systems formulated for cannabis (as long as you keep your root pH in the correct range and prevent the plants from getting cold or being overwatered). If you've got very high powered lights, or if your plants are growing in direct sunlight, they may be going through a lot more phosphorus in the flowering stage than average and may need you to provide extra phosphorus to make sure buds get as big as they could be.
Just remember that if there's no actual phosphorus deficiency currently appearing on your cannabis plant, adding more phosphorus is probbaly not going to help plants grow better or make bigger buds - in fact adding too much phosphorus may actually hurt your plants by preventing the uptake of other nutrients! While it's difficult to overdose your plants on phosphorus, adding too much compared to other nutrients will often cause other strange & unexpected deficiencies to appear.
If you cannot get rid of your phosphorus deficiency, please consult our 6-Step Cure to 99% of Cannabis Growing Problems
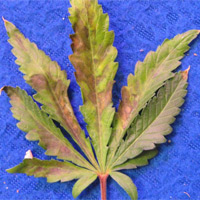
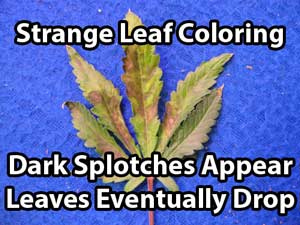
Potassium Deficiency
Problem: Older leaves turn yellow then start getting dark, scorched lesions around the edges of the leaves. Plants may stretch and stems may become weak. The symptoms are very similar to an iron deficiency except the tips of the leaves curl as the edges burn and die. The last picture below has some more information about the potassium requirements of your marijuana plant.
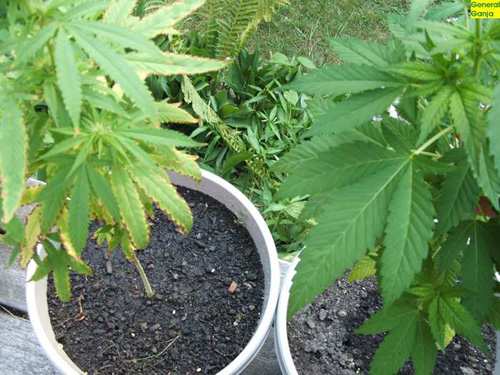
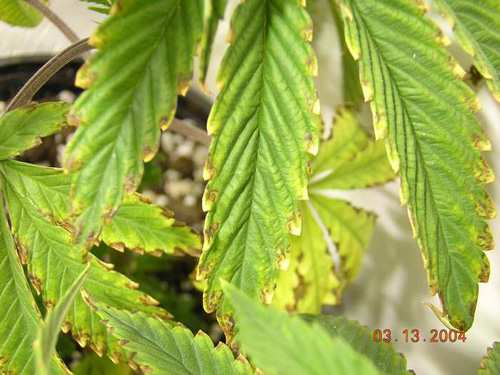
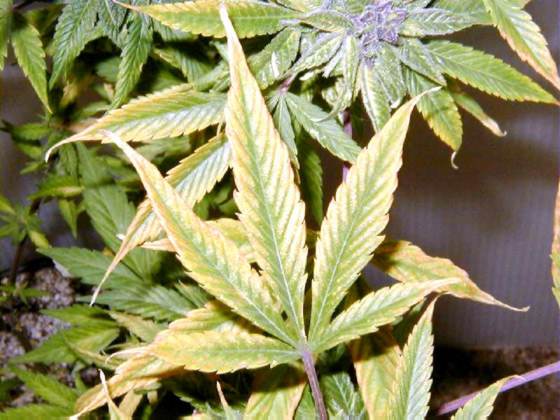
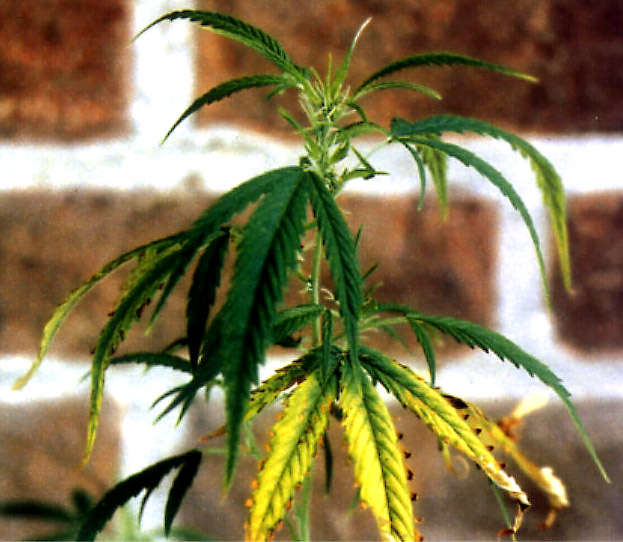
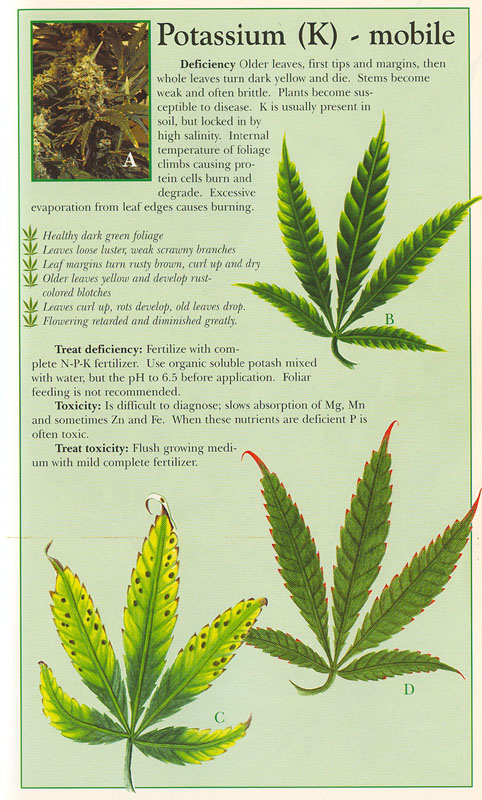
Solution: Potassium isn't absorbed properly when there is too much calcium or nitrogen in the system. Check the pH of your water, and flush your whole system with water that contains half the normal amount of nutrients and see if your plant starts showing signs of improvement.
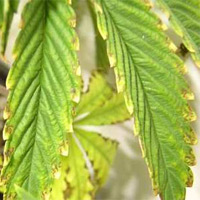
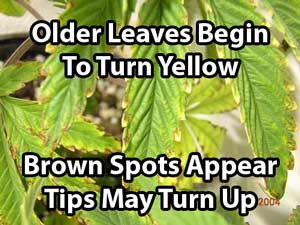
Root Problems
by Nebula Haze
Table of Contents
Root Problem Symptoms (many different symptoms)
Cannabis Plants With Root Problems Show Many Symptoms
- Cannabis may appear overwatered or droopy
- Curling or cupping of leaves
- Wilting - either individual stems wilt or the whole plant may wilt
- Leaf yellowing
- Brown spots / Burnt spots
- Other strange nutrient problems
- Brown or slimy roots - this is often a sign of root rot
- Smelly runoff water (smells rotting or musty)
- Leaves may start dying and falling off rapidly
- Plants drink much less water than usual
The cannabis plant below did not have any drainage holes (water could not drain out the bottom of the pot). Notice the strange twisting of some of the leaves. When roots are left in stagnant water for too long, they cannt get enough oxygen and tend to develop root problems.
This particular type of cupping of the leaves below is common among cannabis plants with root problems. In this case, the plant had no drainage from the bottom of the solo cup, so water was just pooling at the bottom for the roots to sit in. Once the grower poked holes in the bottom of the cup, this problems went away (the cupped leaves didn't recover, but new leaves started growing in happy and healthy).

Sometimes leaves will tend to cup or curl down due to root problems, like the plant above, but sometimes the curl upwards too, like the poor plant below (this was caused by poor drainage and plant was overwatered, leading to a pretty severe case of root problems):
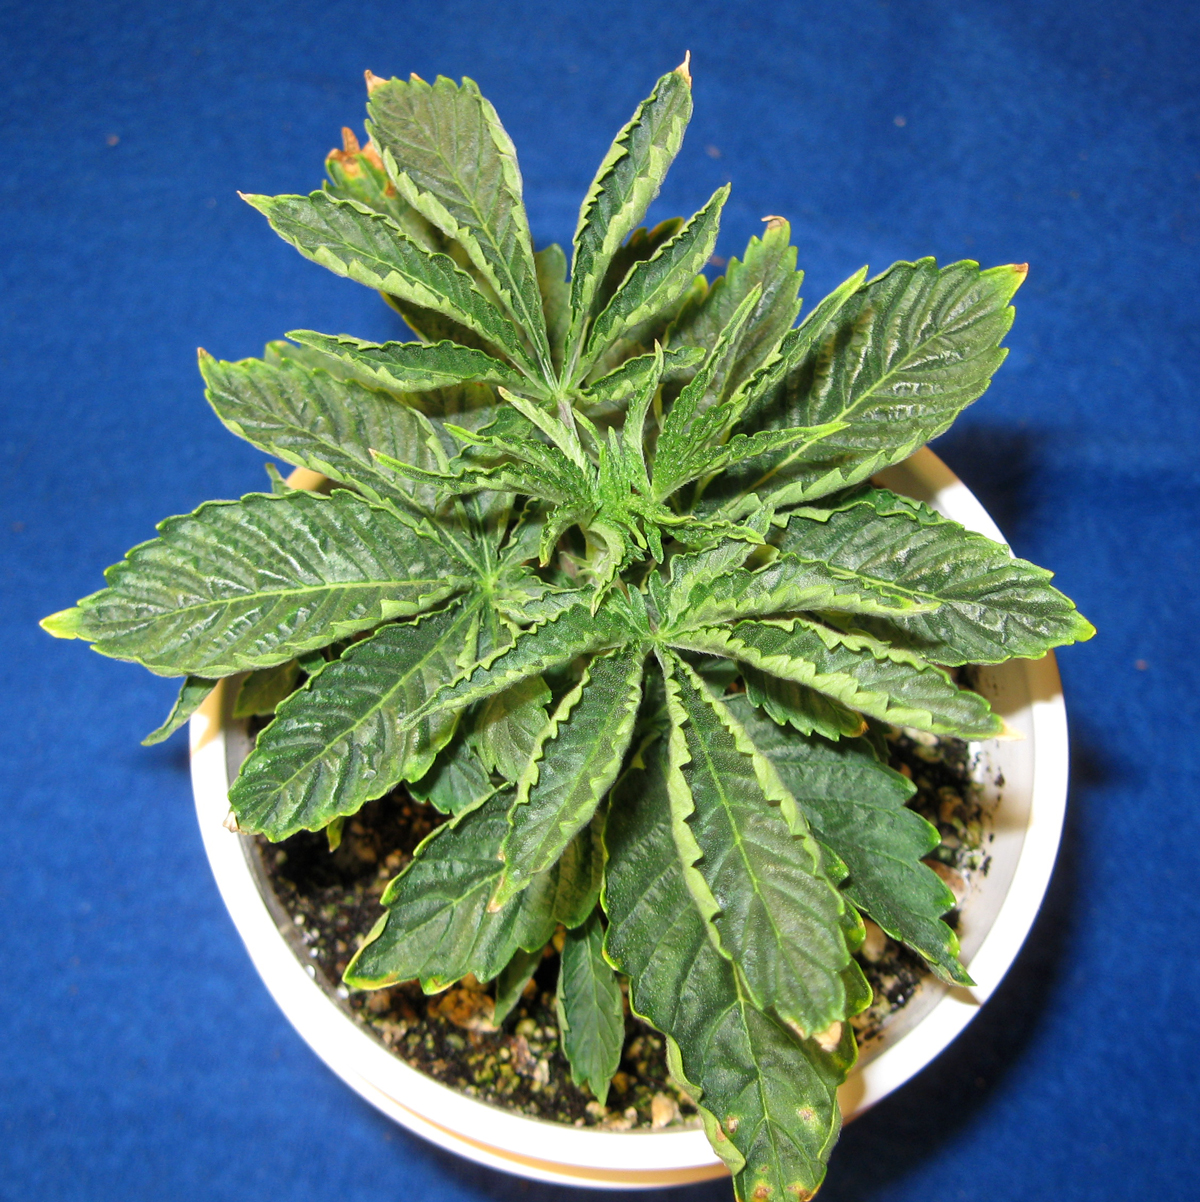
This next plant was also overwatered and had no drainage. Notice how dark the soil is and the green algae growing all along the top of the soil - these are more signs the plant has been overwatered for quite a while. You should never water your plant when the soil is still wet at the top, and if you notice lots of algae growing on top of your soil, it may be a sign that you're overwatering on a regular basis.
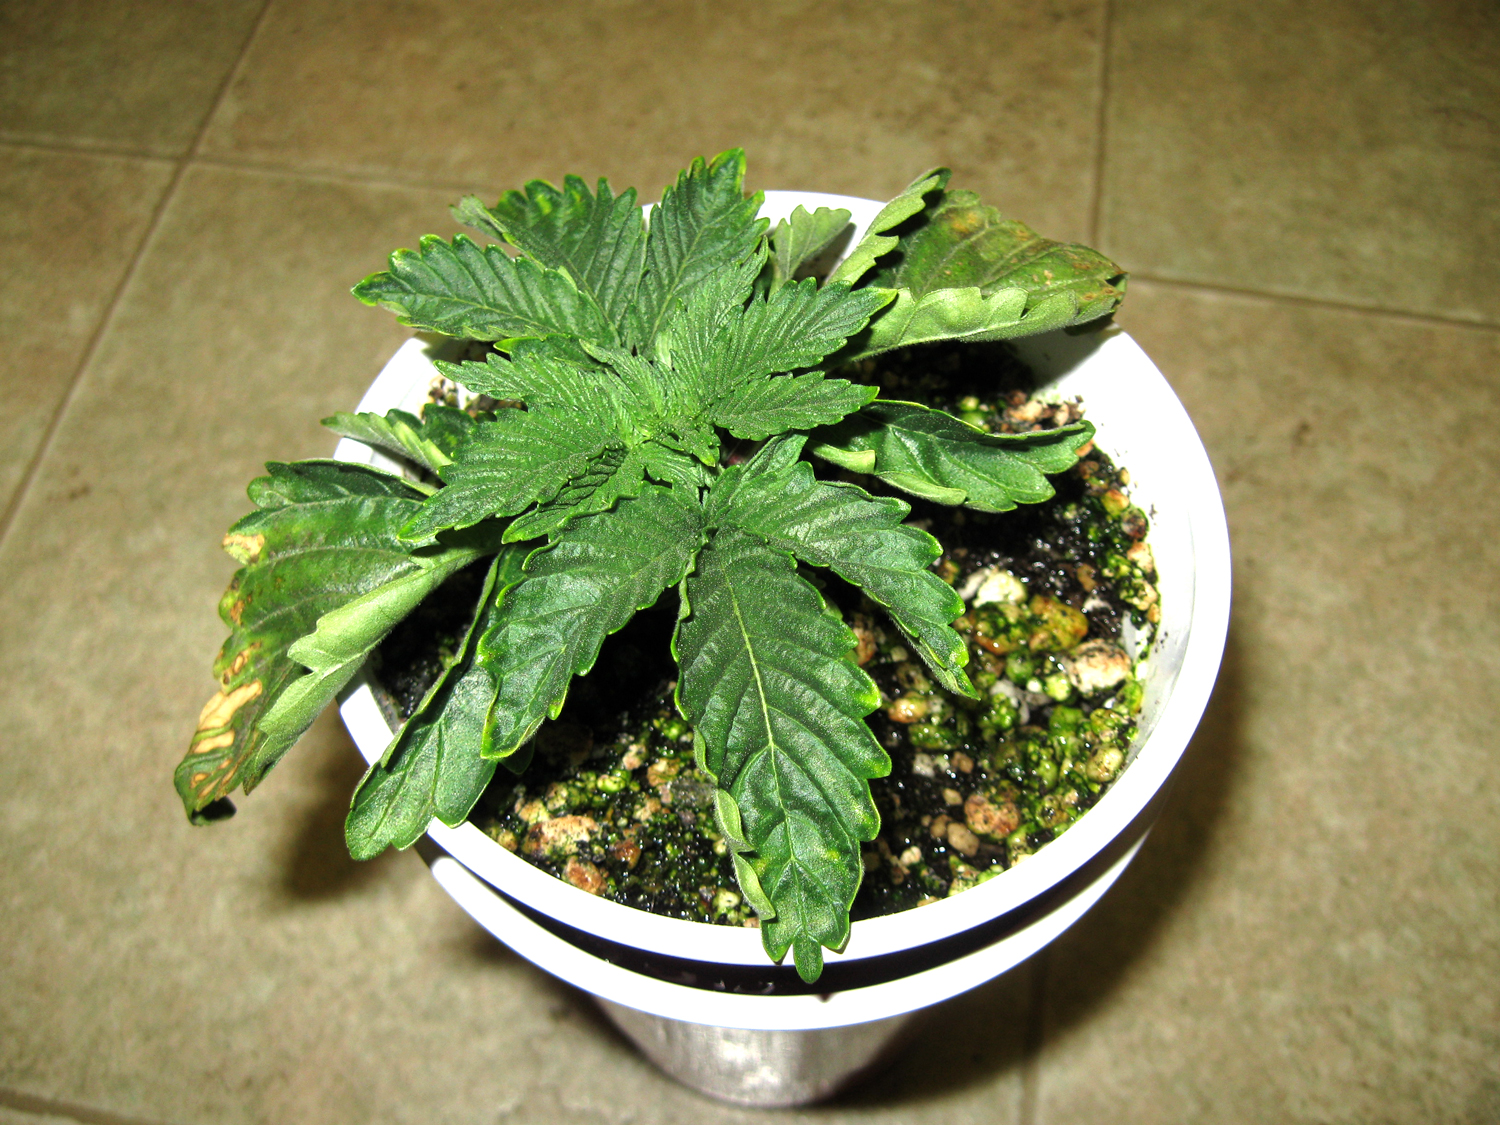
The grower of the next plant was going on vacation for a few days, so they chose to overwater their plant in hopes it would be enough water until they got back. While they were gone, they had a huge heat wave. So this plant was subjected to overwatering plus heat. A few days later, when the grower came back, they saw that the leaves were cuppping upwards and had turned lime green. The stems and veins of the leaves were turning red. You can see the soil is still dark and wet because the plant stopped drinking after developing root problems.
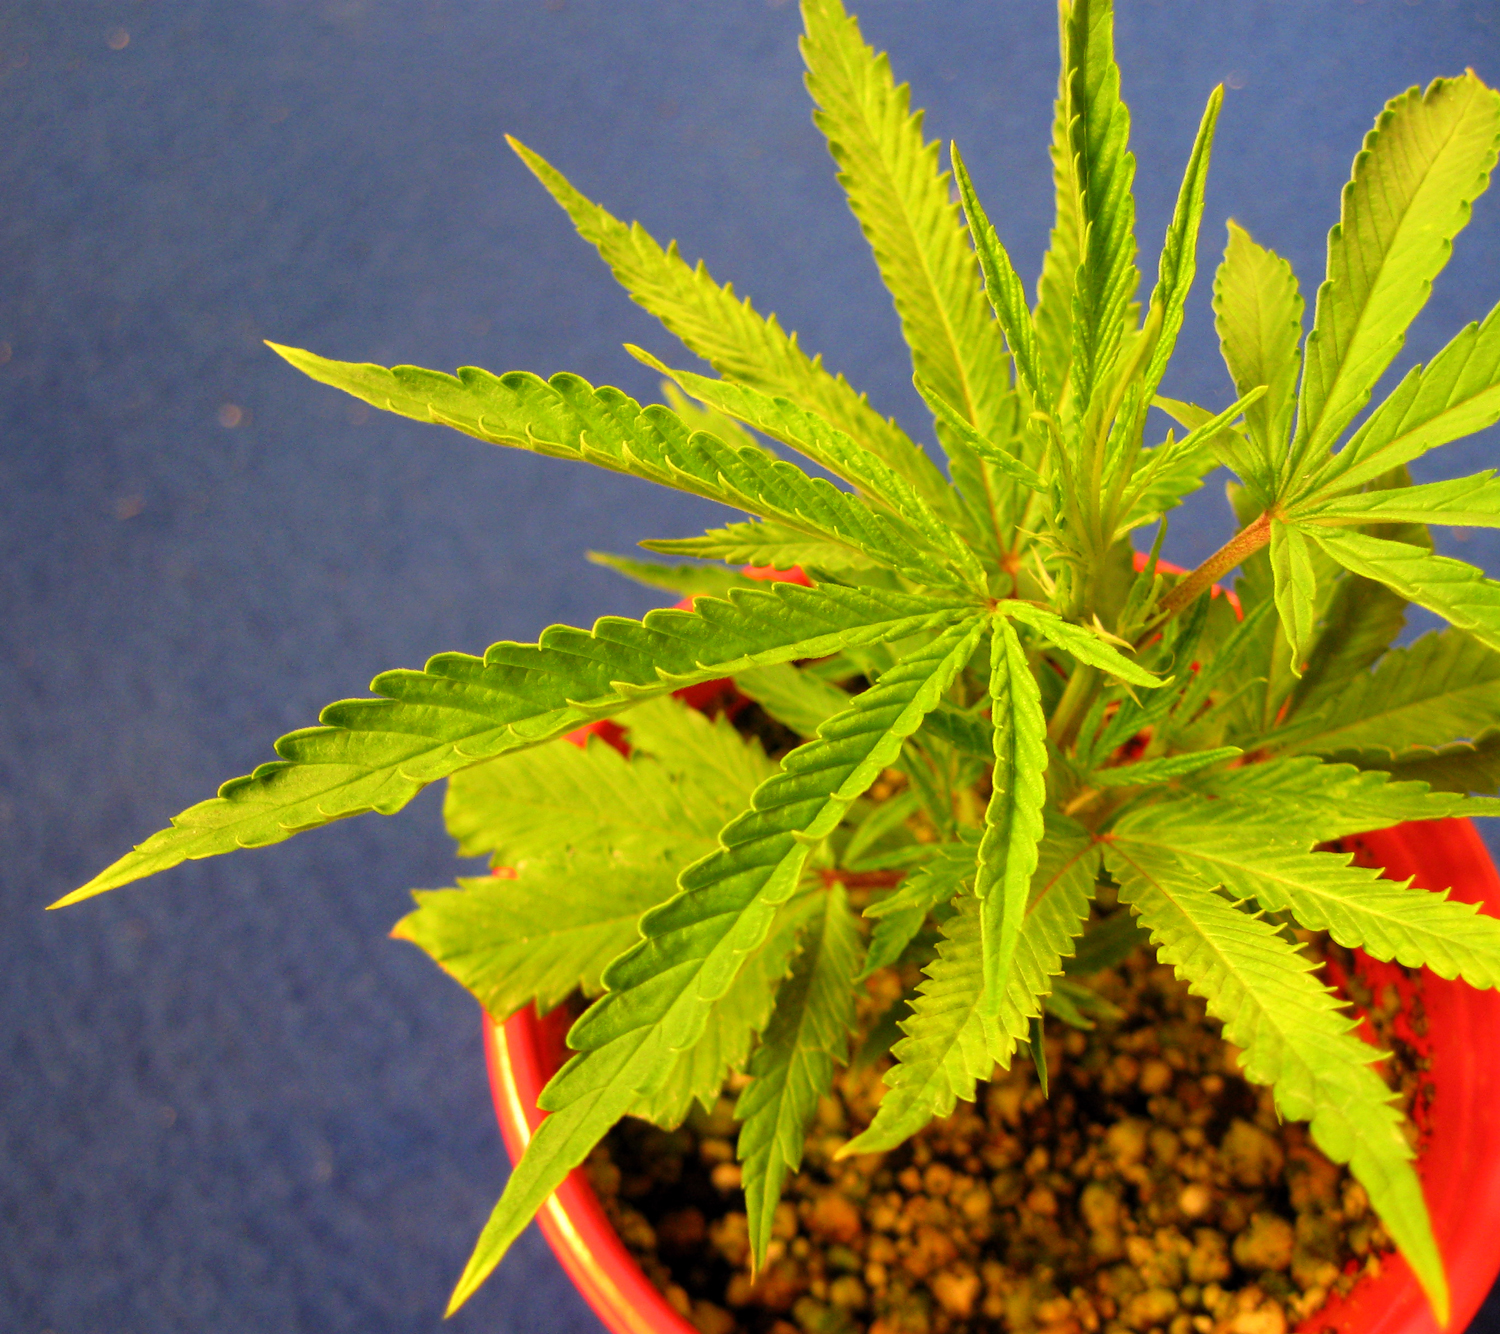
The plants below developed root rot in a hydroponic setup. This is usually triggered when the roots can't get enough oxygen, usually due to high temps or poor oxidation of the water. Notice the strange burnt appears on some of the bottom leaves. They turned almost white. The whole plant was drooping, especially towards the bottom. The roots turned brown (pictures below).
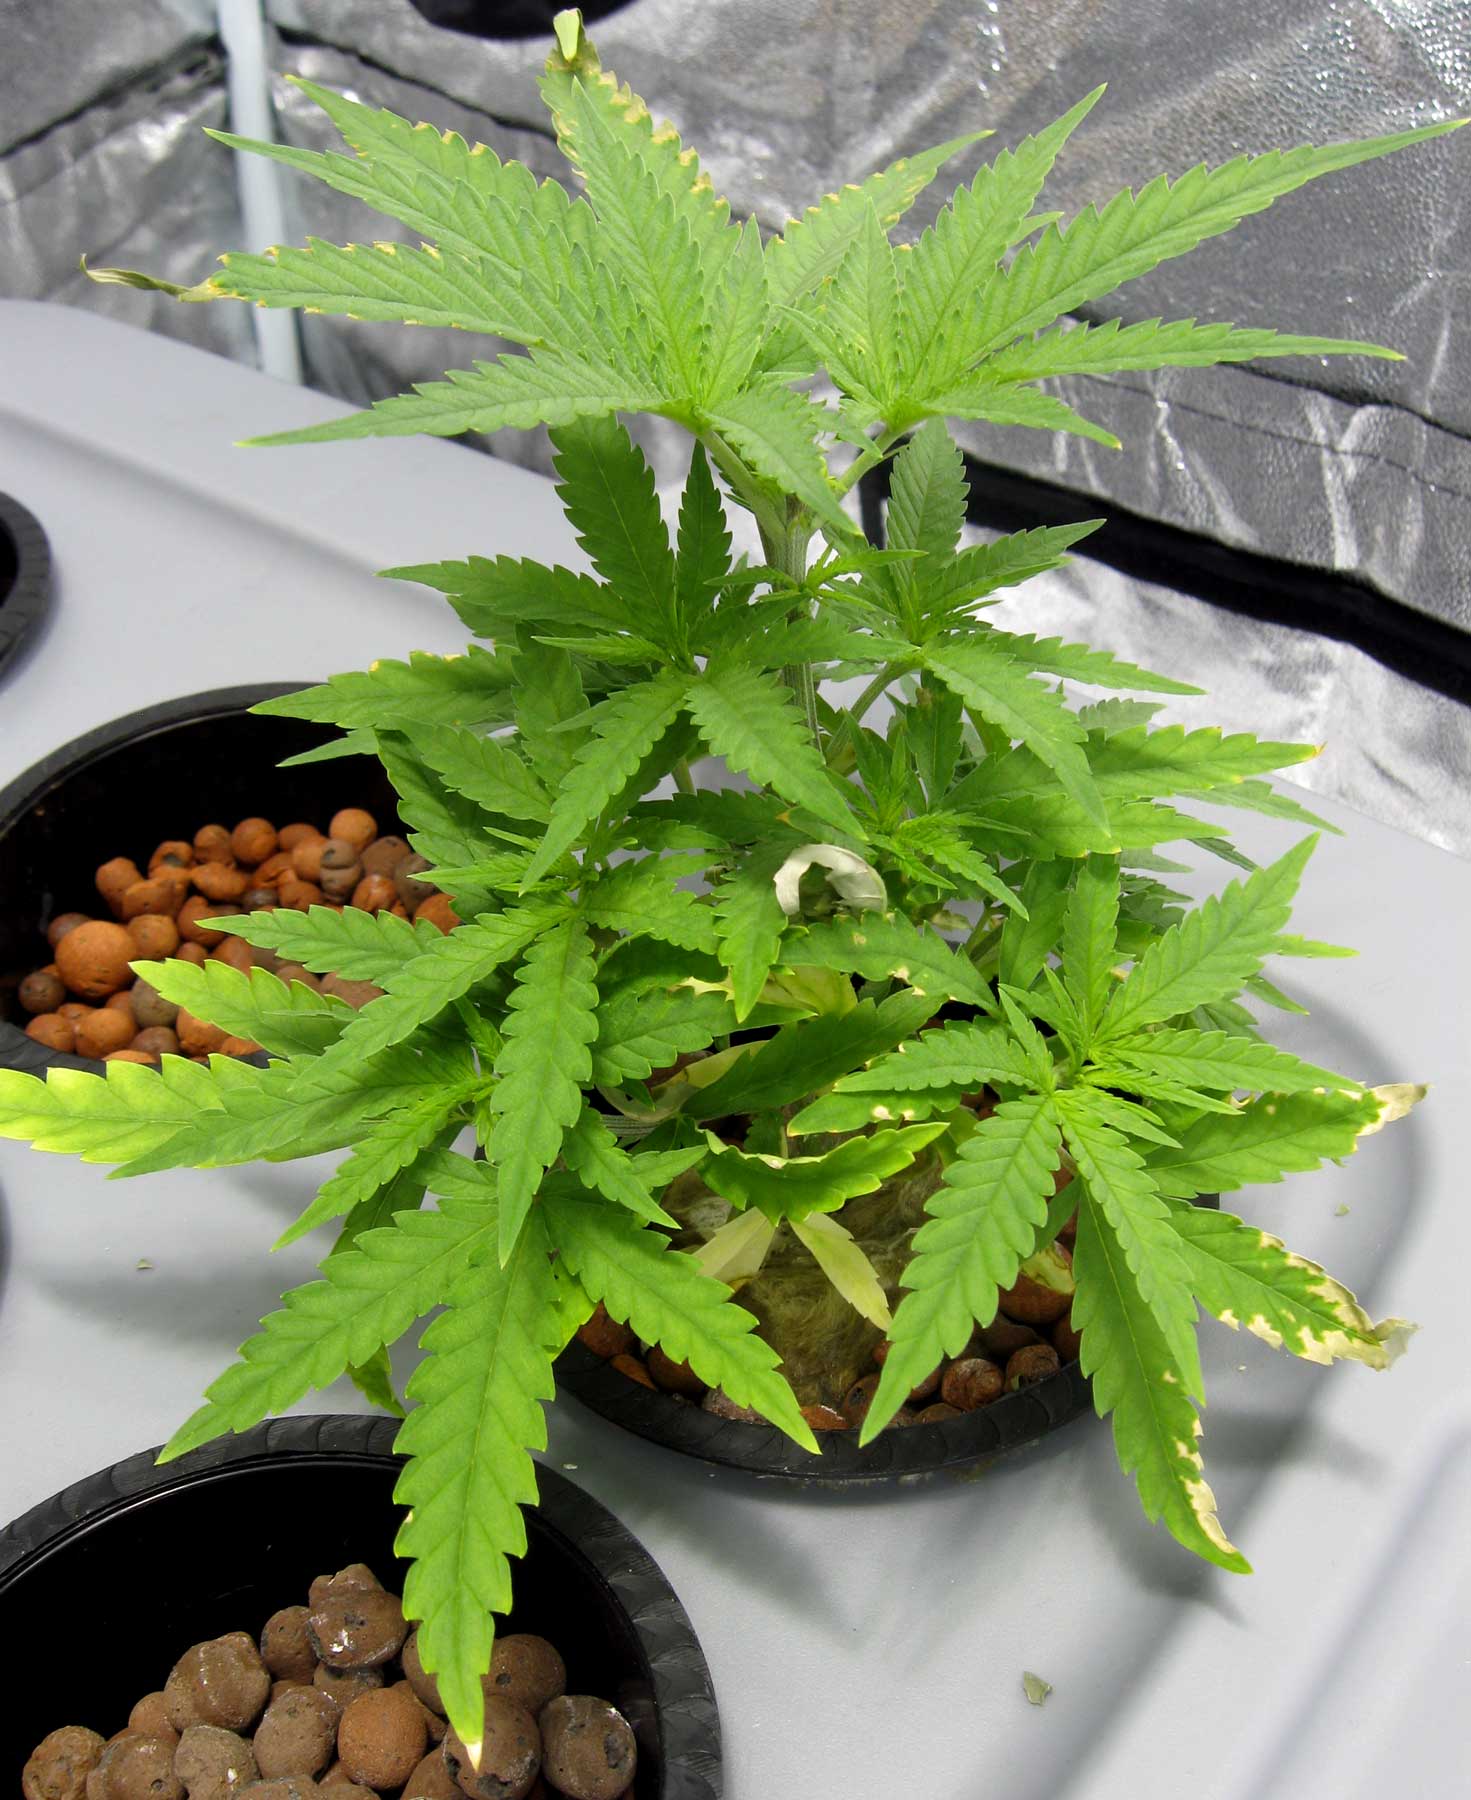
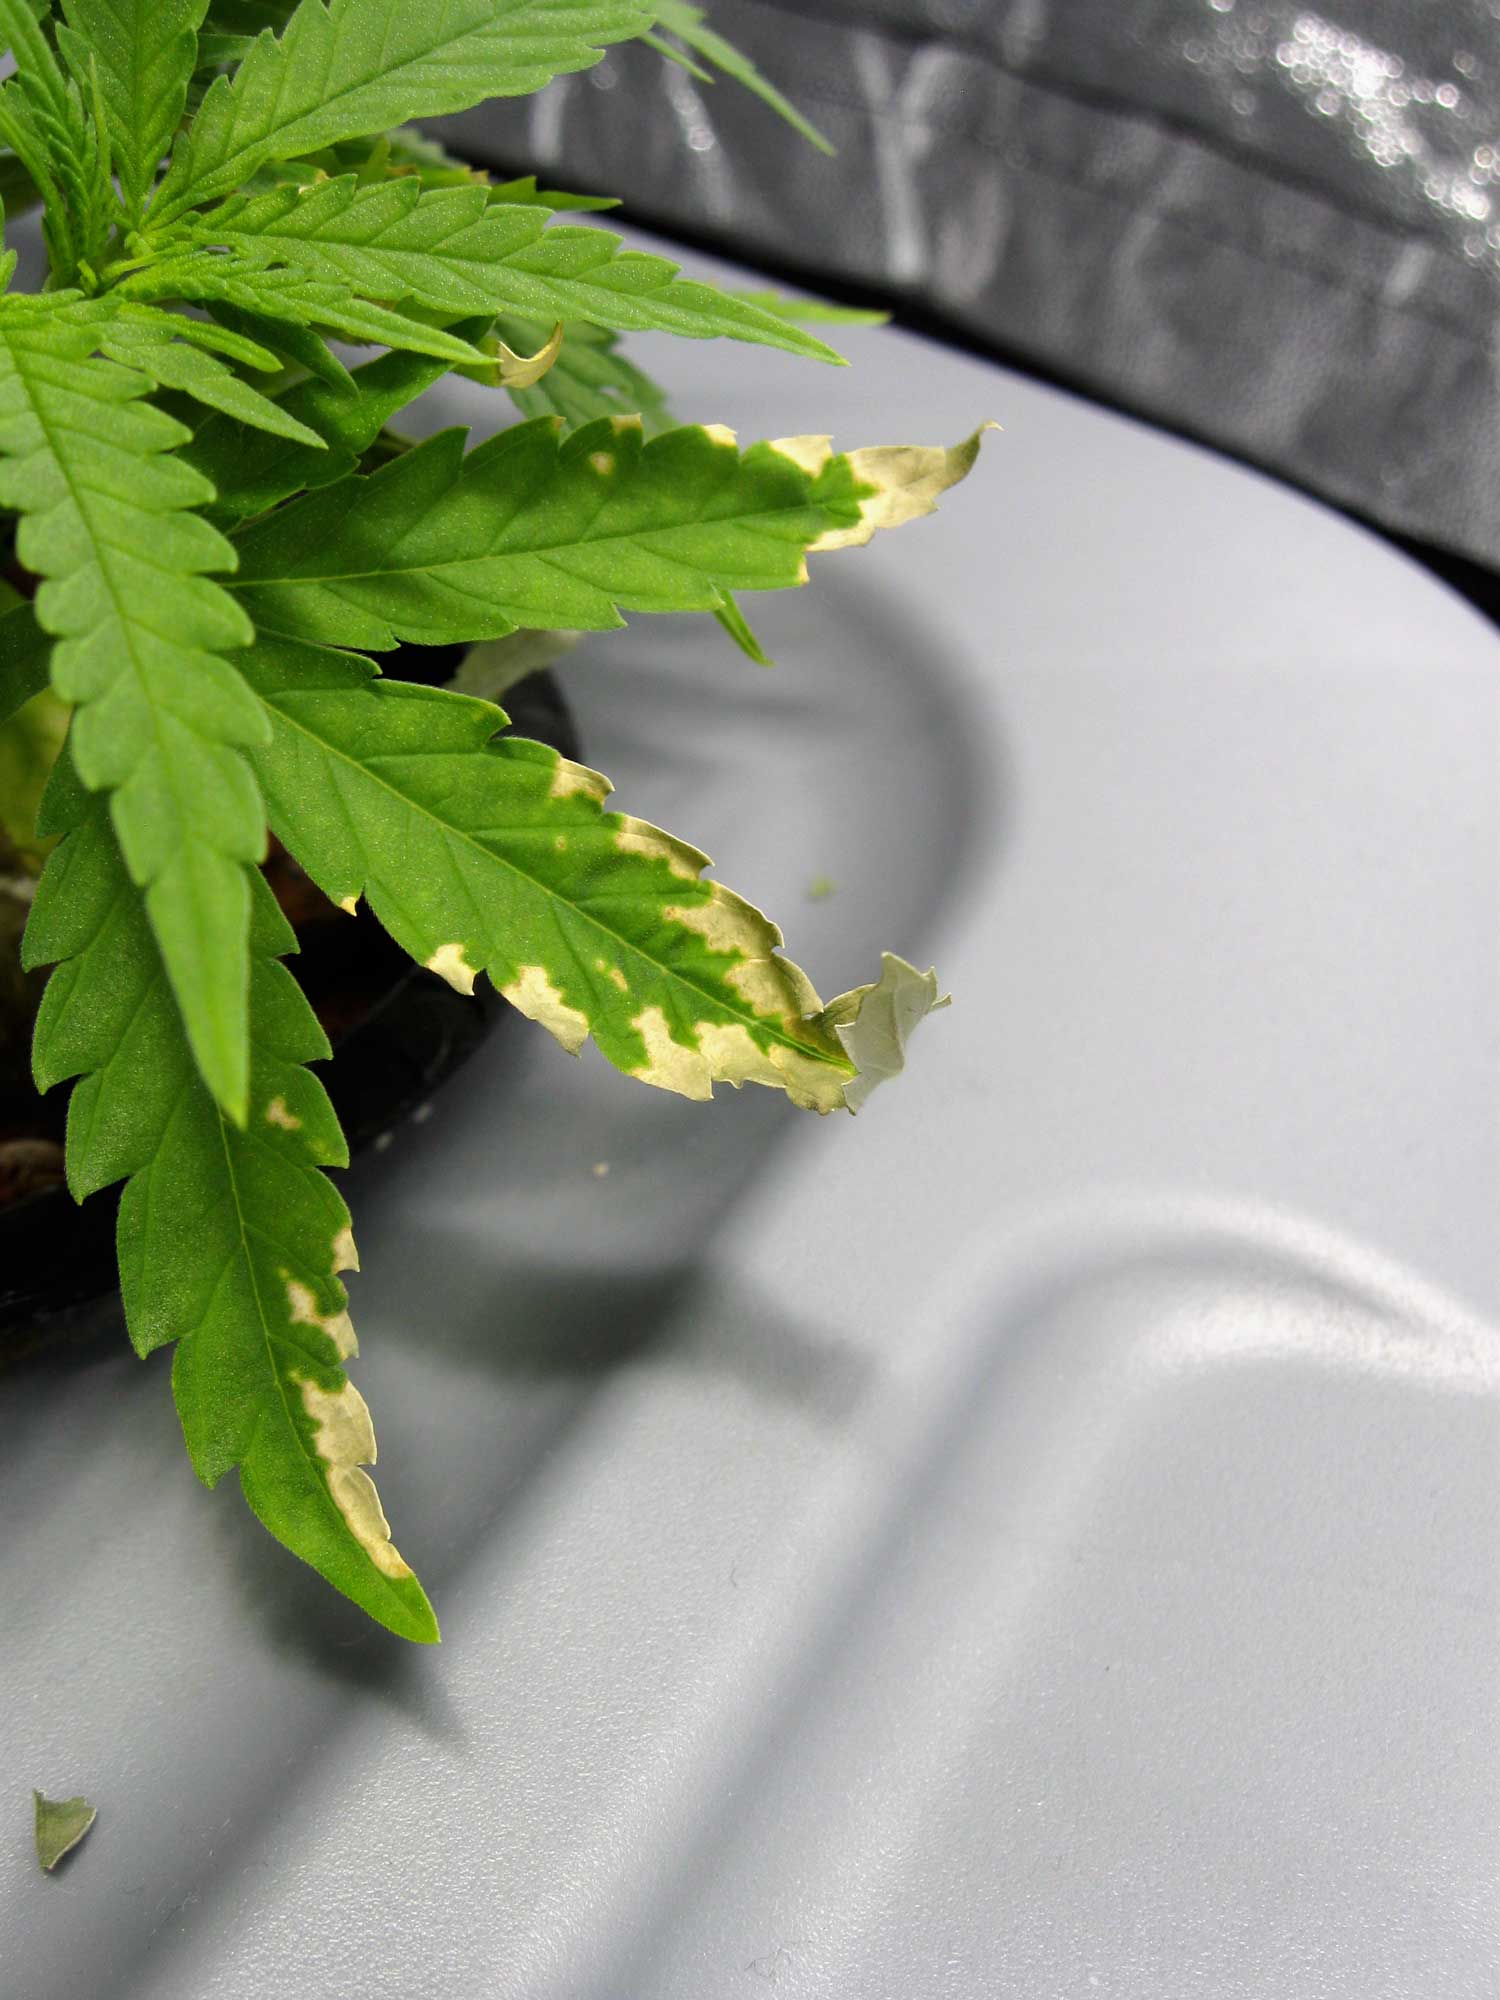
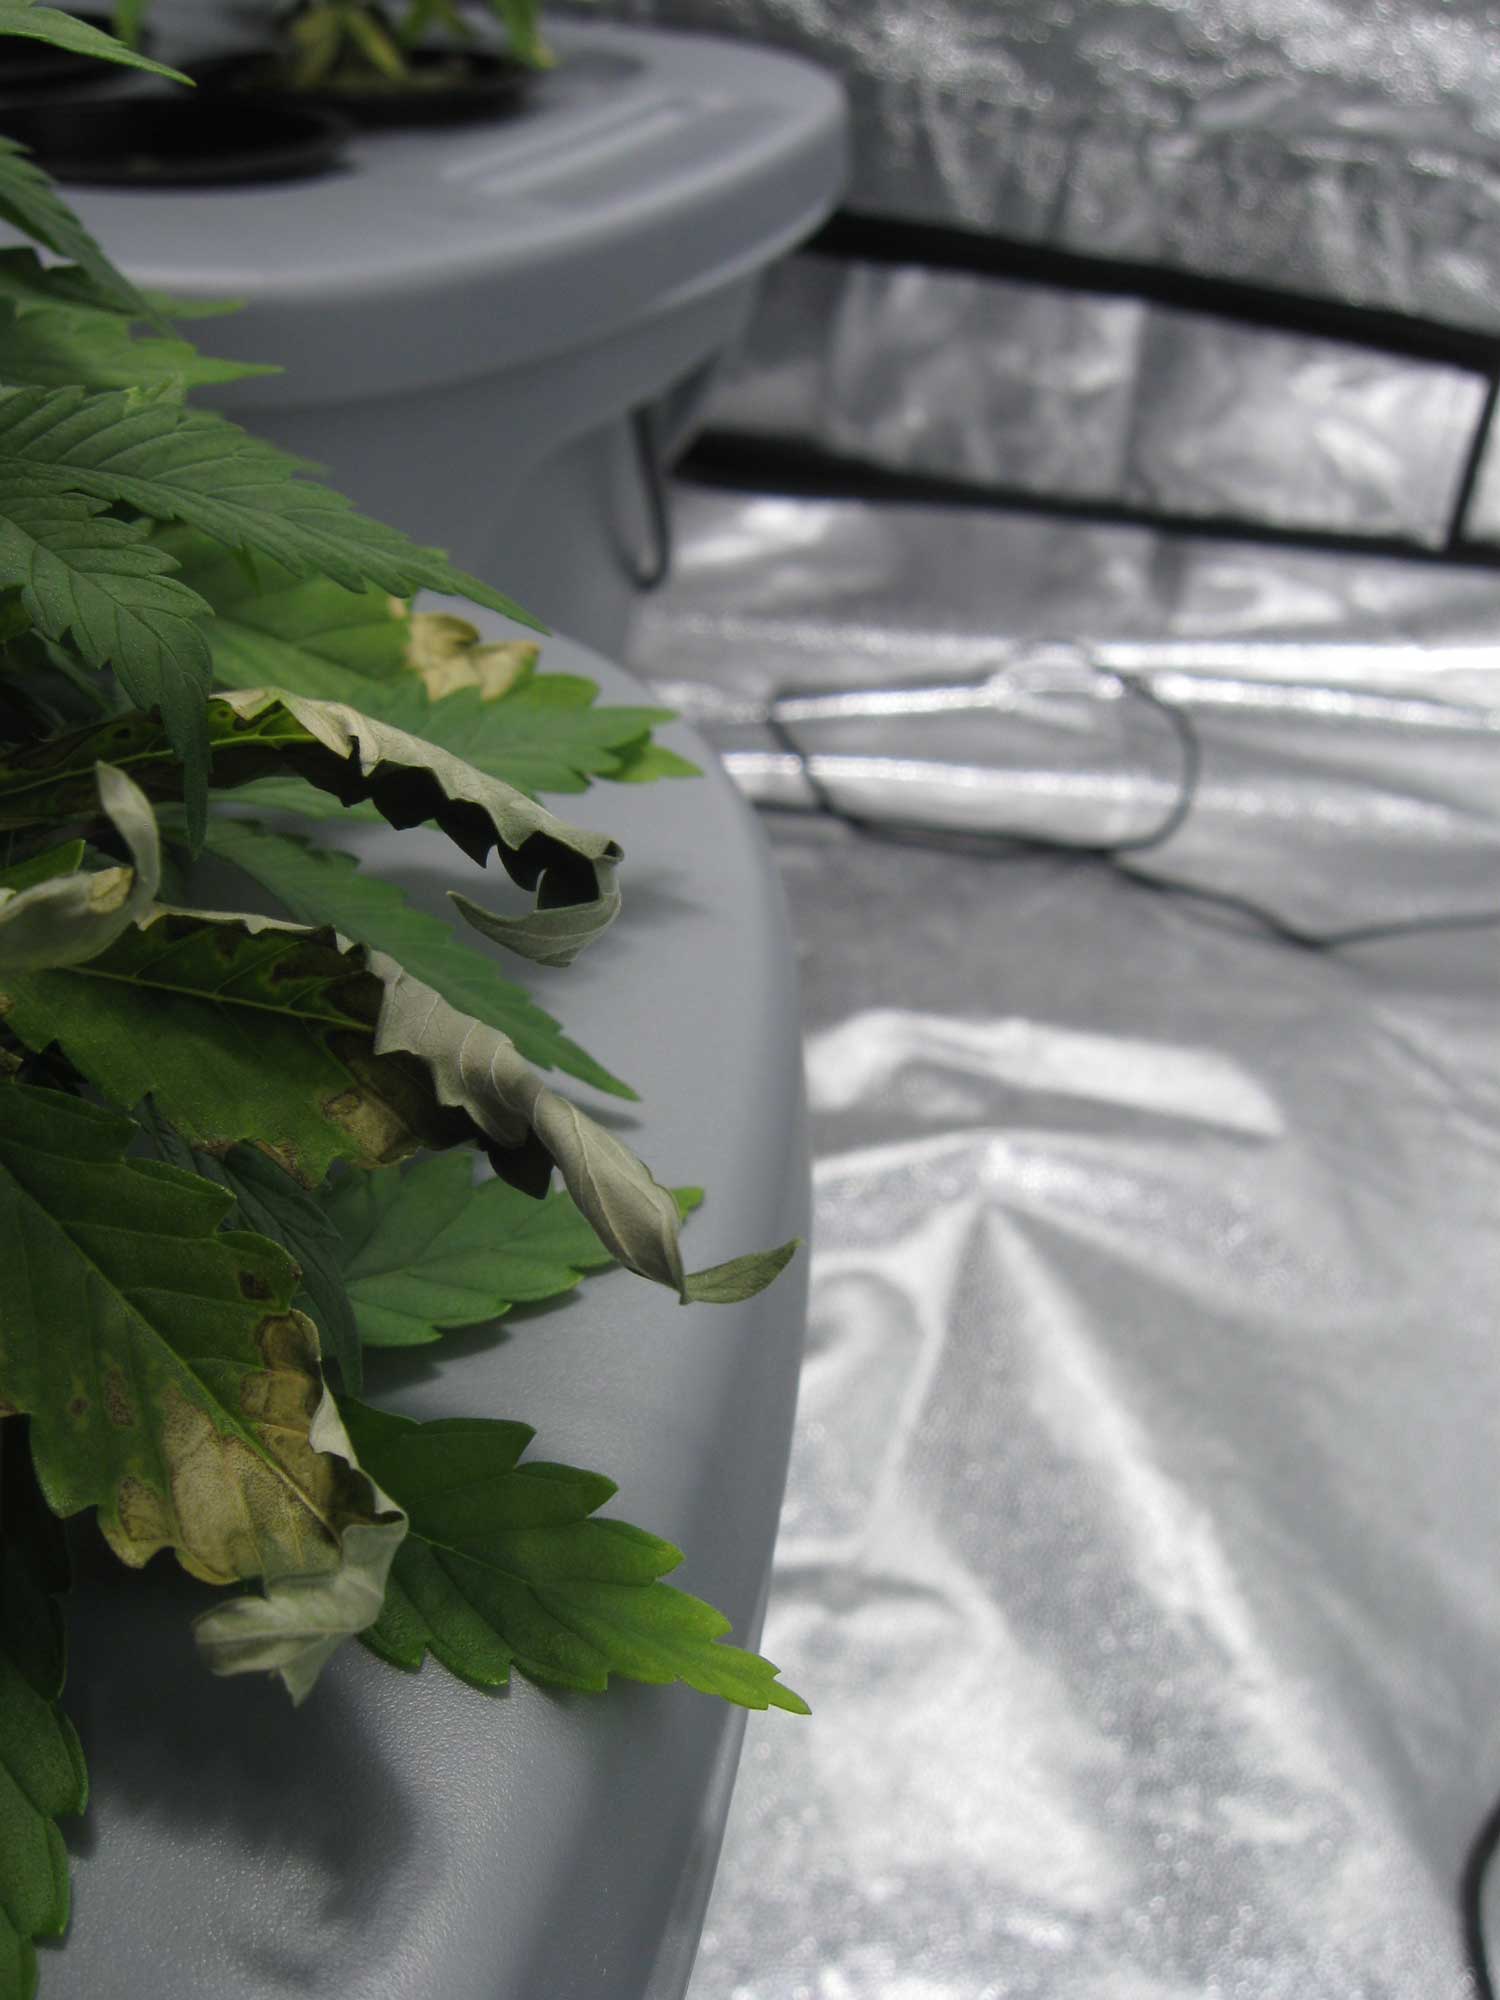
Root rot! No wonder the leaves were having so much trouble on top.
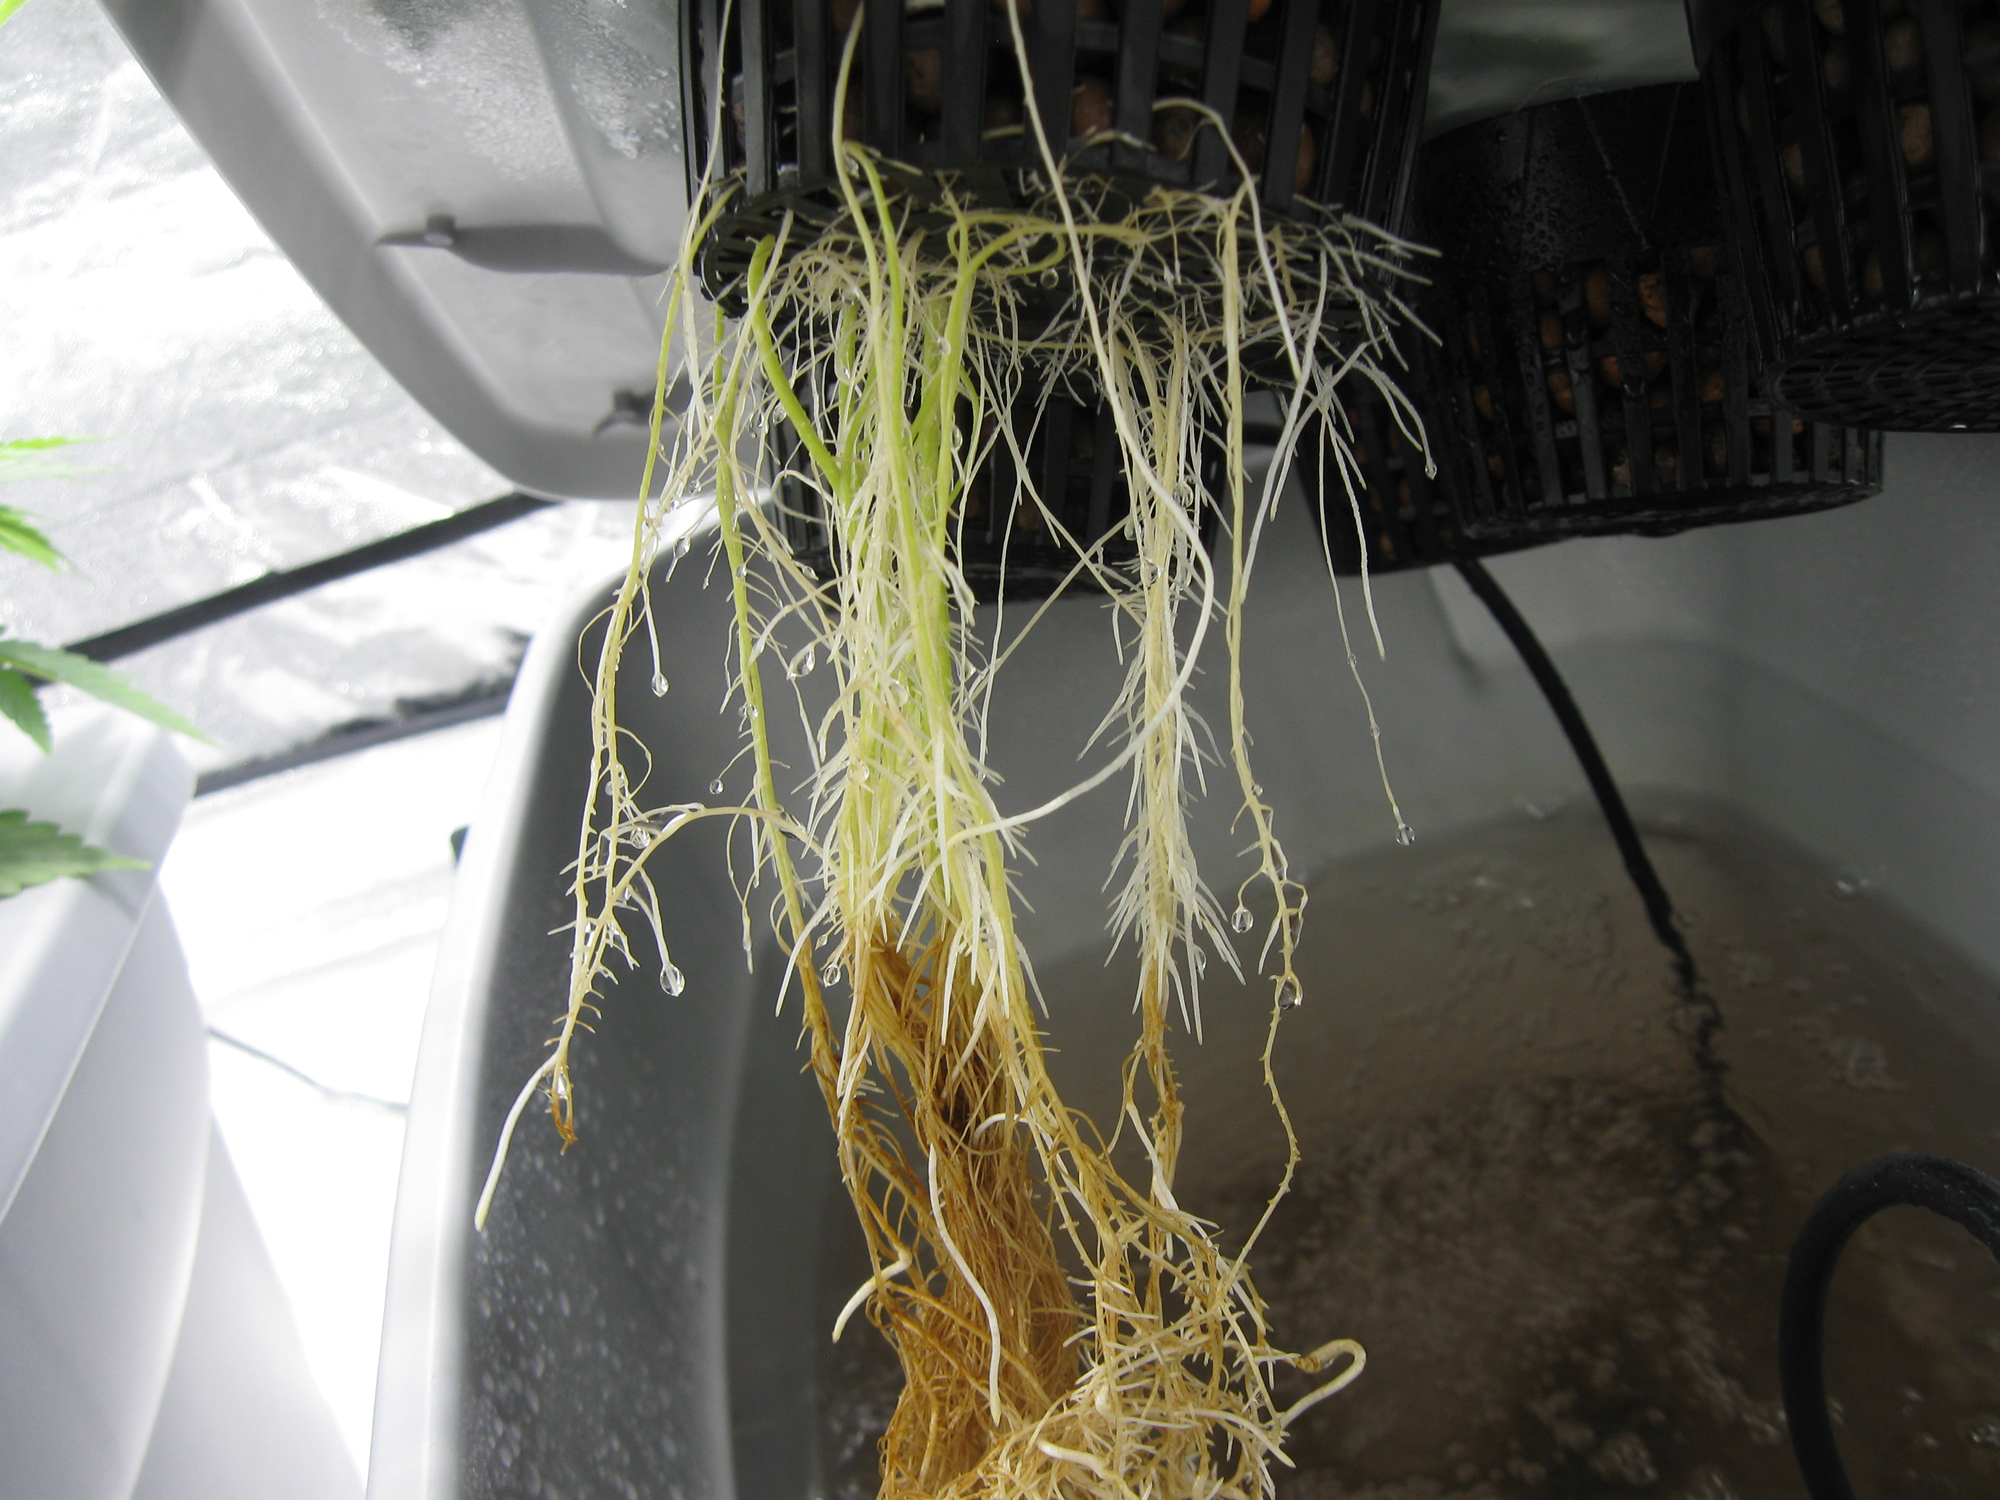
Learn How to Get Rid of Root Rot (common in hydroponic setups)
Possible Triggers For Root Problems
- Heat - cannabis is more likely to have root problems at higher temperatures
- Cold - cold roots are unhappy roots - cold shock can cause wilting and other problems
- Over-watering potted plants - too much watering tends to cause root problems
- No drainage hole at the bottom of the container - if water can't get out and water is sitting at the bottom of the pot, the roots can "drown"
- Muddy or thick soil - if your soil is muddy and thick instead of rich and fluffy, it may mean the soil doesn't hold enough oxygen to support your roots.
- Small plant in a big container - When a seedling (or small plant) is in a big container, it often has trouble getting enough oxygen at the roots. Until the plant has grown bigger and started to fill up the container, it's important to avoid overwatering. It can help to water just a little bit at a time, in a circle around the seedling, until it starts growing faster.
- Big plant in a small container - when roots overgrow their container the plant is considered "root-bound" and the plant often shows symptoms of root problems. When this happens the plant needs to be transferred into a larger container to stop the roots from being "choked."
- Hydroponics - Root problems are caused when there's not enough oxygen in the water, usually caused because it's either too hot or there isn't enough bubbles/aeration
Certain strains are more prone to root problems than others, but good root practices will allow every plant to thrive!
Step 1: Identify what may have caused the root problem (refer to list of possible triggers above)
Step 2: Address this underlying issue
- Happy temps - Make sure your grow area maintains a comfortable room temperature during the day, and is a few degrees cooler at night. Learn more about how temperature affects your cannabis plants.
- Only water your plants when they need it. How often should I water my potted cannabis plants?
- Make sure potted plants have plenty of drainage, and there must be drainage holes at the bottom. If soil or growing medium holds a lot of water, consider mixing in 1/3 to 1/2 extra perlite to "loosen things up" and improve drainage at the roots.
- Put plants in the right sized container to give the roots the best environment to spread out and grow
- Brown, smelly roots? Learn how to get rid of root rot
Step 3: (Optional) Provide your plant with a beneficial bacteria like Hydroguard to help roots recover quickly (more info about root supplements below). Hydroguard will help fight root rot by creating a colony of good organisms to outcompete the root rot.
 Don't Use Hydrogen
Peroxide (H2O2) for root problems! H2O2 is temporarily
effective at best
when it comes to root problems. By it's nature, even commercial grade
H2O2 will be completely gone from a water reservoir after about 24
hours as it reacts with the water to form oxygen (decomposes) until the
H2O2 is completely gone.
Don't Use Hydrogen
Peroxide (H2O2) for root problems! H2O2 is temporarily
effective at best
when it comes to root problems. By it's nature, even commercial grade
H2O2 will be completely gone from a water reservoir after about 24
hours as it reacts with the water to form oxygen (decomposes) until the
H2O2 is completely gone.
If H2O2 is added to a water source, it kills most of the bacteria in the water, including any good bacteria, but will not usually be able to kill all bacteria, so some bad bacteria will still be left to repopulate. Because of it's nature, hydrogen peroxide does absolutely nothing to fix the underlying issue that causes root problems, and it kills any postive bacteria in your soil or water so sometimes it can actually make things worse. I think of H2O2 as a temporary bandaid.
 I personally
recommend using a supplement called Botanicare Hydroguard for root
problems because I've used it successfully to get rid of a terrible
case of Root Rot
I personally
recommend using a supplement called Botanicare Hydroguard for root
problems because I've used it successfully to get rid of a terrible
case of Root Rot
Note: Botanicare used to have an awesome root innoculant called Aquashield, but in our tests Hydroguard works even better to create healthier roots and get rid of root rot!
Hydroguard is also much cheaper than most other similar root treatments and is proven to work well at supporting root health in cannabis. Take a look at our root rot page to see pictures of how Hydroguard was able to completely cure a terrible case of root rot.
Other examples of beneficial root supplements include Piranha, VooDoo Juice, Great White (Great White has great reviews, yet is obscenely expensive), Subculture B, Rooters, and Plant Savers. Most of these can be used with both hydro and soil grows. I personally recommend Hydroguard because I've used it successfully to treat Root Rot (and it's also very affordably priced, you can use it throughout your grow without breaking the bank).
One important thing to note is that after you treat the cause of root problems, the old damaged leaves may never recover! With recovery, you should be looking for the problem to stop spreading, and for new leaves to be growing in green and healthy.
Jump to...
7 Tips to Growing Top Shelf Buds
What supplies do I need to start growing indoors (or upgrade)?
Pests, Bugs, and Cannabis Viruses
Enough of all the pics with sad or unhappy roots - before you go, here's a picture of healthy roots growing from a new clone!
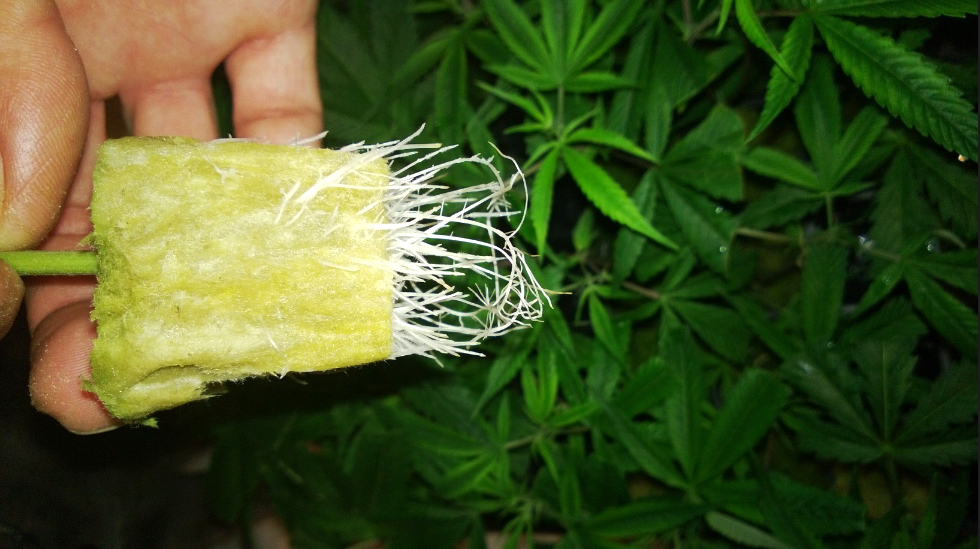
Taken by awesome grower Merrie Jayne
Root Rot
by Sirius Fourside

Marijuana Root Rot & Root Slime
Problem: Roots need water, but if they are exposed to water with bacteria they will start to rot. Roots that have been drowning in too much water without enough available oxygen are much more susceptable to problems.
Healthy roots are white to cream-colored while roots affected by root rot are brownish and actually may even smell like mildew or rotting.
Plants affected by root rot will spontaneously start losing their leaves, yellowing, drooping, wilting, and otherwise look like they're dying.
The very first sign of root rot in cannabis (besides brown roots) is usually wilting. Sometimes the plant will not wilt, or will recover from wilting while still showing other signs of root rot. Although wilting is common, you cannot be sure your plant doesn't have root rot just because it's not wilting. It's much more important to look at the roots in order to accurately diagnose root rot.
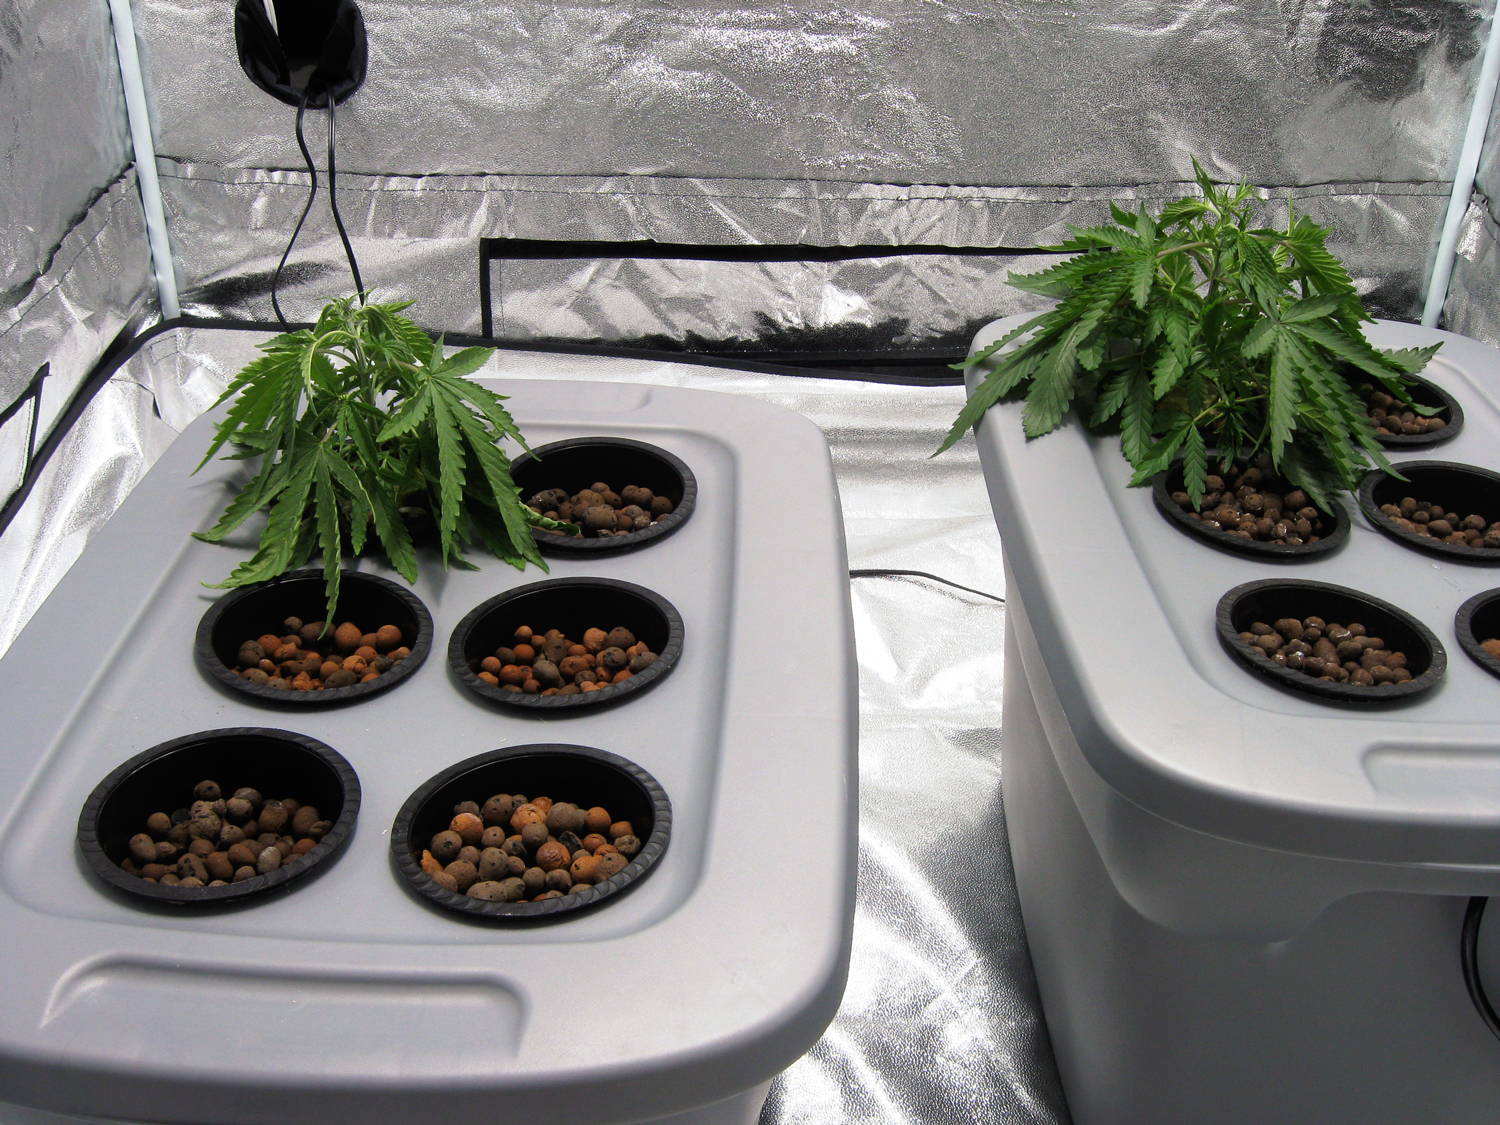
The wilting will soon be followed by other symptoms to the leaves, especially burning, brown spots, nutrient deficiencies, spotting, and other unusual leaf symptoms.
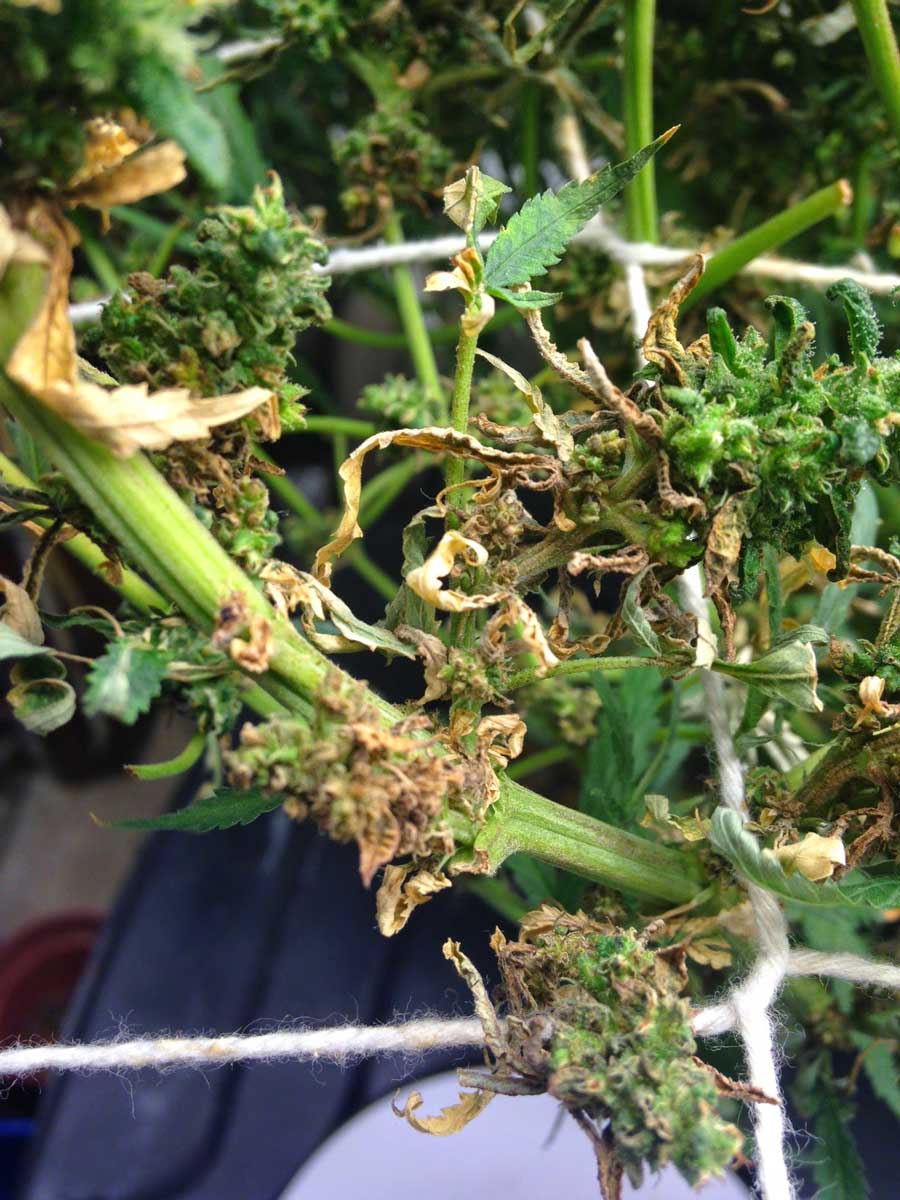
You will also notice that affected plants will start drinking less water. If you notice these symptoms in your cannabis plant, then it can't hurt to try all the suggestions for stopping root rot.
It's important to notes that damage is permanent to both the roots and the leaves.
Old brown roots will never turn white again. Brown leaves will never turn green again. You need to insteaed be looking at new growth for signs of root rot recovery.
A recovering plant will be able to make new growth, but it's old infected roots will likely never recover. Instead, you know that recovery is happening when new white roots start growing from the old brown ones.
Root rot mostly affects hydroponic systems, but can also result from over watering your plants in soil or other medium. Basically anytime the roots are sitting in water, they are at risk of devloping root rot.
- Plants may appear overwatered or droopy, sometimes plants wilt overnight
- Brown, slimey, smelly roots
- Plant leaves often start turning yellow or white
- Leaves start dying and falling off rapidly
- Oftentime you'll see what appears to be a random mix of nutrient deficiencies on the leaves - this is due to the fact that the plant can't absorb nutrients properly at the roots even if they're there
- Plants drink much less water than usual
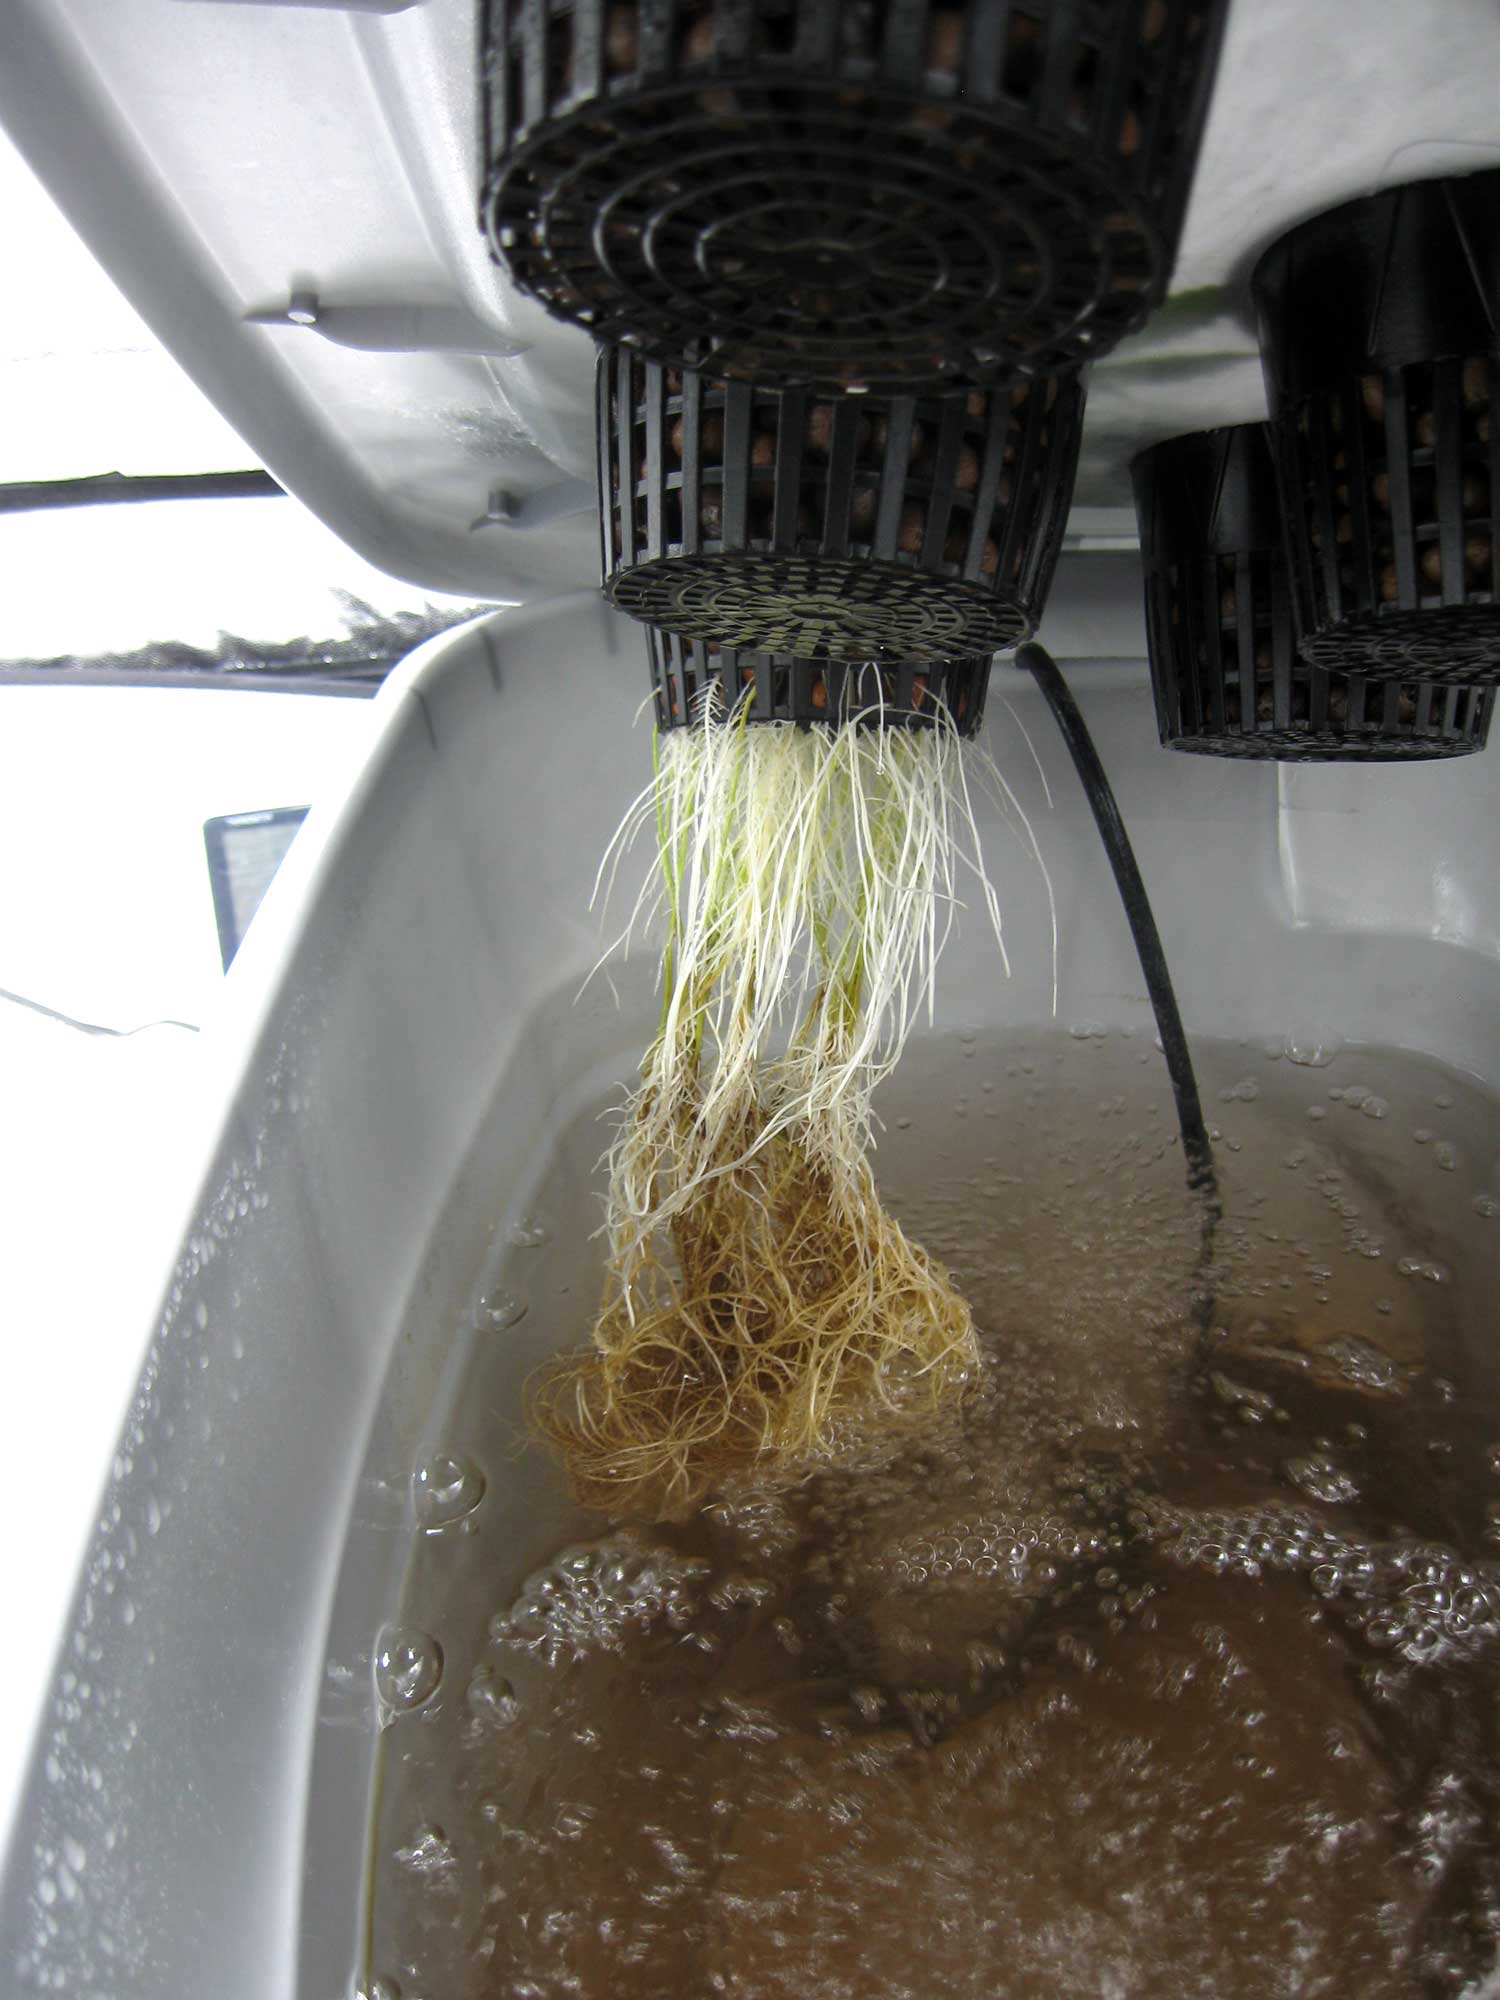
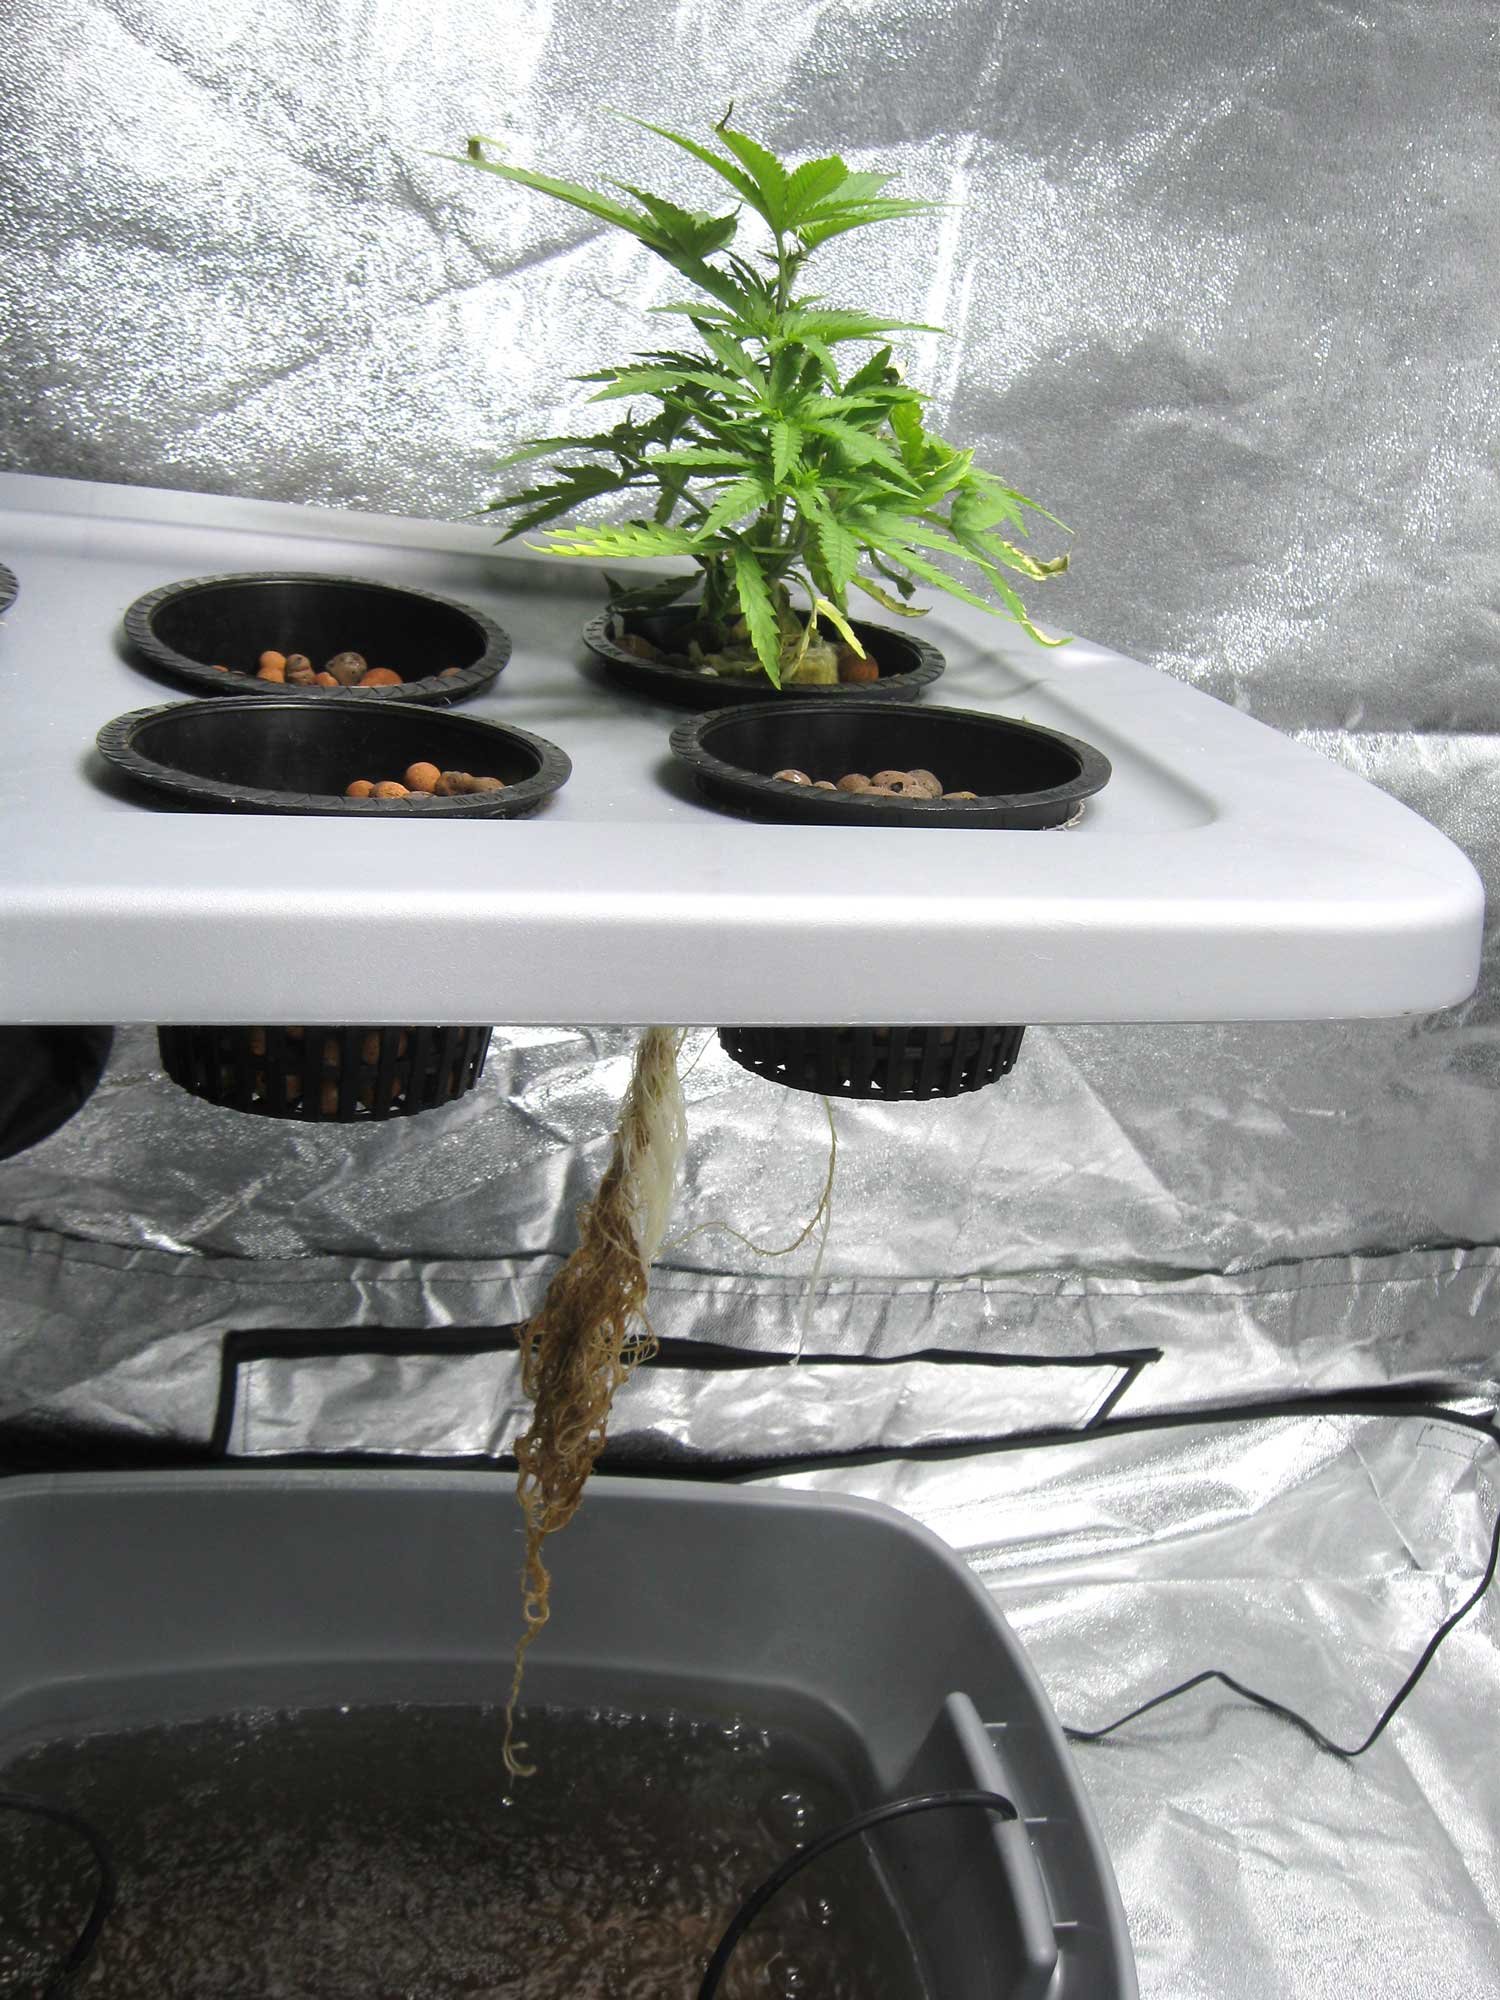
Solution: It can be tough to get rid of root rot and many people feel it's easier to just scrap the plant and start over. However, there are proven techniques that will cure your plant of root rot problems. In order to get rid of root rot successfully, you need to take a two pronged approach. You will need to treat the plant's root directly and you will also need change the plant's environment so that root rot no longer has a good place to grow.
If you don't fix the environmental causes of root rot, then it will just keep coming back no matter what you do. Therefore, it's important to go through the below list and make sure you're covering all your bases to prevent a re-occurrence. It's also important to note that affected roots will likely never recover, just like how discolored leaves on the plant will never recover. What you're looking for is new, healthy white root growth.
How to prevent and treat root rot:
-
Lower the temperature of the grow space, which also lowers the temerature of the water in your reservoir. Water can't hold much dissolved oxygen at higher temperatures and your plants need oxygen to "breathe." Getting more oxygen to the roots not only prevents root rot, it makes your plants grow much faster. If it's too hot in the grow space, you're much more likely to run into root rot. The maximum recommended temperature for the water in your reservoir is around 72°F (22°C). When using a great supplement like Hydroguard you can usually keep the temps a bit higher without as much of a problem.
-
Some people like to add beneficial bacteria to their water to help prevent and treat root-related plant diseases and help make nutrients available to the plant. Some of the formulas available are Hydroguard, Aquashield, Piranha, VooDoo Juice, Great White (Great White has great reviews, yet is obscenely expensive), Subculture B, Rooters, and Plant Savers. Most of these can be used with both hydro and soil grows. I personally recommend Hydroguard because I've used it successfully to treat Root Rot (and it's also very affordably priced, you can use it throughout your grow without breaking the bank).
-
As I mentioned, it is incredibly beneficial to try to get as much oxygen as possible dissolved in your water. Therefore it's a good idea to buy a BIG air pump and big air stones for your hydroponic system. The more bubbles and surface agitation, the better, as this dissolves more oxygen into the water. Root rot cannot thrive in an oxygen-rich environment and your plants roots will love it. I use one EcoPlus 2 Air Pump w/ 2 Outlets for each 10 gallon container, which I have connected to 2 large air stones per air pump (since this one 2 outlets - this helps make sure there's plenty of oxygen in the water healthy roots and faster growth). This has worked great for me - I haven't had root rot since I started using this air pumps/air stone combination.
-
If you have a hydroponic system, it's best to change your reservoir water regularly. I recommend trying to change your water at least every two weeks, though many growers recommend you change the reservoir once a week. Regularly changing your water will also help your plants get better access to nutrients, and help prevent deficiencies and toxicities.
-
In a hydroponic system, make sure that any dead roots, dead leaves or other types of plant debris doesn't get into the reservoir because they will provide a breeding ground for bad bacteria as they start rotting. If you do notice organic matter in the res, fish it out as soon as possible.
-
Don't let any light get to your roots or reservoir water, as it provides heat and light which will promote the growth of bacteria.
-
You will need to keep your grow area as clean as possible at all times to stop bacteria before it starts. Before you begin your grow, you should also thoroughly clean all grow-related items to kill all bacteria.
-
Some people recommend treating root rot with H2O2, also known as hydrogen peroxide. While adding hydrogen peroxide to your water will kill all bacteria including root rot, it is only effective in your system for a day or since the H2O2 is quickly converted to oxygen and water. Therefore, if you use hydrogen peroxide as a treatment for root rot, you will need to treat your water daily to prevent re-occurances. I have tried used commercial grade H2O2 before, and I was never able to use it to get rid of root rot, so this is NOT RECOMMENDED!
Your plant can completely recover from root rot as long as you catch the problem early enough, so it's important to stay vigilent of root rot during your first couple of grows, expecially when growing with hydroponics
Don't Use Hydrogen
Peroxide (H2O2)! H2O2 is temperarily effective at
best
when it comes to getting rid of root rot. It makes me so sad when
people tell growers to use H2O2 (hydrogen peroxide) to kill root rot.
Even the commercial grade stuff just doesn't work (and I've tried)!
All H2O2 does is cause bubbling near the dead brown roots (or any organic matter), which is why I think people believe it's helping. In my experience it doesn't help the plants themselves (they don't look any better), and what's worse, all the H2O2 will be completely gone from the water within 24 hours.
H2O2 kills most of the bacteria in the reservoir, including any good bacteria, and does absolutely nothing to address the underlying problem. Although H2O2 does kill bad bacteria, it leaves enough of it there to repopulate your reservoir. As common as the advice to use H2O2 for root rot is, I've never seen a case by a real grower who was actually able to get rid of root rot with H2O2.
 I personally
recommend Botanicare Hydroguard (the
newer, improved version of Botanicare's popular "Aquashield" root
supplement) for marijuana root problems because I've used it
successfully to get rid of a terrible case of Root Rot (and
by 'successul' I mean new white roots exploded out of the old mushy
brown ones and I was able to eventually harvest the buds - look at the
pics below).
I personally
recommend Botanicare Hydroguard (the
newer, improved version of Botanicare's popular "Aquashield" root
supplement) for marijuana root problems because I've used it
successfully to get rid of a terrible case of Root Rot (and
by 'successul' I mean new white roots exploded out of the old mushy
brown ones and I was able to eventually harvest the buds - look at the
pics below).
Hydroguard (and their old supplement Aquashield) are also much cheaper than most other similar root treatments.
One important thing to note is that after you treat the cause of root rot, the old brown roots will likely never recover. Neither will the damaged leaves!
Take a look at what happens with the roots from using a supplment like Hydroguard or Aquashield.
With recovery...
What you are looking for is new healthy white roots growing out of the old brown roots. Eventually, as the root ball gets bigger, you will no longer be able to see the old brown roots. After you start noticing a recovery, some growers will snip off old dead roots, but I often don't.
Before - Roots Just Got Root Rot
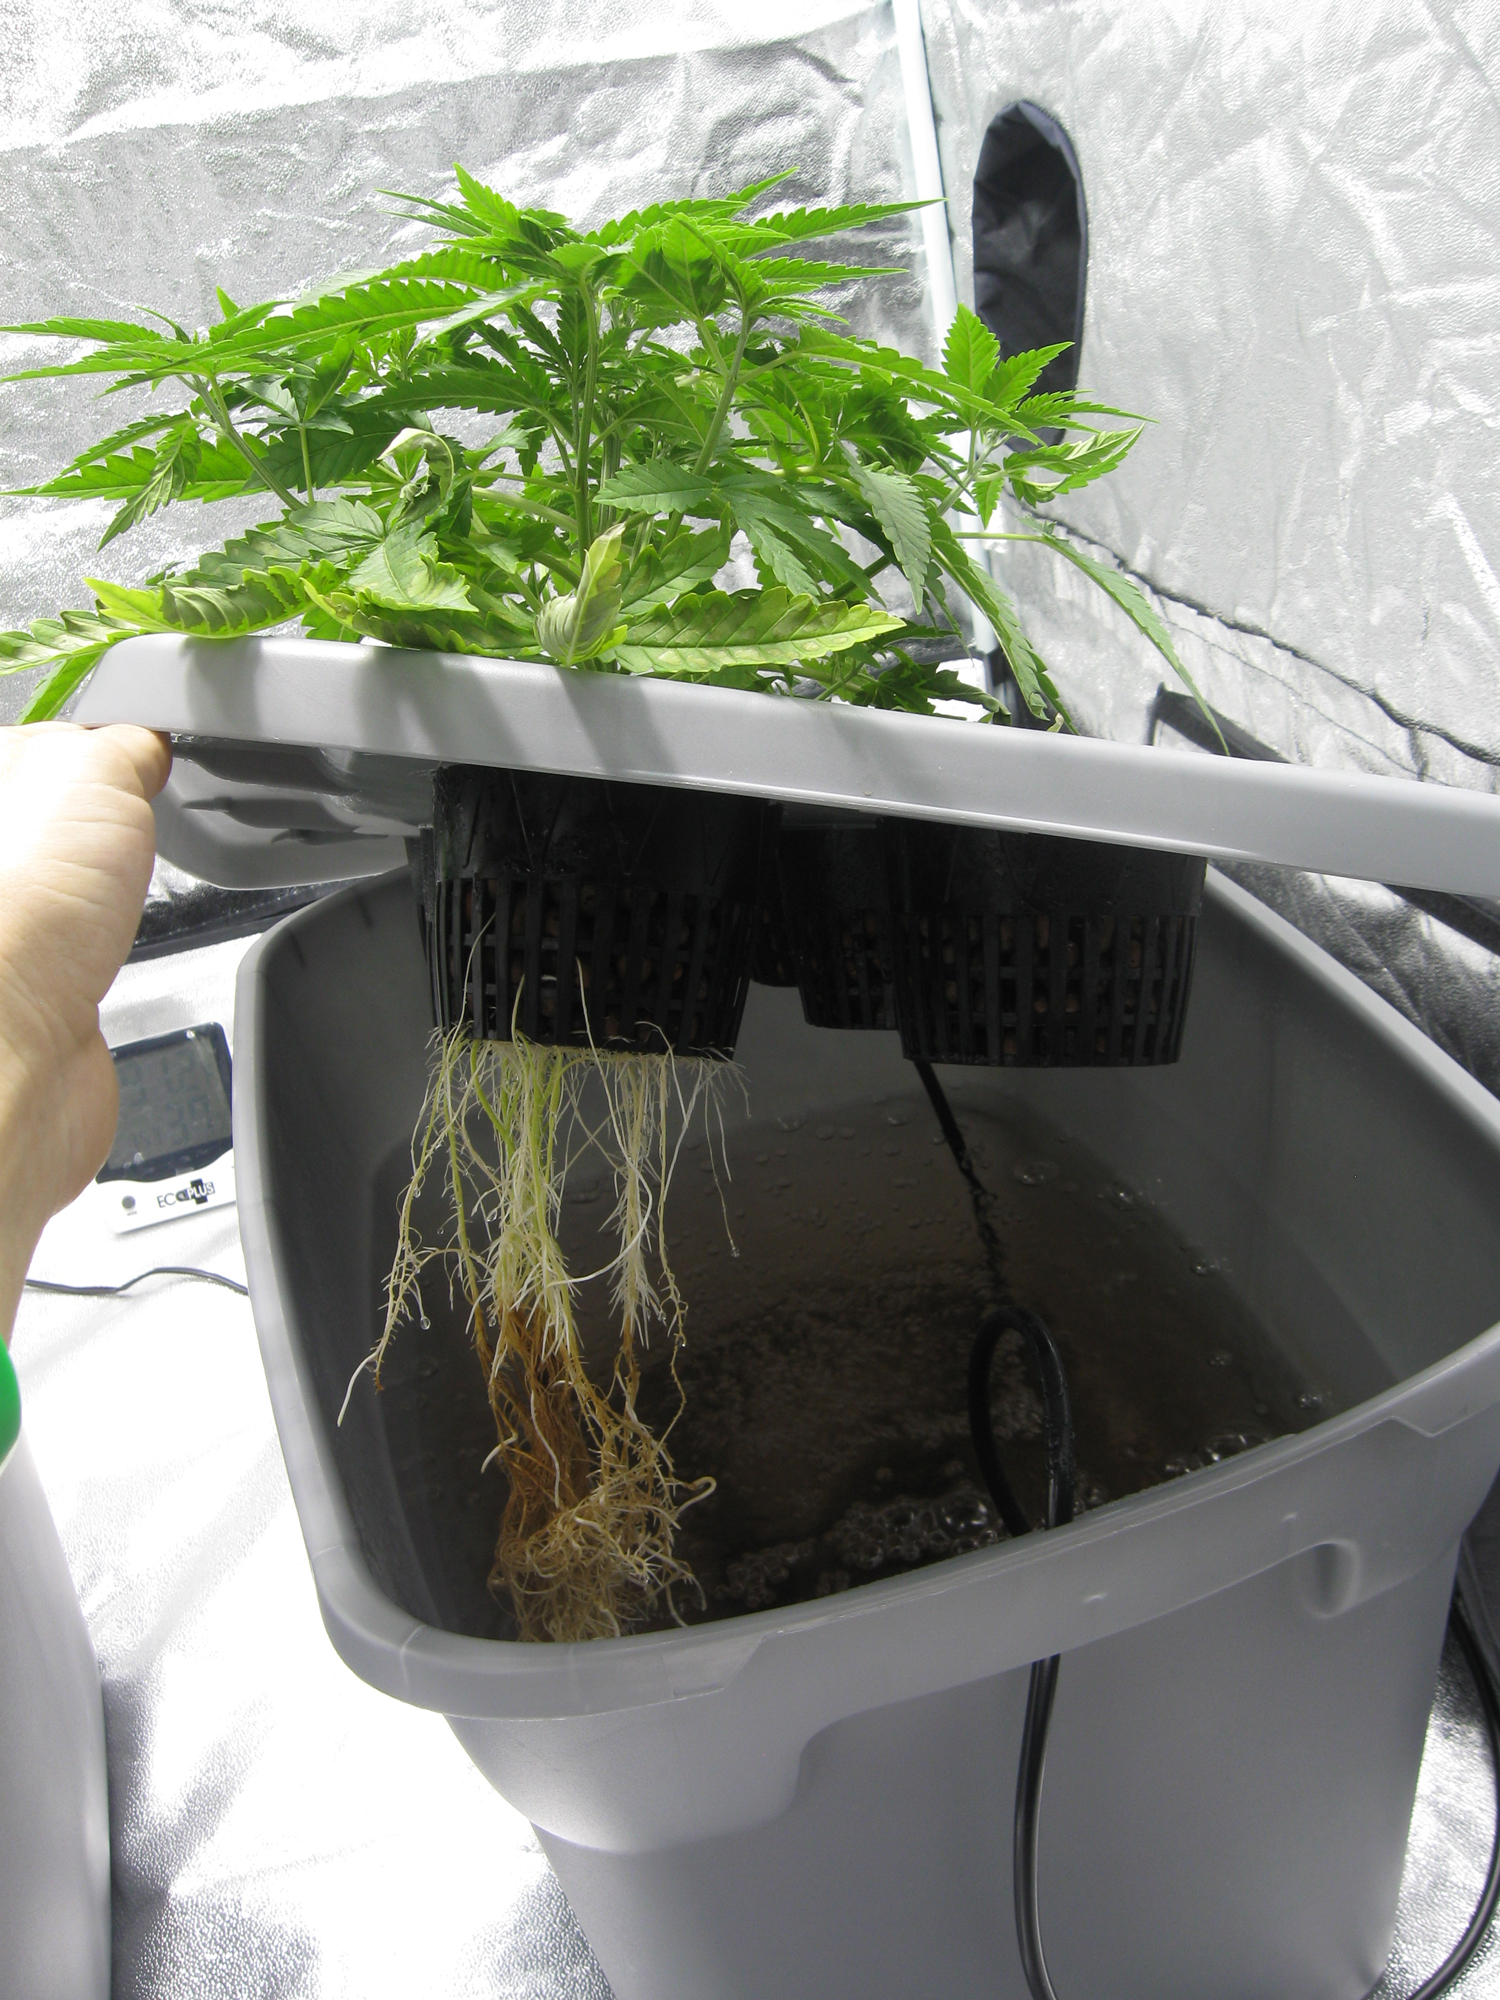
Roots are beginning to recover...
Notice the new white roots growing out of the old brown dead ones within just a day or two of receiving Aquashield in the reservoir. By this point, the plant has stopped showing any new symptoms and appears to be growing normally.
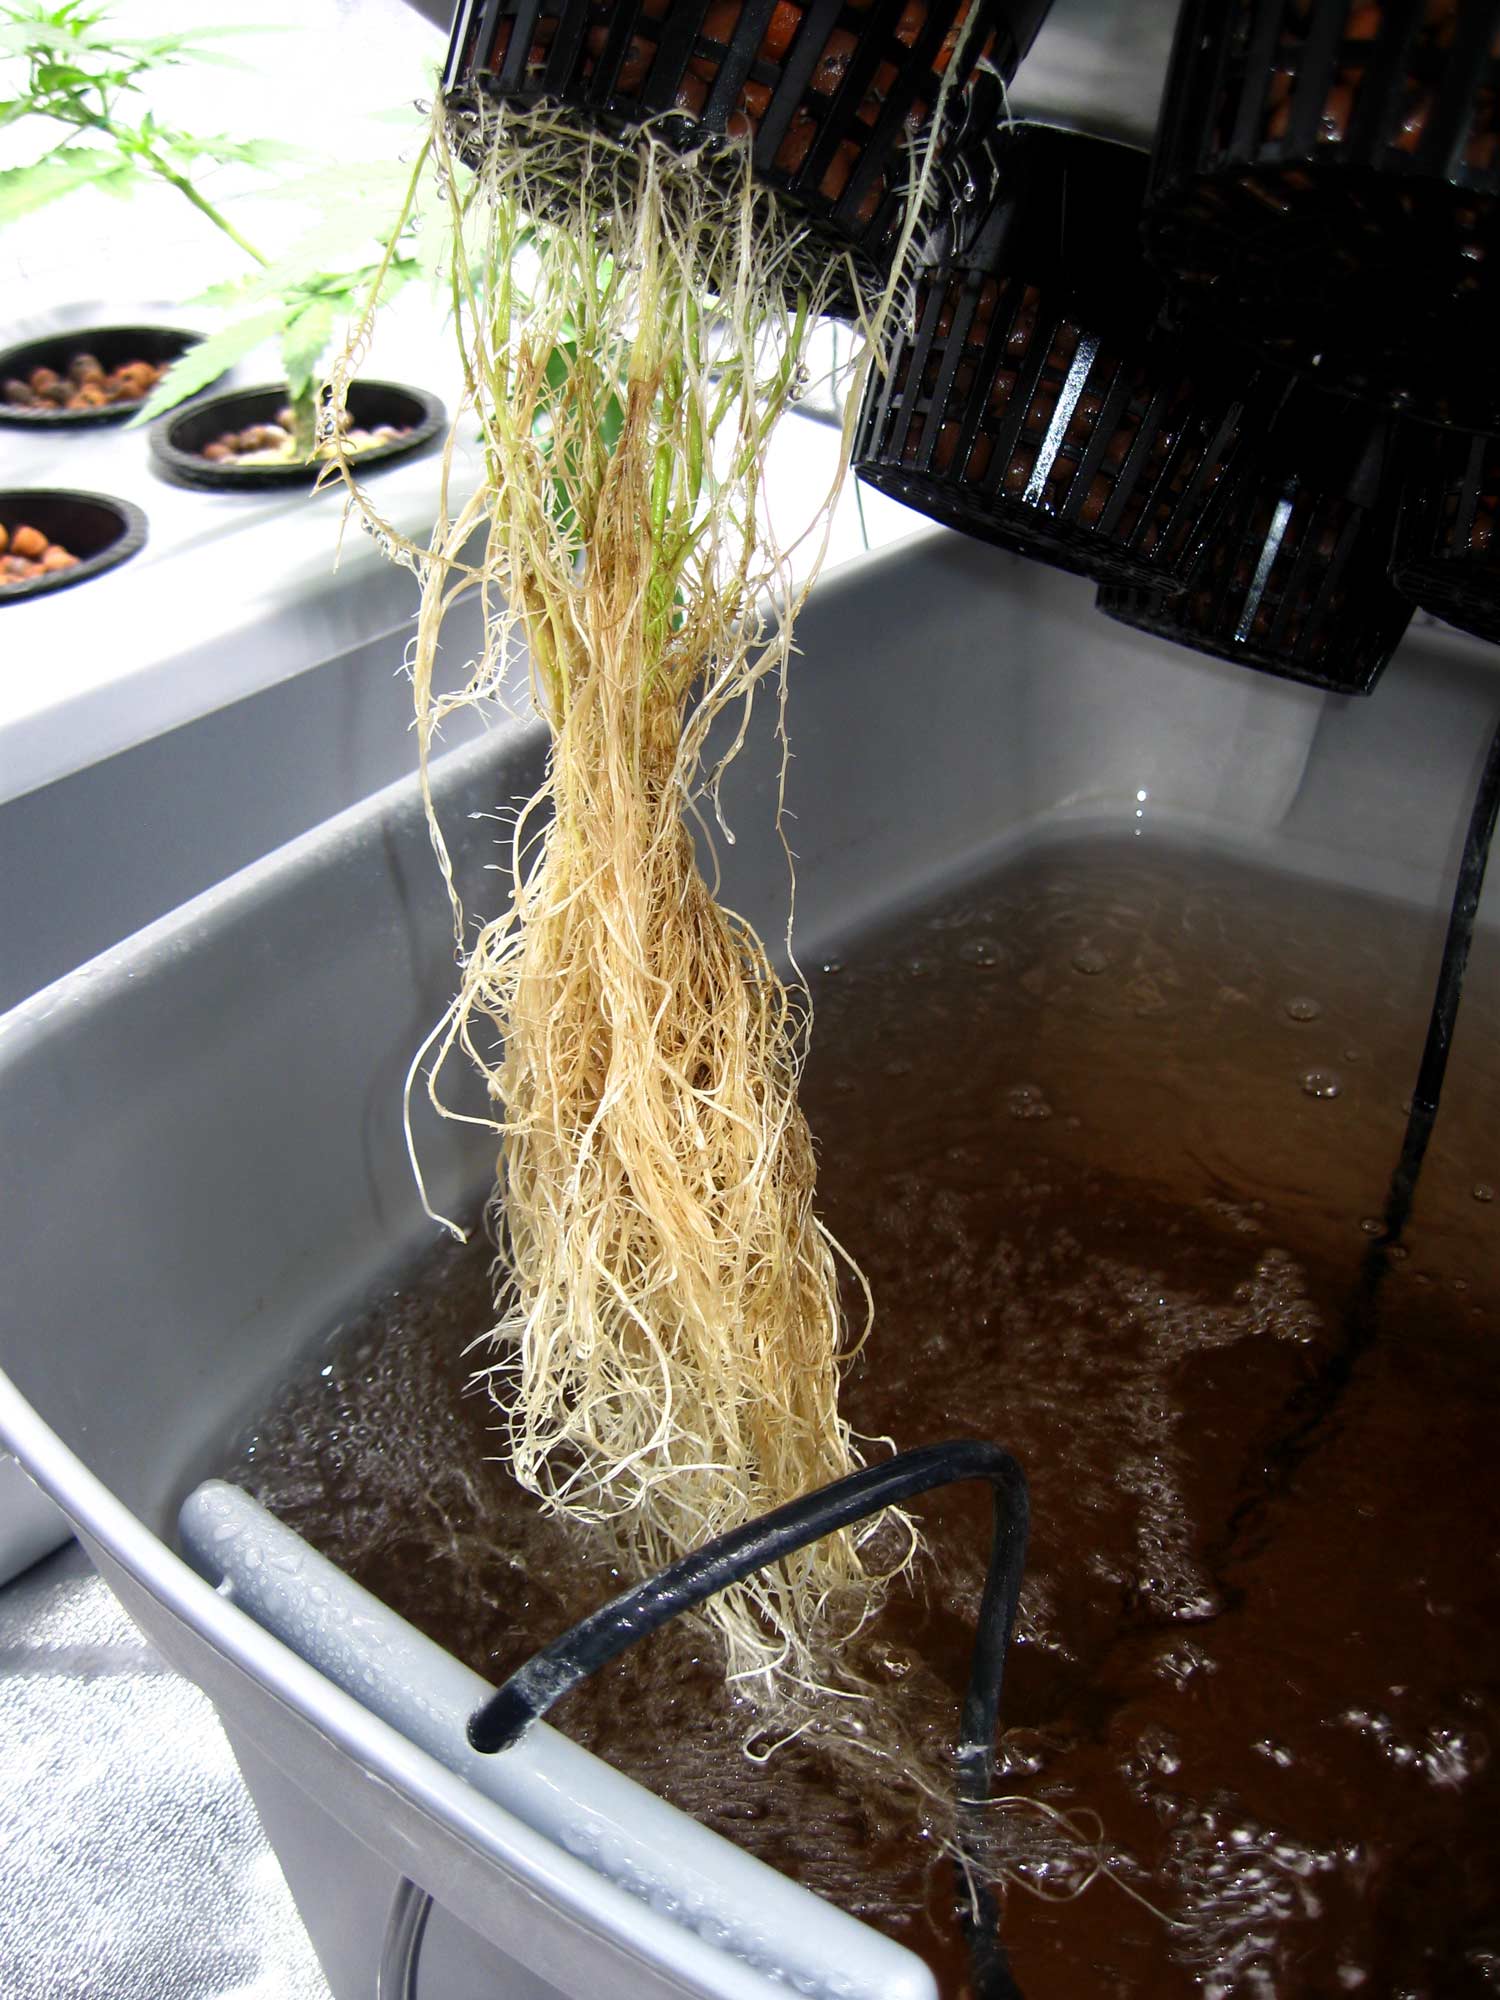
Roots are now mostly recovered below...
Notice that you can barely see any signs of the old brown, and all the new roots generally appear white and healthy. The plants on top are lush, healthy, and fast-growing, though the old burnt leaves never recovered.
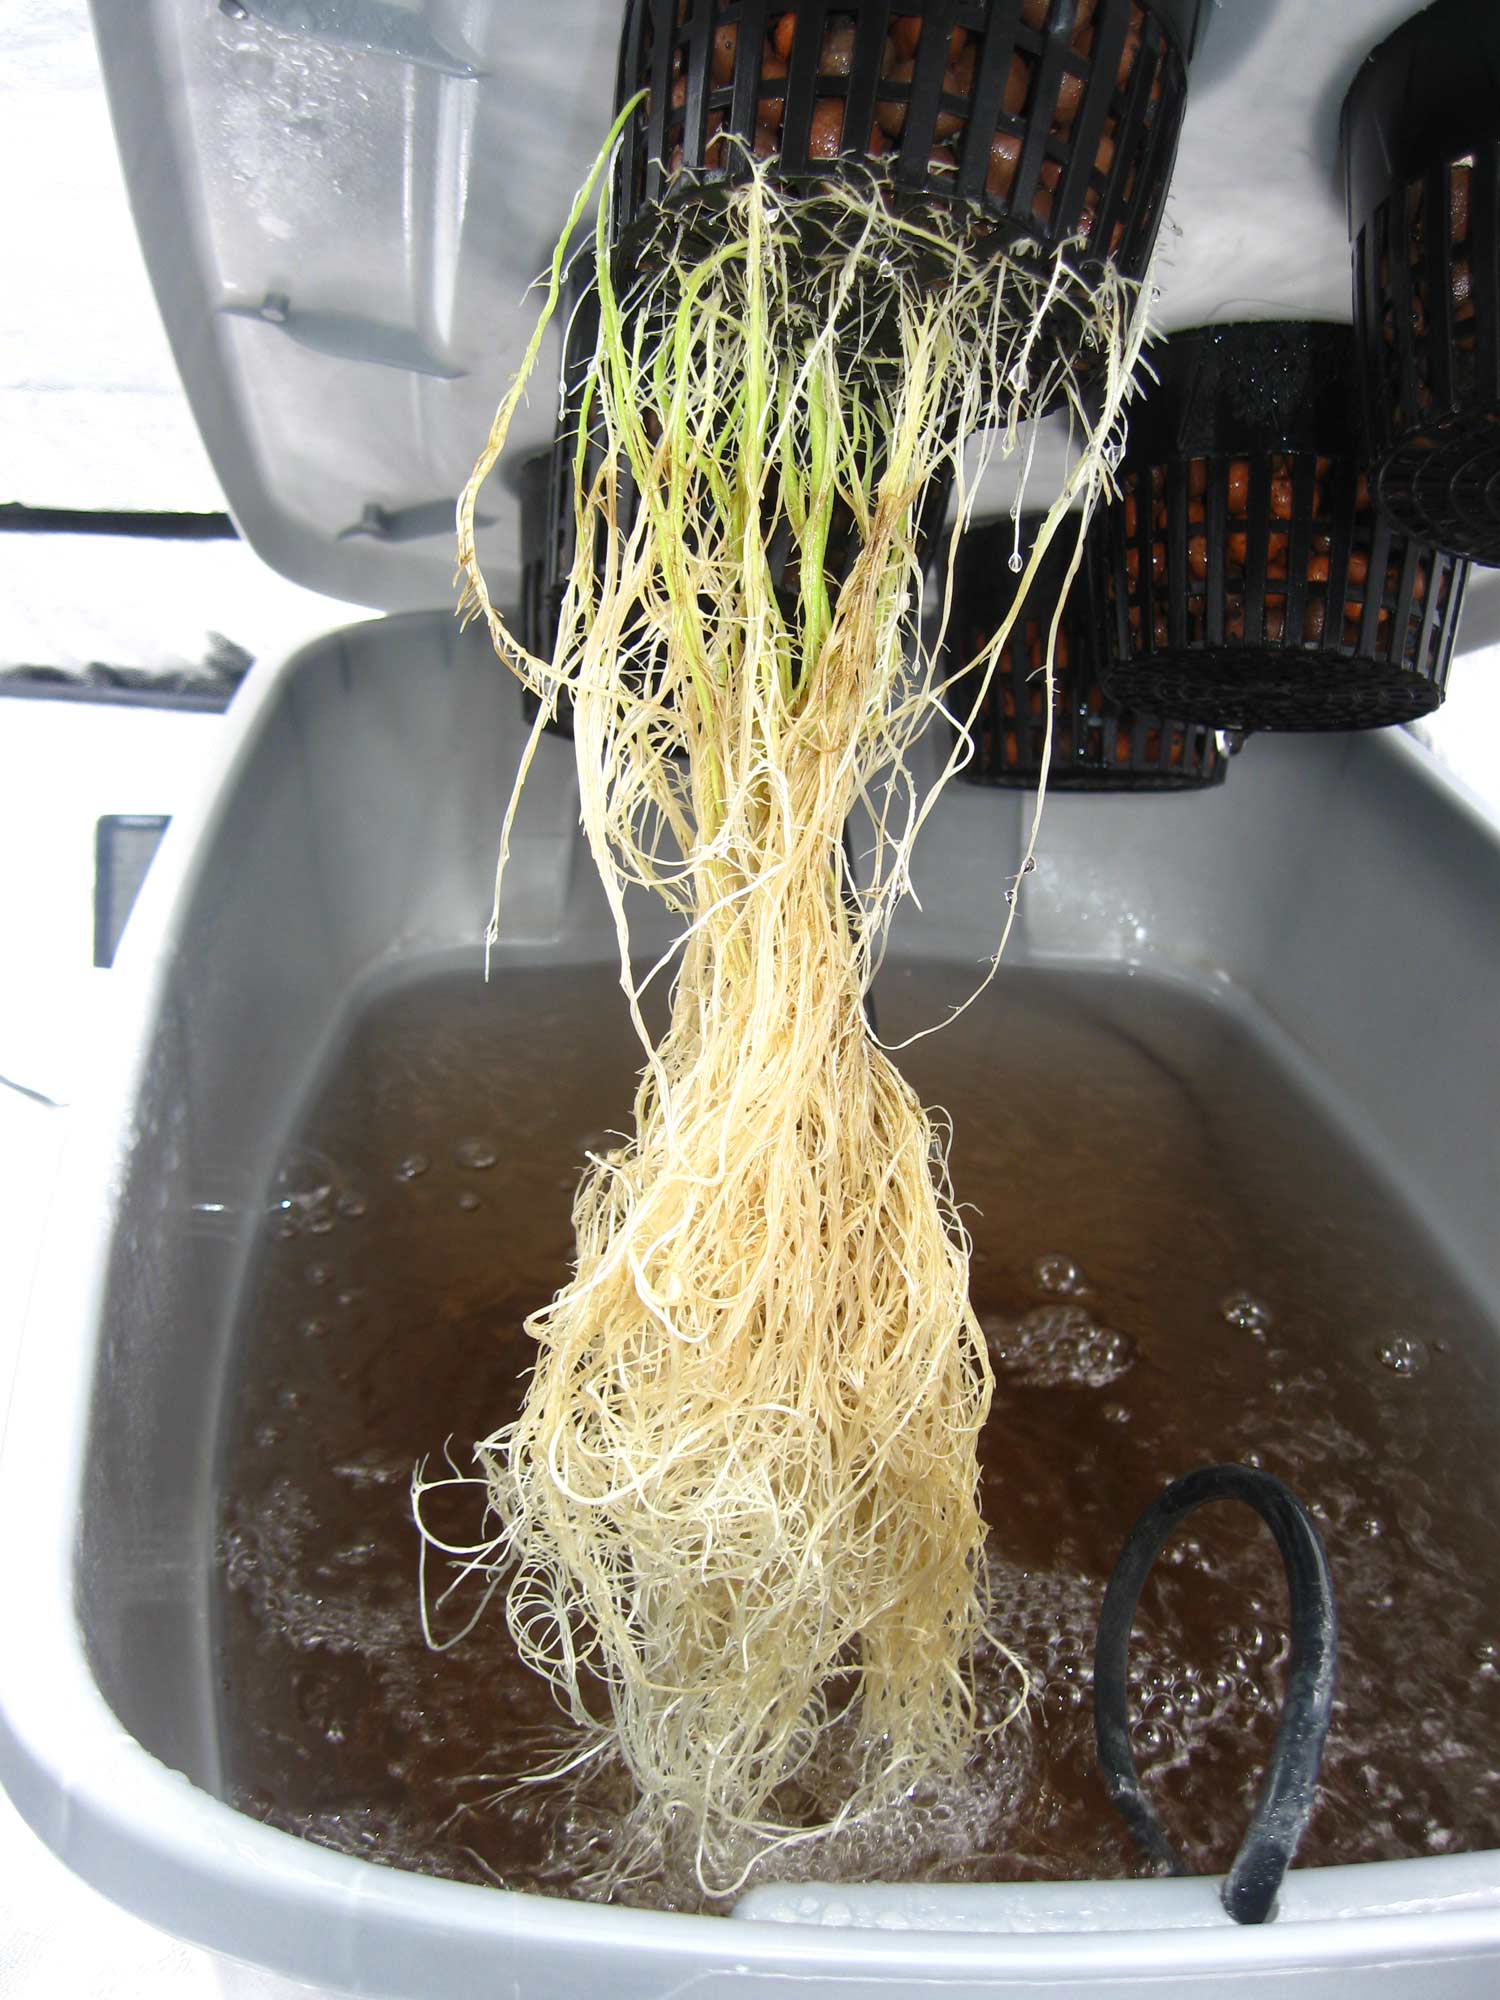
In addition to treating root rot, I like to use Hydroguard or Aquashield as a preventative. It is surprisingly effective even in hot, unclean reservoirs. Hydroguard and Aquashield have definitely gotten me through a hot summer before.
Since I first started using Aquashield in DWC, bubbleponics, and other hydroponics, it has successfully preventing me from getting root rot as long as I keep using it. I also use it when growing in soil if I suspect root problems. And their new version Hydroguard seems to work just as well as Aquashield.
Read a case study about how another grower was able to get rid of cannabis root rot
Jump to...
How to Grow Hydroponic Cannabis
Yuck! Follow This Tutorial and Never Get Root Rot Again!
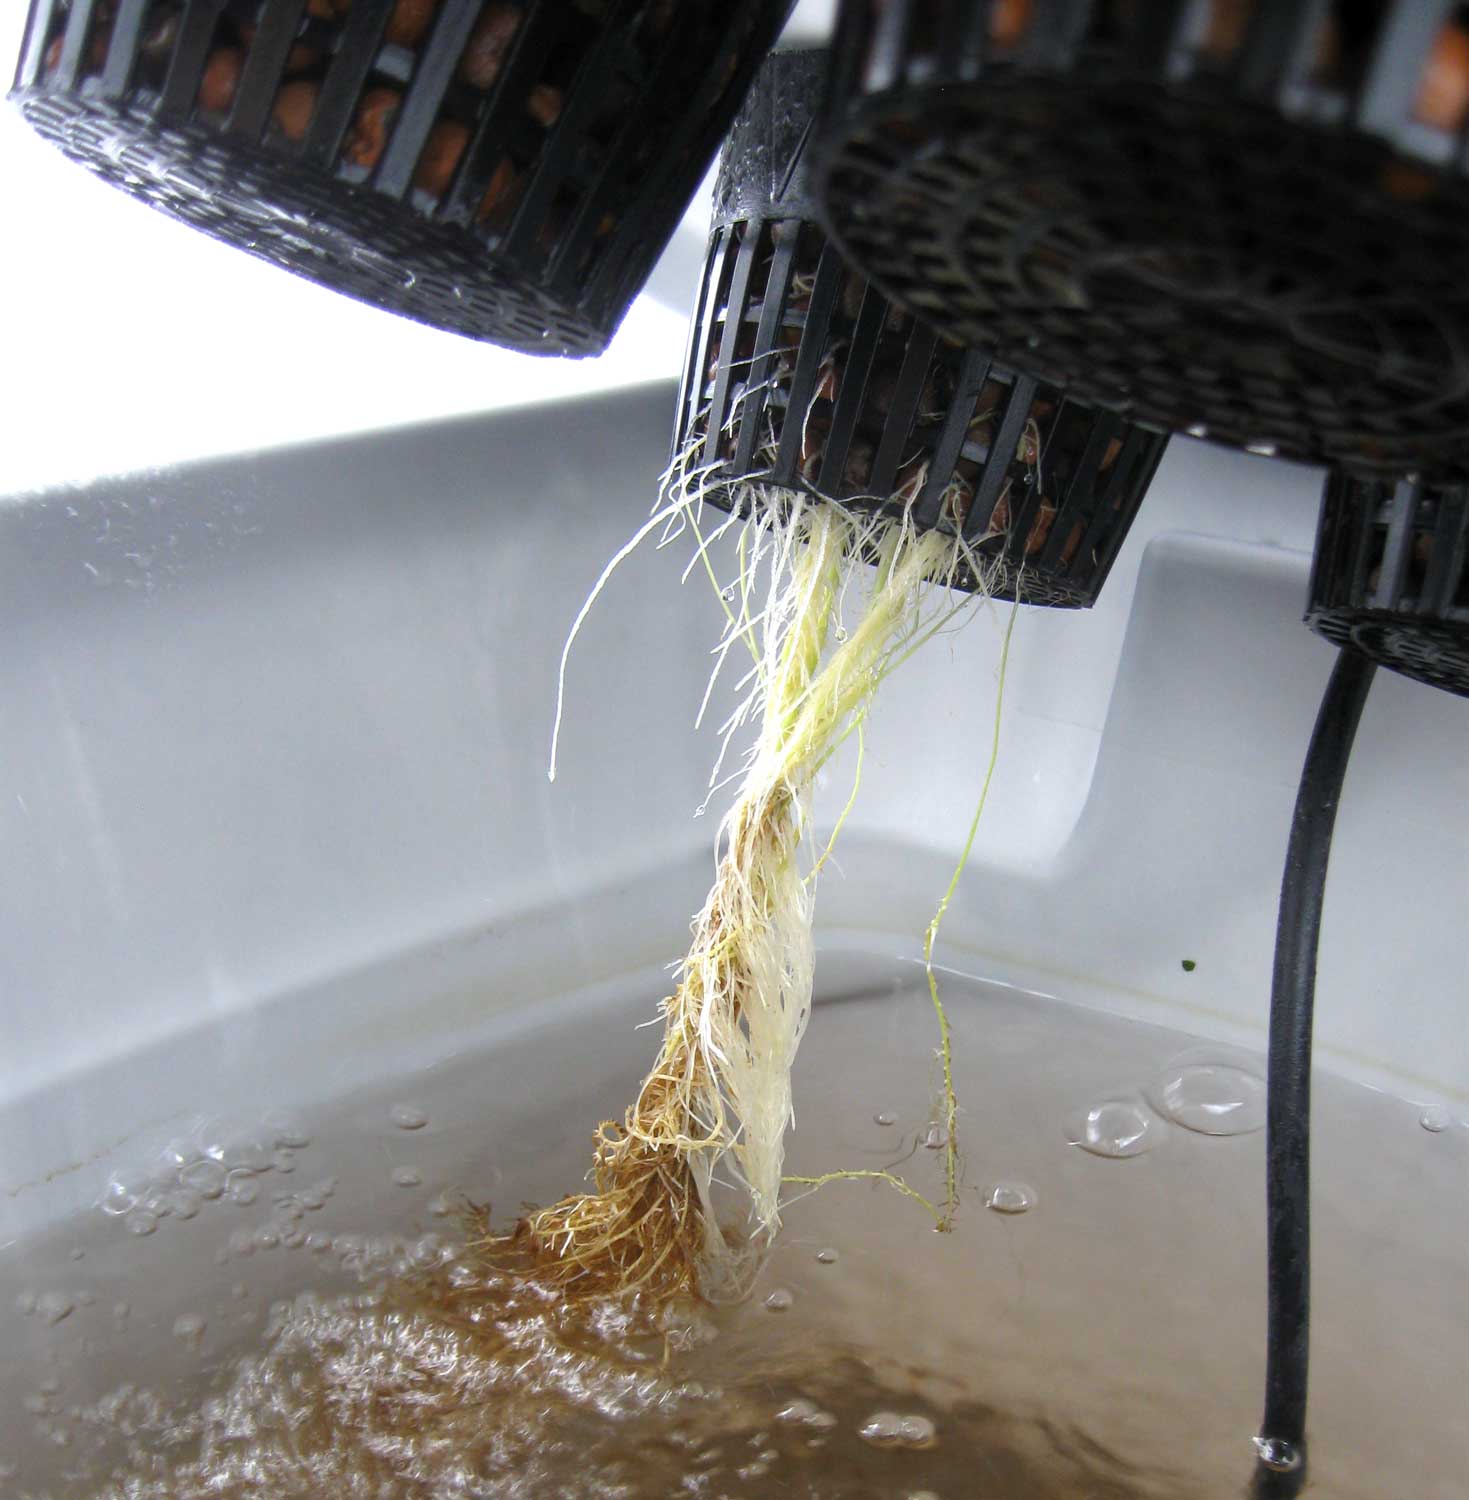
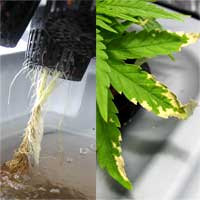
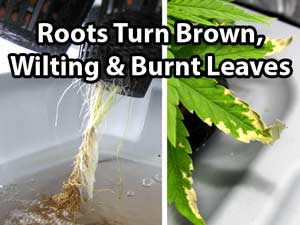
Spider Mites
Spider mites (sometimes called spidermites) are part of the mite family and are related to ticks and other mites. They're a common cannabis pest, and can be hard to get rid of.
First Sign of Spider Mite Damage - Tiny Specks (Bite Marks) On Leaves
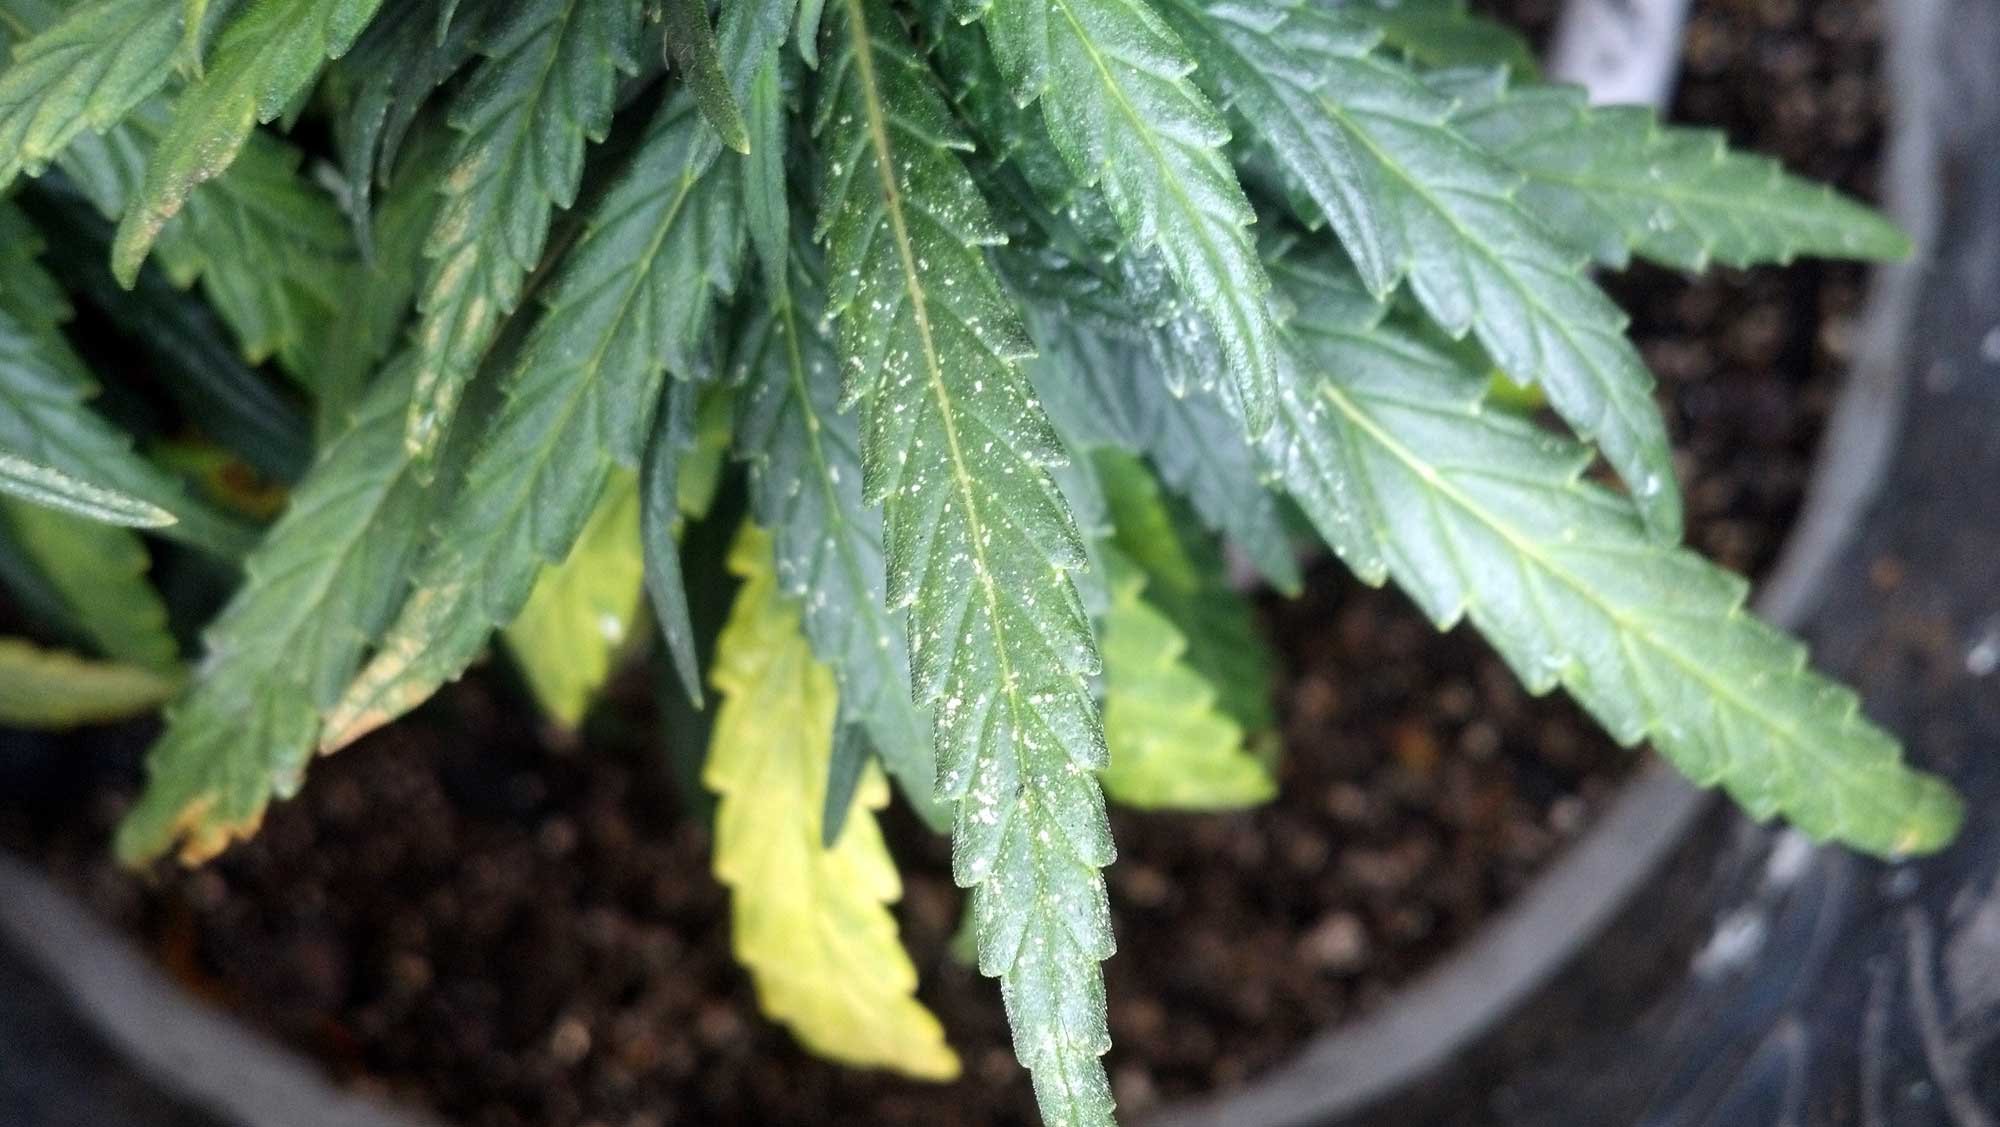
Picture of spider mites on a cannabis leaf - they're tiny and often found under the leaves
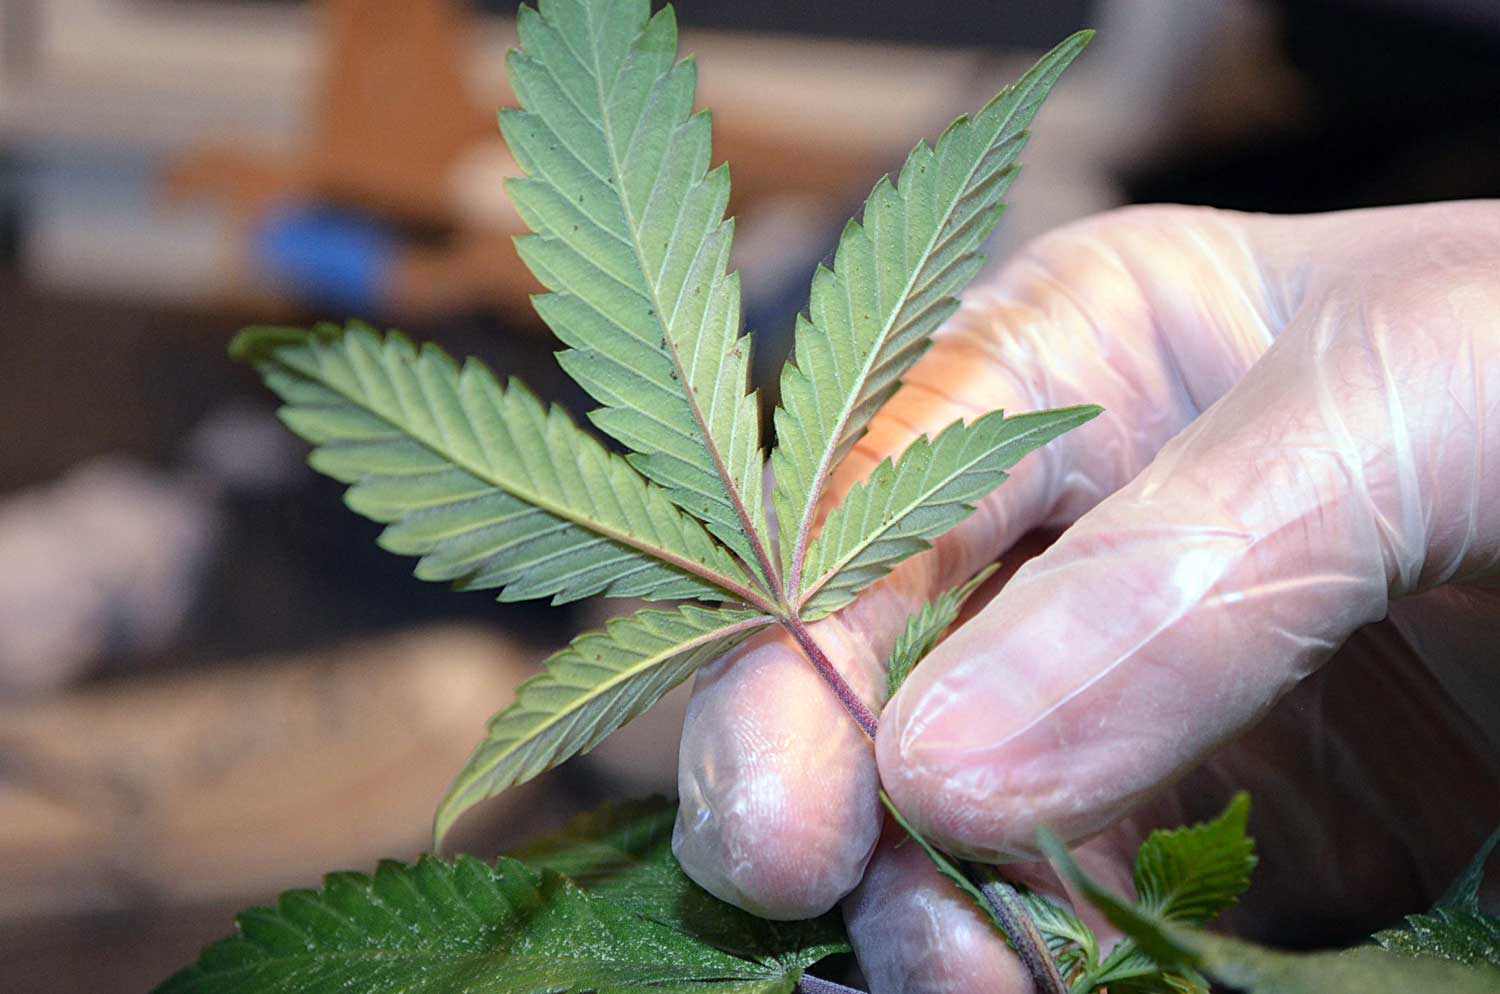
Table of Contents
- Spider Mites and Marijuana
- How To Get Rid of Spider Mites - Step-By-Step
- Indoor Spider Mite Prevention
- Outdoor Spider Mite Prevention
- Proven Spider Mite Cures
Learn how to get rid of spider mites for good - this pest is a marijuana grower's worst nightmare!
Extreme Close-Up of Two-Spotted Spider Mites with Egg

Growers Need to Take Spider Mites Seriously... Or This Can Happen!
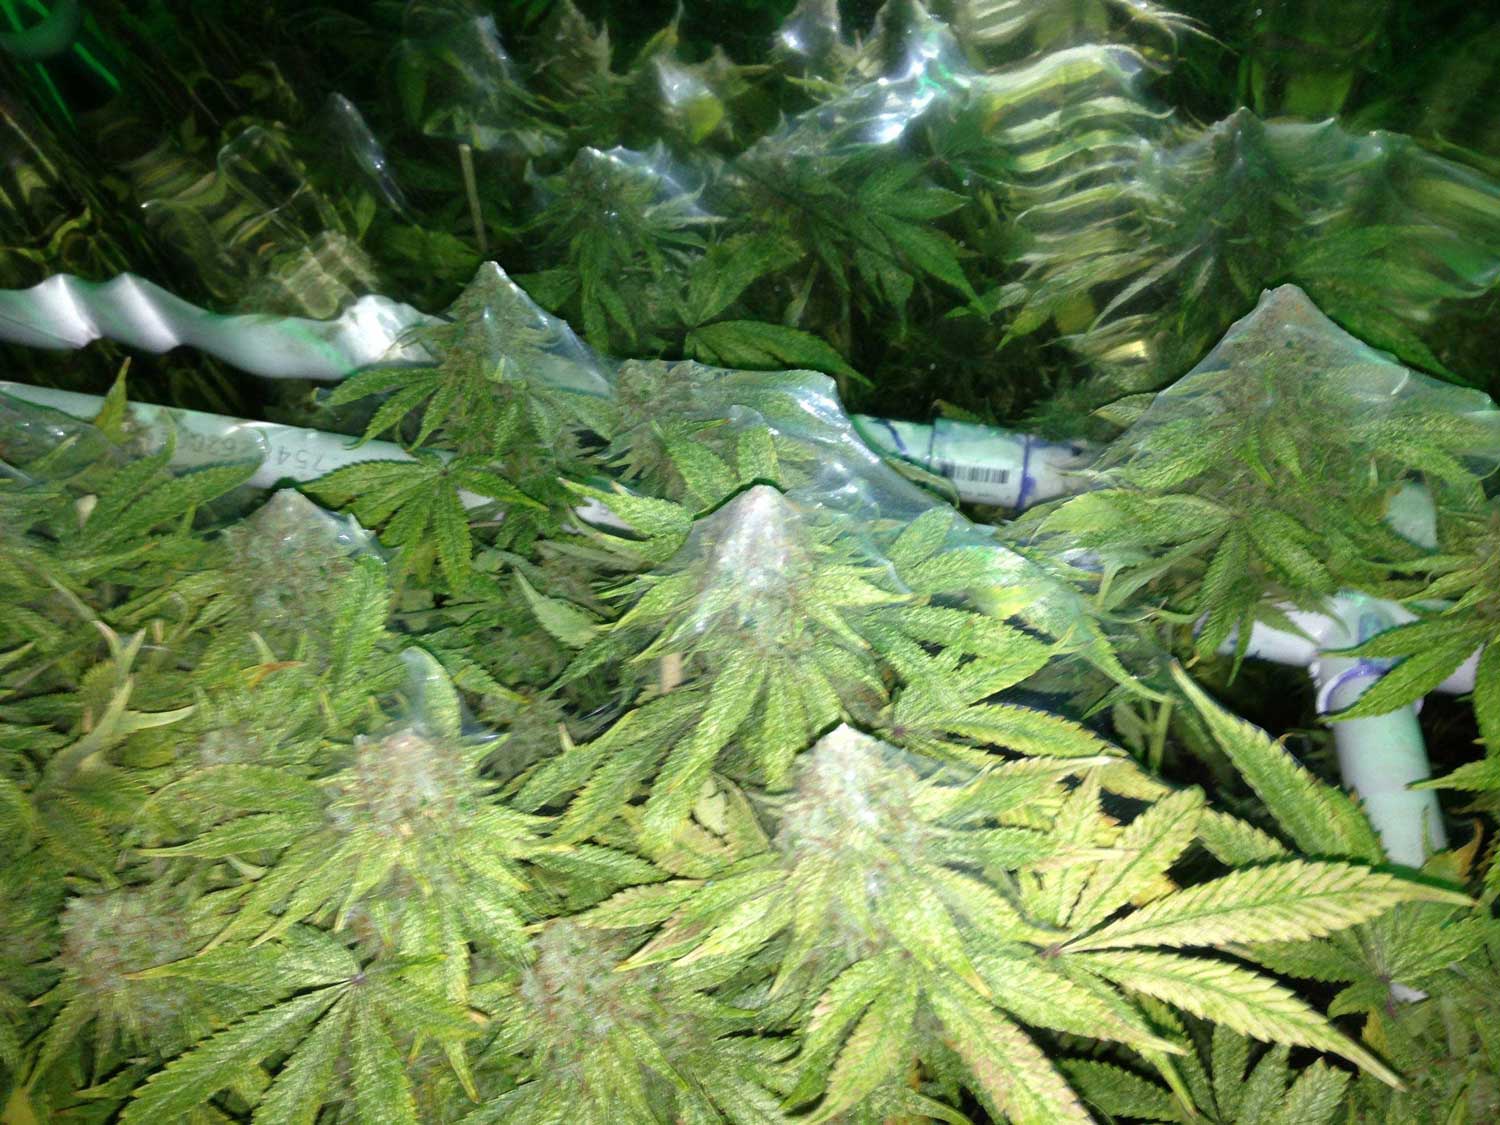
Spider mites live on the undersides of marijuana leaves.
The first sign of a spider mite infestation is often the tiny white or yellow spots on leaves.
These tiny spots are bite marks.
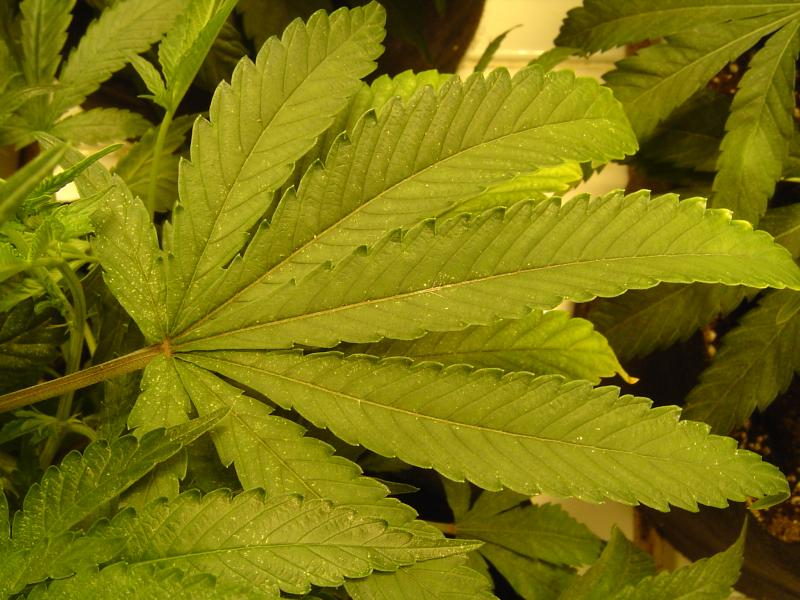
They get the "spider" part of their name from the distinctive silk webbing they spin on vegetation, leaves and flowers.
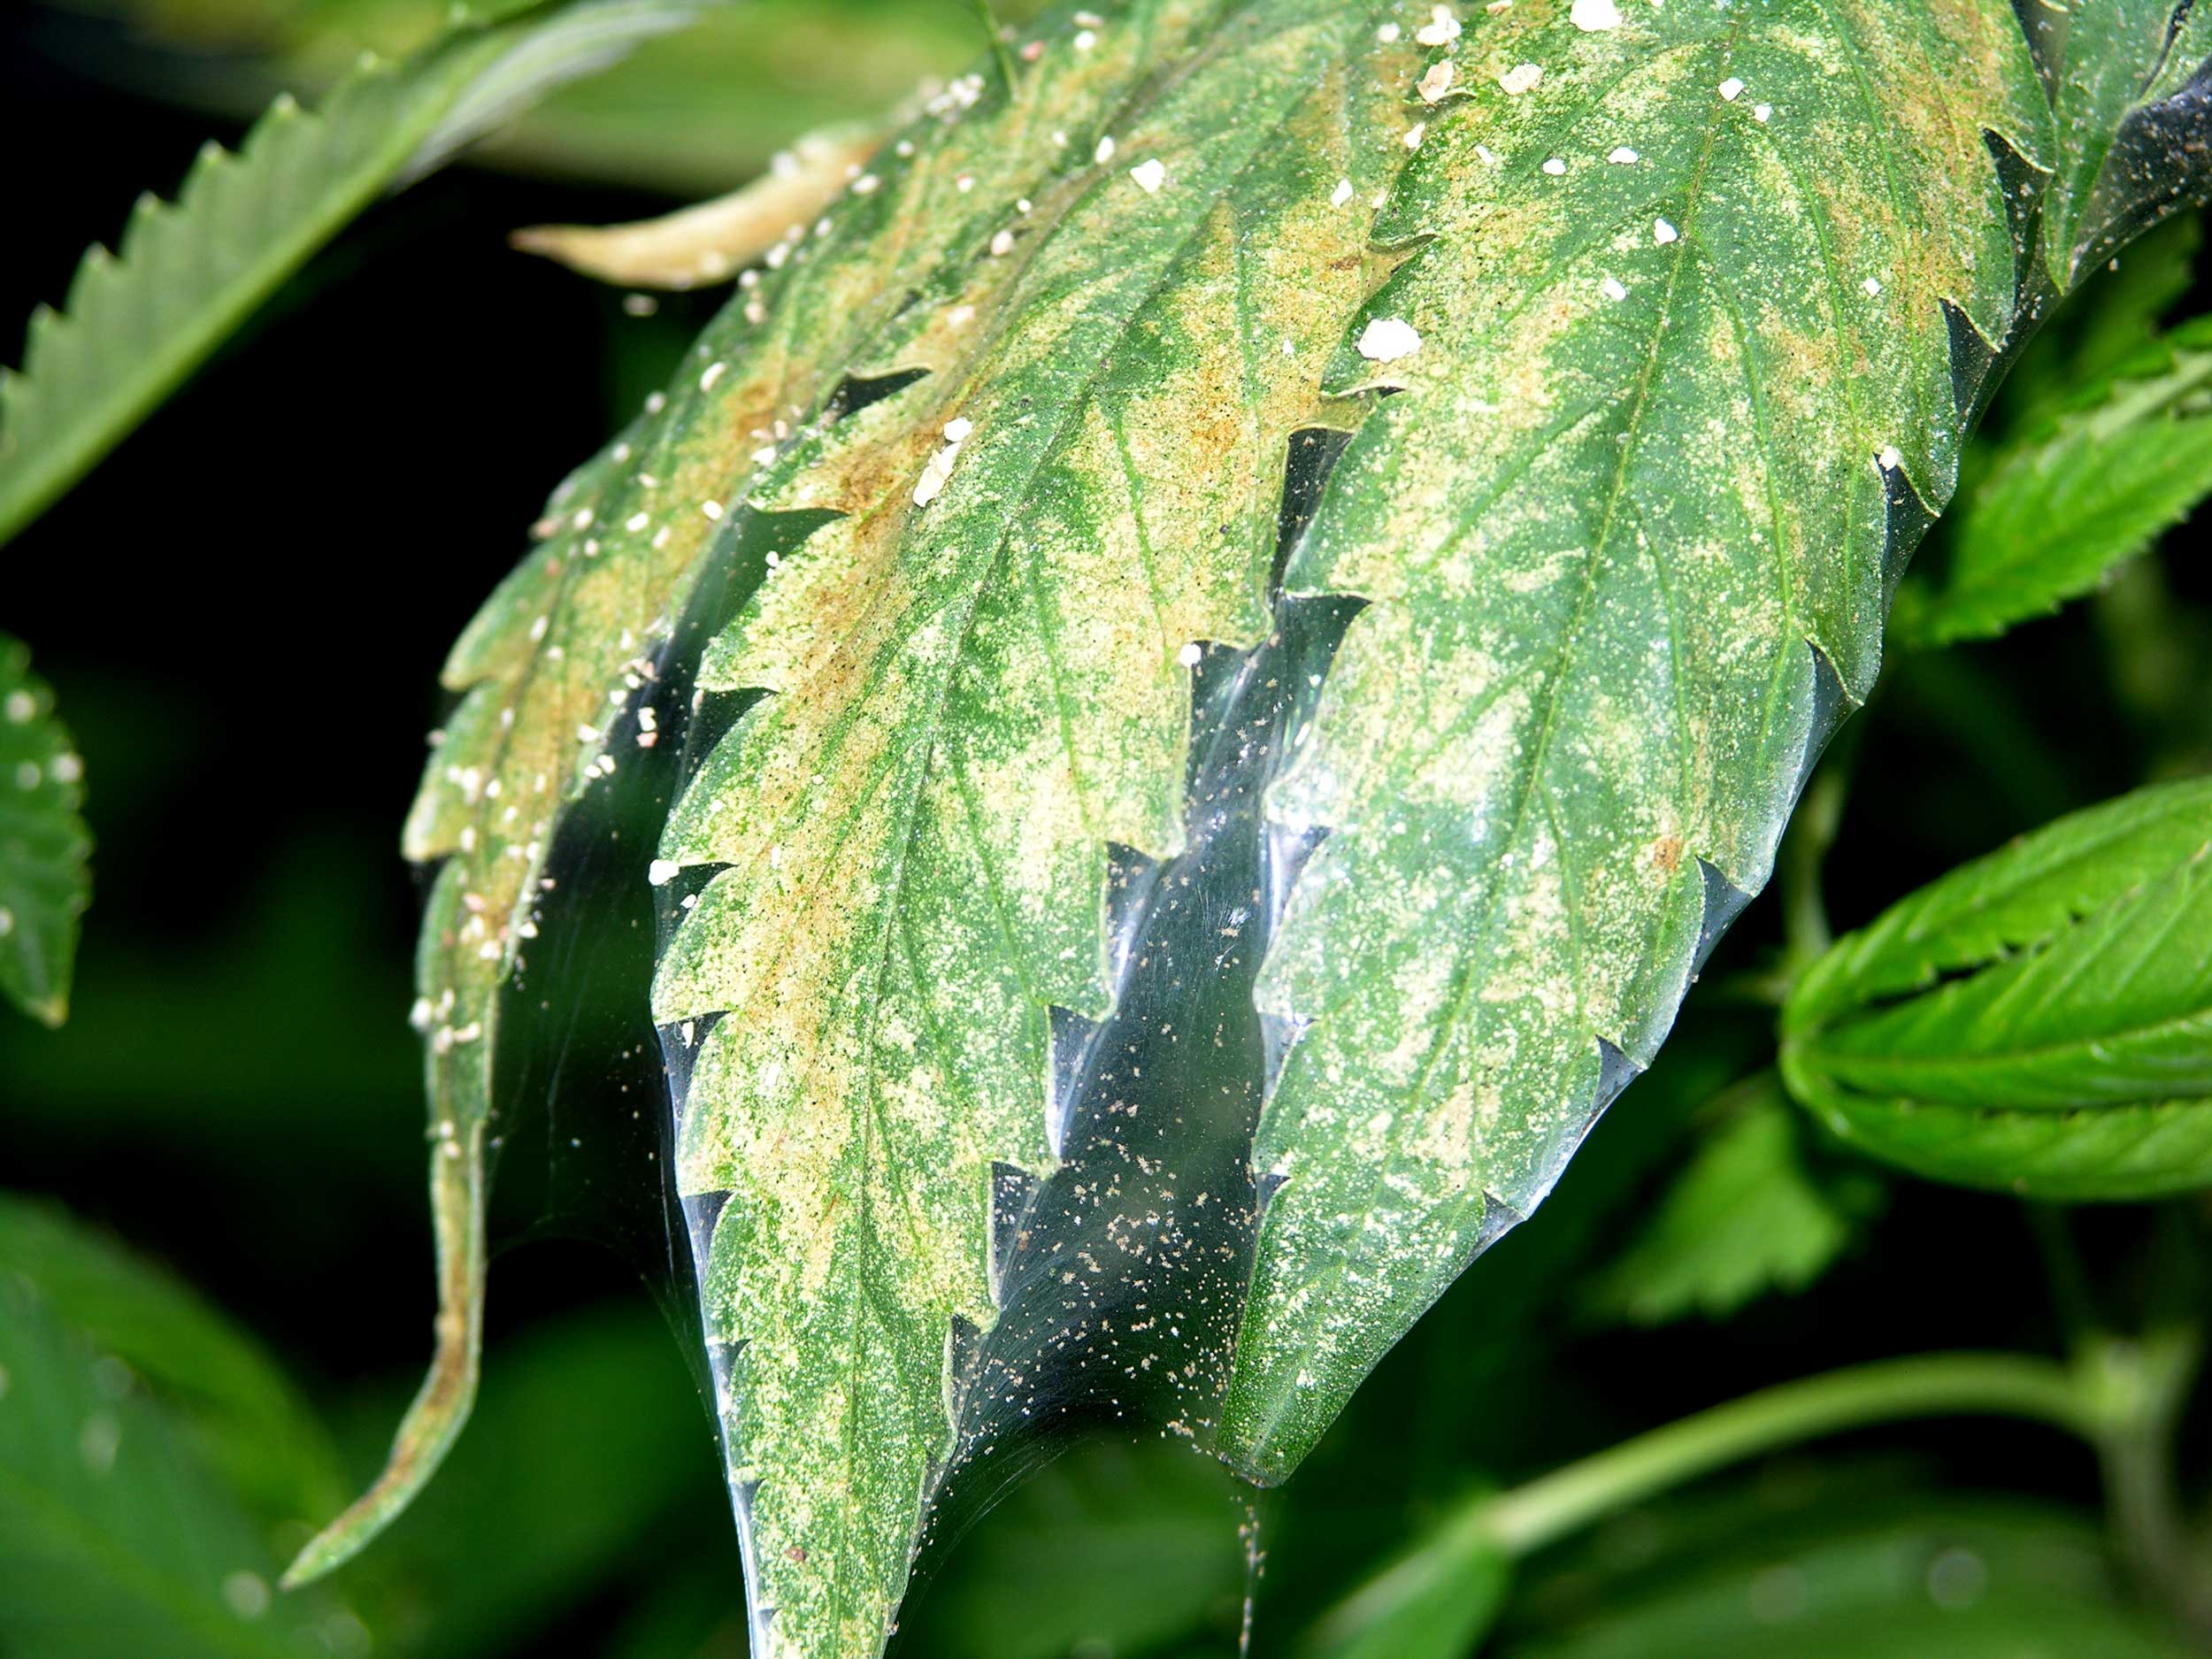
Spider Mites and Marijuana
Spider mites are common marijuana pests, especially when growing in soil. Spider mites are less common in hydroponic setups as there is less dead organic matter, however, you can get spider mites in any setup where you're growing marijuana plants.
Spider mites are a marijuana soil grower's worst nightmare. Here's why...
Spider mites are known for:
- Rapid reproduction (they lay millions of eggs) - one mature female spider mite can produce a million mites in less than a month
- Disappearing act - spider mites often appear to be gone/killed, then they come back with a vengeance when all those eggs hatch days or weeks later, right when you thought you'd gotten rid of spider mites for good.
- Big appetites - spider mites can eat up your tender plants in an amazingly short amount of time; a bad infestation has been known to kill plants overnight
- Webs - spider mites cover leaves and buds with a fine mesh of silk webbing, ruining whole crops even after you get rid of the spider mites
- Zombie-like resistance - spider mites quickly become immune to whatever you do to try to kill them; if you don't take care of your spider mite problem by eradicating them completely from your grow room, you may soon find you have a huge population of Super mites. The two-spotted spider mite which specializes in cannabis seems to be particularly resistent to insecticides, and is sometimes referred to as "the borg" in the cannabis growing community. Read one grower's journey to get rid of the "borg" spider mites in his grow room.
Spider mites often go unnoticed at first because they are tiny, they look like spots to the naked eye. Each spider mite is about the size of a pencil tip. Under a microscope you can see they have four pairs of legs, no antennae and a body that looks like an oval.
The spider mites with two spots on their back are often the worst for cannabis growers!
Spider mites can be an especially tricky pest in the grow room. Since they are so small they can build up quite an infestation before a grower even notices a single mite.
This cannabis leaf shows the first signs of a spider mite infestation: dozens of tiny yellow spots.

Spider mites have tiny sharp mouths that actually pierce individual plant cells and such out the contents. This results in tiny yellow, orange or white speckles on your plant leaves.
When spider mites attack a particular spot, and you see lots of speckles near each other, the leaves will often start looking yellow or bronzed. Badly attached leaves will often die prematurely, so a bad spider mite infestation can kill an entire plant.
Plants that are heavily infested with spider mites will become discolored, sickly and may even die.
Most spider mites have the ability to produce a fine silk webbing. Web producing spider mites may coat the foliage with the fine silk which collects dust and looks dirty. In a flowering room, it's common to see buds get covered in fine webbing from a spider mite infestation.
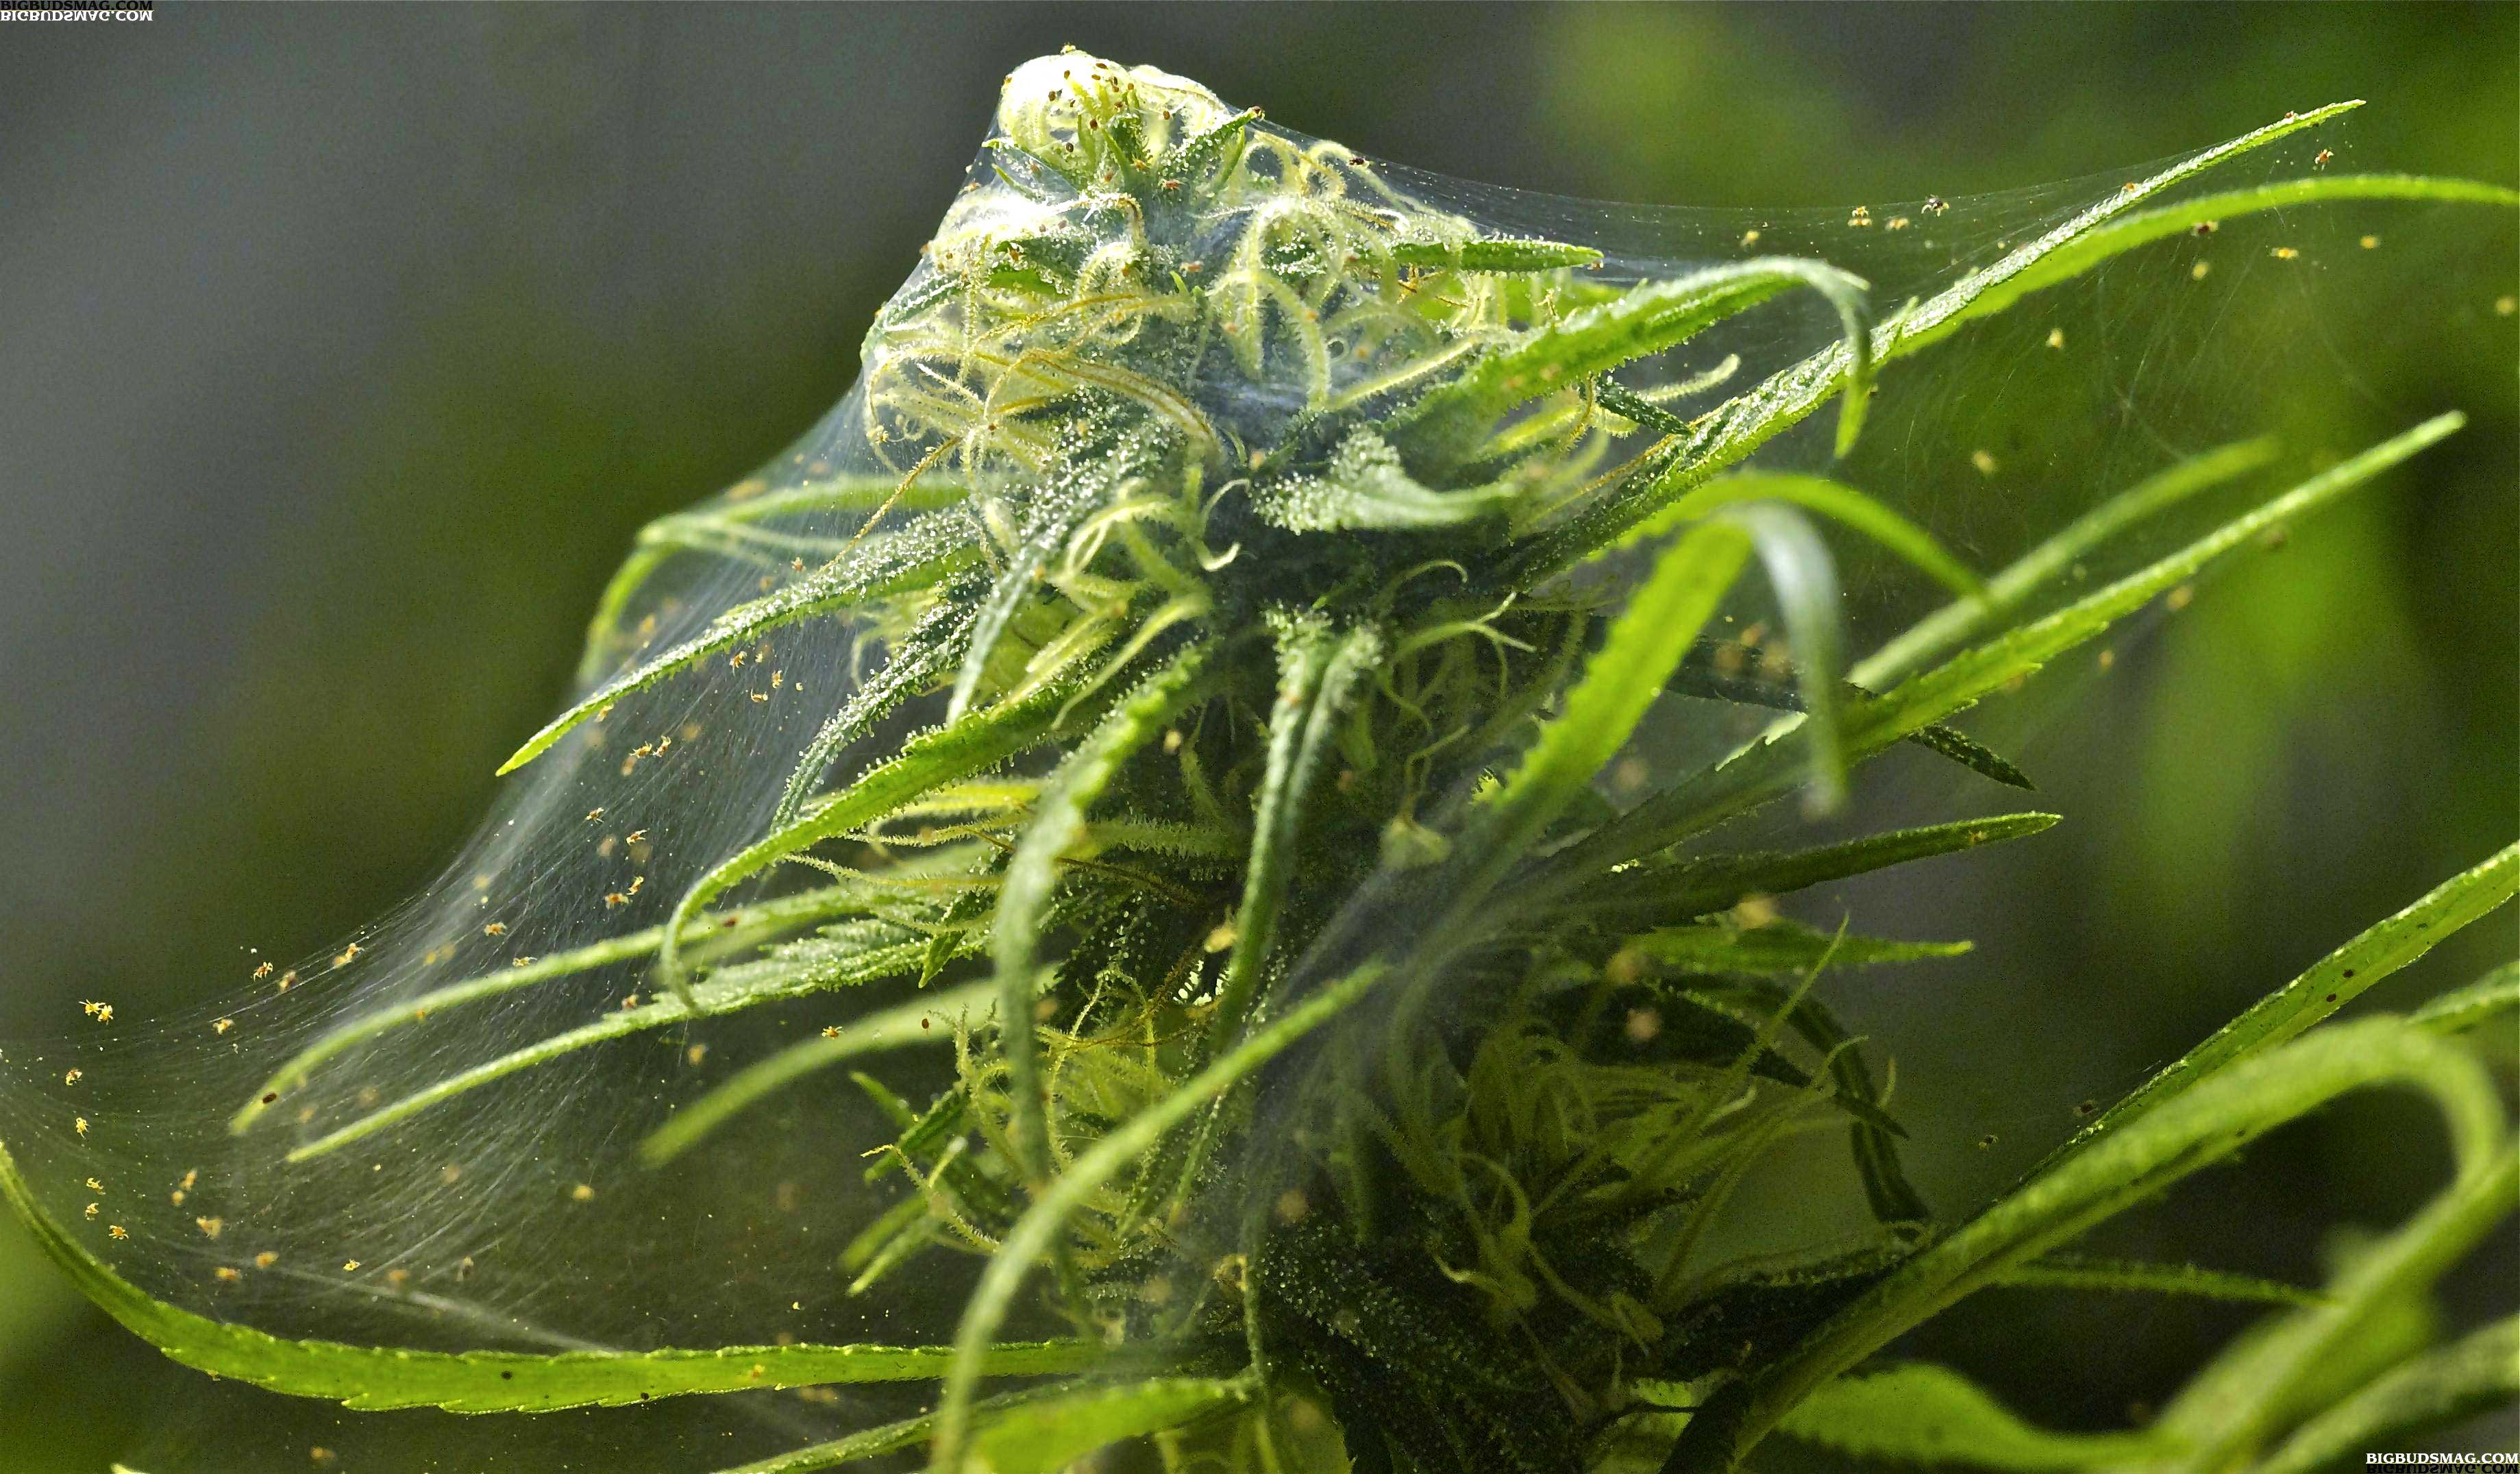
Spider mites have a life cycle that helps them re-populate quickly and effectively after much of their population has been destroyed. All spider mites go through the same development stages in life.
Adult females begin the cycle by laying eggs, often on their host plants. The eggs hatch in days or weeks into the first stage, called a larva. Larvae are round bodied and have only three pairs of legs. The larvae feed for a few days, seek a sheltered spot to rest and then molt into the first nymphal stage. The first nymph now has four pairs of legs.
The first nymphs feed a few days, rest and molt into the second nymph. The second nymphs feed, rest and molt into the adult stage.
Here are female adult
spider mites with eggs
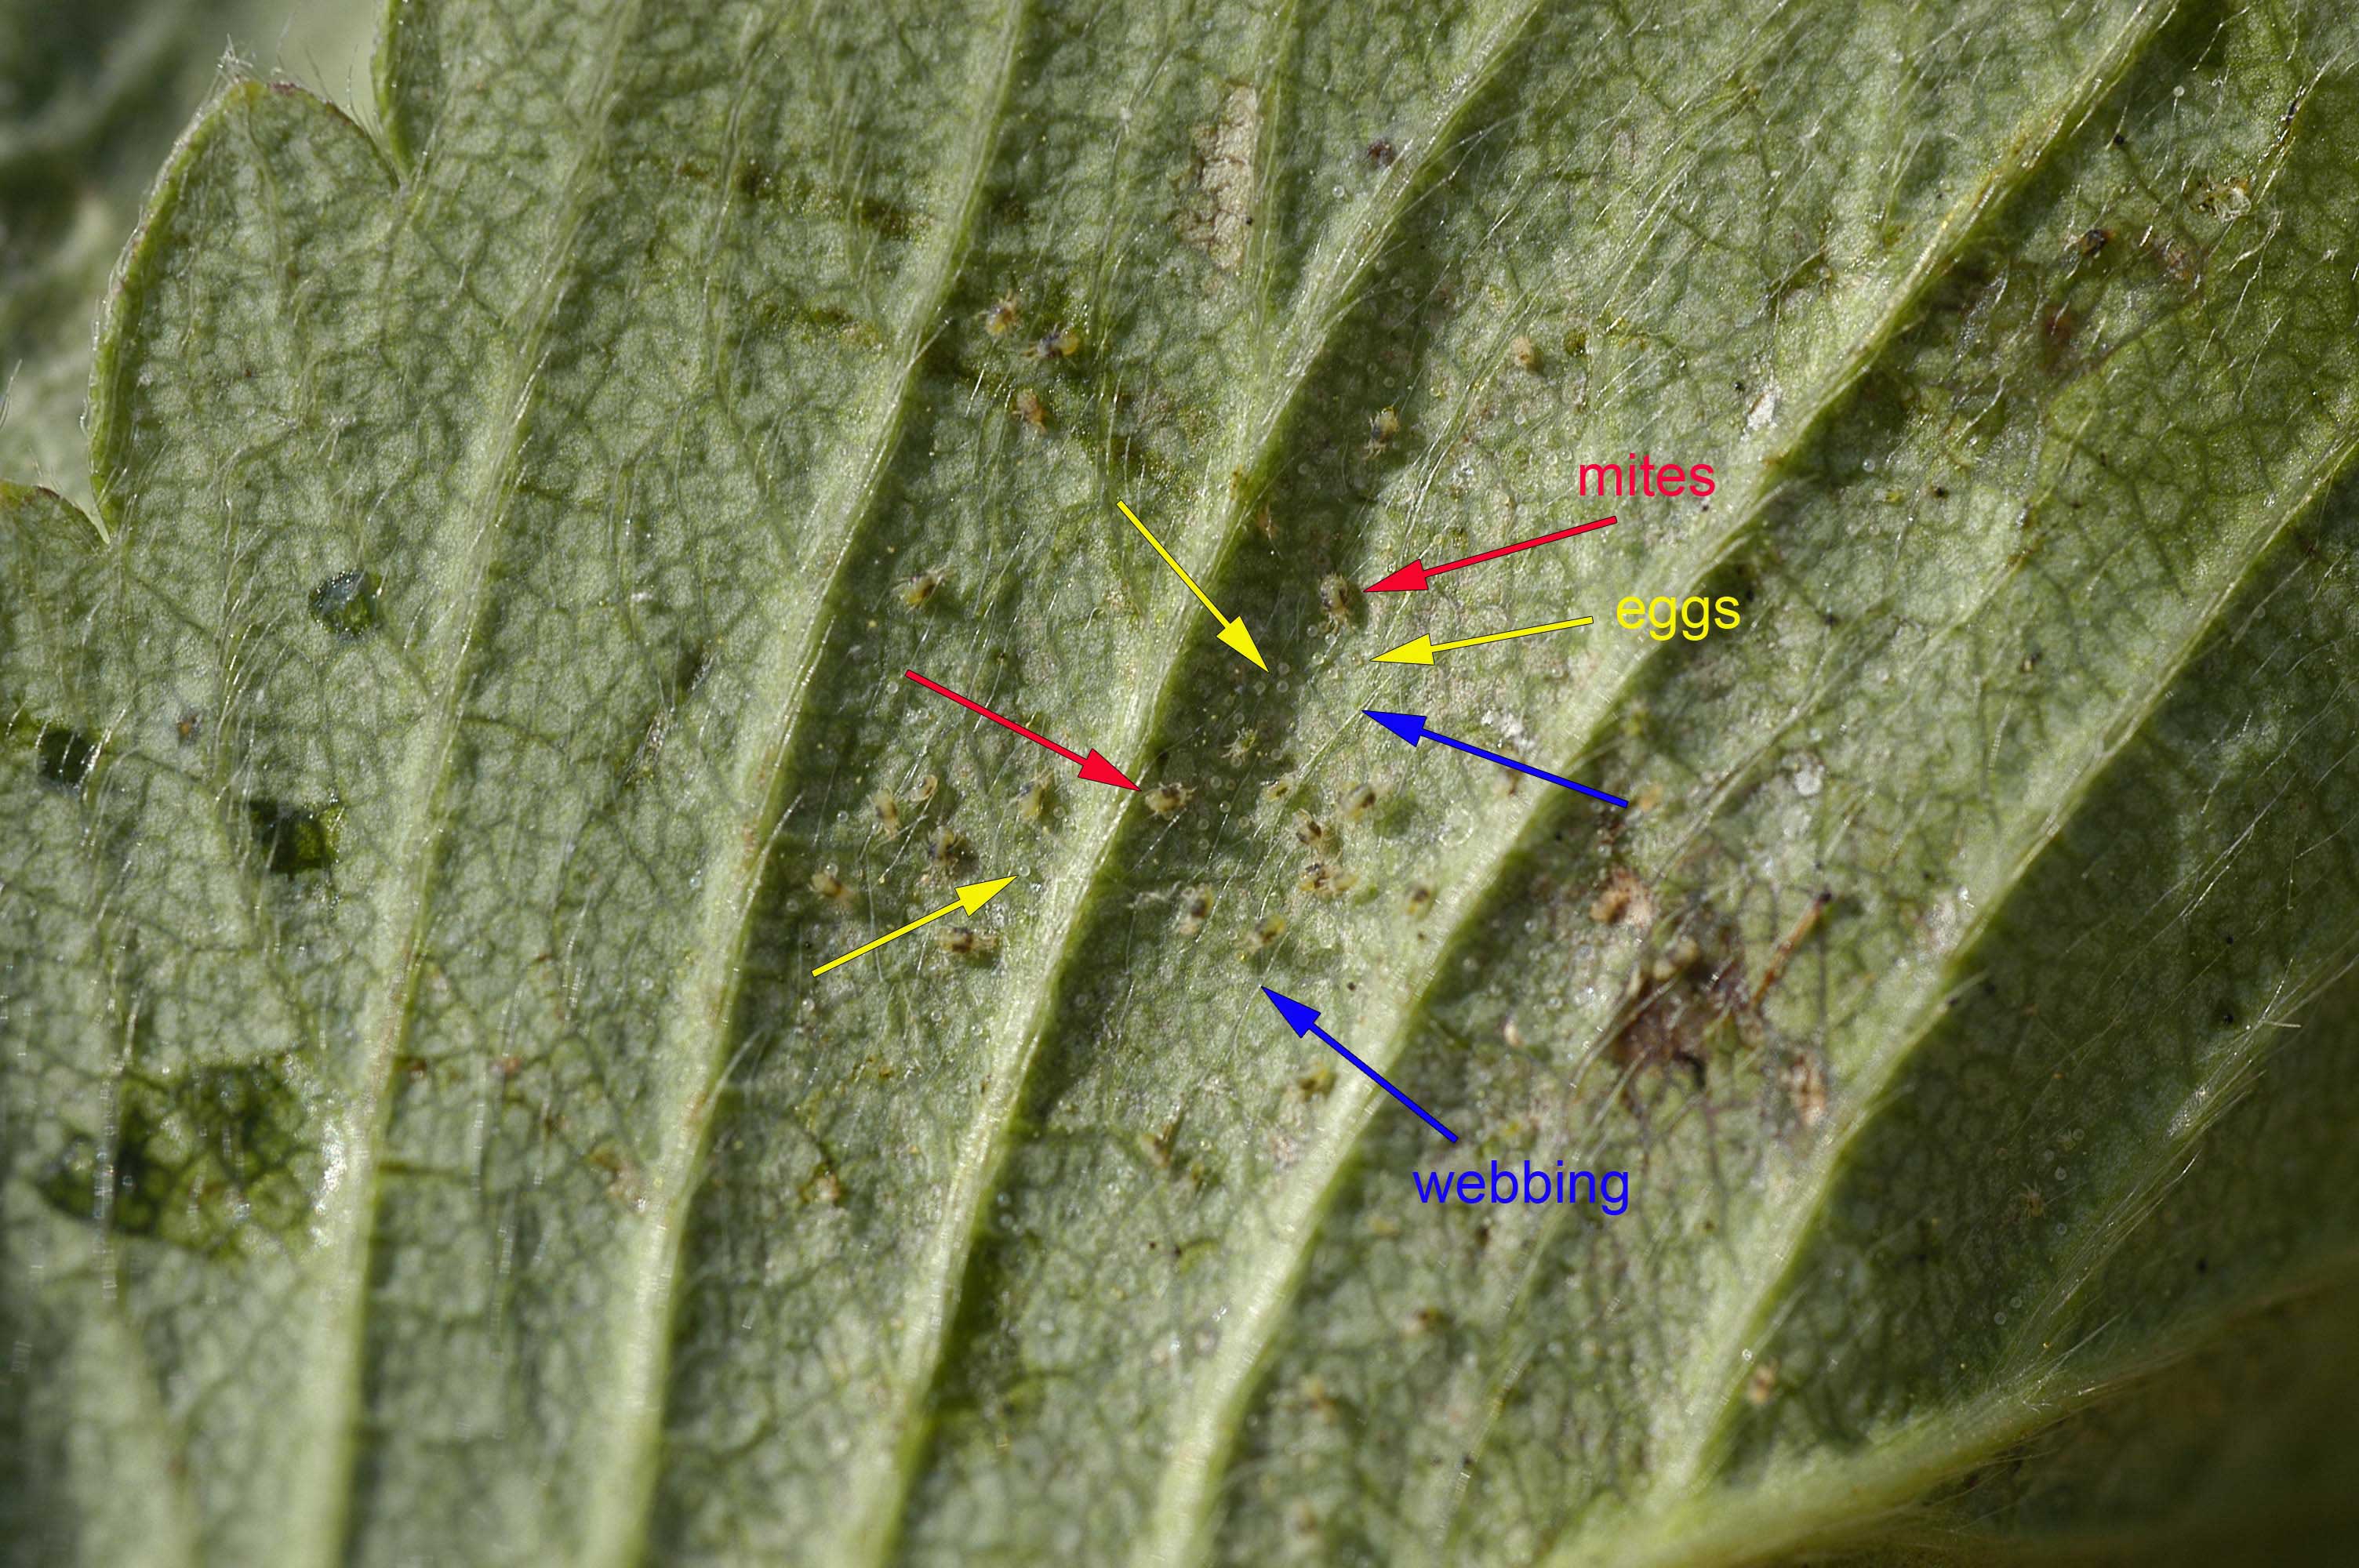
The males are usually the size of the second nymph and have pointed abdomens. The females have rounded abdomens and are the largest mites present.
Because of this variable growth process, it's common to think that you've erradicated the spider mites in your grow room, while they're secretly building up numbers in one of their immature stages.
This is why it's so important to keep treating your grow room after a spider mite infestation, even if it appears that all the spider mites are gone. Just pretend they're hiding and doing pushups, trying to build up their numbers for a second infestation. Treat your grow room like a war zone, and don't allow the spider mites to build up any numbers and attack again.
Solution: Early detection of spider mites, before damage is noticed, is VERY important.
Spider mites are tiny and can be detected only by a full and thorough leaf inspection (on both sides of the leaf). If you find Spider Mites you must act fast and hit them hard.
Spider mites are very quick to take over your plant, and even quicker to develop a resistance to almost any method you use to get rid of them, which is why it's generally recommended to use multiple methods of offense against a spider mite infestation.
If you have problems with spider mites, keep a constant and varied offense for the best chance at success.
How To Get Rid of a Spider Mite Infestation
Step 1: Identify how/where you got spider mites
If you already have an infestation, you will immediately wan to start hitting them hard with something that will kill them on contact (several options are listed below). But....
First, what type of spider mite do you have?
- Tracked in from outside
- Vegetable garden
- Animals/pets
- From a plant besides marijuana
If you have some spider mites which got tracked in randomly from outside, chances are you've got a run-of-the-mill spider mite that should be easy to get rid of.
Chances are you'll be able to use one of the less harsh home remedies to stop your infestation.
- From another marijuana grower
- Clones were infested with spider mites
- Tracked spider mites in from another marijuana garden
- Any time the spider mites were living on another marijuana plant before they got to your plants
If you got your spider mites from a cannabis clone or plant from another marijuana grower, chances are you've got the type of spider mite that is an expert at infesting marijuana plants.
The two-spotted mites often seem to be the worst spider mite in this category!
These specialized spider mites are incredibly developed at living on marijuana plants, and will already be immune to many common spider mite remedies.
If you believe you got your spider mites from another marijuana grower, then don't play games. Get serious and get rid of your mites NOW, before they adapt to your grow room and become unstoppable.
Step 2: Kill Every Spider Mite That You Can Find
Now that you know what kind of mite you have, this is what you do.
Shake the plant, then kill the spider mites with something that kills them on contact, like...
Proven
Spider Mite Remedies
(from serious chemical pesticides to organic repellants to home
remedies)
-
Azamax is a time-tested way to rid your grow room of spider mites - Spray plants 15 minutes before lights out, making sure to drench the foliage under the leaves as well as the top of your soil. Use a fan to blow on your leaves to help things dry. Treat your room more than once, even if you believe the spidermites are gone. You can also add small amounts of Azamax when watering your plants, as it will not hurt your roots but will kill spider mites in the soil.
-
Mighty Wash - use in a similar way to Azamax
-
Spinosad Products (safe & organic) - Spinosad products are organic and unlike many other spider mite pesticides, completely harmless to pets, children, and plants. Unlike many insecticides, you can spray spinosad heavily on leaves and roots with basically no negative effects. Spinosad products can be used directly to kill spider mites on contact, but can also be used when watering plants to systematically kill spider mites via the roots. Spinosad is also effective at fighting caterpillers, thrips, and many other marijuana pests.
Can be used both as a topical spray like Azamax and Mighty Wash, and can also be used directly at the roots. Spinosad is an organic insecticide made from the fermentation of a specific soil bacteria (actinomycete Saccharopolyspora spinosa) and kills spider mites via ingestion or contact by effecting the insect nervous system. Spinosad can be a good choice for organic and outdoor growers, because it is very toxic to spider mites, but is less toxic to many beneficial arthropods.
Note: Most spinosad products are effective for only about 24 hours after being mixed with water, so only mix as much as you will need per application. Anything left over will be waste.
Recommeded: Monterey
Garden Insect Spray with Spinosad
-
Doktor Doom Spider Mite Knockout Spray - This spray is hard on spider mites, but the main ingredient Pyrethrum can also be hard on plants (espcially in tight spaces without much ventilation) so use as a last resort if possible. Use with extreme care around humans as the ingredients can be toxic. Never use Pyrethrum-based products on your plants while your grow lights are on as it can burn your plants! Avoid using Pyrethrum products on young or sensitive plants as they can get burned even when the lights are left off. Do cover your grow lights and vents when bombing your plants with Pyrethrum and make sure you give the area at least 24 hours to air out before you try to breathe the air. This spray can works well for a couple of plants, but you'll want a Pyrethrum fogger if you have a lot of plants to treat. Outdoors, Pyrethrum can kill beneficial insects too, so keep that in mind if you're using natural predators to control pests (like ladybugs). All that being said, this spray will work to get rid of most spider mites, and it kills them on contact. Pyrethrum kills spider mites but not their eggs, so this product usually needs to be used 2-4 times (once every 2-3 days) to stop the breeding cycle and get rid of the toughest infestations.

-
NoPest Strips - these emit a vapor that kills spider mites, do NOT use if you will be breathing air from your grow room. Only get these if there will be no mammals breathing in the grow room while they're being used. These are only suitable if you're growing somewhere that is NOT your living space.

-
Floramite - Strong stuff with harsh chemicals, incredibly expensive, but it often does the job when everything else fails. Use as directed and only as a last resort!
-
Bleach solution (1 tablespoon of bleach to 1 gallon of 95°F, pH balanced, water in a spray bottle) - make sure to clean all surfaces of your room, and bleach them too if possible.
-
Alcohol and Water mixed togther will also kill the bugs on contact and shouldn't hurt the plant as long as the solution contains at least 30% water.
-
SM-90 mixed with water (1 part SM-90 to 5 parts water) kills spider mites on contact and is organic (it even smells good!)
-
Neem Oil works in a similar way to SM-90, though Neem oil doesn't smell as nice and will leave an unpleasant taste/smell on buds when used to treat flowering plants. There's some evidence Neem oil may be harmful to humans so use with care!
-
Homemade Pepper Spray (or buy Hot Pepper Wax Spray) - make at home by mixing 9 parts water, 1 part additive-free dishwashing soap, and one tablespoon of cayanne pepper. This treatment is very effective against some types of spider mites, but is ineffective against other types.
-
Nicotine tea - hit or miss like pepper spray, but can be very effective against certain types of spider mite. Take 15 gram of organic tobacco and steep it in hot water overnight to make nicotine tea. You can also add a little bit of Safer Soap. Use like any other spider mite spray.
-
Insect predators - there are also insect predators such as lady bugs that can provide some control and reduce your spider mite numbers, but it is unlikely these will get rid of your spider mites on their own. Insect predators can be effective if you have a small problem or if you need to get to harvest and chemical sprays are not a good option.
-
Dichotomous earth - Basically, this is fossil dust - sprinkle on the top of your soil, and anywhere else in your room (window sills, doorways, etc). This powder-like substance is harmless to mammals and plants, but is incredibly sharp at the microscopic level. Therefore it will tear and dehydrate spider mites on physical contact. This will not get rid of an infestation, but can help control and slow things down when used effectively.
-
Treat Entire Grow Area With Insecticide - Treat complete room with broad spectrum insecticide (only do this for a really bad problem, or one that keeps coming back) - avoid this if you can!
Note: Many growers to avoid chemical sprays or miticides which contain Abamectin or lindane because these are harmful to humans. Please take a look at anything you use to treat your grow room, follow the directions closely, and heed all warnings. Some treatments will work for some setups or types of mites, but not for others. As mentioned earlier, if you got your spider mites from another marijuana grower, chances are you will need to resort to extreme measures to get rid of your infestation.
Step 3: Follow up in 2-3 days with a different method to kill them (you should also re-apply your first method)
Follow up in 2-3 days with something different that kills their eggs as well as a different method to kill the remaining adults (these ones will already be more resistant to your original method).
Step 4: Repeat Step 2 & 3 at least one more time - treat grow area at least once after you think spider mites are completely gone
Repeat those two step at least one more time to ensure that you have really cleaned out your grow room.
Some species of spider mite can take days or weeks to mature and will reappear in the grow room stronger than ever.
Because of this, you should treat your area at least once after you are almost certain all the spider mites are gone.
Using a mix of several different methods seems to work best for getting rid of spider mites. Some spider mites are more resistent to some methods than others.
If you can see spider mites with your eyes, it means you probably have millions in the room waiting to hatch.
Step 5: Prevention: thoroughly inspect and proof your grow area against future attacks
Once spider mites are gone, you need to worry about prevention.
With spider mites, the best offense is a good defense! Stop spider mites from ever getting hold of your grow room with good prevention....
The best spider mite prevention is a clean grow room.
If you've had spider mite attack your grow room in the past, chances are you are unintentionally doing something to encourage or attract them.
There are many preventative products such as sprays or neem oil, which make plants less tasty to annoying spidermites. However, these should only be used to supplement good practices.
The most important aspect of spider mite (or any marijuana pest) prevention when growing indoors is a CLEAN GROW ROOM.
- Never move other plants from the outside world into your grow room - this is the most common way people get spider mites, especially the marijuana specialist spider mites. If you get a clone or plant, keep that plant away from your other plants in quarantine for at least a couple weeks to ensure it has no bugs. Get a handheld microscope and use it to look for bugs on new plants, too.
- No old dead leaves in your grow room at any time - you must collect old leaves regularly and completely remove them from your growing space. It doesn't count if you put them in a neat pile or trash can in the corner, you need to keep dead plant matter out of your grow room
- Make sure that you or anyone who comes into your contact space is clean (don't ever walk into your grow room directly from outside)
- No dogs, cats, rabbits or any other pets in your grow space
- Make sure you have good airflow in your room - spider mites like hot plants and low air movement
- If you have an intake from outside, make sure you have some sort of filter to keep bugs from getting in
- Dip new clones or small plants in room temperature water treated with Safer Soap and/or Neem Oil
- Alternatively, if you're growing just a small amount of marijuana for personal use, it may be better to start with seeds than clones, since you don't have to worry about accidentally getting marijuana zombie mites when starting from seed (plus you can choose to grow any strain you want!)
- Sprinkle Diatomaceous Earth on top of your soil and all around your grow room - this all-natural remedy is safe for humans (we can even eat it), and works because it is very jagged on the microscopic level. Tiny spider mites get ripped apart while plants grow through happily
- Spider mites like hot, dry weather. Keeping temps cooler can help slow down a spider mite infestation
- Keep a close watch on your plants, and react quickly at the FIRST site of spider mites!!!!
Outdoor Spider Mite Prevention
If you have a spider mite problem outdoors, you will want to...
- Quarantine new plants or clones, or dip new clones in something that kills spider mites - most importantly, don't bring marijuana-specialized spider mites to your grow area!
- Make sure there is a healthy population of predatory insects to kill off the spider mites (like lady bugs, though the "Western Predatory Mite" is your best defense against spider mites)
- Make sure you have proper ground cover (cover your soil with a soil cover, weed barrier fabric, Diatomaceous Earth, or some other barrier). Basically, you want to prevent anything from being able to live or grow in the soil near your plants
- If things get bad, invest in a strong pesticide that is specifically formulated for spider mites, take a look at this list for ideas, Floramite is considered a very strong and effective pesticide
- Make sure your plants are growing in a breezy area that doesn't get too hot and stagnant - spider mites love hot weather with no breeze
- Keep a close watch on your plants, and react quickly at the FIRST site of spider mites!!!!
Jump to...
6-Step Cure to 99% of Marijuana Problems
Marijuana Problems - Picture Guide
Marijuana Nutrients - What do I need to know?
Compare Different Grow Lights - Which one will work best for me?
Here's a photo album of a spider mite
invasion by LordLorax420
These vegetating clones were treated with Neem Oil then the entire
plants were dipped in Azamax.
(Click gear icon in upper right corner to see full resolution pictures)
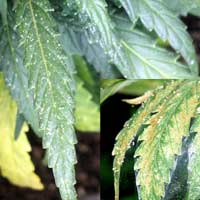
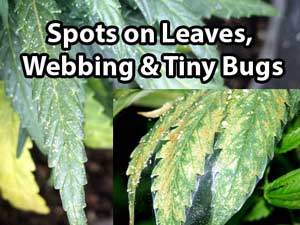
Sulfur Deficiency
Problem: A sulfur deficiency will manifest itself as all-over chlorosis (yellowing of leaves), usually starting with the newer leaves and at first may look like a nitrogen deficiency.
The parts underneath the leaves may take on a pinkish red or orange color. The buds on a flowering plant may start dying off. Unlike most other deficiencies that cause chlorosis, a sulfur deficiency will start at the back of the leaf and move it's way forward as opposed to starting at the tips.

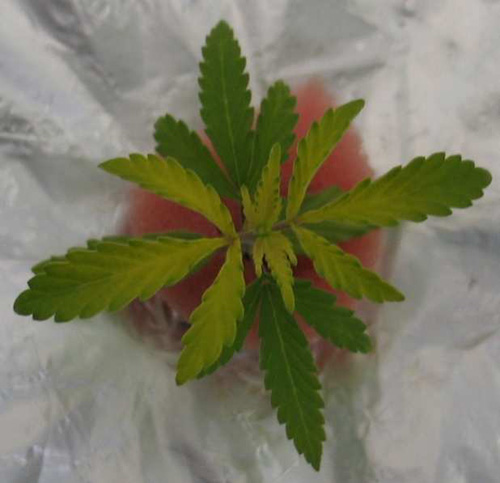
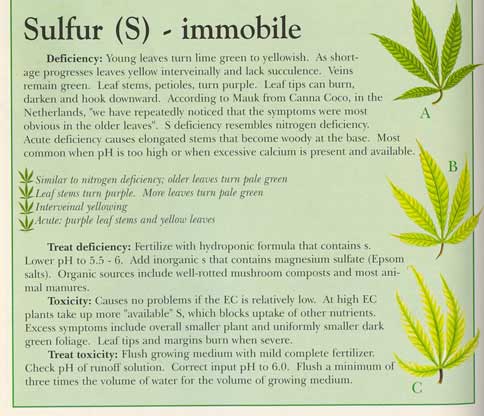
Solution: Check and correct your pH to make sure that your sulfur isn't being locked out. Sulfur moves slowly through the plant so it may take a few days after you fix the problem before you start noticing an improvement in your plant.
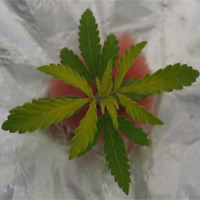
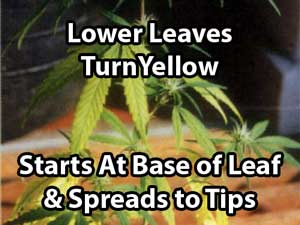
Under-watering
Problem: If your plant is drooping, then it's usually a sign of either over or under-watering.
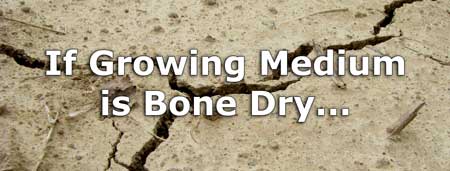
If your soil or soilless medium look bone dry, or if you know that your roots have dried out, than skip right down the the solution section, as you definitely have a case of underwatering.
Not Sure? If you're not sure whether your plant needs more or less water, how do you figure out exactly why your plant is drooping?
1.) Determine: Is my plant over-watered?
A cannabis plant does not get over-watered because it's given too much water at once - overwatering is caused by the plant being watered too often, or if the plant does not have proper drainage (which means the growing medium is taking too long to dry out).
2.) If not over-watered, does my plant have root problems?
Growing hydroponically? When you see signs of wilting and overwatering in a plant that is growing hydroponically with the roots in water, usually that's a sign of a root problem like root rot.
In fact, all cannabis plants can sometimes display wilting/drooping symptoms that are actually the result of root problems.
3.) You may be seeing symptoms of under-watering
So if you read the short description in step 1 about what causes overwatering (and you're sure you haven't overwatered your cannabis plants), and you're certain you're not seeing signs of root problems, than your cannabis plant might be drooping or wilting because it needs more water.
If you've been underwatering your plant, its leaves will look limp and lifeless, like these plants.
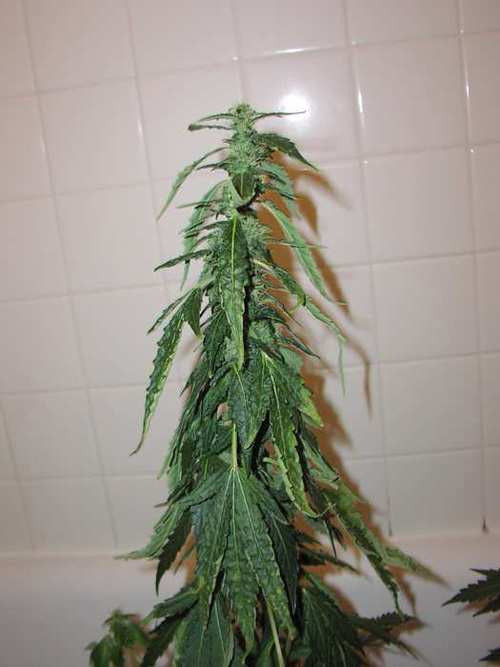
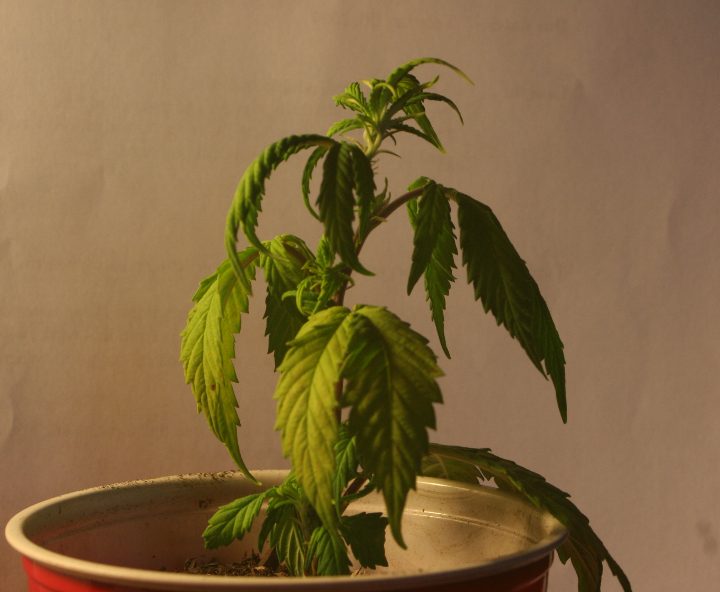
Symptoms of underwatering look the same whether your cannabis plant is growing in soil or a soilless growing medium like coco coir or perlite.
How can I tell if my cannabis plant is over or under-watered?
Does my plant actually have root problems?
Don't wait until leaves droop to water your potted cannabis plant! While it is generally a good idea to let your potted cannabis plant dry out a bit after watering (watering too often causes its own problems), you should always water your cannabis plants again before the leaves start drooping.
This is the case for cannabis plants grown in both soilless growing mediums and soil.
First-time growers tend to overwater their plants, but underwatering happens too.
So you're pretty sure your plant is under-watered. A thirsty cannabis plant will usually perk up quickly after the roots are given water.
Click here to see time-lapse of
under-watered marijuana plant coming back to life
1 picture taken every 75
minutes. Strain is Island Sweet Skunk. Used with permission. By
micks_trichs.
Watch another time-lapse - middle plant
is very under-watered and perks up after getting water
6 plants, 1 photo per
minute for 125 minutes. Used with permission. By
micks_trichs.
Learn about ones of the best ways to properly water your potted cannabis plant every time...
How to water cannabis properly (for soil and most soilless mediums)
-
Wait until the top of the growing medium is dry about an inch deep (up to your first knuckle).
-
Add water until you see some at least 20% extra runoff water drain out the bottom of your pot. Go back to step 1. (If water does not come out quickly or pots take more than 5 days to dry out for step 1, you may have a drainage problem)
Learn more about how to water your cannabis plants perfectly every time
Another simple way to tell if a potted plant is ready to be watered is to pick it up and tell if it feels heavy or not.
As plants use up all the water in their pot, it will get lighter. If you need something for comparison, you can get an extra pot and fill it with your growing medium. Now you can use this extra container for comparison with your potted plants as it represents the 'dry weight' of your growing medium. If you pick up a potted plant and its feels just slightly heavier than your dry pot, then you know it's time to water your plant. After a while you get a feel for how heavy your plants need to be and you may not even need the extra pot anymore.
Need more help?
If your plant is experiencing "the claw" and not just normal drooping (the ends of leaves are curling like a claw or pointing down like talons), then you may actually have a nitrogen toxicity (too much nitrogen).
These Plants Are NOT
Over or Underwaterd, These Leaves Show Signs of
Nitrogen Toxicity
("The Claw", tips bent down, curling / clawing, dark green leaves)
Jump to...
Cannabis plant problems by picture
6 Steps to Cure 99% of Cannabis Growing Problems
Am I overwatering my cannabis?
Prevent nutrient problems by managing pH
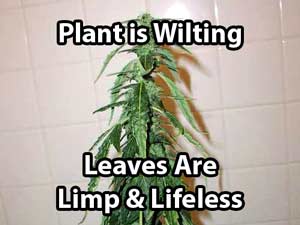
White Powdery Mildew
by Sirius Fourside
White spots on your leaves? Leaves dusted with round patches of powder that looks like flour?
It could be White Powdery Mildew.
Also known as White Powdery Mold.
WPM is usually a minor annoyance that's easily fixed, but if you don't catch it early, white powdery mold can turn into a relative catastrophe that ruins an entire harvest.
Never experienced it?
Imagine circular patches of a living, breathing, fuzzy, flour-looking substance showing up on your plant’s leaves without any warning. From there, the mildew can easily spread to other leaves and buds, rendering the buds unusable.
White Powdery Mildew has such an easy time spreading that even careful growers who take proper precautions can still experience it.
 For
example, the picture to the right is what I found on one of the leaves
of MY plants
the week before I wrote this!
For
example, the picture to the right is what I found on one of the leaves
of MY plants
the week before I wrote this!
Luckily, the issue was easily resolved because it was caught early, and because White Powdery Mildew is completely reversible up to a point.
This week, we will arm you with the information to stop this fungus’ proliferation before it even has a chance to take hold!
What IS White Powdery Mildew?
White
Powdery Mildew is a rapidly reproducing (both sexually AND asexually)
fungus who only knows how to do two things:
-
Eat your plants
-
Make more White Powdery Mildew
Fortunately, White Powdery Mildew is easy to spot since the white patches of fungal growth it creates stand out against cannabis’ green leaves.
It can be removed from plants with proper treatment if spotted early on, but any buds with WPM should be discarded as they most likely contain many more spores than your eye can see.
What causes White Powdery Mildew?
High Humidity
-
WPM needs moisture to thrive, but that doesn’t necessarily mean it needs water. Having a grow area with high humidity is all WPM needs to grow. This seems to be a bit problematic since young cannabis plants grow best in relatively humid environments (40% -60% RH). Luckily, high humidity usually only becomes an issue when it’s combined with the next cause (low/no airflow).
-
People who live in environments with extremely high humidity (such as Florida and the UK) can purchase a dehumidifier to control humidity in the grow area. This is especially important during the flowering phase when humidity needs to be much lower (45% rh) to prevent rampant growth of WPM and bud mold.
Low/No Airflow
-
White Powdery Mildew has a hard time settling in a grow room where the air is being moved. High humidity will give WPM the conditions it needs to survive, but poor airflow is what gives it the ability to settle down in the first place. In fact, a small (preferably oscillating) fan moving air in a grow area will prevent the vast majority of White Powdery Mildew woes.
Poor Ventilation
-
If you have WPM spores in your grow area and the air in grow area is never exchanged for fresh air, the spores get multiple chances to land on your plants and reproduce. This happens most often in conditions where cannabis is being grown in a closed, unventilated space - such as a closet - and precautions aren’t taken to exchange old stale air for new fresh air.
Leaf-Leaf Contact
-
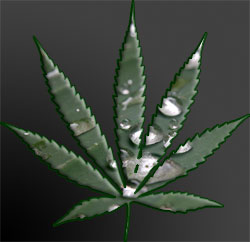 Leaves
that are touching each other will form moisture between them, and thus
they become more likely to contract WPM. Untrained bushy/leafy plants
with lots of new vegetative growth are especially prone since plants
will often have leaves mashed up against each other as they try to
reach the light.
Leaves
that are touching each other will form moisture between them, and thus
they become more likely to contract WPM. Untrained bushy/leafy plants
with lots of new vegetative growth are especially prone since plants
will often have leaves mashed up against each other as they try to
reach the light. -
Advanced growers can defoliate some of the fan leaves that are completely shaded from the grow light to make fewer choice landing spots for White Powdery Mildew. Also, defoliation frees up energy for the plant to use when done correctly and increases yields! See our article on defoliation for more info.
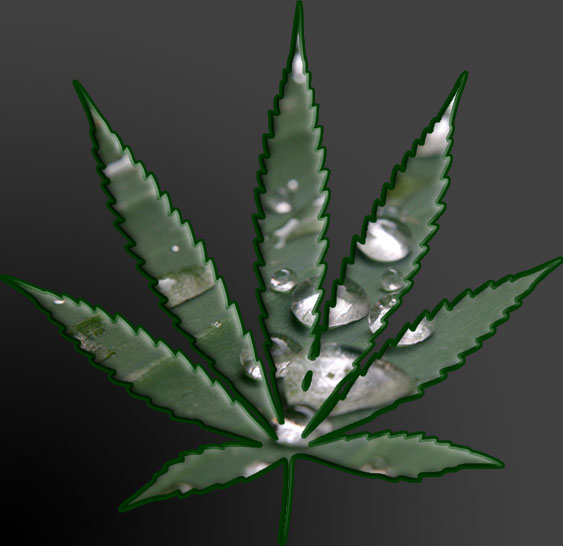
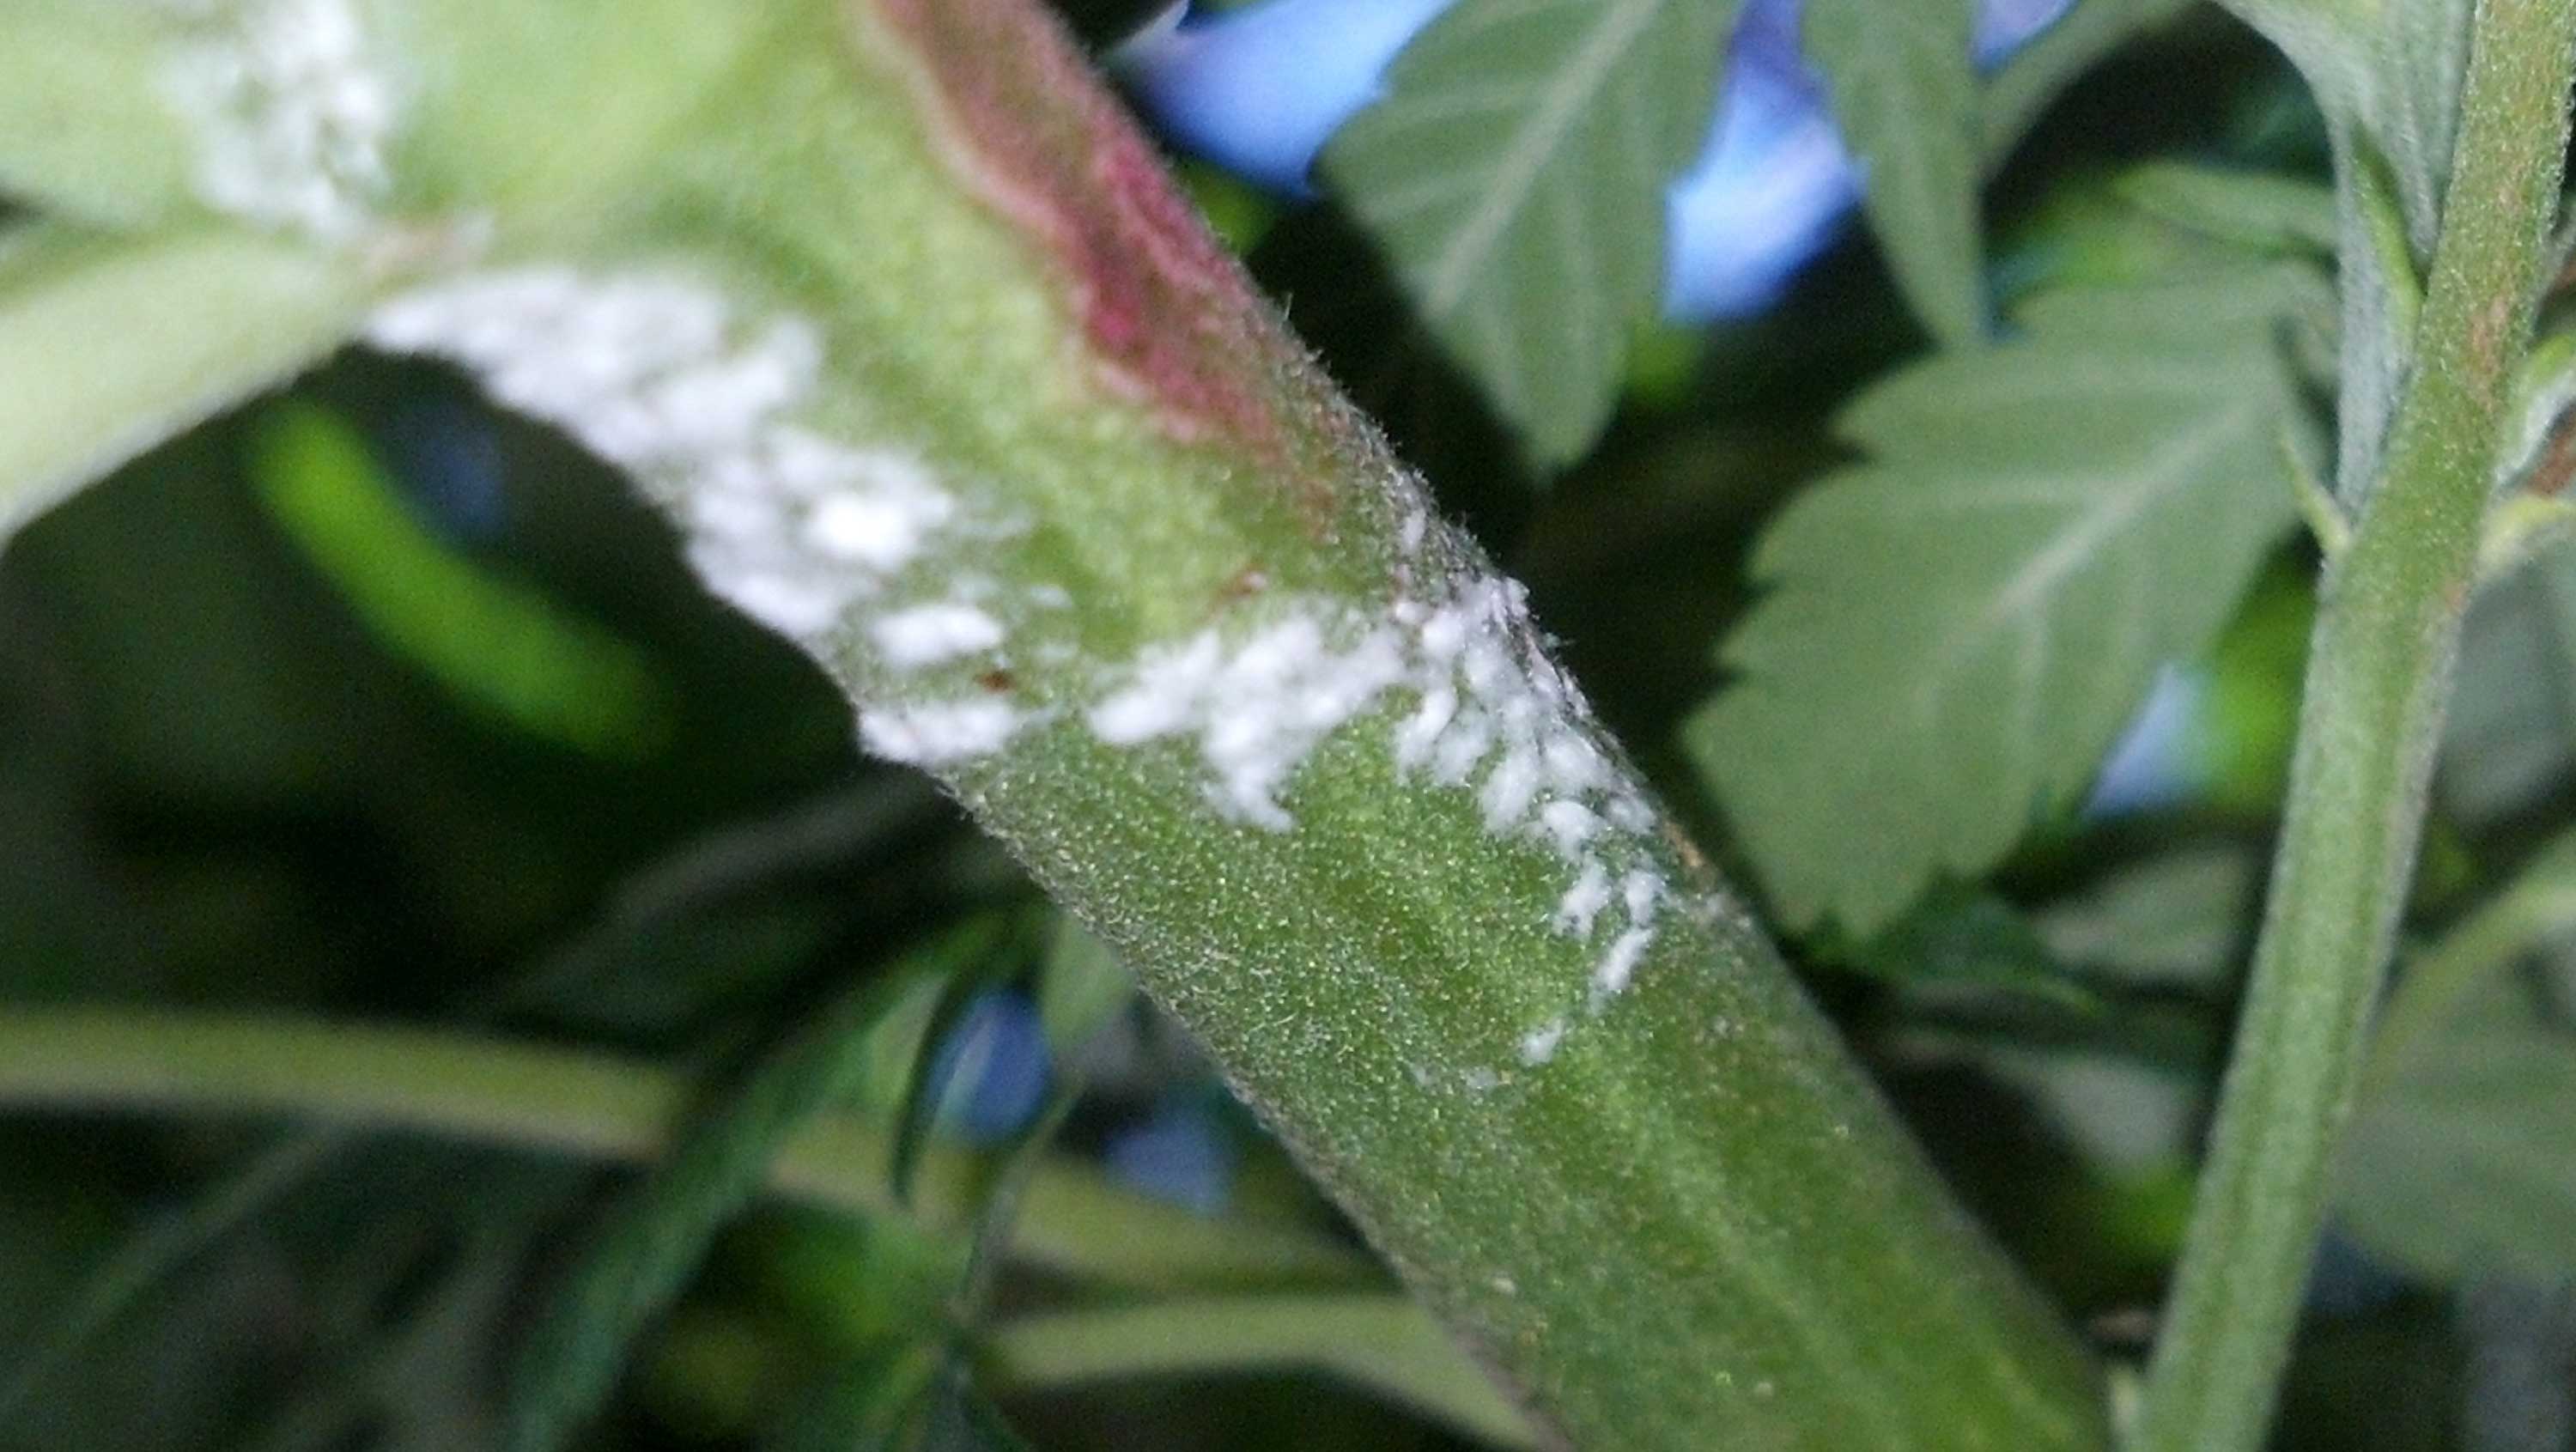
How to Eliminate White Powdery Mildew
As I mentioned earlier, I recently had a battle with White Powdery Mildew. Rather, it might have been a battle if I noticed it later or waited to fix the problem. That’s the one good thing about WPM: in most cases when WPM is caught early, you can remove all traces of the mildew without harming your plants.
There are quite a few products and homemade concoctions people use to treat WPM. Among the effective treatments are:
-
Milk (1:9 ratio of milk to water)
-
Baking soda (2 tablespoons per gallon of water)
-
Neem Oil (4 teaspoons per gallon of water)
-
Hydrogen Peroxide (1 teaspoon per gallon of 35% H202)
-
SM-90 (1:5 ratio of SM-90 to water)
Rather than go into these methods, I’m going to give you the simple strategy I use that gets rid of White Powdery Mildew on the first try, every time! Here’s my trusted 3-Step White Powdery Mold cure:
-
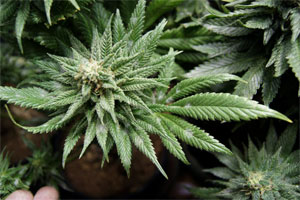 Remove
White Powdery Mildew from leaves
- Get some water (tap water works fine) and some paper towels. Wet the
paper towels and use them to gently wipe the mildew off the affected
leaves whilst being careful not to jostle any leaves with spores on
them. Using a wet cloth will ensure that more spores stick to the cloth
instead of becoming airborne. Note: While it isn’t necessary to use
paper towels, their disposability helps to curb the spread of spores
from one leaf to another.
Remove
White Powdery Mildew from leaves
- Get some water (tap water works fine) and some paper towels. Wet the
paper towels and use them to gently wipe the mildew off the affected
leaves whilst being careful not to jostle any leaves with spores on
them. Using a wet cloth will ensure that more spores stick to the cloth
instead of becoming airborne. Note: While it isn’t necessary to use
paper towels, their disposability helps to curb the spread of spores
from one leaf to another. -
Ensure plants have proper airflow and ventilation - Even if you have absolutely no airflow or ventilation in your grow room, having even two fans will drastically reduce your chances of encountering WPM while also benefitting your plants overall health. One fan should be oscillating if possible and should gently blow air over your plants. All the plants need is enough air to gently rustle their leaves. The second fan should be in your grow room pointing outward, pulling heat away from your plants (only needed if you have no ventilation). Having a fan pointing out of your grow room will force old air out of the room, and in turn, pull new air into the room. At this point, you’ll have new air coming in, being used and circulated, then kicked out. Keep in mind that two fans is a minimum.
-
 Treat
plant with SM90 to kill spores prevent future growth
- Mix 1 part SM90 to 5 parts water(I’ve found 7 parts water to be
equally effective) in a clean sprayer/mister.
Wait until just before your lights for off for the day and mist your
(newly cleaned) plants. Get all the leaves! This diluted SM90 mixed
will kill any spores it touches, and anywhere it lands becomes
uninhabitable for future spores. Plus, it’s safe to use - even during
flowering - and it smells awesome.
Treat
plant with SM90 to kill spores prevent future growth
- Mix 1 part SM90 to 5 parts water(I’ve found 7 parts water to be
equally effective) in a clean sprayer/mister.
Wait until just before your lights for off for the day and mist your
(newly cleaned) plants. Get all the leaves! This diluted SM90 mixed
will kill any spores it touches, and anywhere it lands becomes
uninhabitable for future spores. Plus, it’s safe to use - even during
flowering - and it smells awesome.
There you have it. If you end up running into White Powdery Mildew, give this advice a shot and you won’t have to deal with it past that first day. If you do end up using these steps, feel free to let us know if it helped you or not, or how you did it differently. When growers know just a little bit about this disease, it doesn’t have a chance!
White Powdery Mildew Defense
What's the easiest way to fight against White Powdery Mildew?
Have it completely outgunned!
Get the right stuff to let White Powdery Mildew know that your grow room is off limits!
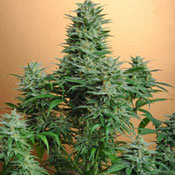
Papaya cannabis strain
The strain Papaya is potent, flowers early, and - most importantly - is disease resistant!
SM90 kills WPM, is safe for buds, AND it smells GREAT!

A Mister is awesome for applying SM90. Also, it's the best way to foliar feed your plants!
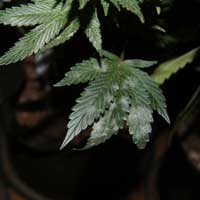
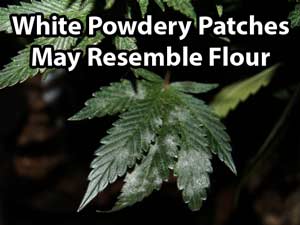
Zinc Deficiency
Problem: Younger leaves start yellowing in between the veins. Leaf tips get discolored and start dying. the leaves will take a unique banded appearance and the plant will stop growing vertically. There will be much less space between new nodes which will cause all the new leaves to start bunching together. If the plant is budding, it's flowers may start dying.
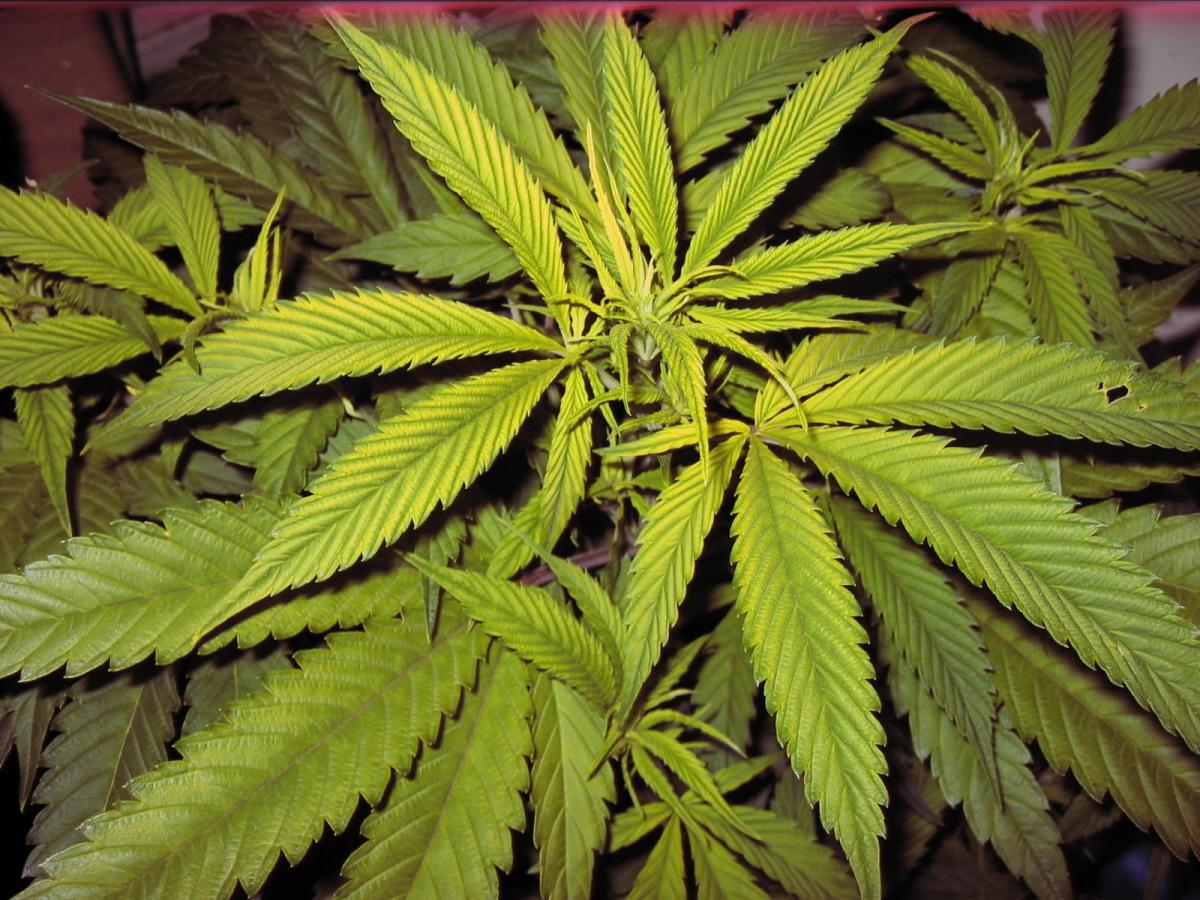
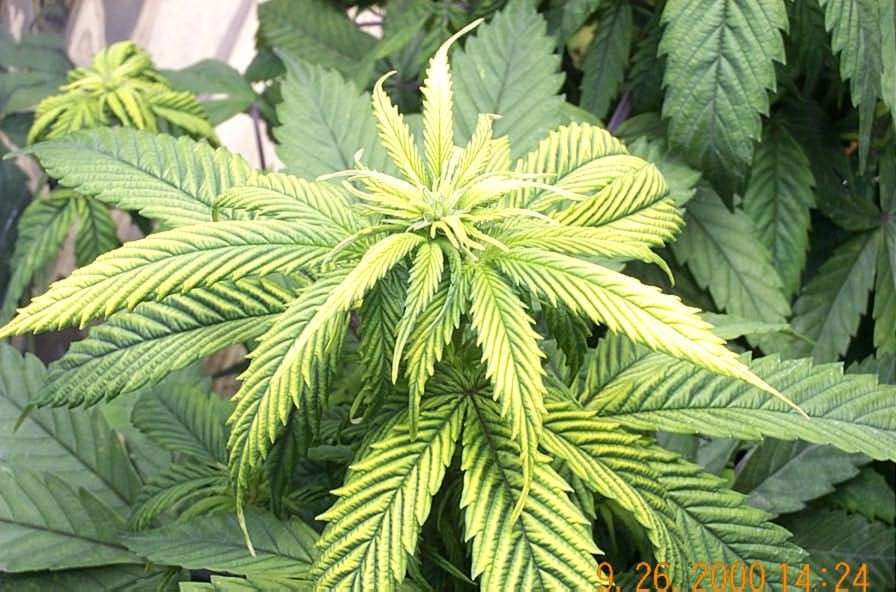
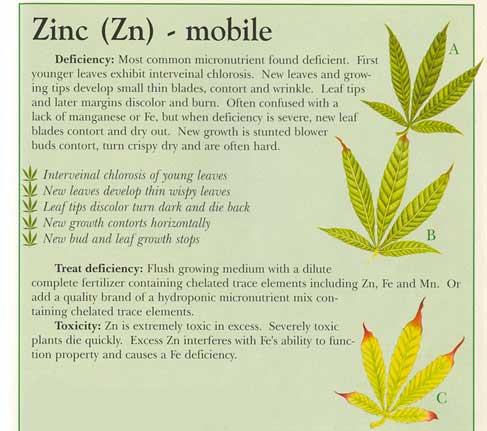
Solution: Flush your system with clean, pH'd water that contains about half the nutrients needed for the plant (including zinc, iron, and manganese). Watch to make sure that the problem starts to clear up on new growth within a couple of days.