You are hereNebula's Manifold Tutorial - Main-lining Cannabis
Nebula's Manifold Tutorial - Main-lining Cannabis
by Nebula Haze
Table of Contents
Ultra-Quick Guide to Building a Manifold
- Supplies List
- Important Definitions
- Main-Lining Diagram
- Main-Lining Video Tutorial
- Step-By-Step Instructions
Manifold Grow Journal - See a cannabis plant get main-lined from beginning to end
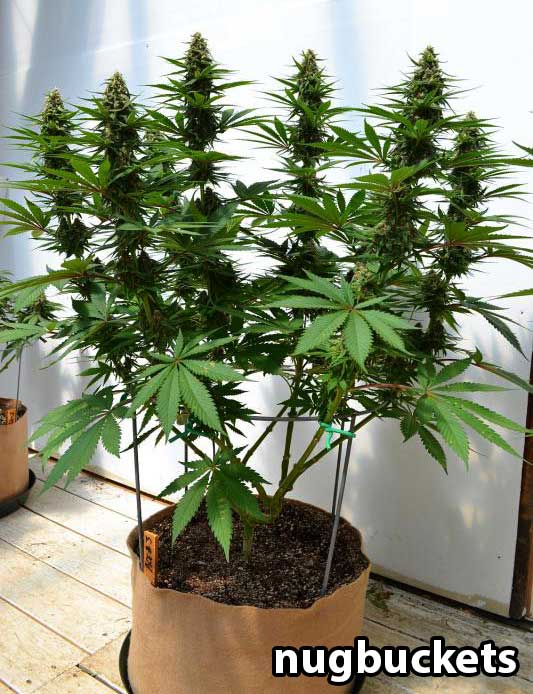
The cannabis "main-lining" technique was given a name and originally described by a talented grower named Nugbuckets
---
This cannabis main-lining tutorial is a work in progress! I did not create "main-lining" and am not the first grower to try main-lining cannabis. Several growers have asked me to put together a main-lining tutorial based on what I've learned so far in my setup, so I am simply sharing my experiences and personal technique for making a cannabis manifold. I am not an expert, but I hope this information helps other growers!
Main-Lining (building a manifold) for growing cannabis is a relatively new technique on the grow scene. At least, it’s only recently that growers have been talking about it by the name "main-lining" or "manifolding." This technique has not been tested by a lot of growers. We encourage you to contact us about your experiences with main-lining cannabis, so we can add what you’ve learned to this page.
Until the main-lining process has been better tested, it’s hard to predict how it will work in your setup. In this article we’ll share everything we’ve learned so far about building cannabis manifolds, but know that we're still collecting data.
---
The technique of “main-lining” or manifolding cannabis was first described and named by a talented grower known as Nugbuckets.
The idea of main-lining is to build a “manifold” at the base of your cannabis plant to efficiently deliver resources to all colas. During the process of building a manifold, the grower can choose to create a plant with usually 8 or 16 colas (8 is most common, 16 for ScrOG setups, and 32 is rarely an efficient use of plant resources).
Why I build manifolds when growing cannabis indoors
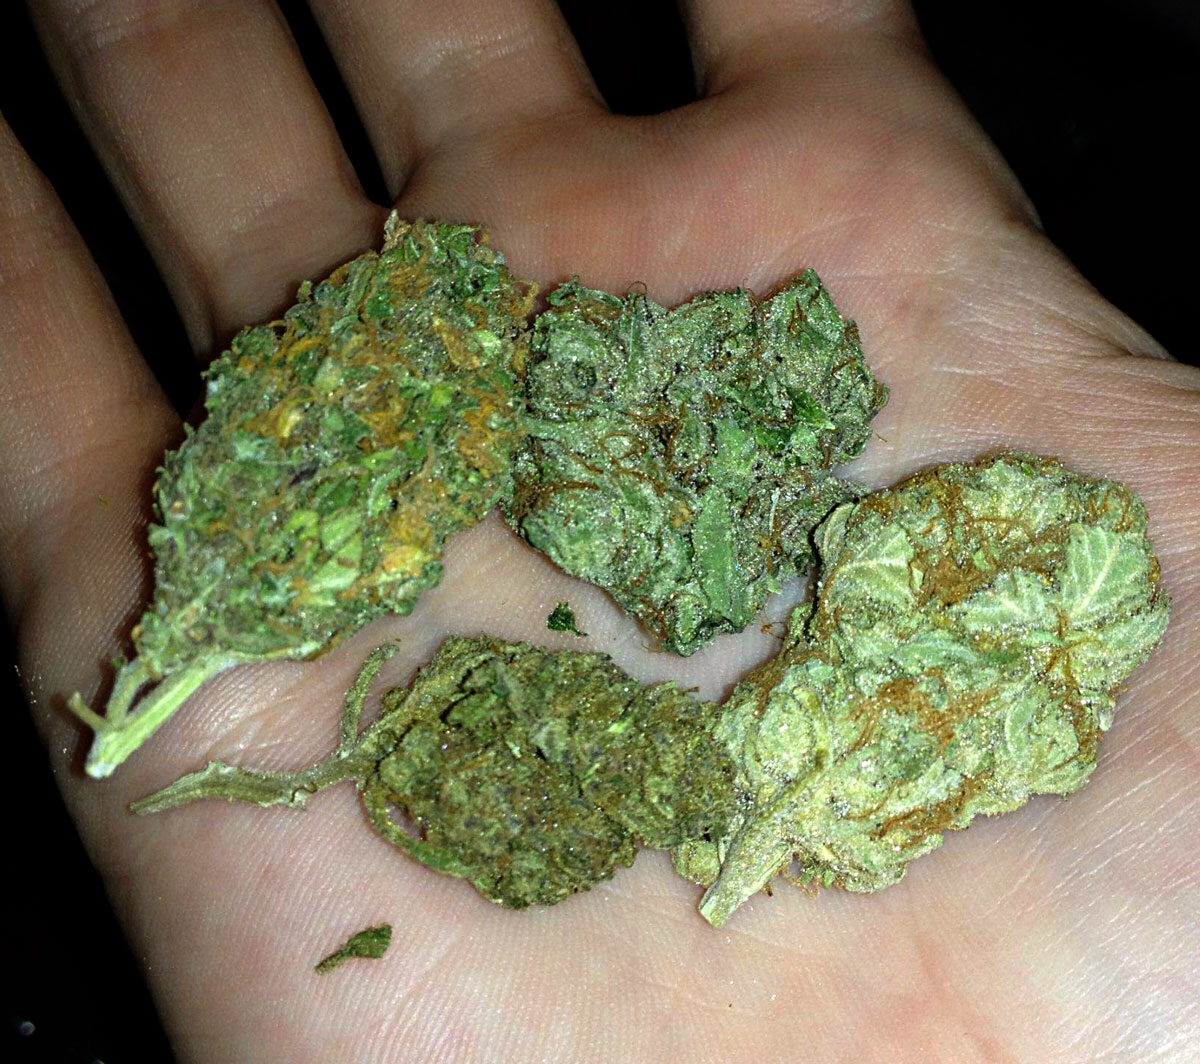
- Bigger yields! The main reason I continue main-lining and building manifolds is because this training technique has resulted in harvesting much bigger yields from the exact same setup I had before. I've used other types of plant training, and main-lining cannabis seemed to get better results than any other individual plant training technique.
- Easier for me than other training methods - While it may seem like a lot of steps, the basic idea of main-lining cannabis is to cut the plant 3 times, then just arrange the colas where you want. Each of the colas tend to grow about the same height as each other. This makes it straightforward to get a "sea of colas" that are each thick and dense, without a lot of popcorn or larfy buds.
- Less time training - Since you just top the plant 3 times and place buds, it really doesn't take much time to get plants to become a desireable shape with lots of colas indoors. Some training methods can create similar shapes and canopies, such as ScrOG, but ScrOGing can take up to an hour a night during the intense process of filling the net in the late vegetative stage before the flip to flowering. Manifolding only takes a few minutes for the first few weeks of veg, then no more training is needed besides holding up heavy colas late in the flowering stage.
- Training takes place in beginning instead of the middle or end - Since all the training happens in the first few weeks of the plants life, you get to sit back and care for the plants, instead of worry about getting a shape you want.
- Less likely to get bud rot or mold - While this method produces many big thick colas, each cola is uniform and tends instead of growing just one main cola. When colas get too thick, they run the risk of developing bud rot (inside of buds simply rot away), or getting moldy during the curing process. Instead of growing just one main cola which can get spoiled, manifolding cannabis during the early veg stage builds a support structure for many colas that are thick and uniform, with less chance of getting bud rot or other types of mold.
- Less time trimming - With only long, dense colas without larfy small buds, trimming is much faster. There's only 8 long colas to trim, and that makes trimming go by faster than trimming lots more nugs
- Better drying - Since all the buds are a similar width and density, drying is a lot more straightforward. All the buds tend to be done drying at the same time.
Main-Lining - Building a Manifold
Creating a Plant with 8+ Fat Colas Using a Simple Topping Technique
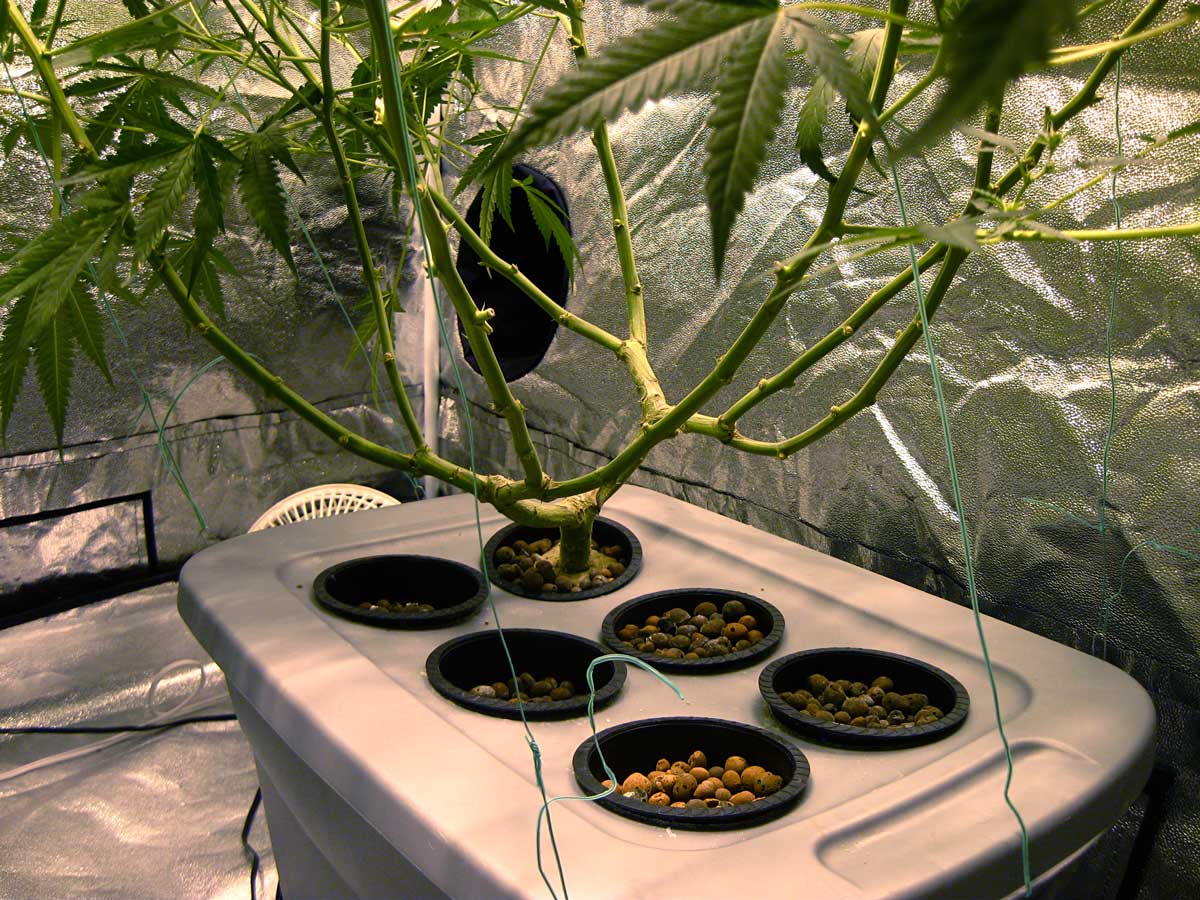
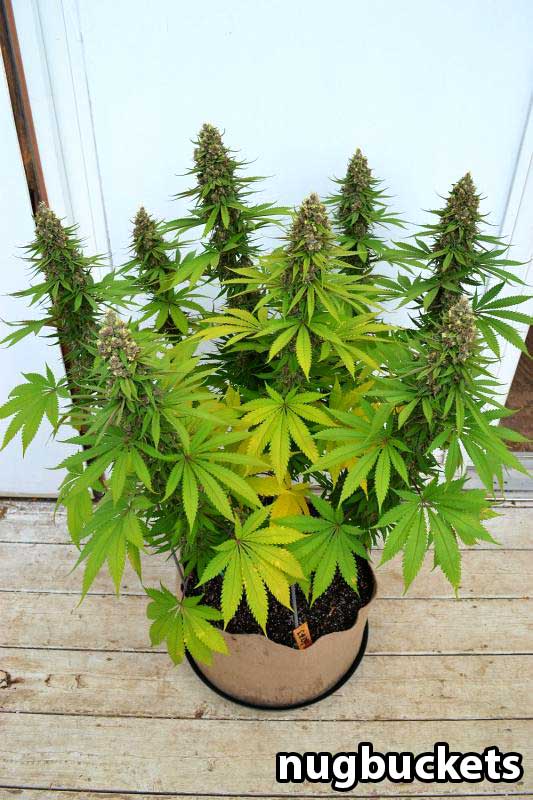
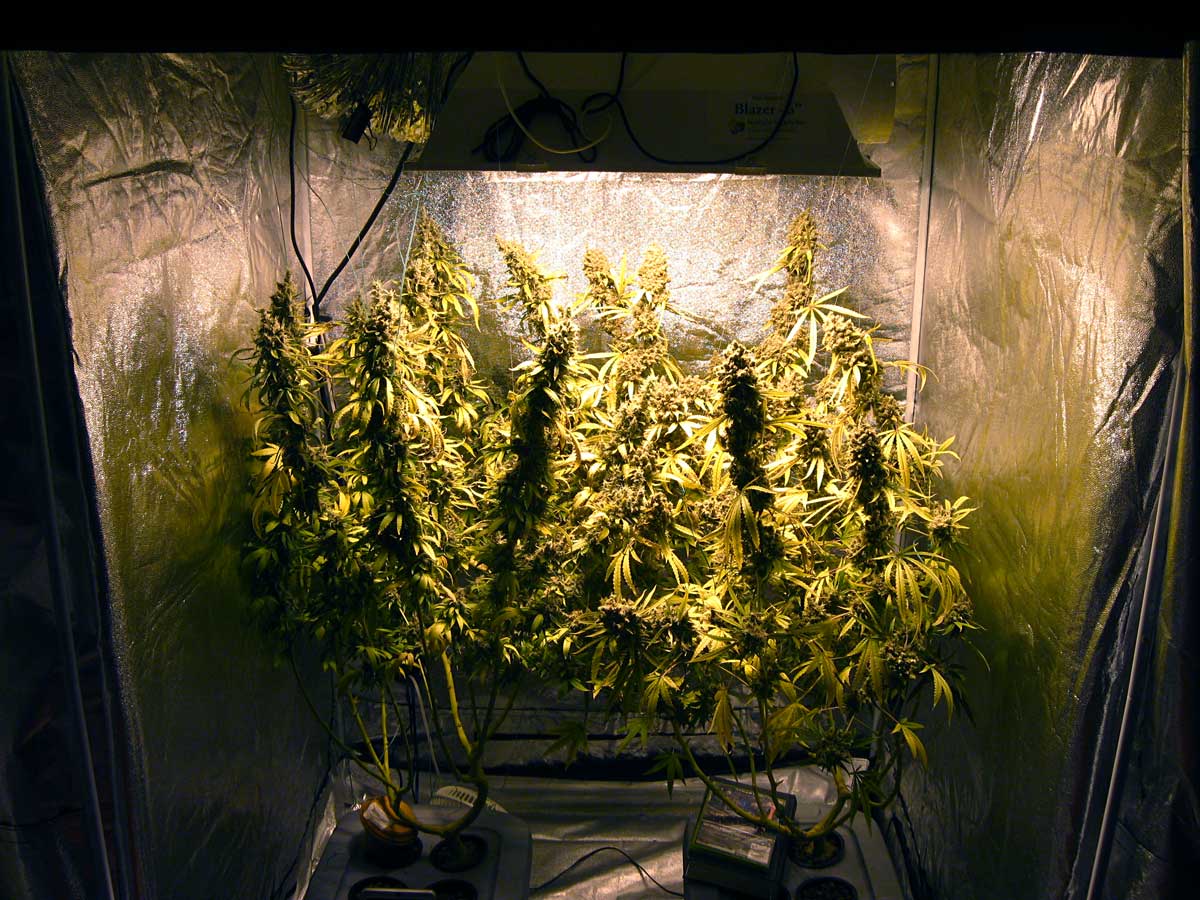
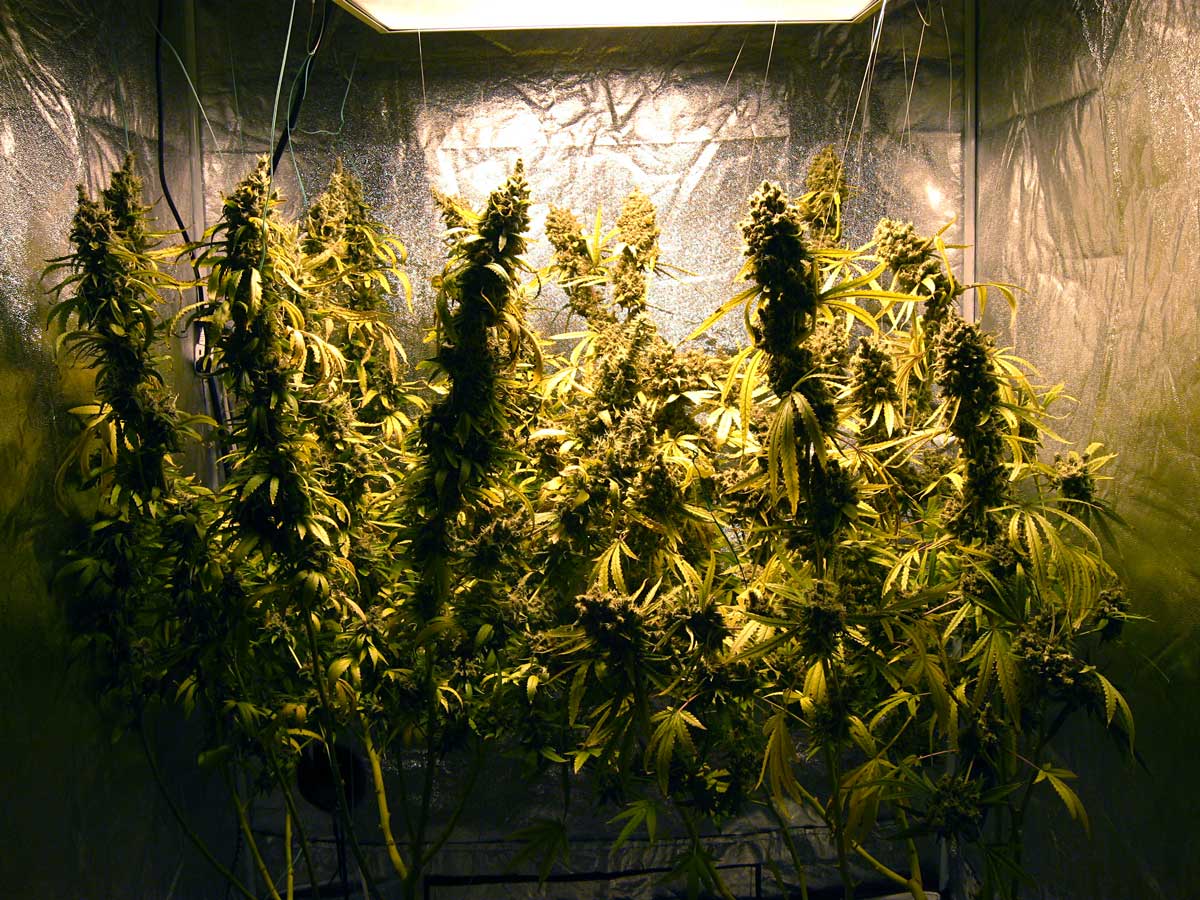
This is what main-lining and building a manifold can do for you
This technique of building a manifold at the base of cannabis plants has been adapted to many growers in many setups, and it’s not always done the same way.The following steps do not describe the process exactly how Nugbuckets does it, but I’ve had great results with main-lining this way. Many growers have asked me for a quick, concise tutorial, so here it is.
Sometimes I wonder if main-lining is as good for soil as hydroponics. I’ve had soil growers tell me that this technique adds too much time in the veg stage for the results. Then again, Nugbuckets was an avid organic soil grower. But I know for sure that plants respond really well to main-lining in a hydro setup.
Ultra Quick Guide to Building a Manifold
What You Need to Start Main-Lining Cannabis
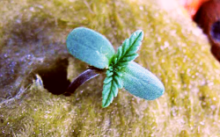
- Healthy, fast-growing plant in early veg stage
- Sharp scissors
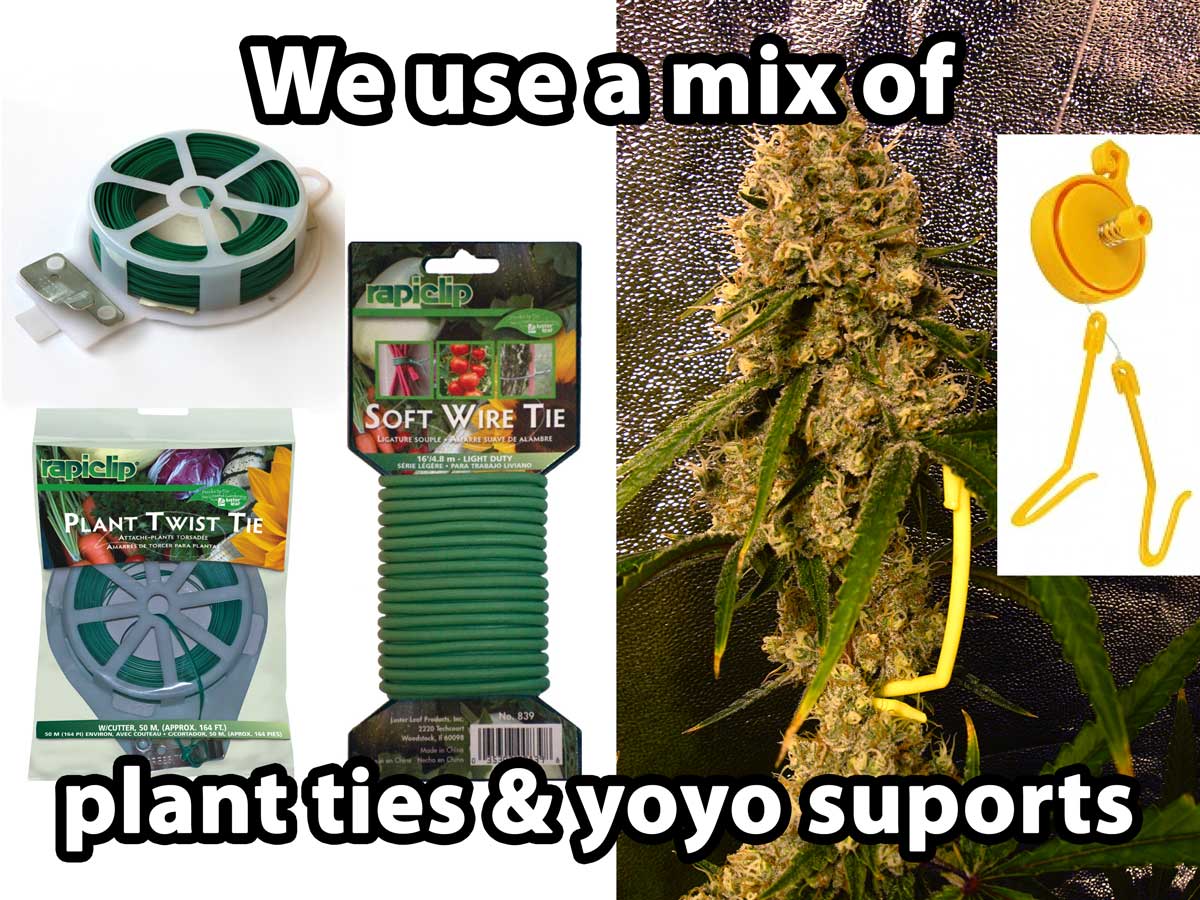
- Plant ties & Soft Wire Ties
- Plant yo-yos (or "yoyo supports") - you're going to need these to hold up all your tall, heavy colas when they start falling over from their own weight
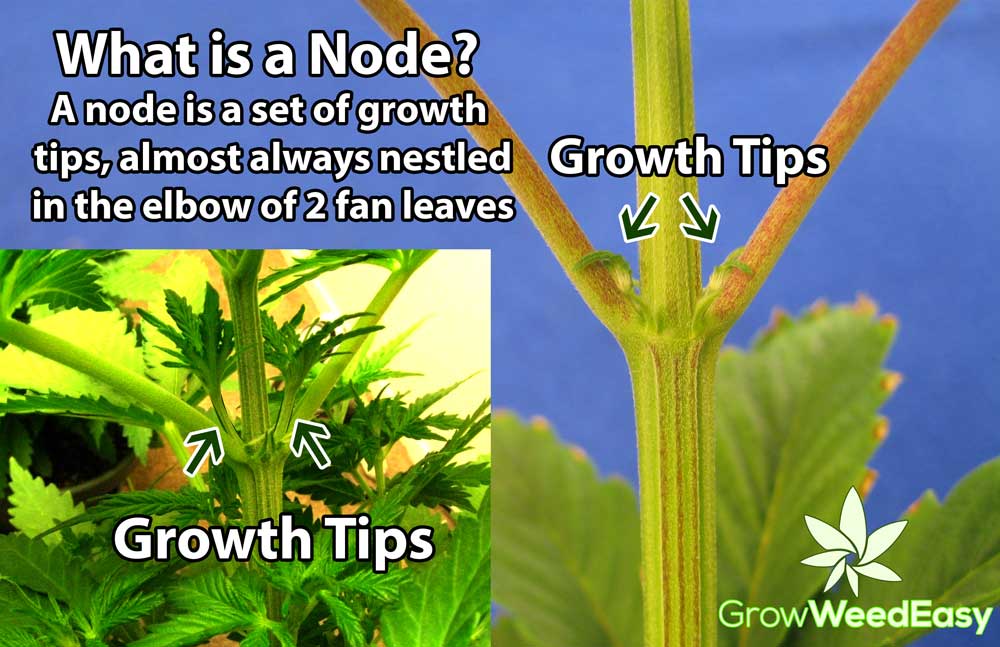
- Node - a set of leaves attached to a stem. When talking about the “3rd node” for example, it means the 3rd set of leaves from the base
- Growth tip - a part of the plant that is growing new nodes and leaves; if the growth tip is part of a long stem that reaches near the top of the plant, it’s often called a “cola” or “top”
- Cola/Top - a main stem with a growth tip at the end - colas will grow buds in the flowering stage. The goal of main-lining is to end up with 8 (or 16) evenly spaced colas.
- Topping - To “top” a cannabis plant means to cut off growth tip. You can cut off a growth tip at the end of a stem, or further down. In this article, you will be topping plants right above certain nodes.
Important! Never start main-lining a plant that isn’t growing fast and healthy. For an unhealthy plant, main-lining could slow growth even more. Stunting a plant could add more time and reduce yields, so only start main-lining with fast-growing plants.
This is the super condensed version for main-lining cannabis indoors, exactly as I do it now (after some trial and error). The complete tutorial with pictures and notes is below.
Main-Lining Cannabis Indoors
Nebula’s Step-By-Step Tutorial for a Wide-Based Indoor Cannabis Plant
Quick Reference - Main-Lining Cannabis Diagram
Nebula's Main-Lining Cannabis Video Tutorial
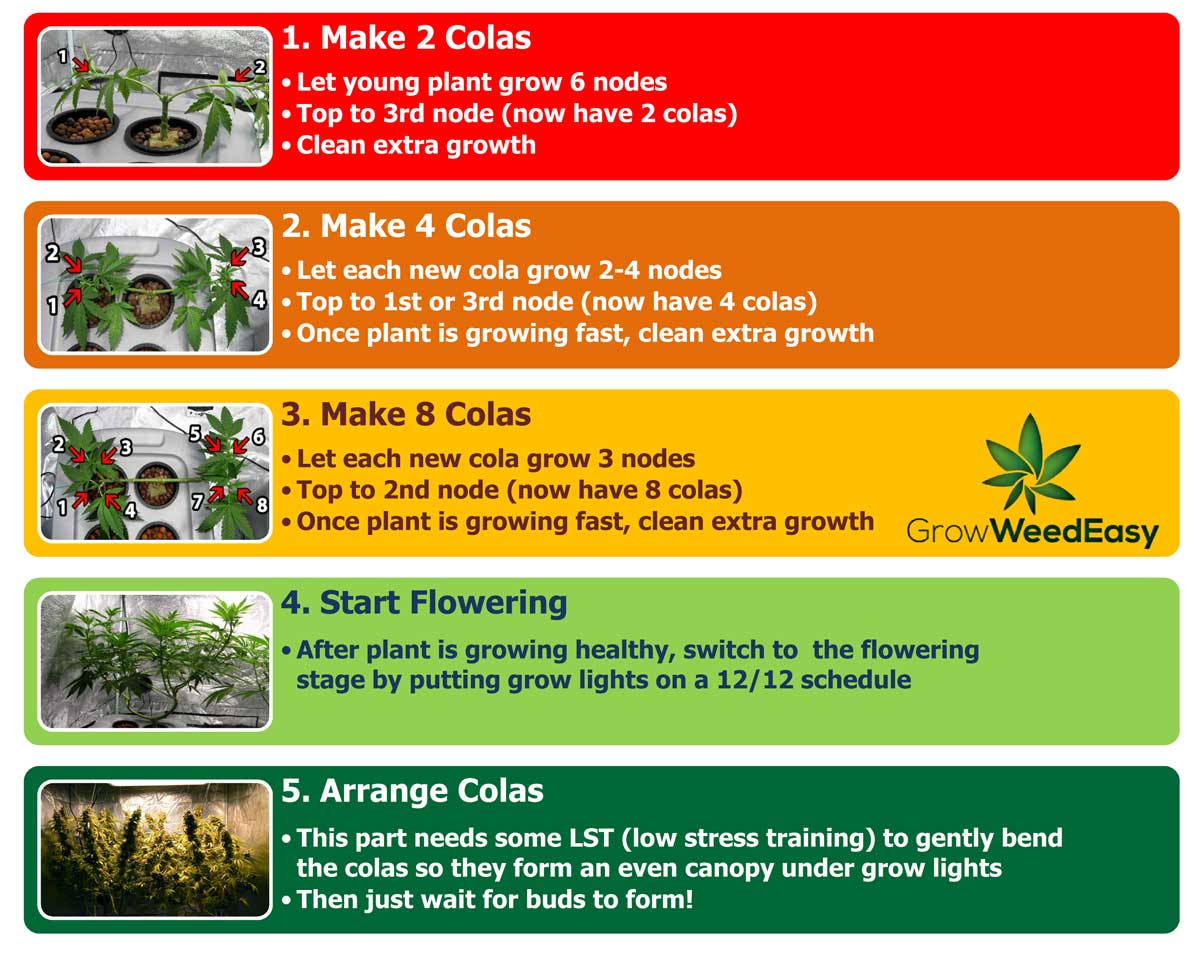
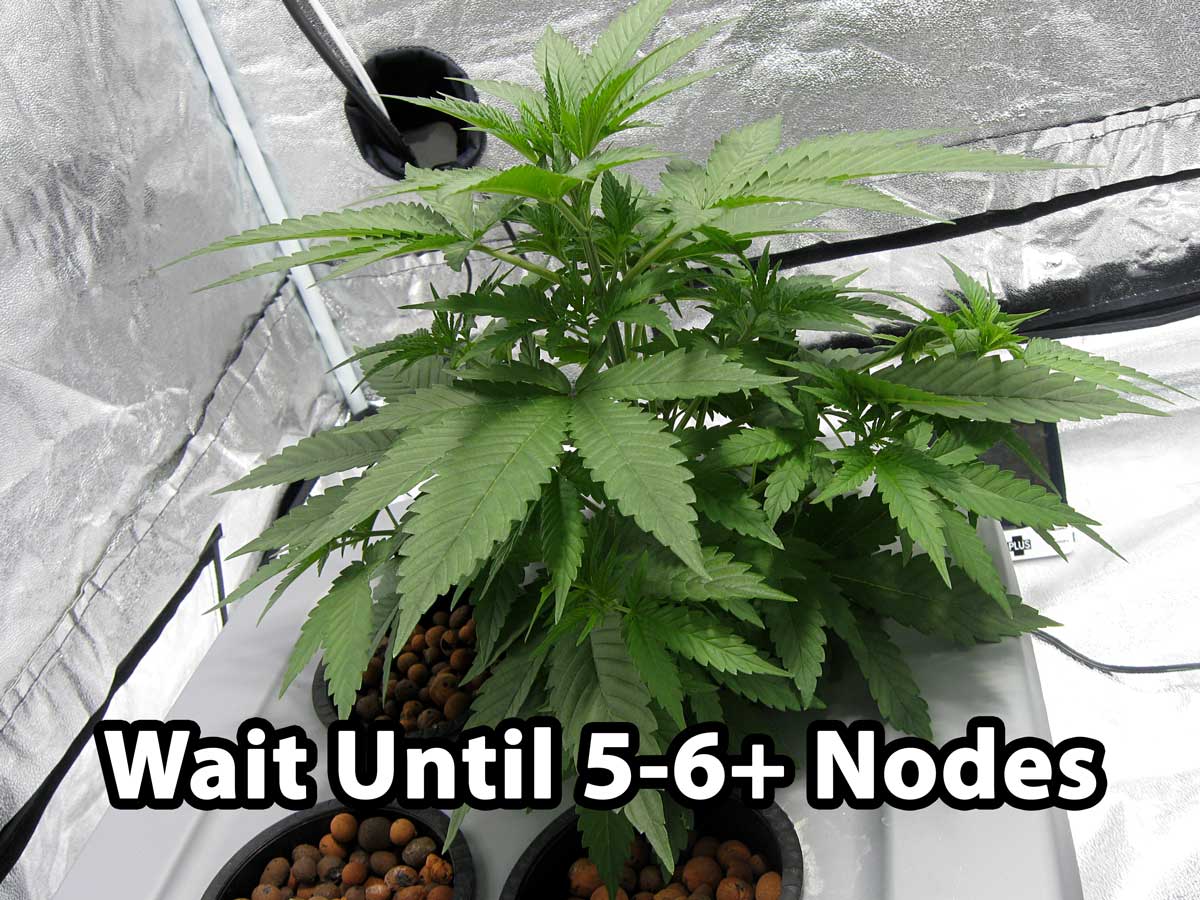
- Let young plant grow 6 nodes
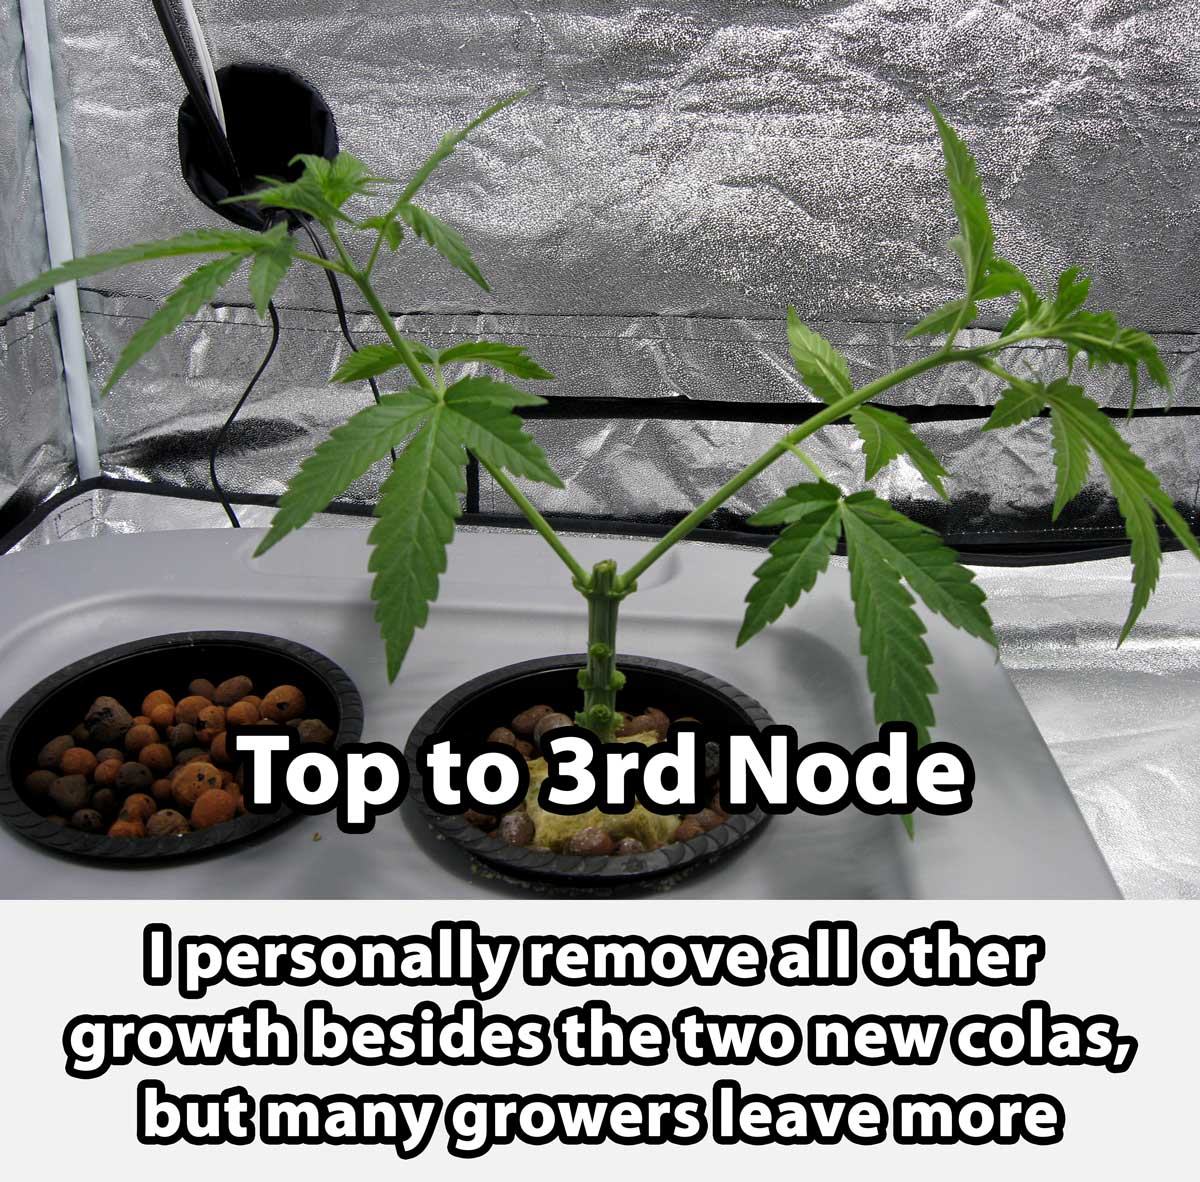
- Top to 3rd node (now have 2 colas)
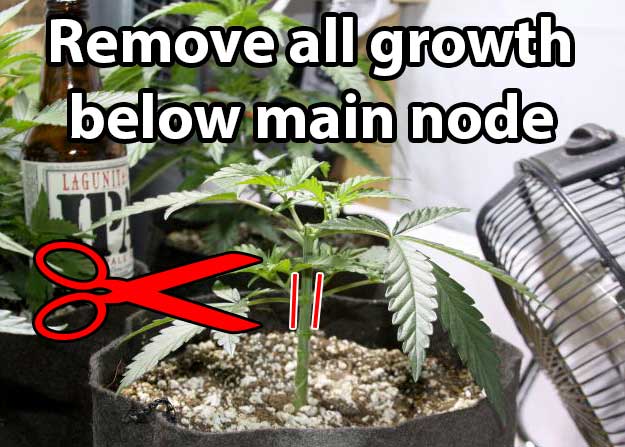
- Clean extra growth
2.) Create 4 main colas
- Let each new cola grow 2-4 nodes
- Top to 1st or 3rd node (now have 4 colas) - top to the 1st node for a more compact plant, and to the 3rd node for a bigger plant with a wider manifold
- After plant is growing fast, clean up extra growth
Note: In this step, growers should top to the 1st node for a more compact plant, and to the 3rd node for a bigger plant with a wider manifold. I tend to grow pretty big plants, so I top at the 3rd node in this step. If you have a plant that is growing faster than the others in your grow space, this is a chance to top it at the 1st while topping the others at the 3rd - this will slightly slow down growth of the fast-growing plant, but it’s not certain how big a difference this will make.
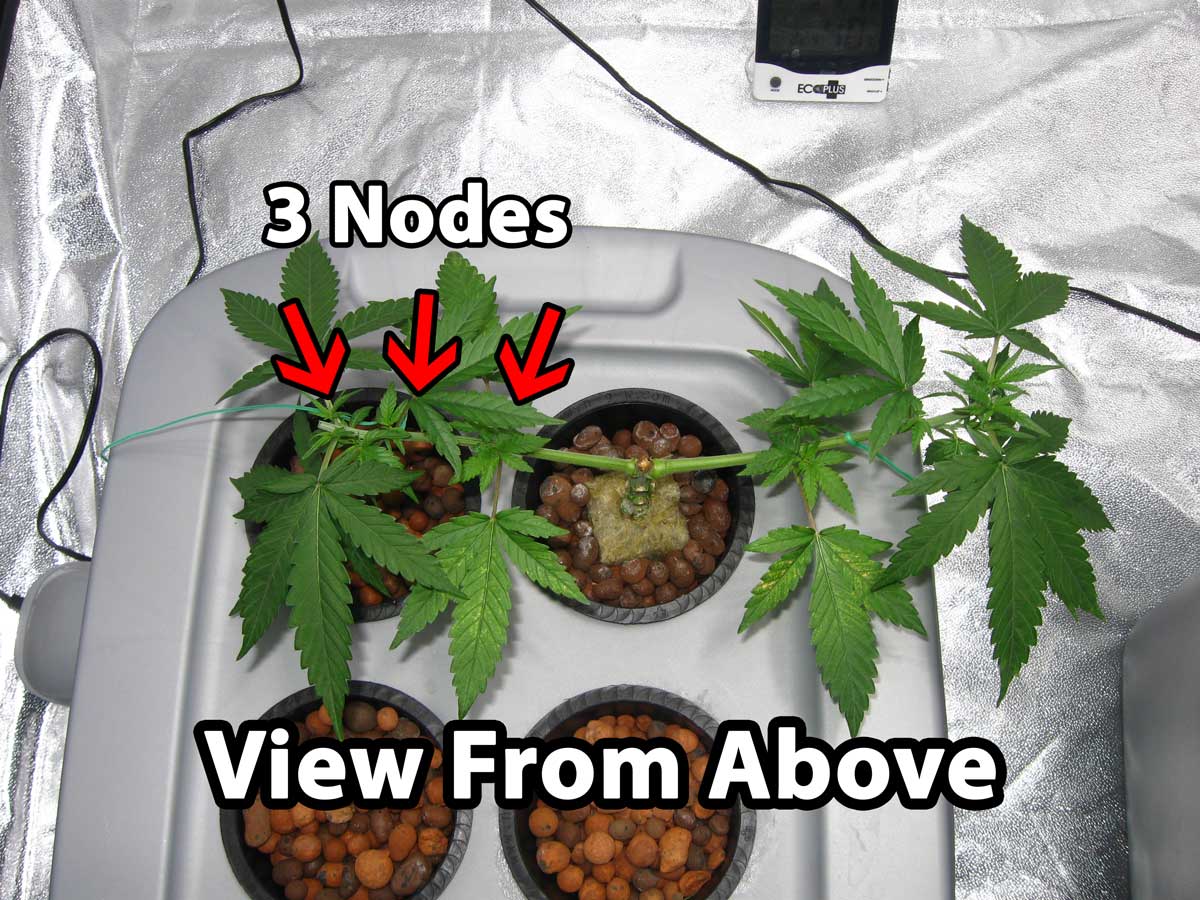
3.) Create 8 Colas
- Let each new cola grow 3 nodes
- Top to 2nd node (now have 8 colas)
- After plant is growing fast, clean up extra growth
4.) After plant is growing healthy, switch to flowering
- If you desire a larger plant, you can let the plant veg for a few more weeks, but make sure to clean up undergrowth so that all energy is directed to the 8 main colas.
5.) Arrange colas to fill up your space under the light
- This part needs some LST (low stress training), which basically means bending the colas so they create an even canopy to fill up the space under your grow lights
- The idea is to fill up the entire space under your grow lights with colas that are a few inches away from each other. Try to arrange them so that they are evenly spaced and have similar height to each other. Bend any tall colas out and away from the center of the plant, so they are closer to the edges of the space.
- Use plant ties to secure young plants
- Use soft wire ties to hook around colas or anchors when plant ties are not strong enough, and use the plant ties from now on as "string"
- Use plant yo-yos to secure colas once they start getting too heavy with buds to hold up their own weight. (at this point, the above measures just aren't enough to hold up the dense long buds, and plant yo-yos are the perfect solution)
Now you just wait for big fat colas to form under your grow lights!
What I’ve Noticed So Far with Main-Lining: Tips & Hints
(this is my experience with the method as outlined on this page, and it’s possible that other growers have had different results - more testing is needed!)
You Must Match Strains - It’s important to paying attention to choosing strains that are well-matched when main-lining. Main-lining doesn’t change the nature of the strain and you don’t want to mix a strain that stays short with a strain that tends to grow tall. If you have a strain that tends to stay short, main-lining will help spread out the plant, but it won’t cause the plant to grow the long colas if the strain doesn’t tend to make long colas. Main-lined plants will grow with the same patterns as normal, just with a manifold. Main-lining won’t force a plant to stay short or grow tall.
Not For Short Strains - Best for Medium-Tall Strains - So far indoors, it seems the best benefits from main-lining come from growing strains that are considered “medium” or “tall” in height. These plants will have a bigger “flowering stretch” and may double or even triple in height after the switch to the flowering stage. This stretch is what creates the long colas of a main-lined plant. With a short plant that doesn’t have much of a flowering stretch, you aren’t going to get those long colas, and probably aren’t going to get the most from main-lining, especially compared to the time put in during the vegetative stage building the manifold. For shorter strains, other types of plant training might be better at increasing yields, and will take less vegetative time.
Not for Autos - You cannot main-line auto-flowering strains. They do not have time to recover from any plant training technique that involves cutting the plant. If you want to try out main-lining, you must do so with a photoperiod strain (it is unlikely you’ll ever run into an auto-flowering strain unless you order a seed from a seedbank - learn more about autos here - http://www.growweedeasy.com/autoflowering-vs-photoperiod
Start from Seed - While main-lining clones can be done (more info here from Nugbuckets), the main-lining cannabis process is much simpler with plants grown from seed. Cannabis grown from seed tends to be more predictable and plants usually have symmetrical nodes. If you decide to start main-lining clones, it's important to be aware of the overall structure of the manifold you're trying to create. Don't follow these step-by-step instructions for clones! This tutorial wase designed for main-lining cannabis grown from seed.
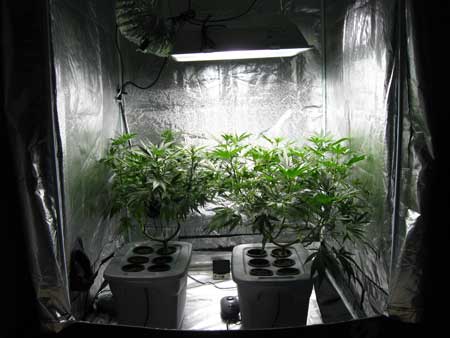
Use Penetrating Grow Lights - Along the same lines, indoor main-lining seems to get the best results under powerful lights that have deep penetration. With main-lining, you grow long thick colas, and you need a powerful light to fill those colas up with bud. Because lights like CFLs & fluorescent grow lights don’t have much penetration, I wouldn’t recommend them for main-lining. Main-lining performs best with HPS (recommended) or powerful LED grow lights which have deep enough penetration to fill the long colas with bud.
Main-Lining May Not Be for Soil Growers - Manifolding Often Seems to Perform Better in Hydro & Soilless Mediums - The person who named the main-lining technique, Nugbuckets, was an avid organic soil grower. While Nugbuckets achieved great results with the main-lining process in soil, some growers feel the process of building a manifold in soil takes too long for too little return. Soil tends to grow more slowly in the vegetative stage than hydro or soilless mediums, and therefore some growers feel it takes too much veg time for a soil-grown plant to recover from the multiple toppings required for main-lining. I’ve heard some indoor soil growers tell me that main-lining is not worth it in soil. In a hydro or soilless setup (like coco coir), vegetative growth and recovery is far faster, and main-lining usually only adds a couple of weeks to the veg stage at most. One of the best benefits of hydro is its fast vegetative growth, and it may be that main-lining is best suited to hydroponics or soilless grow mediums when growing cannabis indoors.
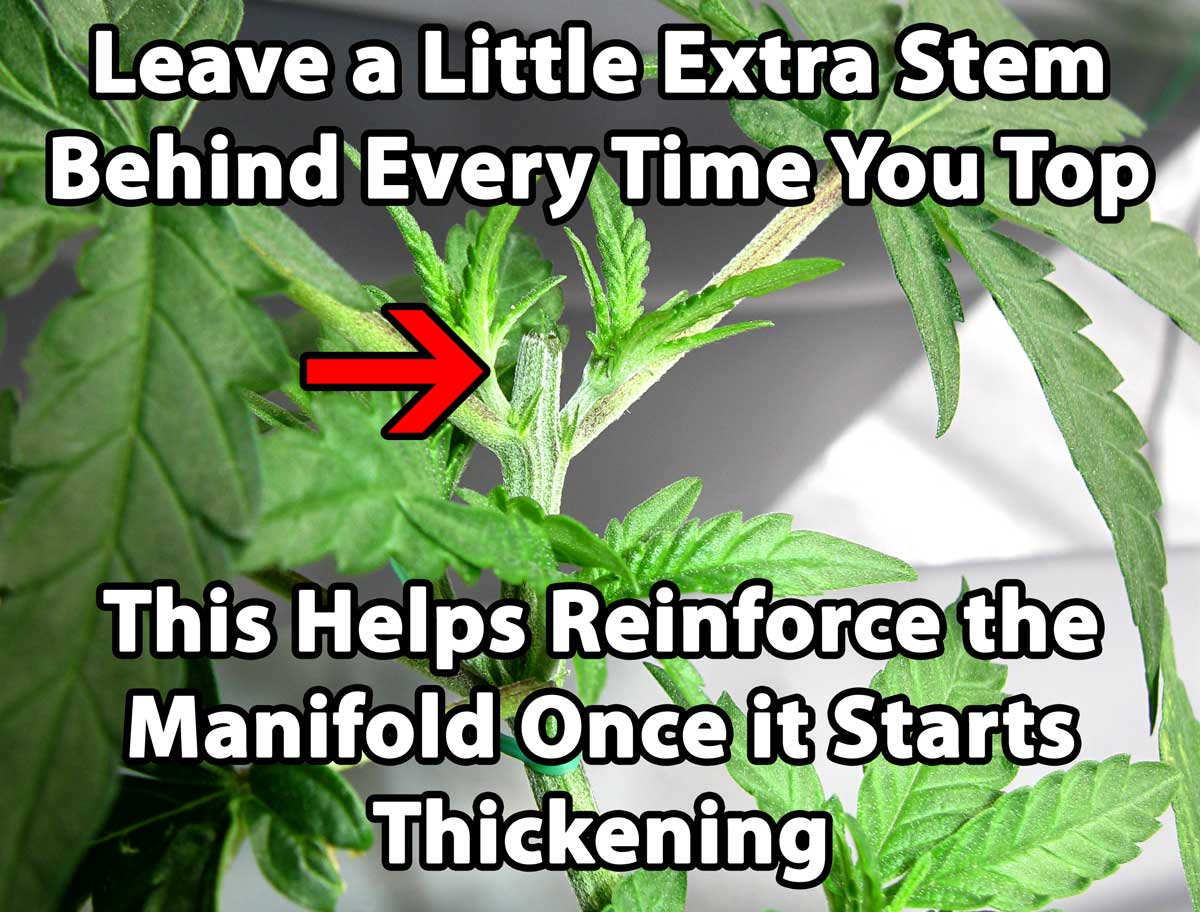
Topping Technique - When topping, leave a little part of the old stem above the topping point. This helps reinforce the manifold and prevent any main stems from splitting as they are thickened through the manifold process.
I know this may be hard for those who want to make everything completely even and neat. But leaving a little extra stem will help prevent your “elbows” from splitting.
After the colas are well formed and you have a thick stem and manifold, you’ll be able to see the little mini stems (they won’t have grown at all, while the colas would have thickened coniderably). If they bug you, you can cut them off then. I just leave them on until the end.
Combine Main-Lining with LST - Main-lining works very well when mixed with LST (low stress training - gentle bending) to hold down plants in the spaces you want. Just remember that after you tie down a part of the plant, it will immediately start turning up and towards the light.
Split Stems - If plants ever get an open wound or split any part of their stems, make sure to reinforce the injury (if needed) and immediately wrap with electrical tape, duct tape or even scotch tape. The leaves on the damaged stem may wilt, but if you secure the injury fast enough, the life will come back to the leaves. When using this technique, always make sure you check on the injury regularly to make sure the tape isn’t choking the stem.
How to Secure Plants While Main-Lining - you will need to use a few different tools to secure down your plants at various phases of the manifolding process. These are the tools that have worked best for us. You can use whatever you'd like, but I do warn you not to use anything sharp (like string or thread) as it can start cutting into your plants once they start getting bigger and fighting back. The tools listed below will never run into that problem since they were explicitly made for training plants.
Plant Ties - young plants

Plant ties are made of thin wire with a plastic coating on the outside. This material usually comes in a long spool so you can cut off as much as you need at a time. The container usually has a built-in cutter so you can quickly get a piece without any other equipment. They tend to be more flimsy than some of the other methods to secure plants - they don’t have a lot of strength. But this is part of what makes them so great - they are very gentle on young plants.
Soft Wire Ties - to anchor stronger stems

When plant ties aren’t strong enough, you can use soft wire ties to hook around colas or anchors, and use plant ties as the “string”. Soft wire ties are made of a thicker wire, with a very soft coating. These are much stronger than the palnt ties, but they will give way to a strong stem and will never cut into the plant. These can be used in situations where strength is needed to hold down a thick unruly cola which wants to grow in the wrong direction. They can also be used as sturdy anchors, with the plant ties above used as "string."
Plant Yo-Yos - when colas start fattening so much they fall over

These can be hung conveniently to the top of your grow tent, and the special hooks at the bottom are idea to hold onto thick colas without causing any damage to your buds. When colas start getting too big to hold themselves up, plant yoyos will help you greatly. With this technique, the plant will produce these long dense colas that start falling over under their own weight and are hard to secure with other methods. Plant yo-yos are perfect for gently stringing up colas where you want without damaging buds. In order to use plant yo-yos, you need something to attach to at the top of the grow space (easy with a grow tent, but may need some creativity in other grow spaces).
Help Out Other Growers by Answering 6 Questions About Main-Lining Cannabis - You're welcome to answer the questions even if you've never tried main-lining!
Manifolding Technique - A Case Study
1.) Wait until plant grows 5-6 nodes and is growing vigorously
Why wait? If you start main-lining too early, you can stunt growth and your plant might take longer to recover through the whole process. A plant that has 6 nodes recovers incredibly quickly from topping, while a plant with less nodes than that can be stunted for weeks from a single topping.
We might have waited just a bit too long for this one. I think it had 7 nodes. But it was so quick to recover from everything that I wonder if it’s better to err on the side of waiting to start. Especially since (as you’ll see in a second), we will be removing a lot of the plant..
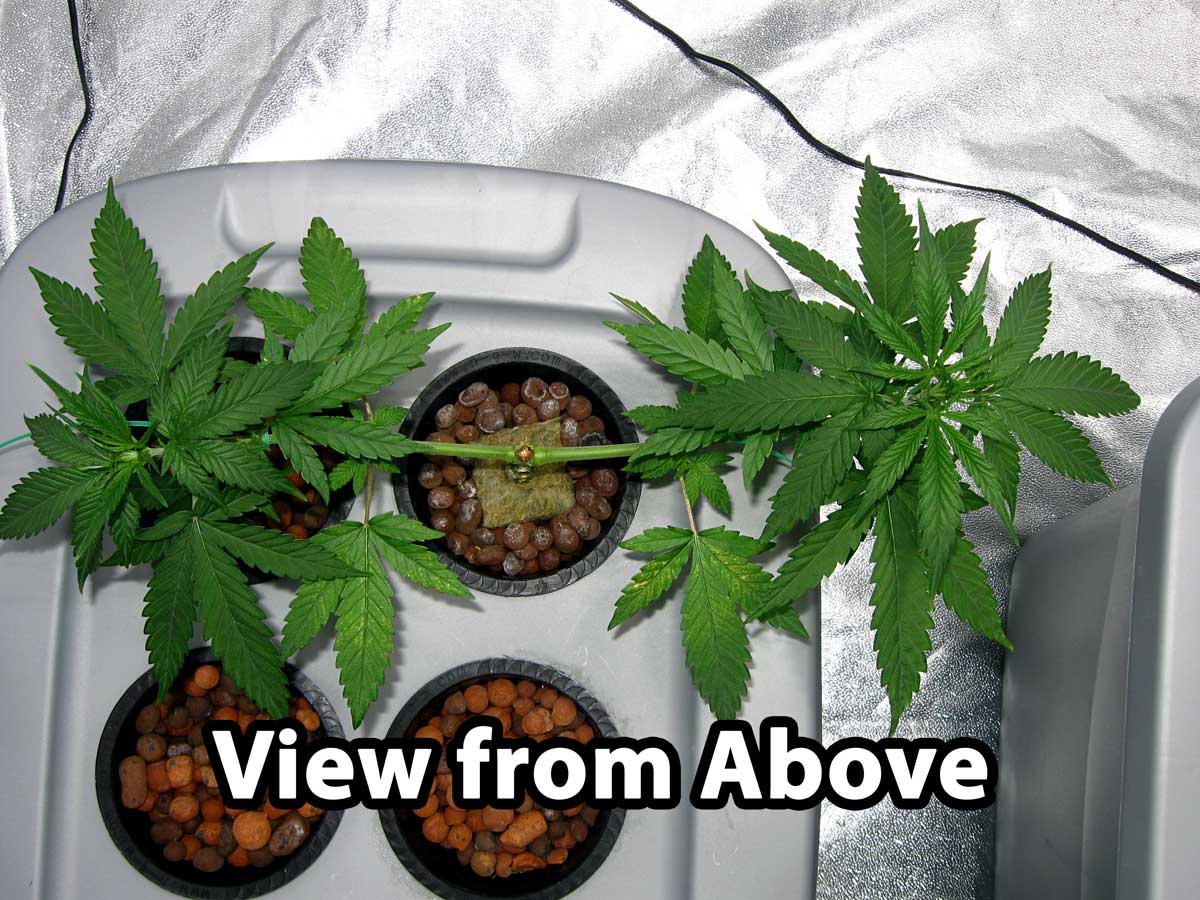
2.) Top down to the 3rd node and secure down two new tops
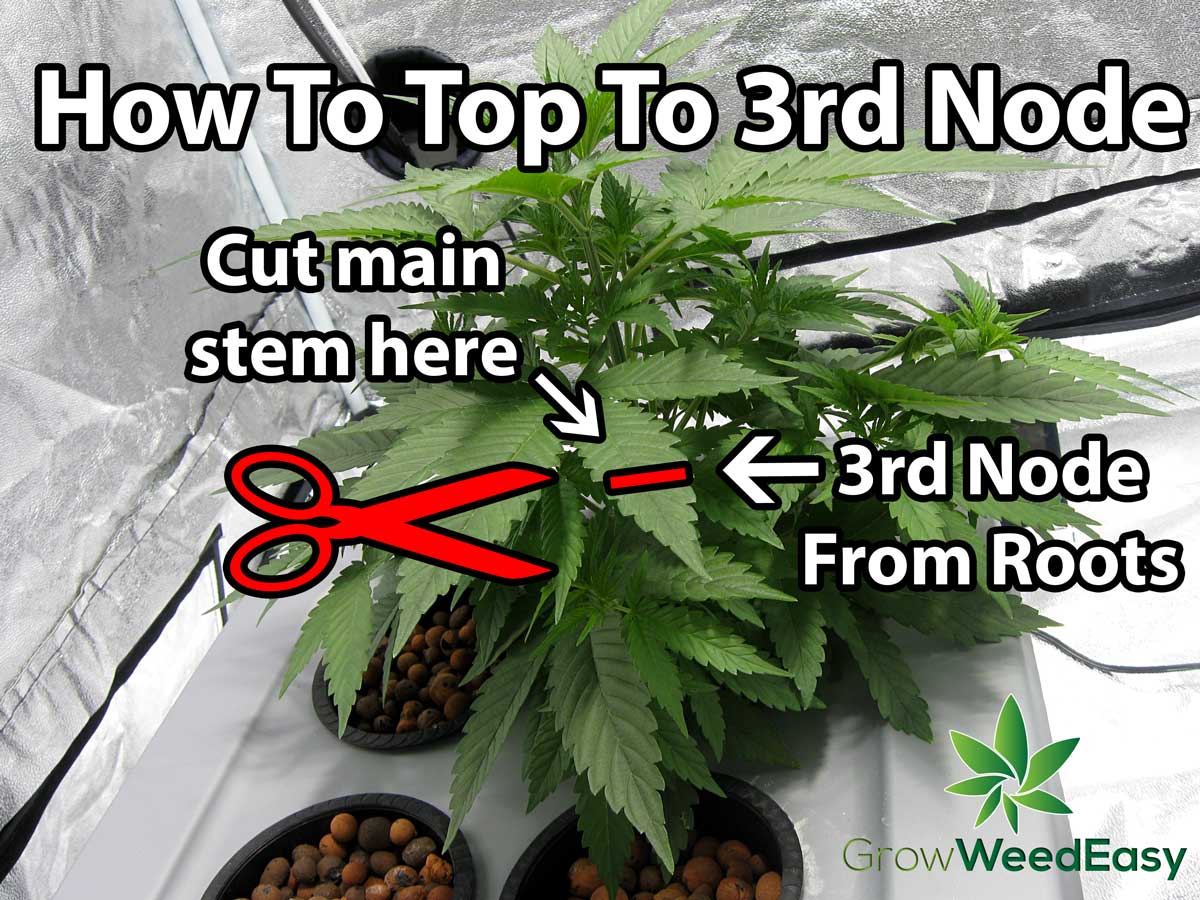
At this point, you will have 2 new main colas!
After cutting to the 3rd node, clean off all the vegetation below it.
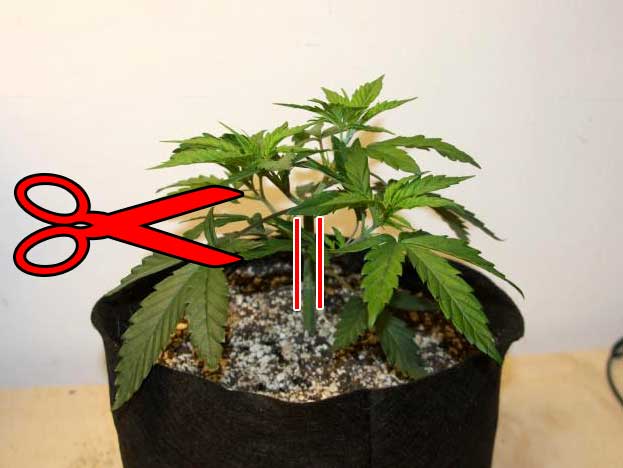
At this point, the plant is ready to be held down so it grows in the shape we want.
Wait, my new mains are too small!
Sometimes you will get smaller new mains, like this. This is especially common if you top the plant too early, before it has 6 full nodes.

This plant was topped to the 3rd node, and all the extra growth was cut away. The two growth tips on the 3rd node and the adjoining leaves are the only thing that was left. Because this grower topped a bit early for main-lining, they left the fan leaves for now, to help power the growth of the plant until the colas grow longer.
When you have just short little nubs for growth tips, like the plant above, you will likely want to wait until they grow out into longer stems before you start LST (low stress training & bending) to hold your new colas down.
Ready to start training your plant?
After topping your plant, you use LST (low stress training) to hold the new colas down to make a relatively straight line. LST basically means gently bending your plants to do what you want. Bending the new colas down keeps the manifold short without much effort, and helps with the whole process of getting the plant to produce a great manifold.
Basically, you’re just bending the colas down and away from the center of the plant, and then securing them so they grow in that position.
Securing your new colas/tops down
Where to Tie… You can tie your new tops down to anything handy - the sides of your container, net pots, etc. Just make sure that you’re tying your colas to something that moves with the plant. You don’t want to tie to a nearby object, use weights on the ground, etc.
When you move the plant for whatever reason, you want the ties to move with the plant. This prevents accidental cola breakage. Growers almost always end up needing to move their plants for one reason or another during a grow, and it’s just a good practice to make sure the plant and container is self-contained and can be moved without disturbing the LST you are doing..
Avoid using string. It will work well at first, but it can start digging into the “skin” of your plant as it gets bigger unless you cut them off first. When building a manifold, the stems and stalks will end up getting big, and you want something that will
Best Ties. I like using a mix of “plant ties” and “soft wire ties” which are both made for gardening and are more gentle on the plant than string. I recommend using both. The plant ties are good for young plants, and soft wire ties are better for larger plants with strong stems.
Plant Ties - young plants
Plant ties are made of thin wire with a plastic coating on the outside. They tend to be more flimsy and don’t have a lot of strength. They are very gentle on young plants.
Soft Wire Ties - to anchor stronger stems
Soft wire ties are made of a thicker wire, with a very soft coating. These are much stronger than the palnt ties, but they will give way to a strong stem and will never cut into the plant. These can be used in situations where strength is needed to hold down a thick unruly cola which wants to grow in the wrong direction. They can also be used as sturdy anchors, with the plant ties above used as "string."
Plant Yo-Yos - when colas start fattening so much they fall over
These can be hung conveniently to the top of your grow tent, and the special hooks at the bottom are idea to hold onto thick colas without causing any damage to your buds.
Now that you've got an idea of what tools you can use to secure your plants in the shape you want, let me walk you through everything.
This plant was secured with plant ties, which were hooked to the edges of the container.
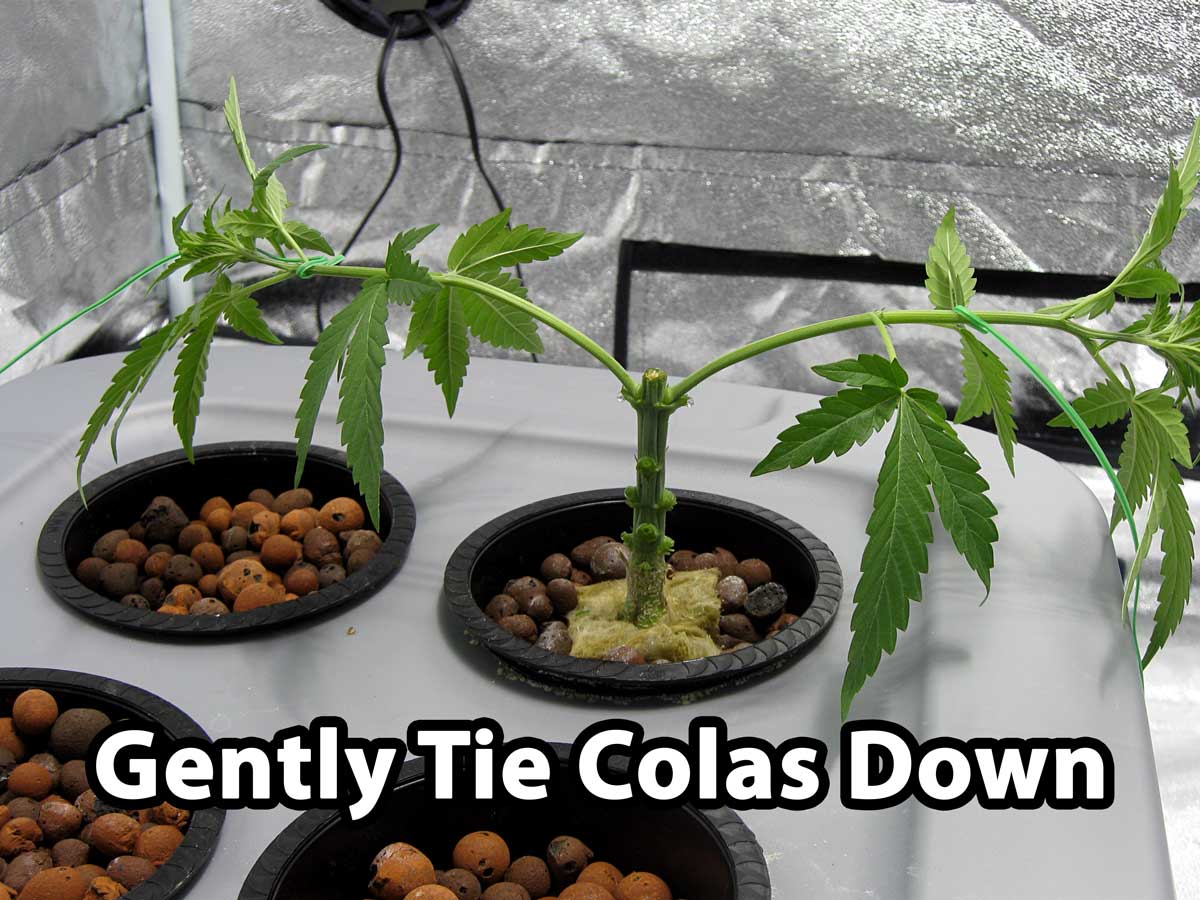
In the beginning I use plant ties. The plant ties are very gentle on young stems & they can be easily molded into any shape, allowing you to create hooks to gently move young stems where you want them. Once you build your manifold, you won’t need these first ties, and they’ll naturally fall off.
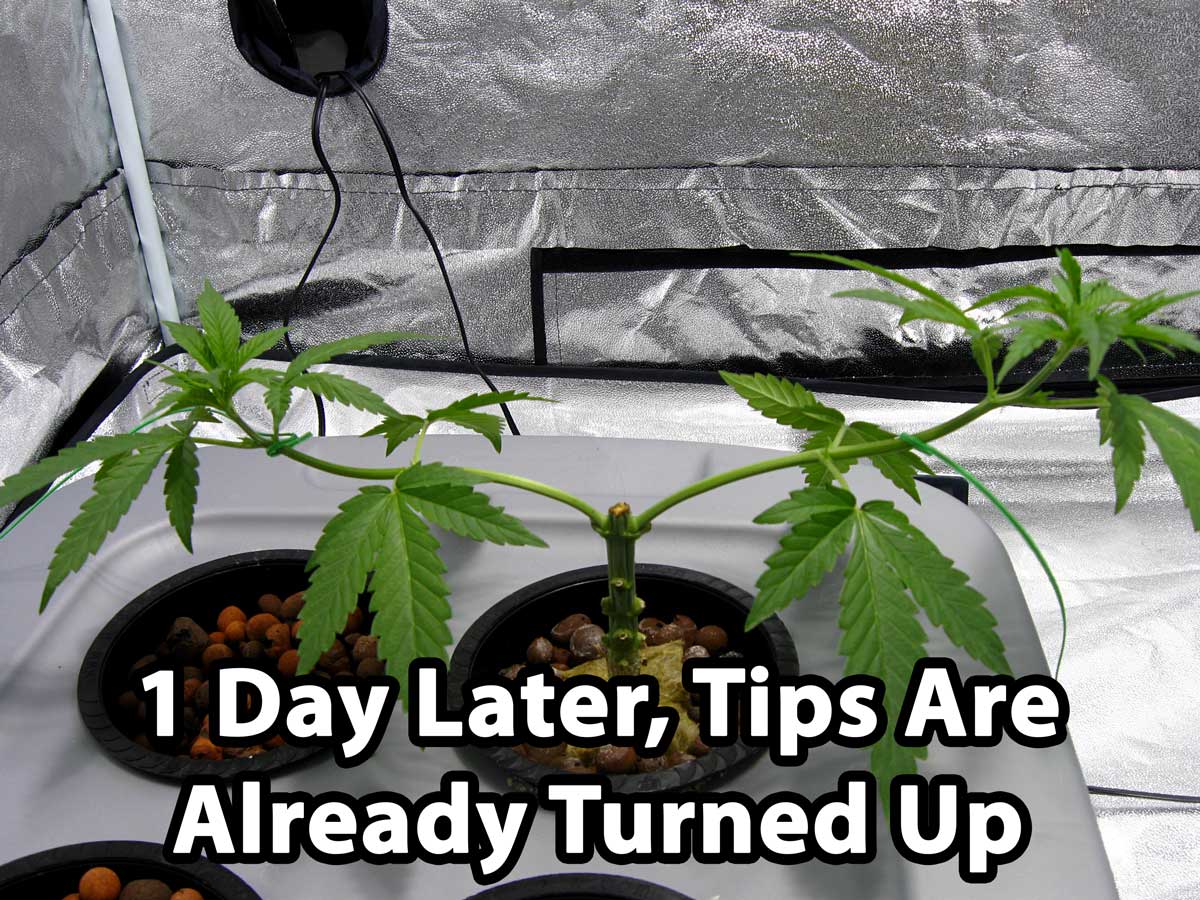

When the plant is responding to training by growing up at the tips, that’s a sign that the main-lining is going well.
The growth tips of a healthy plant grow upwards and towards the light.
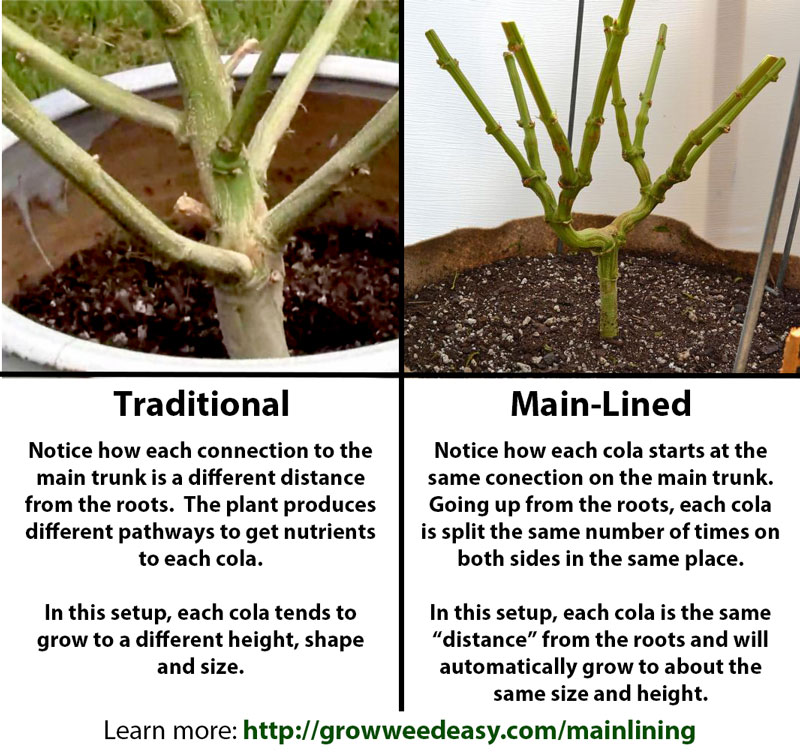
At this point, you may start noticing that the base of your two main colas are starting to “beef up” as the plant sends ALL its resources to just those two stems.
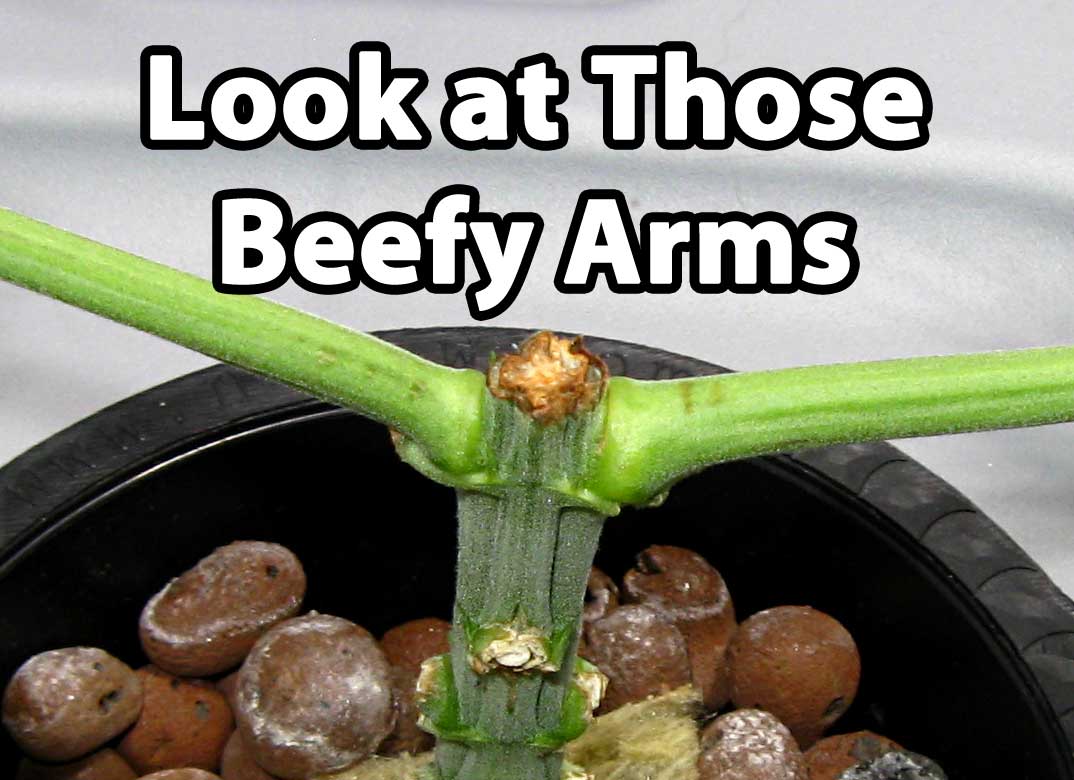
The plant is strengthening the connections between the main stem and the new colas, which causes bulging at the base of the colas.
3.) Double number of colas
Wait until the new tops/colas have recovered and look like they're growing fast, then top all the new colas to the 1st or 3rd node
After this step, you will have doubled the number of main colas.
Wait until the plant has grown about 4 nodes before topping again. I know it seems like it will speed everything up by starting earlier, but from what I’ve seen with other growers, topping again too early can seriously stunt growth. If you wait to top until the plant is growing vigorously, it will quickly recover from topping..

Once your plant has recovered and is growing quickly, it’s time to top all the main colas again.
Should I top to the 1st or 3rd node during this step?
Top to the 1st node for a more compact plant, and top to the 3rd node on this step for a bigger, wider manifold. Most growers will do best by topping to the 3rd node.
Note: Don’t top to the 2nd or any other even-numbered nodes. When you don’t top at odd nodes, it will prevent the plant from spreading out properly. If you only top to odd-numbered nodes, all the cuts will be at right angles from each other, the manifold will be working as efficiently as possible.
In this case, the plant was topped down to the 3rd node, because we were looking for a bigger, wider plant to fill the space under our 600W grow light.
Topping to the 3rd Node
All your old mains should now look something like this - notice the two growth tips at the end, which will become new mains.
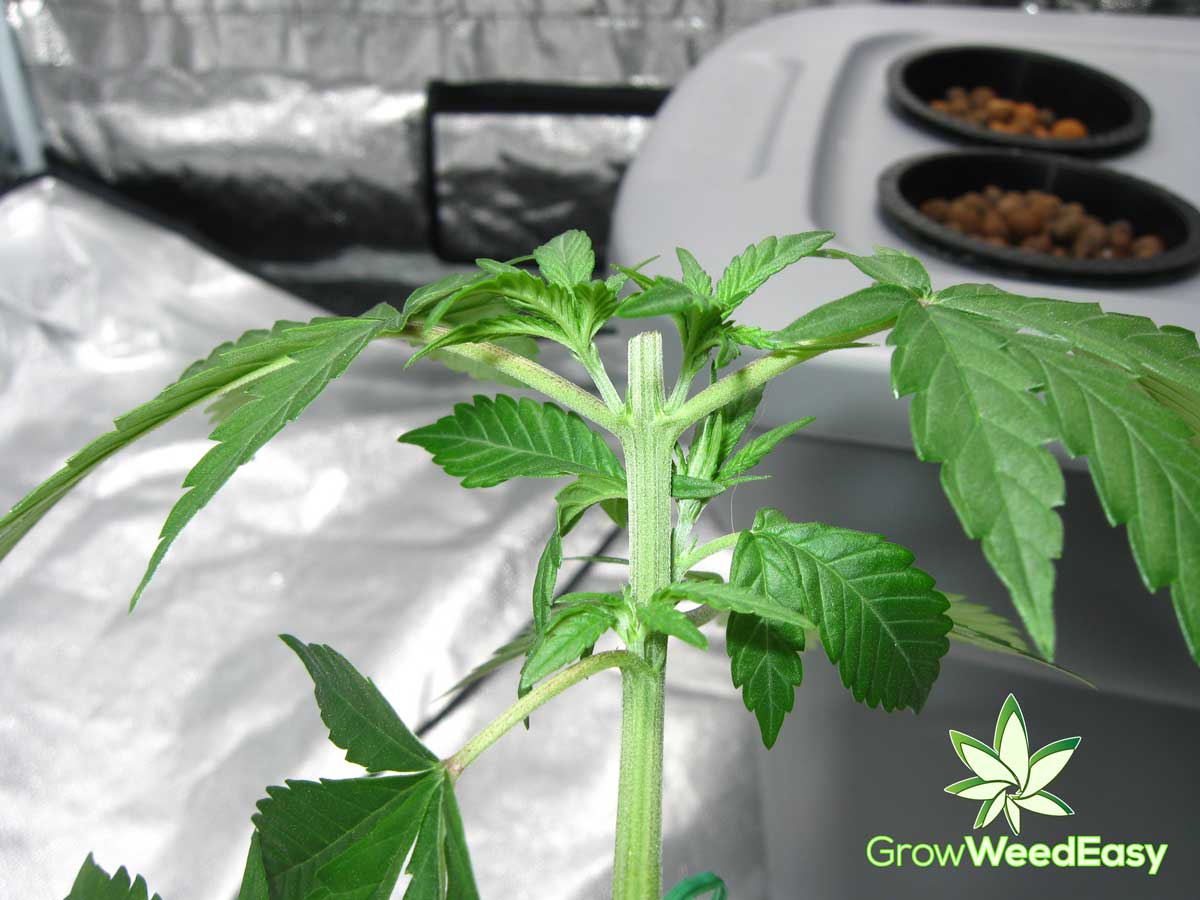
Here's what the plant looks like after being topped the 2nd time.
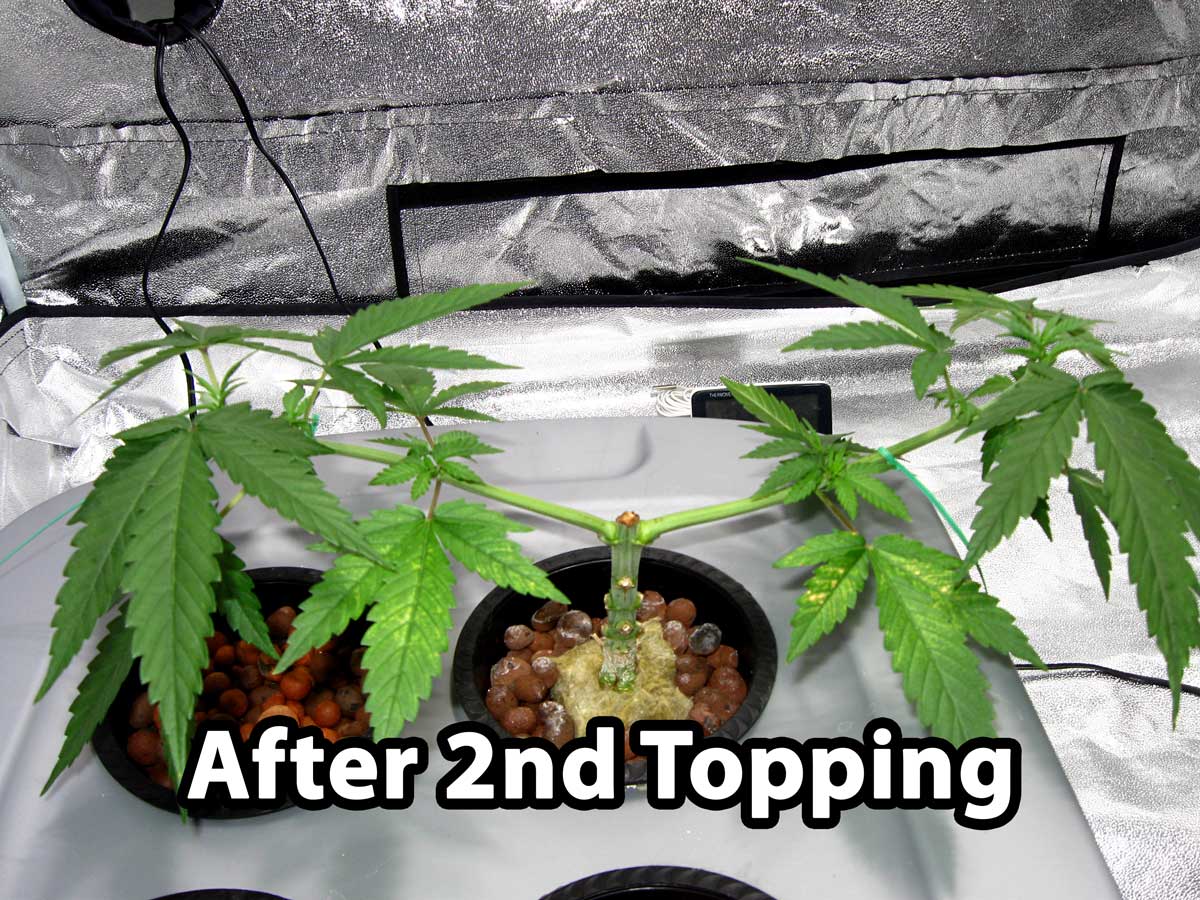
As you can see from the picture above, there are now 3 nodes on each “branch.” If I wanted a more compact plant, I would top to the 1st node instead of the 3rd here. Don't top at the 2nd node during this step, as it will tend to produce a long plant instead of a spread out one.
There are now 4 total growth tips/tops/colas

You can leave the rest of the leaves and growth alone for now. It will help your plant recover from the topping more quickly.
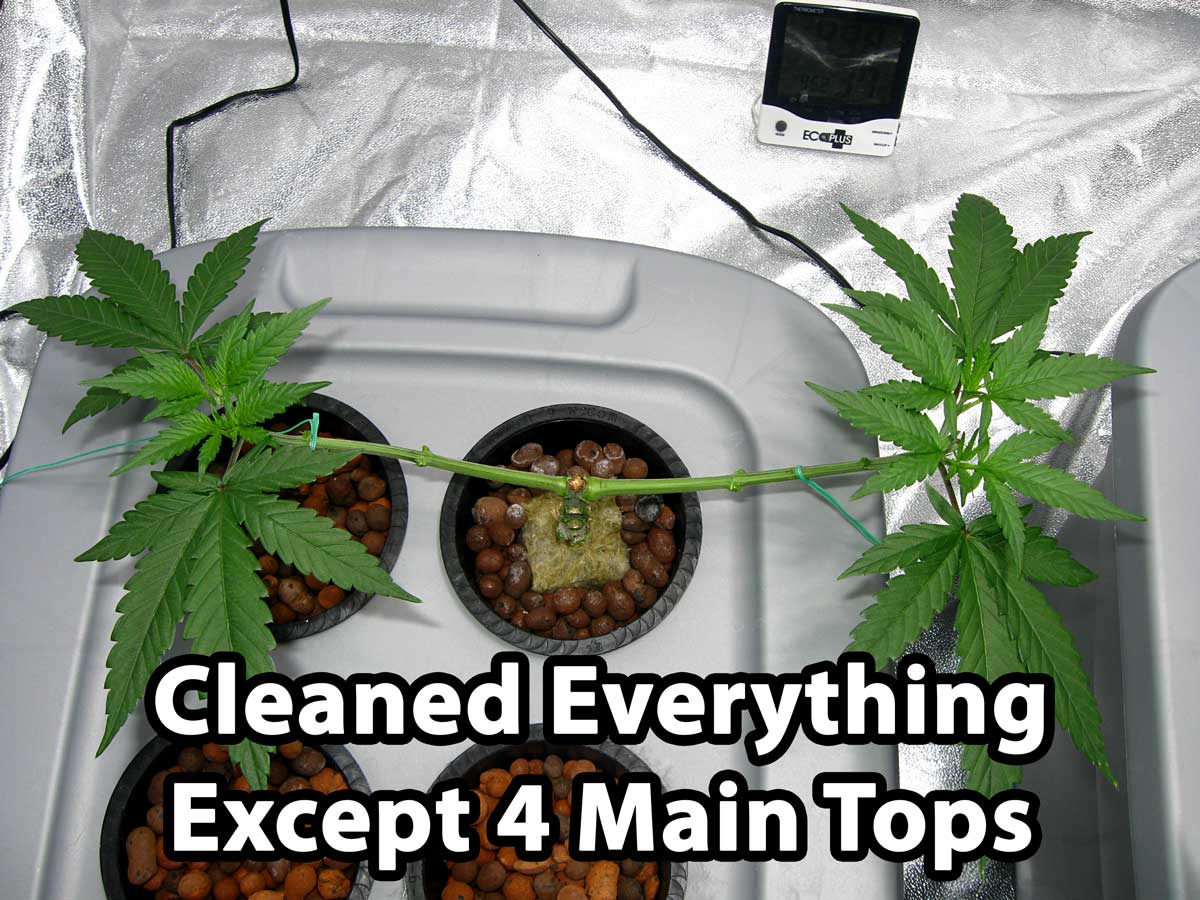
4.) After plant is growing fast, remove all extra growth except for the main colas and their adjoining leaves.
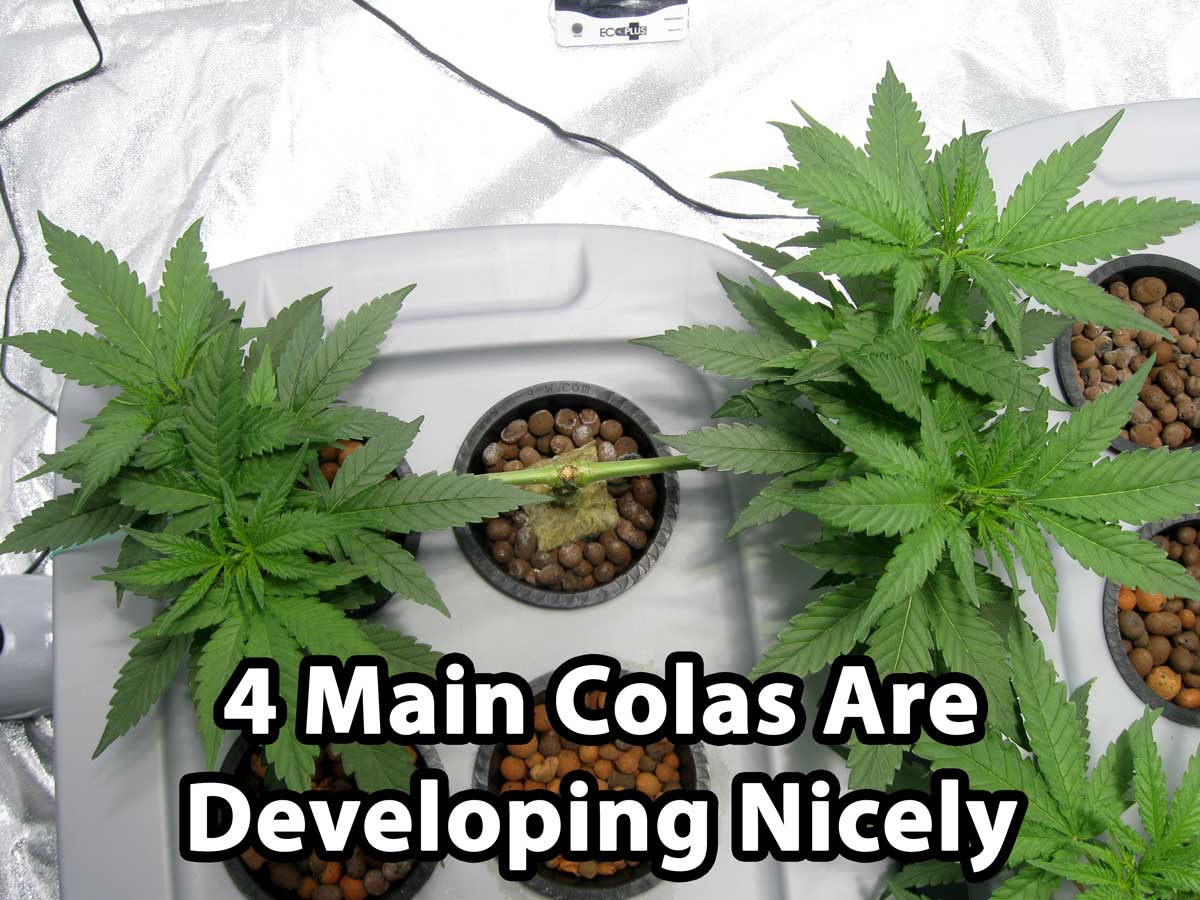
3 days later, this plant is already growing fast and seems to have recovered from the last step.
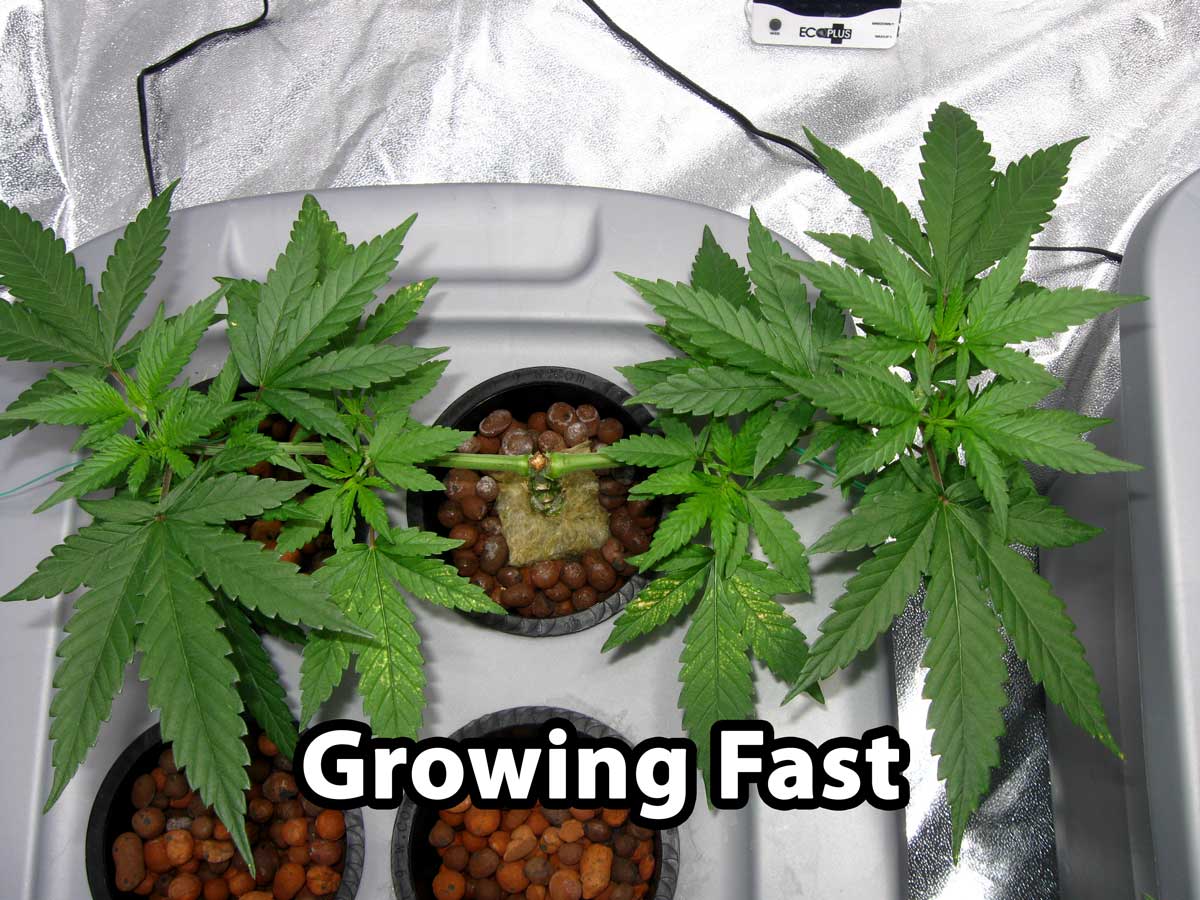
Now it’s time to clean up your plant so that your 4 colas (and the leaves attached to them) are the only growth that’s left.

By removing all the extra growth, you are “telling” the plant to spend all its energy on developing your main colas. We want this to happen before we do the next step - topping everything one last time.
What is most important is that you remove all growth tips besides your new mains. You want your plant to be putting all her new growing energy into your chosen mains. Every other growth tip just steals energy away from the manifold you are creating.
Before
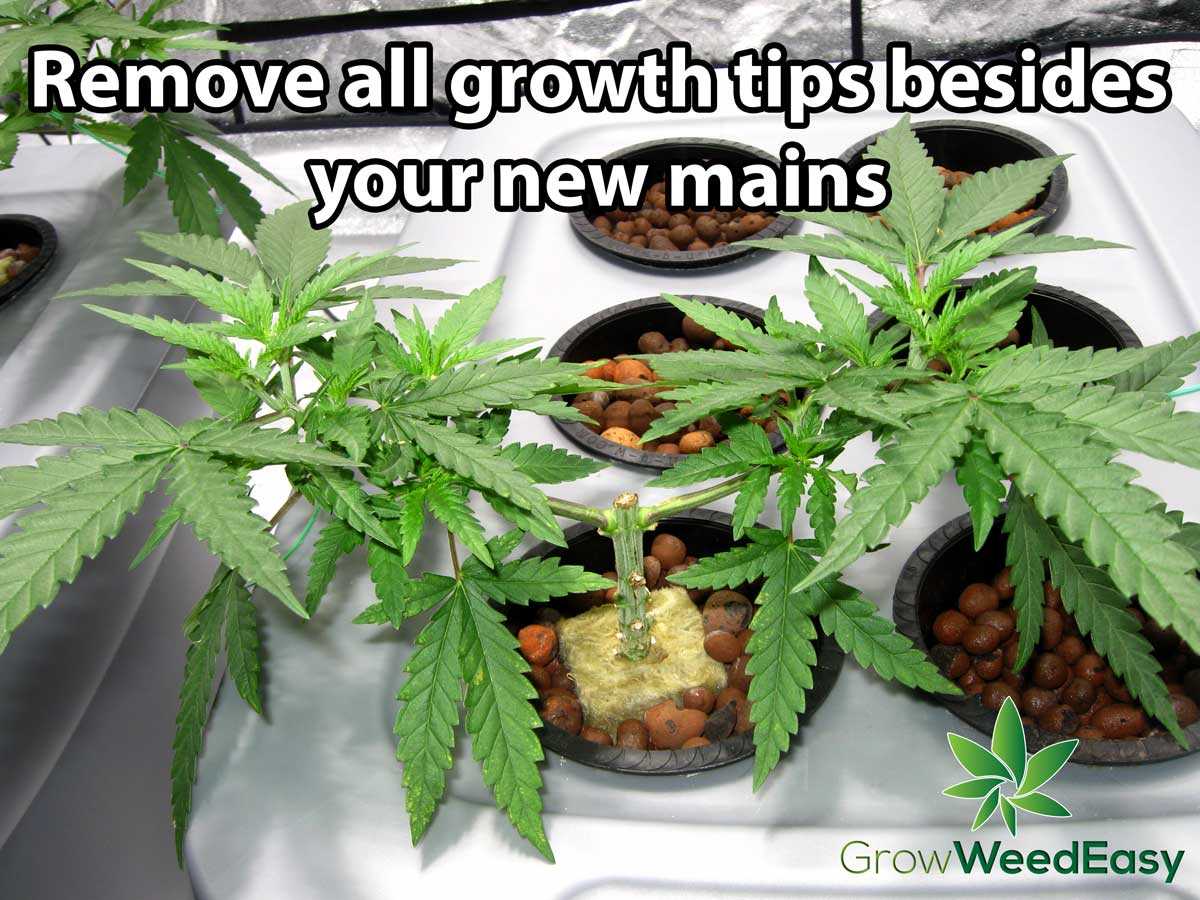
After
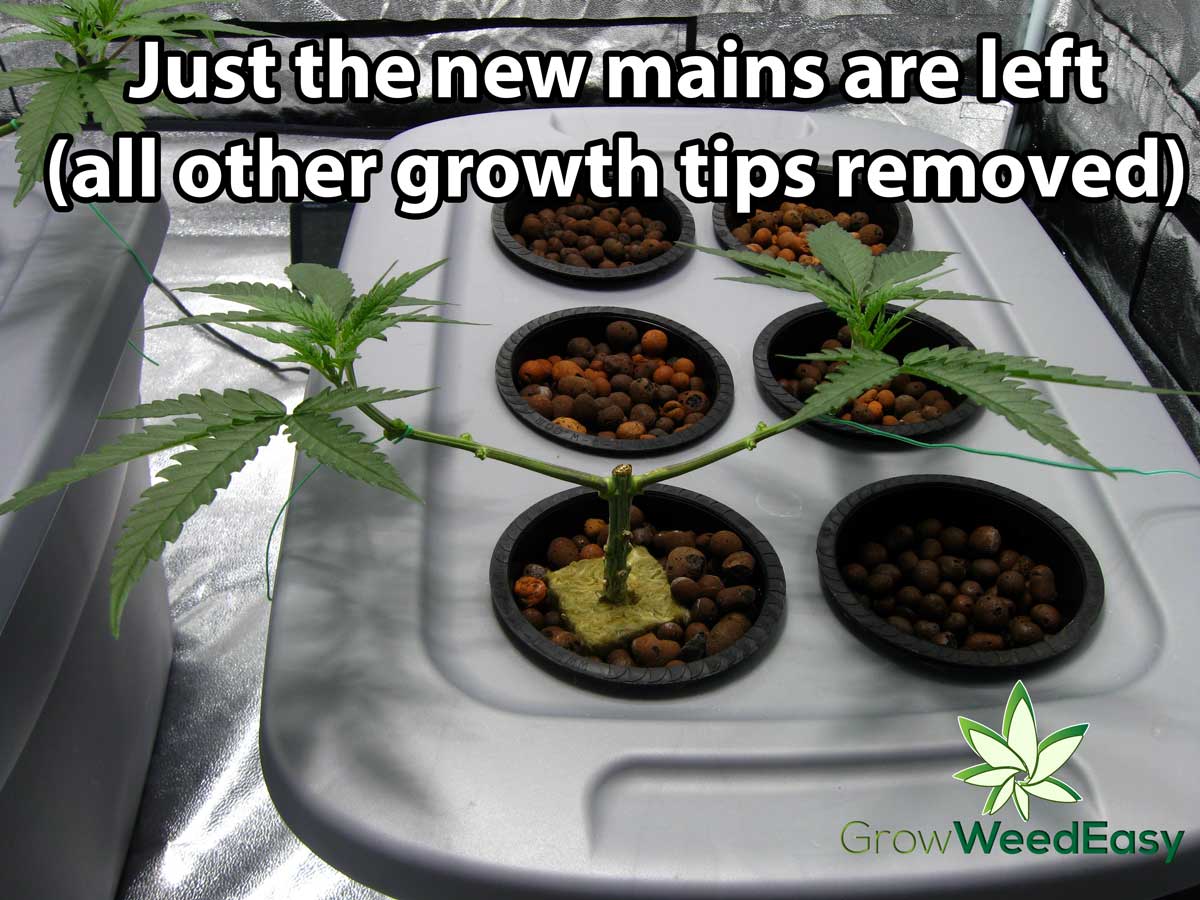
Note: if we'd topped to the 1st node instead of the 3rd in the last step, this manifold would be much more compact.
Of course, make sure to give your colas time to recover and start growing before you can consider moving to the next step and topping again.

5.) Top all colas at the 2nd node to get 8 colas in total.
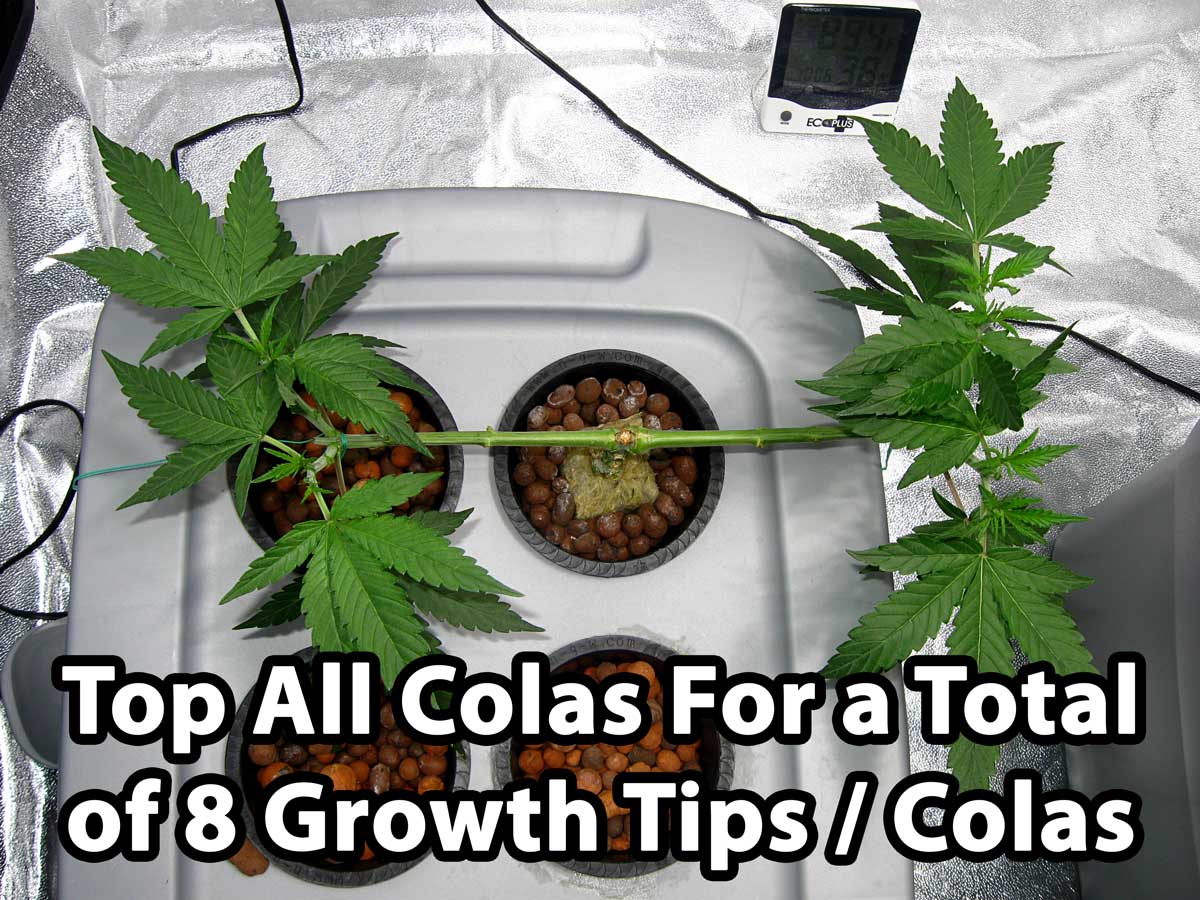
I personally stop after this step at 8 colas. If you want more colas, keep repeating the process of topping all colas until you have the desired number of growth tips. Every time you top all the colas, you will double the total number of colas/growth tips.
I think most growers will be happy with 8 colas. More than that and the plant may be spreading itself too thin. If you topped again after 8, you would end up with 16 colas. Top again and you have 32 colas. 16 or more would be too many colas for most setups (but perhaps not a ScrOG setup).
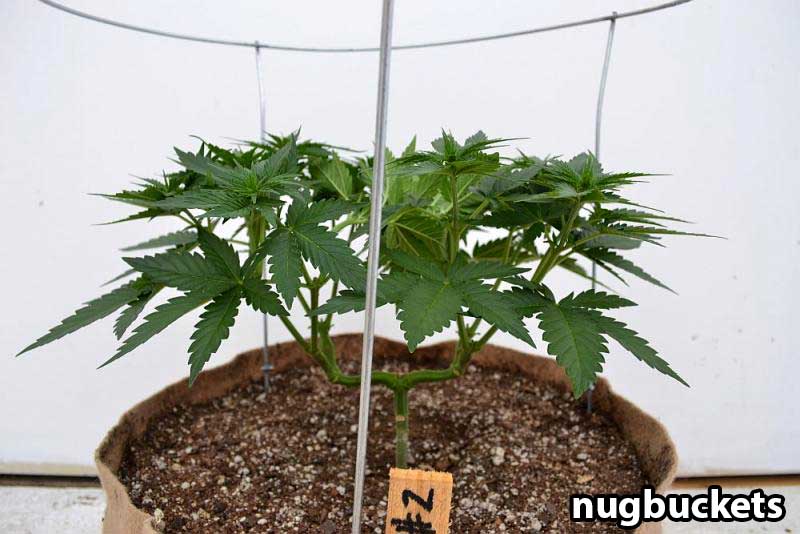
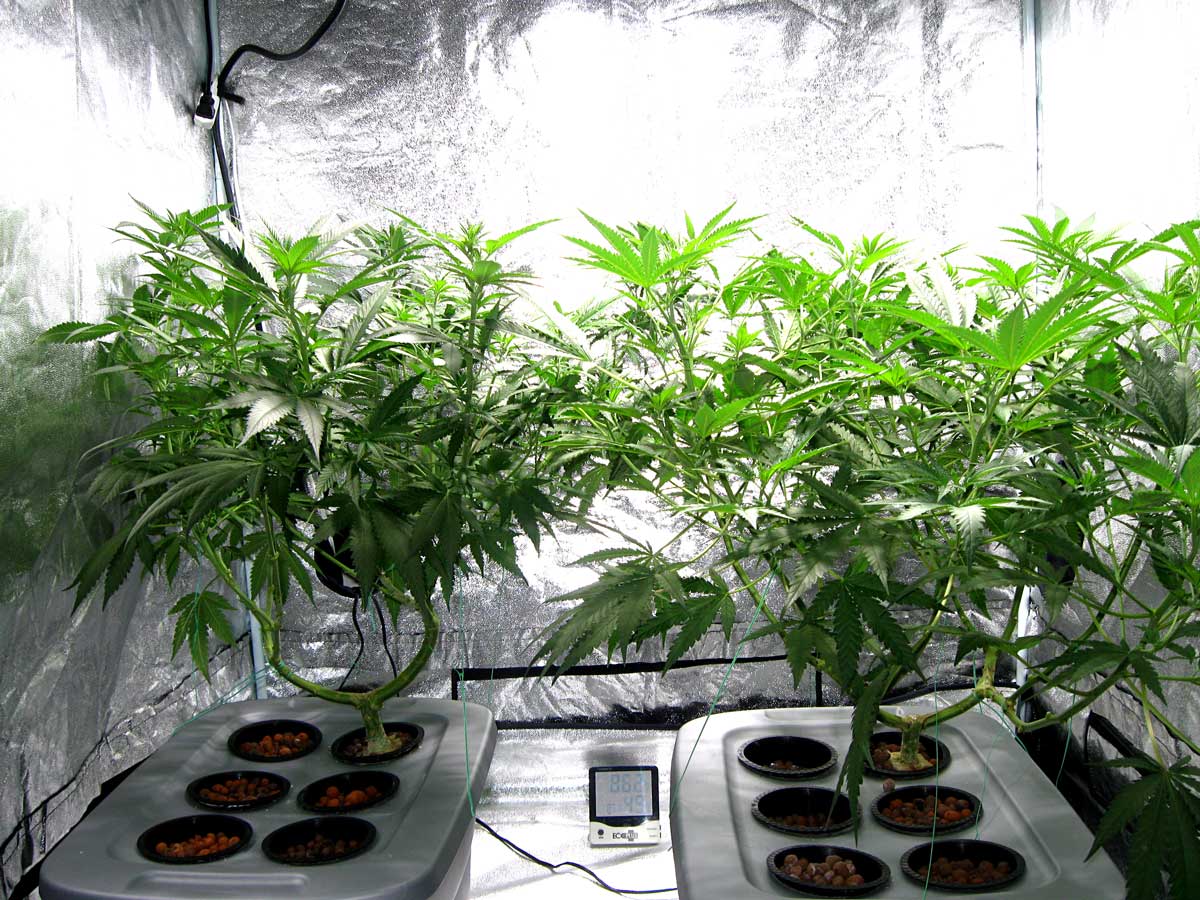
Here’s that plant about 2 weeks later, just before the switch to flowering.
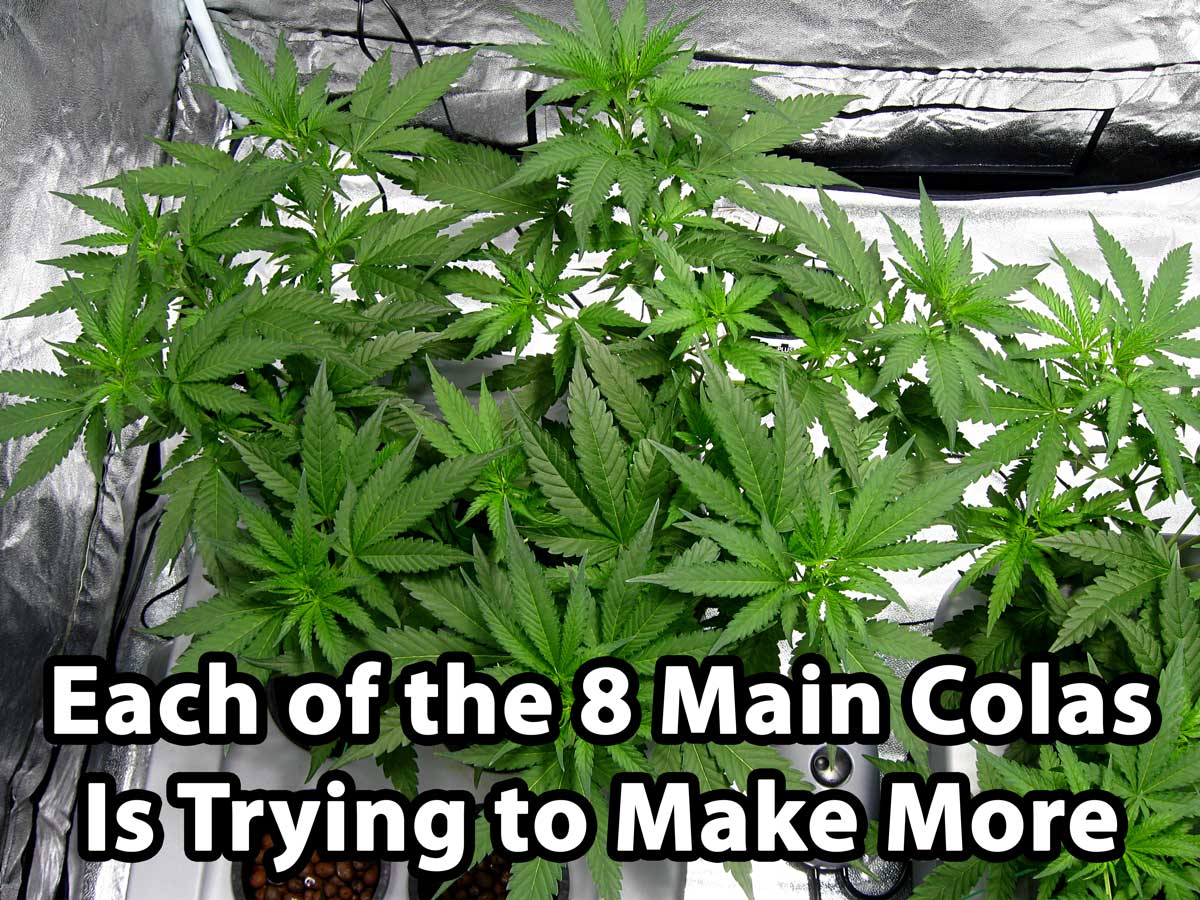

At this point, you should probably consider cleaning up the 8 main colas, so the 8 mains have the only growth tips. This is what it looks like if you clean the plant again when it has 8 colas
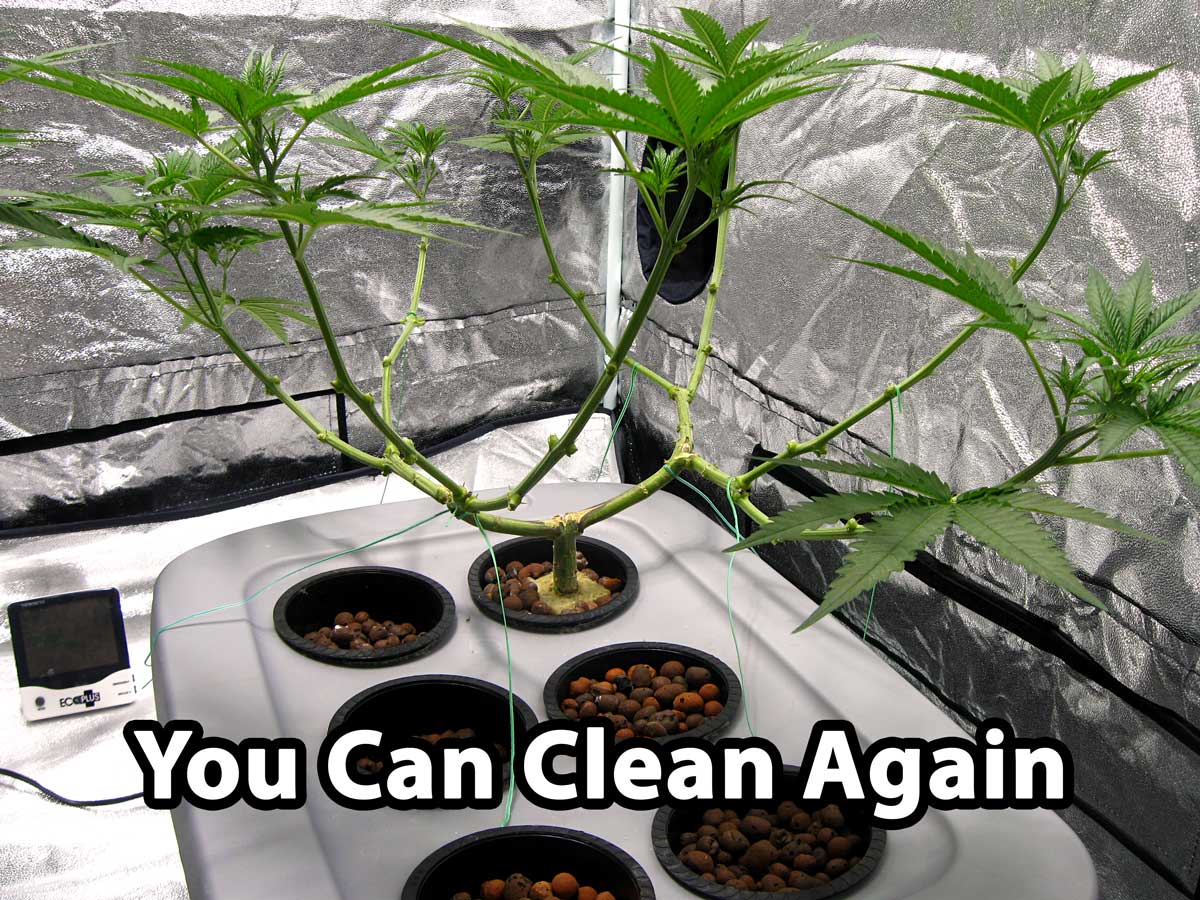
Just make sure to give your plant an extra few days to a week before switching to flowering.
Or you can leave all the promising growth tips, like this plant, and just initiate flowering with only a minimal last cleanup.
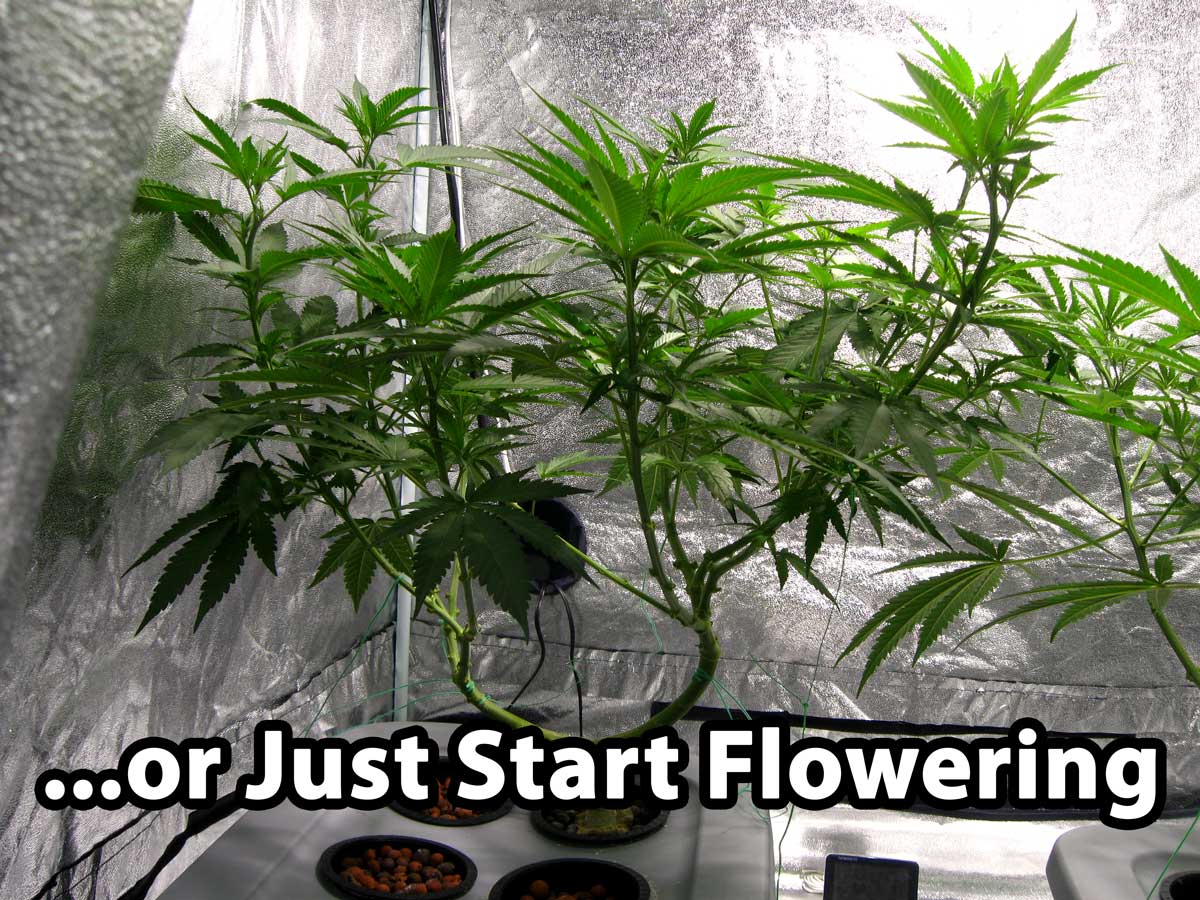
This plant wasn't cleaned as thoroughly as the other before the switch to flowering
Surprisingly, in our (very few) tests, it seems like the plants which get a last “cleaning” before entering the flowering stage have gotten the best yields so far. That seems counter intuitive because you’d think the extra leaves would power more growth. Perhaps it has to do with how hormones are distributed in the plant. Cleaning up before switching to flowering seems the most in line with the whole manifolding technique. But we definitely need much more testing to say for sure one way or the other, since we’ve only tested on just a few plants so far.
6.) As plant is growing in the vegetative stage, arrange colas around the edges of the plant, with a few colas in the middle so it makes a flat table
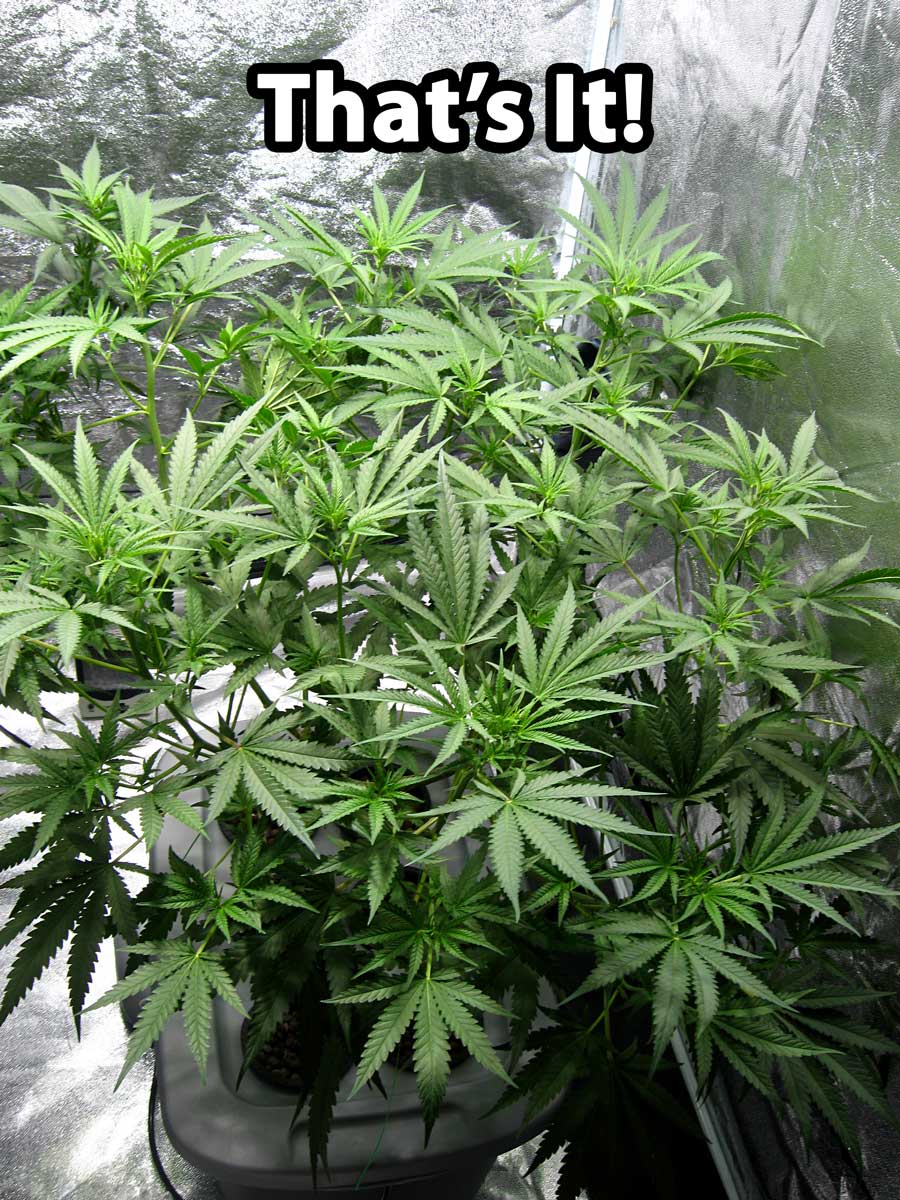
That's basically it (as far as I do it). A this point you should just switch the plant to flowering and enjoy the fruits of your labor. The manifold you created will power the growth of each of your colas.
After this you just prune any small growth underneath that doesn't get light, and string up the colas since they get heavy. With evenly matched strains under a nice grow light, you tend to get 8 really long, dense thick colas with huge nuggets of bud on them on each plant. You also get some very chunky buds wherever side stems are exposed to light and air.
Jump to...
Nugbuckets' Main-Lining Tutorial
More Cannabis Plant Training Techniques
10-Step Quick Start Guide to Growing Cannabis