You are hereAir Circulation & Exhaust Tutorial
Air Circulation & Exhaust Tutorial
by Nebula Haze
Table of Contents
Air Circulation & Exhaust: What are the Benefits?
Understanding Airflow & Exhaust Systems
- Transpiration - Each Leaf Adds Humidity to the Air
- CO2 Injection - Why You Need a Sealed Grow Space
- Suction, Seals & Negative Air Pressure
- Controlling Smells With Your Exhaust
How to Create an Exhaust System
How to Make a Stealthy Exhaust - Examples
 Cannabis plants love a nice breeze and fresh air in the wild. When growing cannabis indoors, you have the ability to control the air circulation and use your exhaust to create the perfect indoor environment for your garden that mimics the best parts of nature.
This air circulation and exhaust tutorial will teach you how to recreate an environment that makes cannabis thrive.
During my first indoor cannabis grow, I didn't pay much attention to air circulation or creating an exhaust. I had a fan blowing directly on my plants and thought I was good to go.
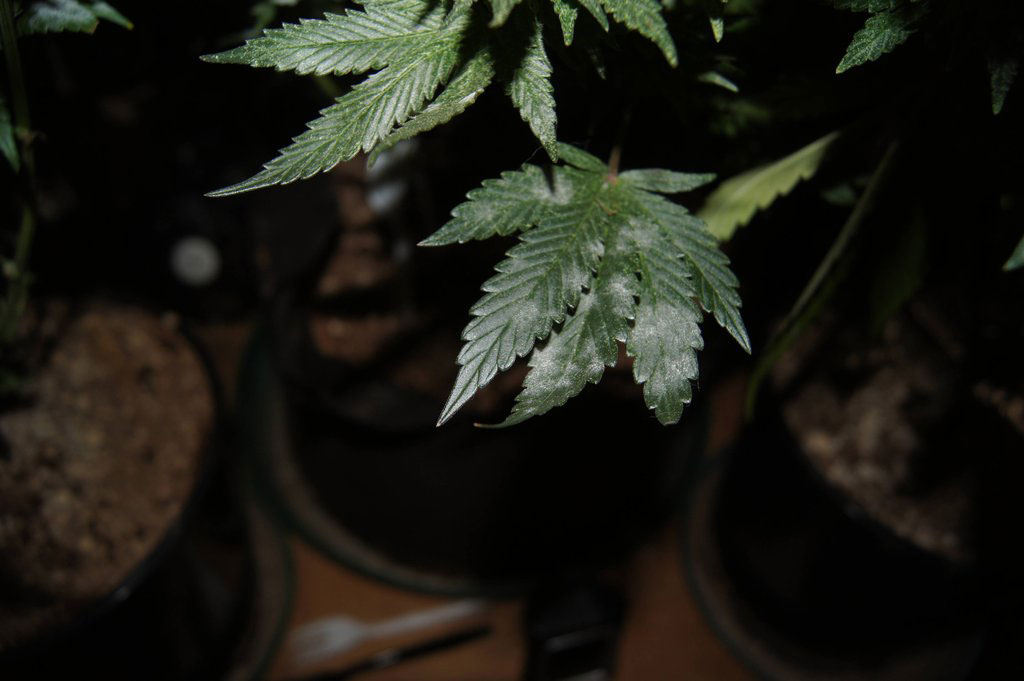
I found out that growing my plants without any way to exhaust heat caused the grow area to become way too hot and humid, even with small grow lights like CFLs. This led to several issues, including root problems, white powdery mildew and heat burn. It could have been much worse because these same conditions can also lead to bud rot, fungus gnats, spider mites, and other unpleasant guests in the grow room.
Once I started exhausting out air from my grow area, cannabis plants grew faster and so many random problems disappeared. It made me realize how many indoor cannabis growers may be unintentionally hurting their plants and yields by missing a few key points about air circulation and creating an exhaust to vent out heat.
Here's some important points I've learned about air circulation...
- Faster Growth, Bigger Yields - Plants given the right environment grow faster and produce more bud
- Temperature & Humidity - An exhaust system helps control the temperature and humidity levels in the grow area by venting out hot and humid air, and replacing it with fresh air. Fans within the grow area prevent hot or humid patches.
- Prevent Mold & Pests - Many molds and pests like stagnant air, high humidity and heat. Fresh cool air blowing over and under your plants will reduce your chance of seeing many types of mold and pests.
- Stronger Stems - A breezy environment strengthens stems.
- Use More than One Fan - Air circulation within the grow area is just as important as venting old air out. It's important to have both an exhaust fan and small oscillating fans within the grow area for the best results.
- Exhaust Systems Can Be Cheap & Stealthy - There are cheap and stealthy ways to create great air circulation and exhaust heat. You have more options than drilling holes or ducting, and many window exhaust options are indetectable outside.
Air Circulation
Air circulation (the way air moves around in your grow space) is an important ingredient to create a perfect growing environment for your cannabis. Indoor growers strive to create a better-than-nature environment for their plants. The way that air moves has a surprisingly big effect on how your plants will grow.
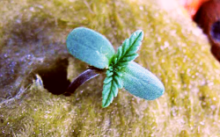
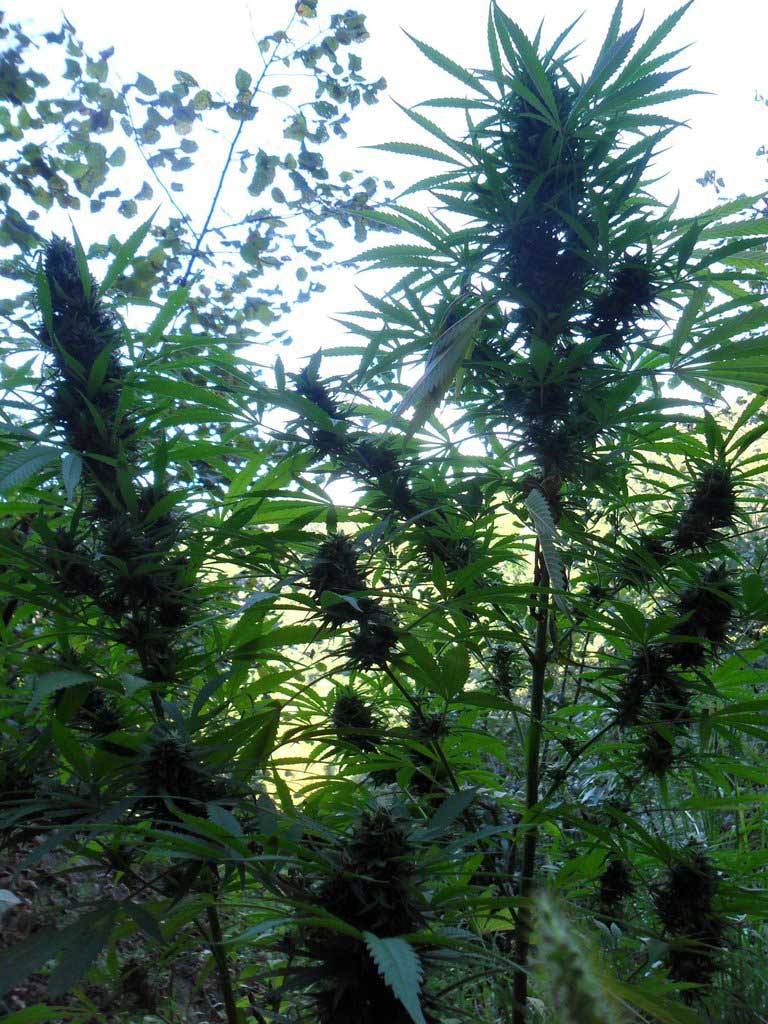
In nature, cannabis plants thrive in a gentle breeze
Why is Air Circulation Important?
When growing cannabis indoors, plants are normally in a relatively sealed environment without access to regular wind, whether plants grow in a closet, a tent or an room dedicated to growing. This can cause some problems compared to growing outside. Outside in ideal conditions there's a breeze flowing through plants, giving them fresh air and strengthening stems. A steady supply of fresh air along with a breeze (not too much, not too little) helps cannabis grow faster and even protects plants against certain pests and molds.
Benefits of good air circulation and an exhaust system include...
-
Protects plants against mold, bud rot and white powdery mildew
-
Less likely to get pests like fungus gnats and spidermites
-
Control heat & humidity to create a perfect growing environment
-
Strengthens stems by allowing them to bend & sway like in nature
Reduce Chance of Mold, Bud Rot & White Powdery Mildew
As air blows over the leaves, it carries away moisture released during transpiration. This allows your plants to drink more water (and pull in more nutrients) at the roots. This regular removal of moisture on the leaves also greatly lowers your chance of running into mold, but rot or white powdery mildew.
Protects Cannabis Against Spider Mites & Fungus Gnats
Air flowing over the plants and soil fights against nasty garden pests like spider mites and fungus gnats by making it hard to fly and drying out the top layer of soil.
Spider mites and fungus gnats both love stagnant air and have trouble living in a strong breeze. A breeze also creates a lot of air circulation over the plant containers, which keeps the top layer of soil relatively dry. Dry top soil makes it hard for pests like fungus gnats to breed (moist top soil creates a perfect breeding ground for molds & fungus gnats).
Whether growing inside or outside, growers with a nice breeze blowing over their plants and soil tend to get less pests.


Temperature & Humidity Control
Great air circulation combined with an exhaust system helps disperse water vapor and heat evenly throughout the grow space. Small oscillating fans blowing above and below the plant canopy helps equalize the air so there’s no hot or humid spots.
An exhaust system ensures that all the air in the grow space is replaced regularly, so plants stay cool, get a fresh supply of CO2, and live in the right humidity. It’s important for plants to be exposed to fresh, moving air for the best growth rates. Learn more about temperature and humidity.
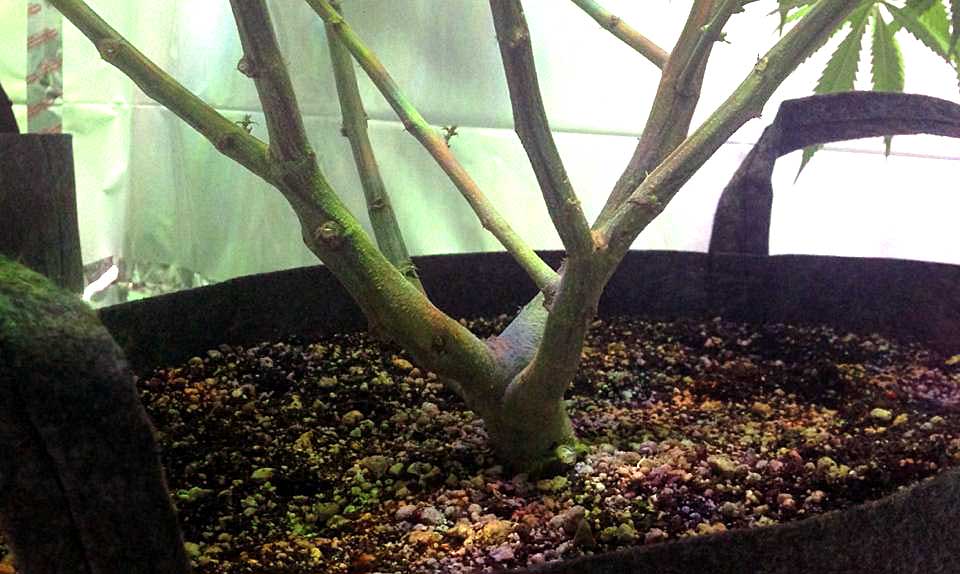
Strengthens Stems
A nice breeze strengthen stems by allowing them to bend and sway like in nature. This builds up the strength of stems over time, which comes in handy when plants start to get big and heavy from bud.
Use Fans & Exhaust System to Control Environment Indoors
Some of the best tools to control air flow, humidity and temperature in the grow room are fans along with a way to vent out used air. Let's cover what you need to know about fans for in the grow room and as part of your exhaust system.
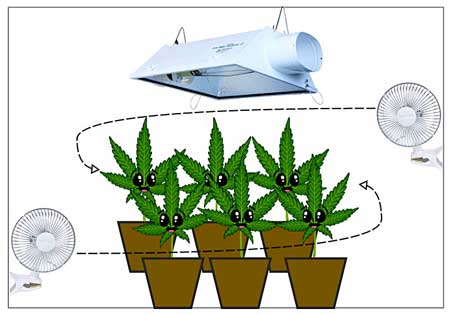
Placing Fans In The Grow Area
Most indoor cannabis growers use fans to blow air around within the grow area. This creates a nice breezy environment that cannabis plants love.
Placing Fans
-
Ideally you’d like a nice breeze surrounding the main canopy, which means you want air blowing above and under the plants.
-
Don’t point a strong fan directly at a plant, because too much wind can start to damage the leaves and stems.
-
After placing fans, check around the grow area to make sure that all parts get a slight breeze. If you feel stagnant air or a lack or breeze, you may want to adjust your fans.
-
Small oscillating fans are great for the grow space since they’re cheap and can be used to provide a nice gentle breeze to a relatively wide area without blowing on any one part too long.
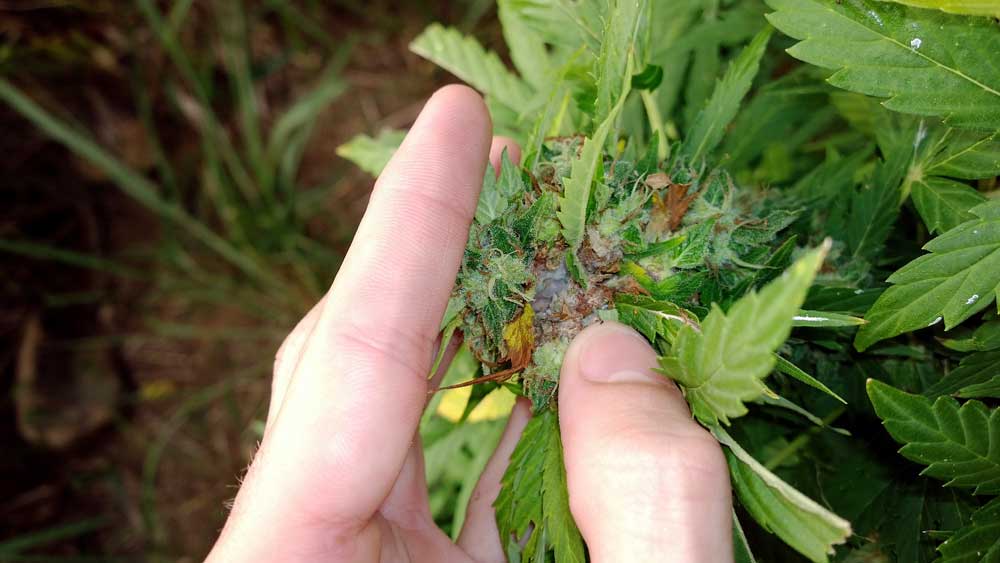
Be Careful! Too Much Wind Causes Clawed Leaves
When there’s too much breeze, the affected leaves will start getting “wind-burned.”
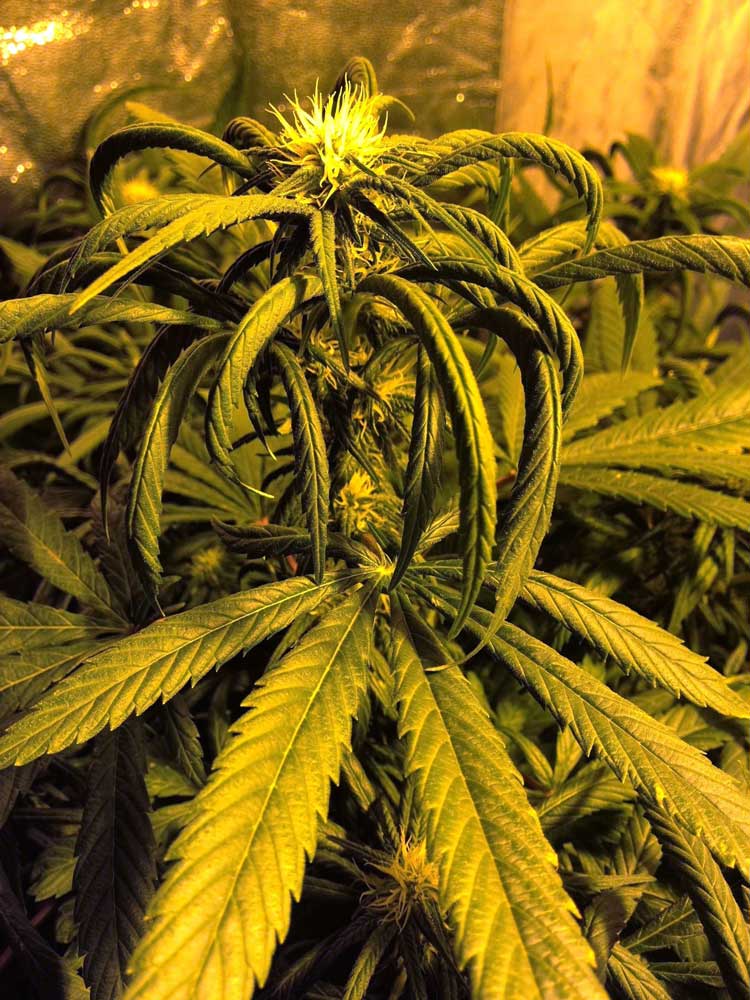
Wind-burned leaves are often curved under and form “claws.” They can look like they’re droopy from overwatering, underwatering, or possible a nitrogen toxicity, but you know you’ve got wind-burn when the leaves in front of the fan are clawing, and leaves further away from the fan look fine.
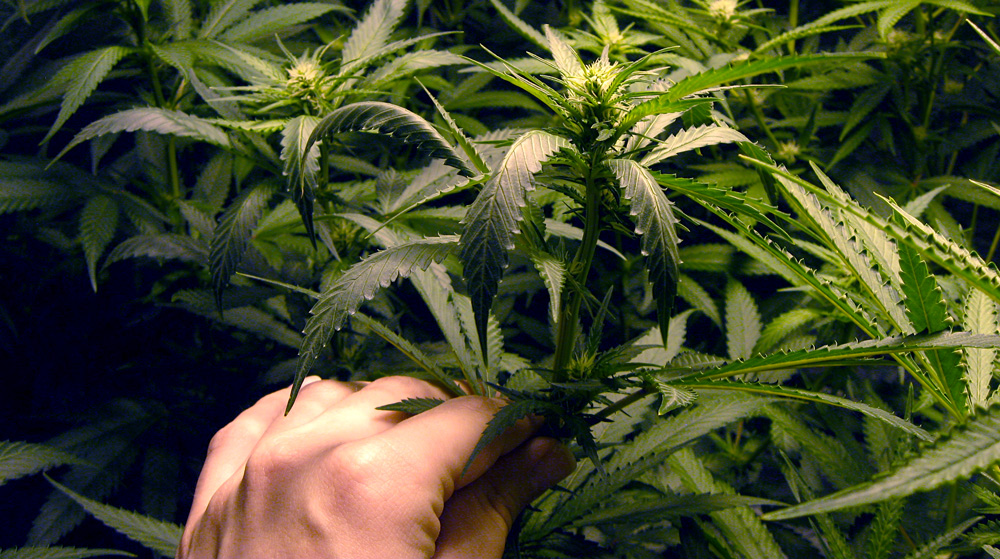
Just for reference, here’s what too much wind/fan looks like!
Choosing the Right Fan for Exhaust System
Even when you're not worried about heat, it's still important to regularly replace all the air in the grow area, which means you need a way to vent out old air. An exhaust system uses fans and often ducting to move hot and humid air out of the grow space.
Designing an efficient exhaust system will be much simpler if you take the time to understand airflow in a room - the whole idea of setting up an exhaust system is to create negative airflow in the grow space or grow tent so that any hot air is regularly replaced with new, fresh cool air.
All the air in the tent should be replaced by new air every 1-3 minutes for the best results. I recommend aiming to replace the air every one minute unless you live in a cool place. You can calculate the strength of exhaust fan you need based on the dimensions of your grow space.
In order to move air out of the tent and vent it outside, you need to use at least one strong fan as part of your exhaust system.

How to Calculate Exhaust Fan Strength
In the US, most exhaust fans have a "CFM" rating. This means "cubic feet per minute" and is talking about how much air the fan can move each minute. It's important to get a fan with the correct CFM rating for your size space.
In addition to CFM, there are 3 sizes that exhaust fans come in as far as diameter (how wide the fan is). They usually come in 4”, 6” or 8”. Generally it’s recommended to get a 6” for most setups, since most air-cooled hoods and ducting have a 6” opening. You can also use converters if you need to convert a 6” hold to a 4” fan. 8” fans are usually used for more high-powered grows.
You probably want a fan with a 6” diameter exhaust fan
Here's a short equation to help you determine what CFM rating you need for your fan in your space.
How to calculate CFM needed
-
Determine the cubic area of your space by multiplying Length x Width x Height. You want to exhaust this amount of air every minute.
-
Exhaust Efficiency - Every exhaust system has some level of inefficiency which will lower the amount of air being moved by the fan. This step tells you how much extra air-moving power needed to compensate. With an efficient exhaust, air goes in a short, straight line after passing through the fan. An inefficient path is when air has to go a long way after leaving the fan, or if the air has to go around turns instead of being in a straight line. This step will help make sure your fan is moving enough air to properly ventilate your space.
• Efficient path - multiply previous number by 2
• Inefficient path - multiply previous number by 3 -
Pick your fan. Fans are measured by CFM (cubic feet/minute), so you need a fan that has a CFM higher than the number you figured out in the last step.
Fan CFM Rating Table
(here are some examples of possible setups using the equation above to figure out CFM)
| GROW SPACE SIZE | WATTAGE OF LIGHT | CFM OF FAN* |
|---|---|---|
| 2’ x 4’ x 5’ | 250W | 80-120 CFM |
| 3’ x 3’ x 6’ | 400W | 108 - 162 CFM |
| 3.5’ x 3.5’ x 6.5’ | 600W | 160 - 238 CFM |
| 4' x 4' x 7' | 1,000W | 224 - 336 CFM |
* Of course fans don’t come in all these sizes, so round up to the closest fan size available.
You’ll generally be able to get away with a lower CFM rating if your grow space tends to stay cool and dry. You’ll need a higher CFM rating if your grow space tends to get hot or humid.
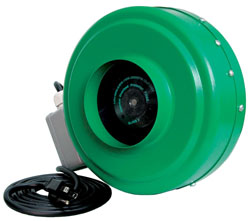
Some fans are overpowered for most small grow spaces, like this Hydrofarm 6-inch inline fan with 400 CFM. You usually won't need a fan this big unless you have a huge grow space!
This doesn't affect many indoor growers, but if the exhausted air has to travel a long ways after going through your fan but before it's vented outside (for example the air has to go through several feet of curved ducting after passing through the fan), a single exhaust fan might not be enough - you may need booster fans along the way to keep the air moving.
When in doubt, it's usually better to get a bigger exhaust fan than you need. You can always turn off the fan if it’s moving too much air. For example you could use a speed controller or put the fan on a timer if the exhaust fan is moving air out of your space too fast. There are often times during a grow where it’s helpful to be able to move more air, so size up if you can when it comes to exhaust fans.
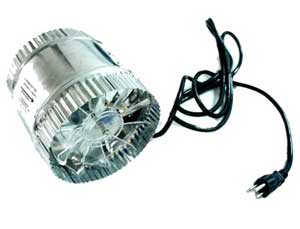
For many growers, a cheap 6" fan is all you need - this one is only ~$30 and moves 240 CFM - plenty enough fan for setups smaller than 4' x 4' x 7'.
Passive Intake
A passive intake means that you just have a fan blowing air out, and you have an intake hole to let new air in. With a passive intake, you don't have an intake fan to help bring in fresh air.
With every passive intake, make sure your intake hole is 3-4 times bigger than your exhaust hole to achieve proper suction and prevent your fan from working too hard blowing out air it can’t replace. You can also help bring air in by having more than one passive intake hole. In other words the holes/spaces for new air to come in (vents, intake fans, doors, windows) should be bigger than the hole/space where air is being pulled out the tent by your exhaust fan.
Active Intake
An active intake simply means that you're using a fan to bring air into the tent. So in addition to your exhaust fan, you also have a fan at your intake hole blowing air in. With an active intake, it's not as important to have a huge intake hole, since the intake fan will help replace the air. An active intake is often a good idea if your intake hole is the same size as your exhaust hole.
Small Ocsillating Fans
Even with a good exhaust system, it is recommended that growers still install small oscillating fans in their grow space to blow air above and below to the plant canopy to improve air circulation and help prevent any hot spots or humid pockets of air.
Cannabis plants like having plenty of fresh air all the time, and your plants will reward you for setting up a proper exhaust system.
Transpiration - Leaves Adds Humidity to the Air
When it comes to air circulation and exhaust, humidity is something you need to pay attention to in addition to temperature.
Leaves are constantly giving off water vapor into the air; in fact, that’s how the plants brings up water from the ground. As the water is transpired through the leaves, it pulls up more water from the roots like a straw!
 This is known as "transpiration." Transpiration is a process where leaves give off water vapor. That means that the humidity will always be rising in your grow area unless you find a way to vent that humid air out (or use a dehumidifier to remove the extra moisture).
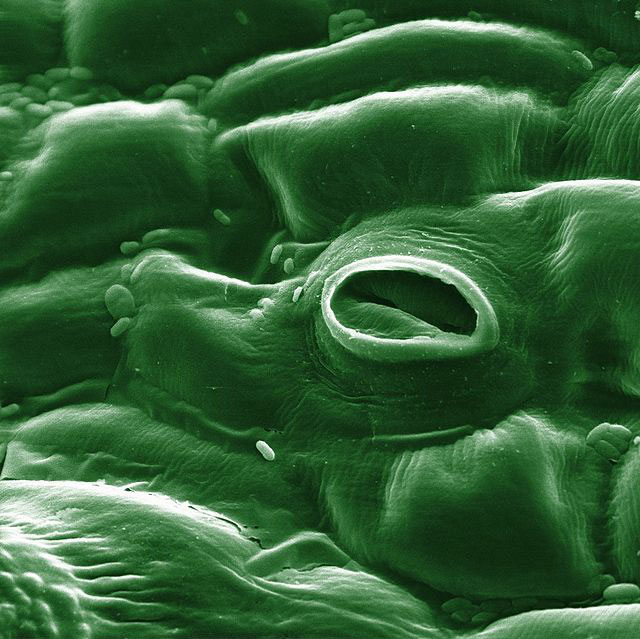
Transpiration happens via the stomata, little pores that are located on the leaves of the plant. Stomata let oxygen and carbon dioxide in for photosynthesis, while letting water vapor out. A closeup of a single stoma from a tomato plant is pictured to the right.
Plants will open and close the stomata based on the environment. Stomata generally are open during the day and are much smaller at night (when there's no photosynthesis happening and no need for CO2). Stomata get smaller when the air or roots get dry, which helps the plant stop losing water.
Never let your plants dry out or important plant processes will stop dead in their tracks! By maintaining the proper humidity, your plants will grow faster and healthier.
Stomata get bigger when there's bright light and high humidity since leaves needs the air for photosynthesis and the plant isn't "worried" about losing too much water vapor in humid conditions. Because stomata must be open as part of the photosynthesis process, it also means that photosynthesis stops when the plant gets too dry.
Stomata must be open for transpiration to happen, so when the stomata are closed the plant has a hard time taking up water and nutrients though the roots. When there's too much water in the plant, sometimes the stomata can't let enough water vapor out, which is part of what causes the symptoms of being overwatered.
Plant leaves can't get access to CO2 in the air when the stomata aren't open and the plant is always losing water when the stomata are open, so that means the plant can never take in CO2 without also letting water vapor out.
So what you need to remember is that leaves are constantly adding humidity to the air. It’s important to remove this humidity from the grow area if the humidity climbs too high, or it can set up conditions that cause mold, bud rot and powdery mildew.
-
To Lower Humidity - Vent out humid air via an exhaust system - the humidity will drop (as long as the air from the intake hole is less humid)
-
To Raise Humidity - If you seal up the tent without a way to vent out humid air, humidity will go up
-
Large plants raise humidity fast - Small plants don’t put off a lot of water vapor, but larger plants have a lot of leaves releasing water vapor into the air, causing the humidity to rise quickly unless the humid air is being vented out. Remember that most of the water you’re giving to your plants is being released into the air of your grow space, so you need to find a way to get that humidity out, especially in the flowering stage when high humidity can lead to bud rot.
-
Dehumidifiers and humidifiers can help control the humidity when an exhaust system isn’t enough
Aim to keep humidity at these levels...
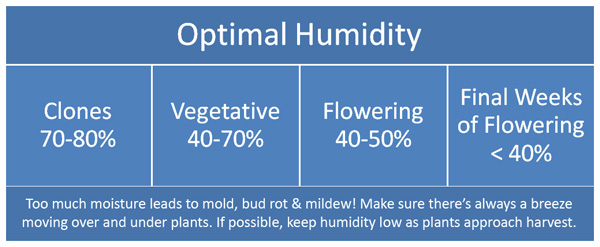
How to control humidity in the grow room: http://www.growweedeasy.com/humidity
CO2 Injection Requires a Sealed Grow Space
In order to use CO2, it’s important to completely seal up the grow room. CO2 is only effective at very high amounts, and you need a sealed grow space to get the concentrations up high enough to benefit plants.
More importantly, CO2 is dangerous to humans at the levels that are recommended for plants. Sealing the grow area is incredibly important to prevent CO2 from leaking into the home.
Learn more about how to use CO2 here: http://www.growweedeasy.com/co2
Suction, Seals & Negative Air Pressure
As far as seals, it’s important that you seal the entire exhaust system after air passes through the exhaust fan. This helps keep the exhaust system efficient. If you're using a carbon filter, this also makes sure that all air passes over your filter before being vented out of the grow space. A sealed exhaust system along with a carbon filter will prevent smells from escaping outside.
Negative air pressure is something you can create to keep smells from escaping the grow room, so you don’t have smells leaking into the rest of your home..
In order to create negative air pressure, you seal the grow space except for the intake and exhaust holes, which creates suction when you turn on the exhaust fan.
In other words, suction is what you create with seals and negative air pressure.
When your grow tent is bending in from the exhaust fan, it means you've got good suction going in there and have created negative airflow. You can also check by burning incense near the intake hole; if the smoke is moving straight to the intake hole you know that you've got good negative air pressure bringing fresh air inside.
Controlling Smells With Your Exhaust
The best way to control smells in the grow room is to use a carbon filter. It is the only method of controlling smells that I recommend for everyone, because it is the most effective and can actually completely scrub smells from the air so they never escape the grow area, either inside or outside the home.
But when using a carbon filter, the way you set up your exhaust is important. Most importantly, the air from the grow area should pass over the filter and be brought straight outside. There needs to completely air-tight after air passes over the filter.
Many cannabis growers set up their carbon filter this way...
Carbon Filter > Grow Light > Exhaust Fan > Outside
This simple diagram shows how many growers set up up their exhaust system
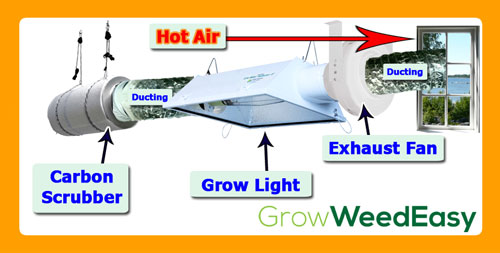
If you're using a carbon scrubber, it’s important that all air from the grow room goes through the carbon filter before it gets outside. So there shouldn’t be any air leaks after the carbon filter.
If you have a setup like this with good suction in the tent, you’ll prevent smells from making it outside or inside the house. The only place there’ll be a smell is when you’re actually in with your plants.
Learn more about controlling smells in the grow room: http://www.growweedeasy.com/how-to-control-smell-when-growing
How to Create a Stealthy Exhaust System
Setting Up a Way to Vent Heat
-
Cheap “exhaust” - no ducting
-
How to Make a Real Exhaust (plus 3 stealthy examples)
Cheap “Exhaust” - No ducting
A lot of people want to grow, but are not willing to install ducting as part of their exhaust system. And I understand why - ducting looks incredibly out of place in most home environments. They do not look “stealthy.”
But there are ways to get around this with small grows. For example keeping the grow small with smaller grow lights will go a long way to preventing heat from getting out of control.
About Grow Lights for Your Cheap "Exhaust"
A lot of growers avoid MH/HPS grow lights in favor of LEDs or fluorescents (T5s and CFLs) to try to control heat. One thing that most people don’t realize is that MH/HPS grow lights are a lot more efficient than fluorescents and even more efficient than most LEDs.
What that means for you is that a 250W grow light will put out about as much heat and use amount the same electricity as 250W of LEDs or fluorescents, but you’ll get more light.
I see a lot of growers stuffing their grow areas full of LEDs or CFLs in an attempt to keep things cool, but often you’ll get more bang for your buck by getting a small MH/HPS grow light (at least as far as ease of use, electricity use, heat, and brightness). CFLs and LEDs can be surprisingly expensive to set up if you want to provide a lot of light, and just aren’t going to get you the same yields as a great MH/HPS (as far as electricity used). LED grow models are very high-priced, and while each CFL bulb is relatively cheap, it’s expensive to get a lot of them with light sockets and a way to adjust the CFLs easily around the plants.
Learn more about different cannabis grow lights: http://www.growweedeasy.com/grow-lights
Regardless of your grow light choice, if you have a relatively small setup, the following technique might work for you. For some people this may be a good temporary solution until a real exhaust system can be made. And for some people, this might be a permanent solution to get your grow area temps the way you’d like.
What You Need
-
Grow tent or grow space with access to a window - one ideal situation is a grow tent (or grow box) in a bedroom.
-
Exhaust fan - I use a 6" Inch Booster Fan Inline Blower for my small grow tent
-
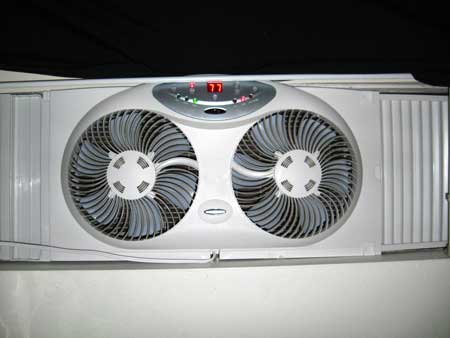
Window Fan - I use the Bionaire BW2300 Twin Window Fan because it moves a lot of air and actually fits my huge windows, but any strong window fan will work.
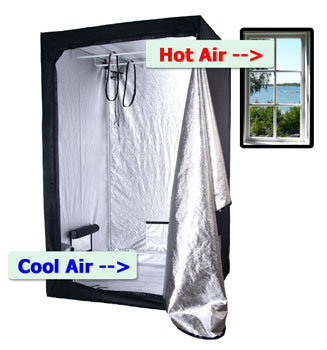
The main idea is to vent hot air out of your grow space, then get the hot air out of your room via a window fan.
I personally like using a small 2’ x 4’ x 5 grow tent because it provides a great growing environment for smaller grow lights but no one ever knows what it is. They're available in hydro stores and on Amazon.com, and can accomodate up to a 400W grow light (though I'm using just a 250W MH/HPS in this one).
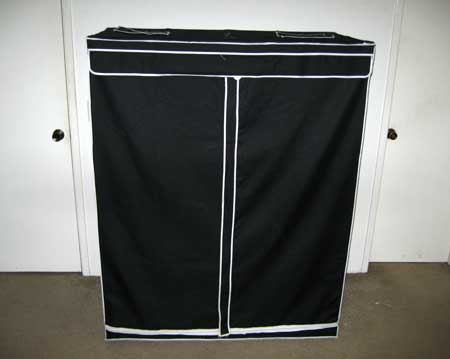
When it’s just a grow tent without any ducting, it doesn’t really look suspicious in your bedroom. A few people have seen my grow tent, and everyone seems to think it’s some sort of storage or way to hold clothes, if they even notice it at all.
Here’s what you do (it’s easy)
-
Set up your grow tent with grow light inside
-
Install your exhaust fan at the top of your tent, blowing air out. Make sure there’s an intake hole for new air to get in. The intake hole should ideally be bigger than your exhaust, and should be located on the bottom of the tent on the opposite side of your exhaust fan. This isn’t always possible, but ensures the best results. Most grow tents already have a suitable intake hole, so this is another reason I like grow tents - less work needed on your part to make a good environment for your plants
-
Install window fan blowing air out in the same room as the tent. This window fan will only be effective if you have an intake hole, just like your grow space. The best way to accomplish this is to simply open another window in the room, or even a window or door outside the room somewhere else in the house as long as the fan gets access to new air. This causes the fan to blow all the air out, sucking in new fresh air to replace it.
This may not be a permanent solution, but it gets air moving through the tent and keeps the air moving out of the house. Most importantly, make sure all fans are blowing out, with some sort of intake hole that has access to fresh air.
You’re basically building an exhaust system without the ducting. It’s not as efficient as using ducting, but for a lot of growers with just a few plants, it’s all that’s needed to control temps in the grow room and tent. As long as it’s cooler outside than inside, the window fan will cool down the room.
The window fan I use is called a "Bionaire BW2300 Twin Window Fan," but any strong window fan will work. They're available in hardware stores, Best Buy, Walmart and on Amazon.com. They have extenders so they'll fit any window snugly, without gaps on either side.
What about smells? All the normal techniques used to control smells will work for this system. The best option to control odors is to create an exhaust system that gives your tent good suction/negative air pressure. Then have your air pass through a good carbon filter just before going through the fan and leaving the tent. With a good strong exhaust system and a quality carbon filter, this will prevent smells in the bedroom or outside except when you actually open the tent. Learn more about carbon filters and controlling smells
Now for growers with bigger grow lights, such as 400W and greater, usually a more robust exhaust system is needed to keep lights cool if the grow space isn’t naturally cool.
How to Make a Real Exhaust System
The principle for all exhaust systems is the same. Intake fresh air and vent out hot, humid air.
The carbon filter (to scrub smells) isn’t needed in all setups (since some people don't need to cover up smells), but here’s the general idea of how an exhaust system works:
What you need:
- Grow Tent (or grow space with a way to hold up lights)
- Rope Ratchets (to hang grow light)
- Grow Light - compare cannabis grow lights
- Exhaust Fan - discover which fan is right for your space
- 6" Ducting (usually cheaper to buy in person)
- 6" Ducting Clamps
- Carbon Filter (optional) - learn about carbon filters
- A way to hide exhaust vent from outside (if needed, explained below)
Step 1: Set up your grow tent
Step 2: Install both fan and carbon filter(if you plan to use one). These items are often tough to install after the grow light, so get these parts in place before you go to the next step
Step 3: Install your grow lights in the tent with rope ratchets. Don’t plug in anything until you’re about to start growing.
Step 4: Inside the grow tent, connect everything with ducting. You will need ducting clamps. Connect carbon filter to light, and light to exhaust fan.
Step 5: Outside the grow tent, install ducting to bring air from fan to exit outside. Use ducting to connect the exit port on your fan to wherever you’re going to exhaust hot air. Try to create a short straight path that’s as air-tight as possible until air is safely outside.
Step 6: Insure intake hole is open so new fresh air can enter the tent. Also make sure that there’s a window or door open in the grow room so fresh air can come inside to replace the hot air being vented out.
Tip: Make sure there is no extra slack in the ducting if possible. you will need extra ducting to be able to adjust your lights, but use something like binder clips or chip clips to bunch together extra ducting.
Keeping a straight path that air has to go through will help make the whole exhaust system more efficient.
If things are getting too cold in the grow area (for example in winter months), you can exhaust the heat back into the grow room to help warm things up, or you could turn down the overall air being moved by your fan by putting it on a timer or using a fan speed controller. Some growers even exhaust the heat into the house in the winter for free heating.
The next big problem is that a lot of people want to be able to exhaust their hot air without anyone being able to tell from the outside.
Here are some ideas for setting up a stealthy exhaust in a window which looks completely normal from outside, while still allowing air to pass through easily.
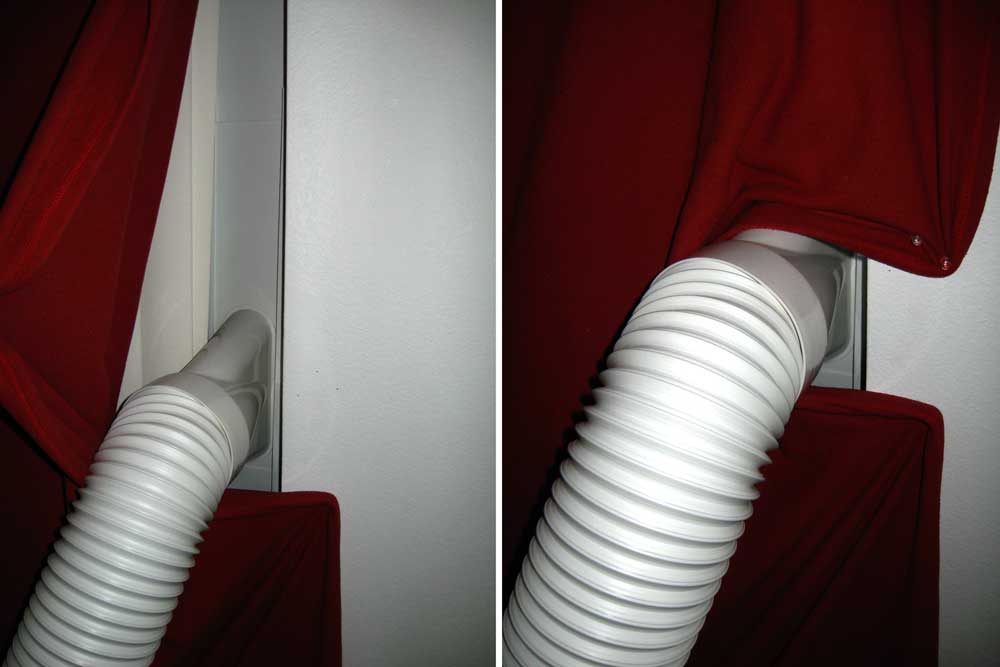
Fake window AC unit - Use window kit to disguise the exhaust from a grow area.
This method takes advantage of the fact that portable air conditioners come with a special window kit that fits into most windows. This look completely normal from the outside.
A portable AC usually looks something like this. Notice the classy window fitting.

You can buy a replacement window kit and install it in your window. It has a hole to vent air outside, but looks like you just have an AC. While most ducting won’t fit it without extra help, you can use adhesive foam to help the ducting make an air-tight fit with the exit hole.
What You Need
- Window kit for a portable AC
- Adhesive foam, duct tape or hot glue to connect ducting to window kit
- A way to black out the rest of your window (for example blackout curtains which don't let any light through but look like regular curtains)
Here's an example of a window kit for available on Amazon.com


This is what a fake portable AC vent looks like in your window from the inside
Learn how to make a stealthy "secret window" exhaust system like this below...
Having trouble finding a cheap & easy way to stealthily exhaust out hot air from your grow tent? I used a combination of the following items to create an awesome exhaust system for about $45 (just add your fan).
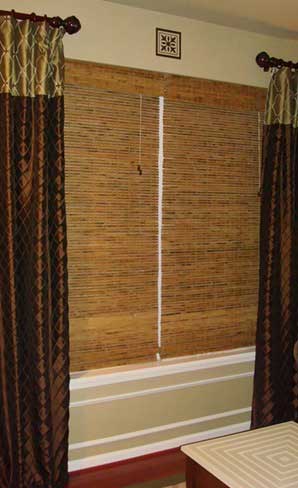
This method takes advantage of the fact that wicker blinds do not allow anyone to see in, but they do allow air to pass in and out.
Wicker blinds offer privacy but still allows air to pass through
What You Need
- wicker blinds that fit your window
- foam (usually cheaper to buy in person at a hardware store like Lowes or Home Depot)
- corrugated plastis sheet that is about the same size as your window (also known as "Twinwall Plastic Sheet" or "fluted polypropylene sheet" or "plastic cardboard sheet"). This is often cheaper to buy in person since you can only buy packs of them online. This item an be replaced with another sturdy backing material like wood since you are using this to give structure to the foam, but corrugated plastic is often simpler to work with and can easily be cut with sharp scissors or a box cutter (so not special tools needed).
- duct tape
- 6" ducting (should match the width of your fan, but most growing fans are 6")
- super glue or hot glue
- staple gun
*All these items can be found at a home improvement store, as they are common items for upgrading around the house
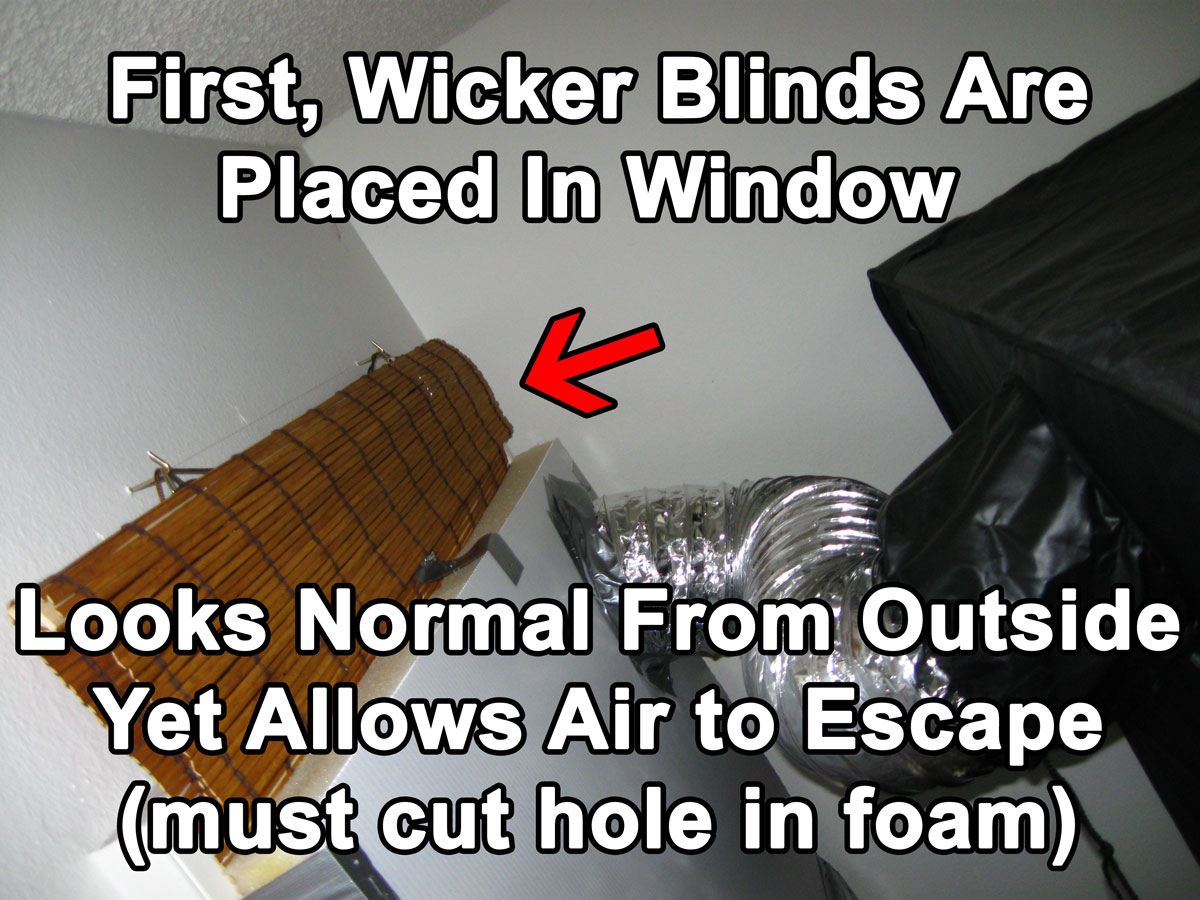
First, hang the wicker blinds in your window like normal. Air can escape through these blinds, but you can't see through them to the other side. They are commonly used in bedrooms and other windows that lead into private areas.
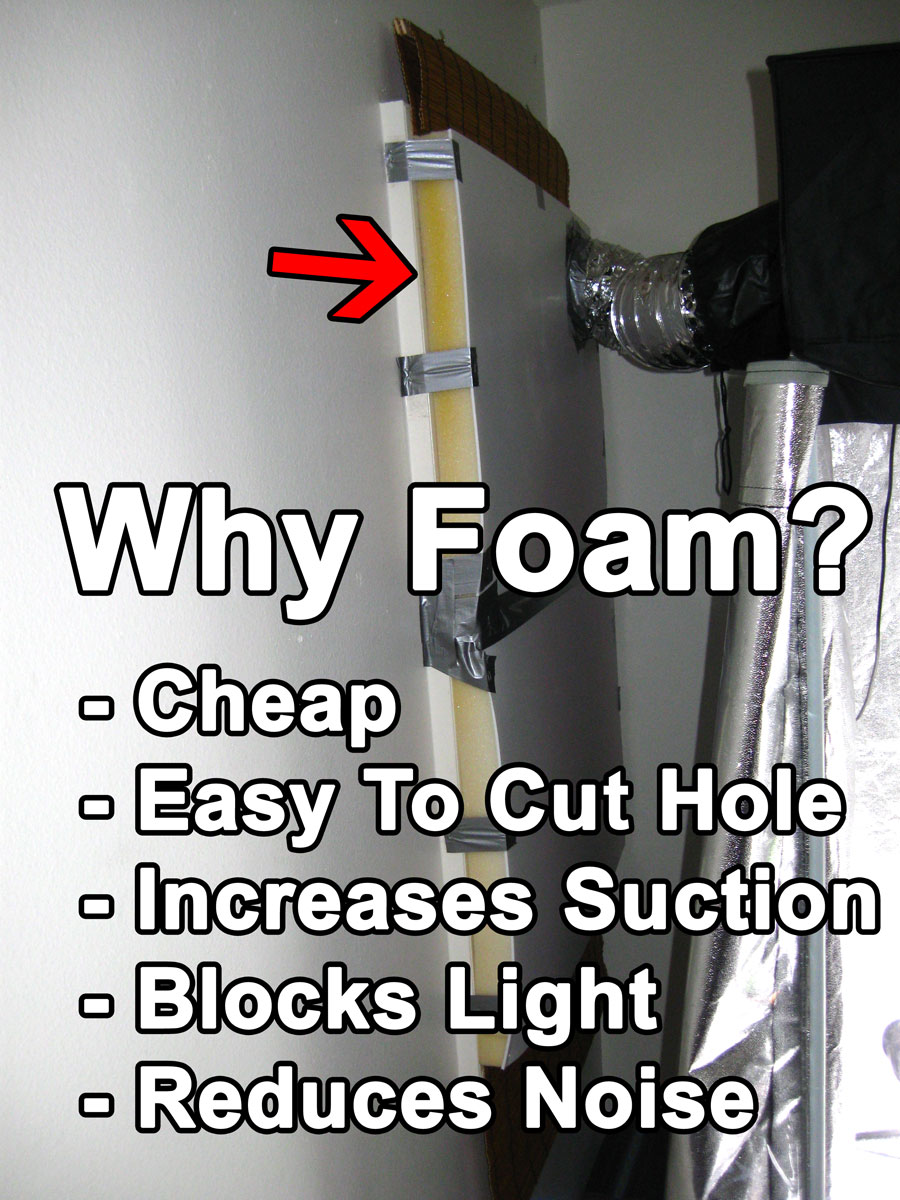
I bought a huge sheet of foam and glued (super glue and hot glue for best results) it to a sheet of corrugated plastic. You can buy both these items for a few bucks at a home improvement store like Home Depot.
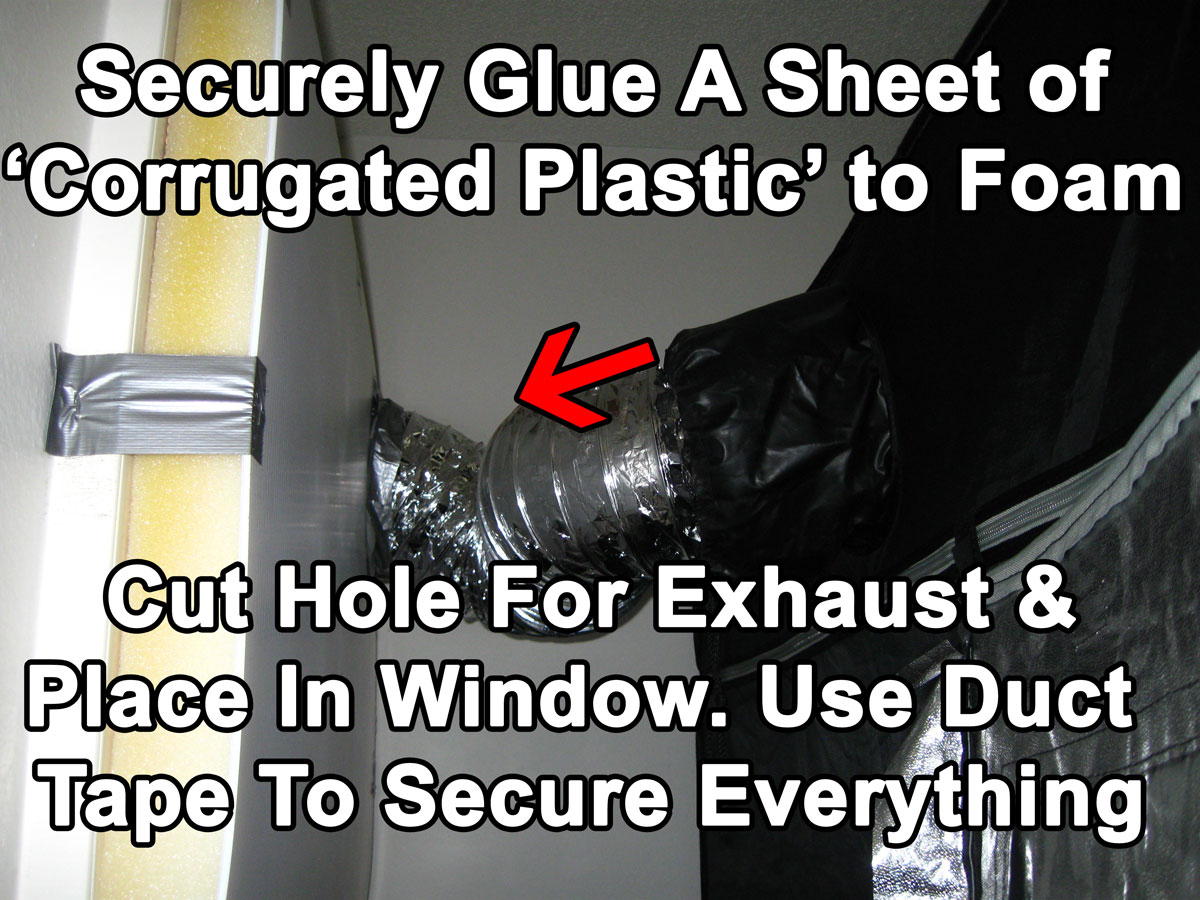
Next, use some ducting to trace a round, duct-sized hole on the foam/plastic. Note: Cut out the duct-sized hole in the foam/corrugated plastic near the top of where it will be mounted. Remember, heat rises, so having the exhuast exit near the top is much more efficient.
Run the ducting through the hole you cut, and right up to the wicker blinds. The ducting should be butted up against the wicker blinds so that heat escapes directly outside (since it will be able to pass through the blinds easily). Use duct tape to hold the foam/plastic in place, then use more duct tape to hold the ducting in place. At the end after everything is placed and you're happy with how everything looks, you will use a staple gun to staple all your duct tape in place, but don't worry about that yet.
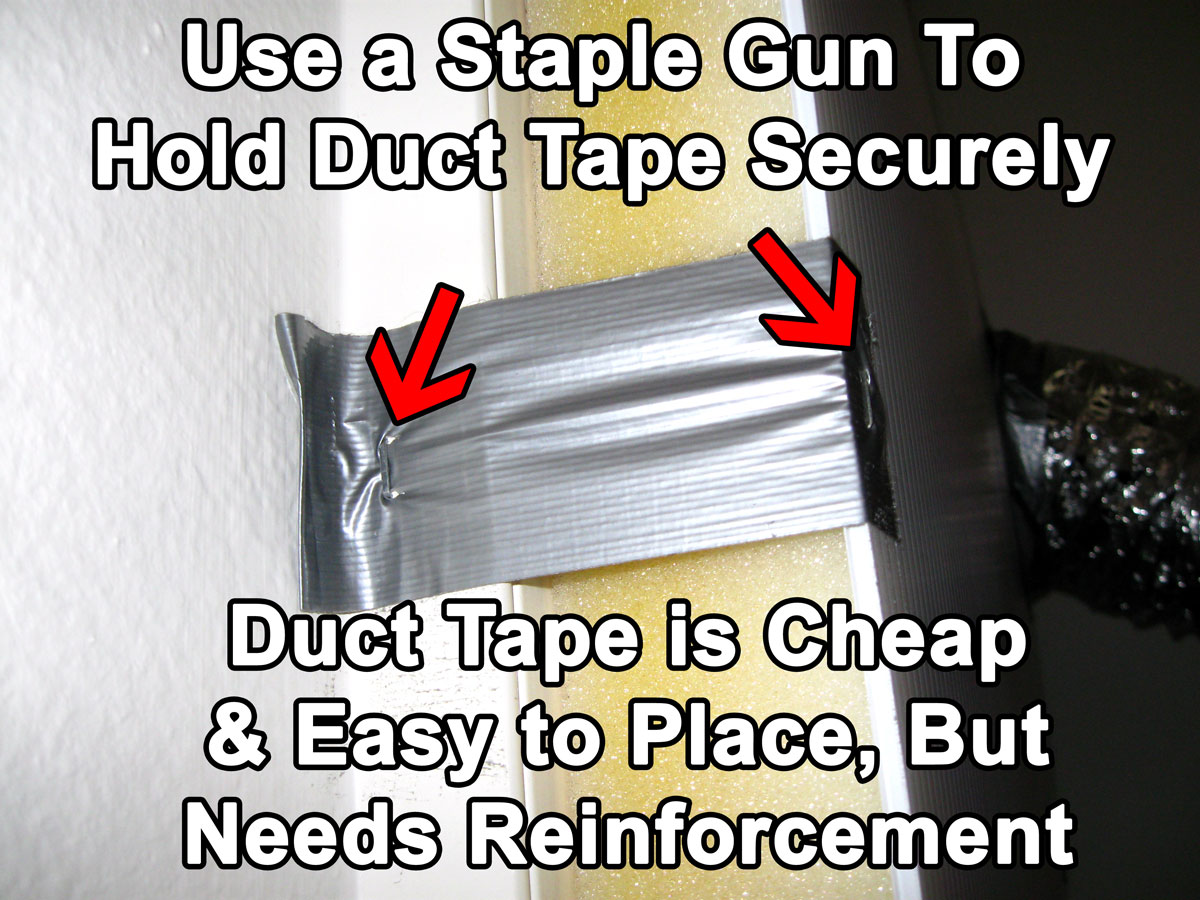
I also used duct tape to secure the foam to the window because it's cheap, easy to use, and is very durable when combined with staples.
Use a staple gun to reinforce anywhere you use duct tape, including where the ducting goes through the hole you made in the foam.
I like using foam + corrugated plastic because it's inexpensive and easy to cut the hole for the exhaust. Having the foam/plastic combo in the window increases the suction in the room so more hot air is vented out and blocks light (no light gets in or out). As an added bonus, the foam dramatically reduces the noise of the fan (so you can just barely hear it even when you're standing right outside the window).
Sent in by a reader named Ray. Love this idea!
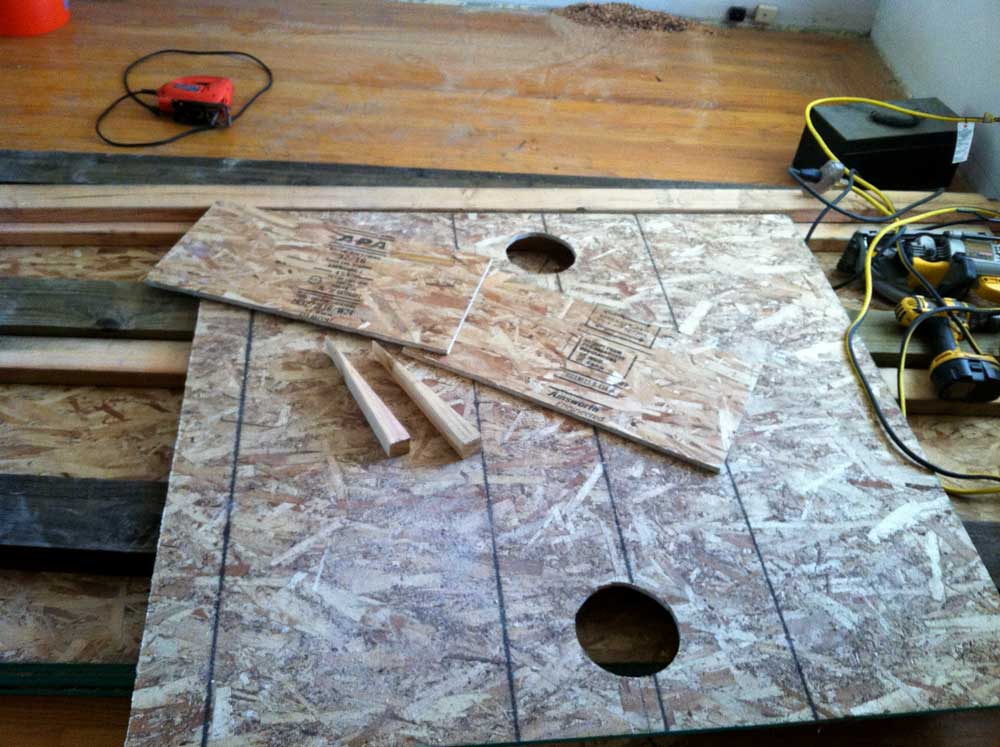
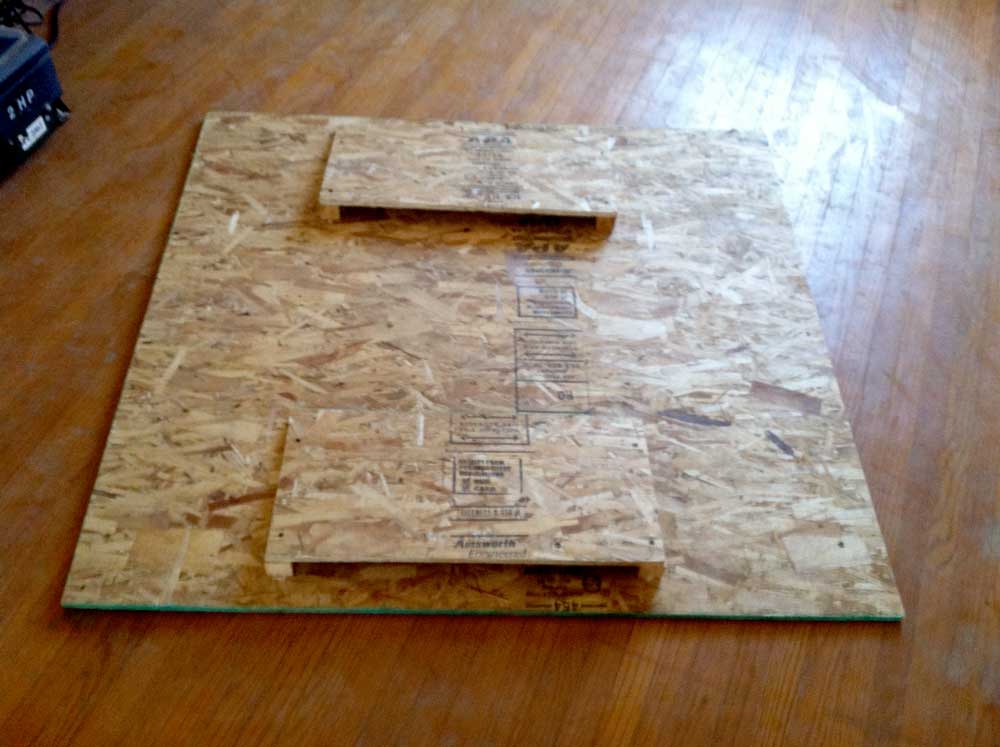
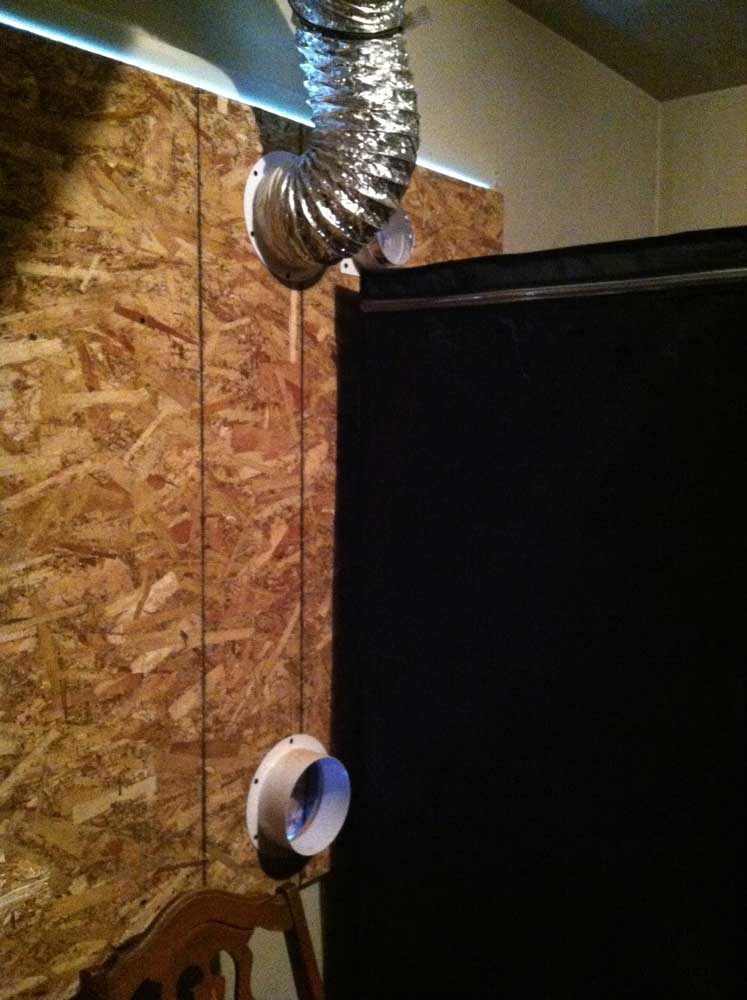
This grower needed an entry and exit hole in this window, which is why there are two holes cut out. The hole at the top is going to become the exhaust port to vent out hot air. The hole at the bottom will be how new fresh air enters the grow space.
With a small entry hole like this, the grower would need an intake fan to help move air into the grow space. If this were just a passive intake (no intake fan), then the intake hole should be about 4 times the size of the exit hole. This helps prevent the exhaust fan from working too hard, and will cool the area more efficiently.
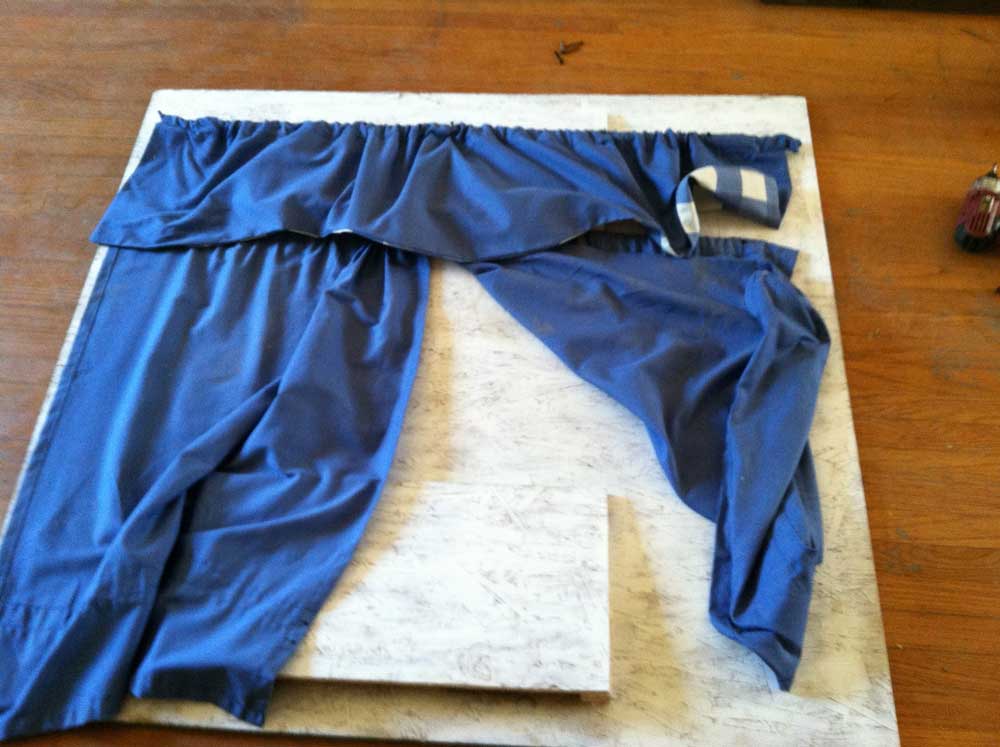
This next picture shows the side that will become the front (outward-facing) part of the fake window. This setup allows air to pass in and out freely, but blocks light from both sides.
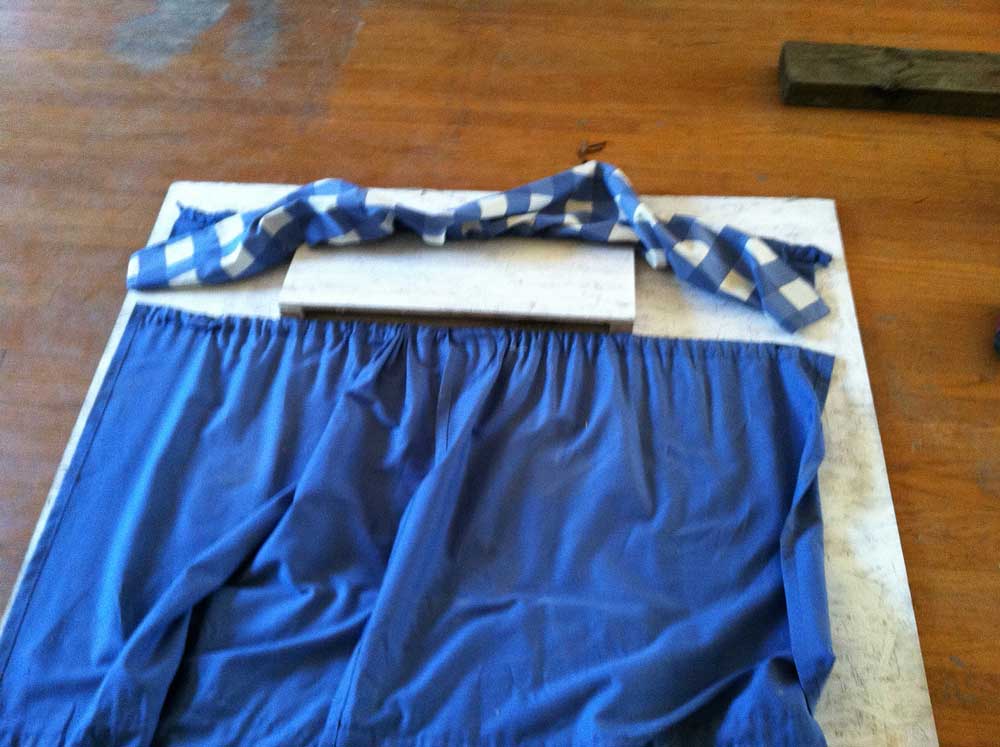
After adding some fake curtains, this secret window exhaust is really starting to come together.
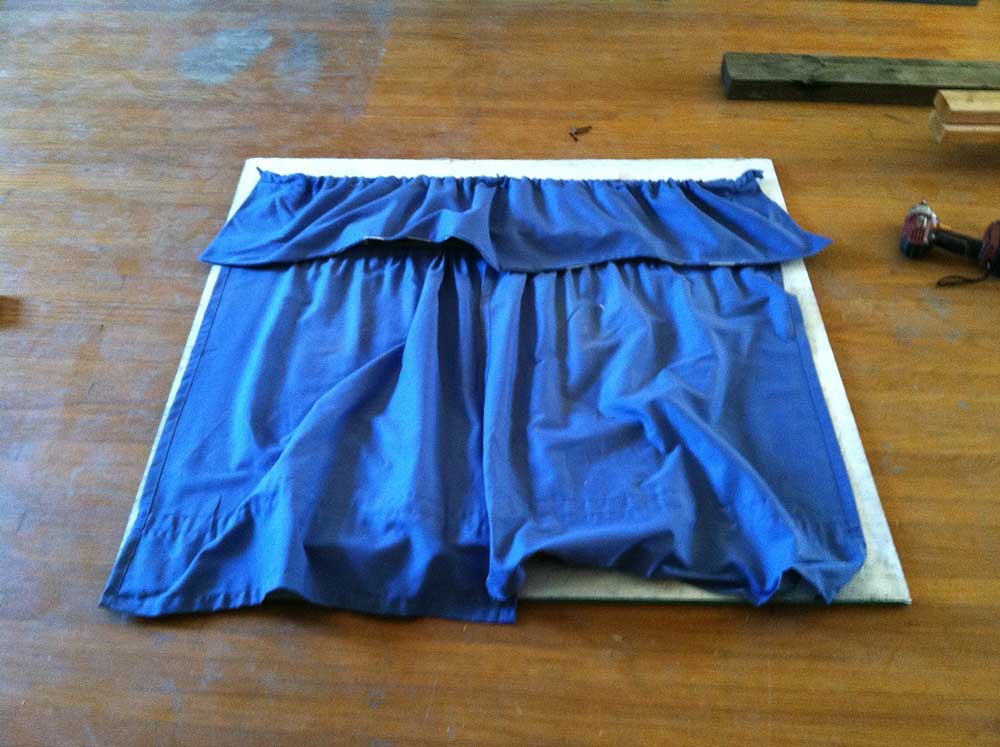
Here's what that window looks like from the inside when it's been hooked up. The heat exhaust is on top while the intake is on the bottom.
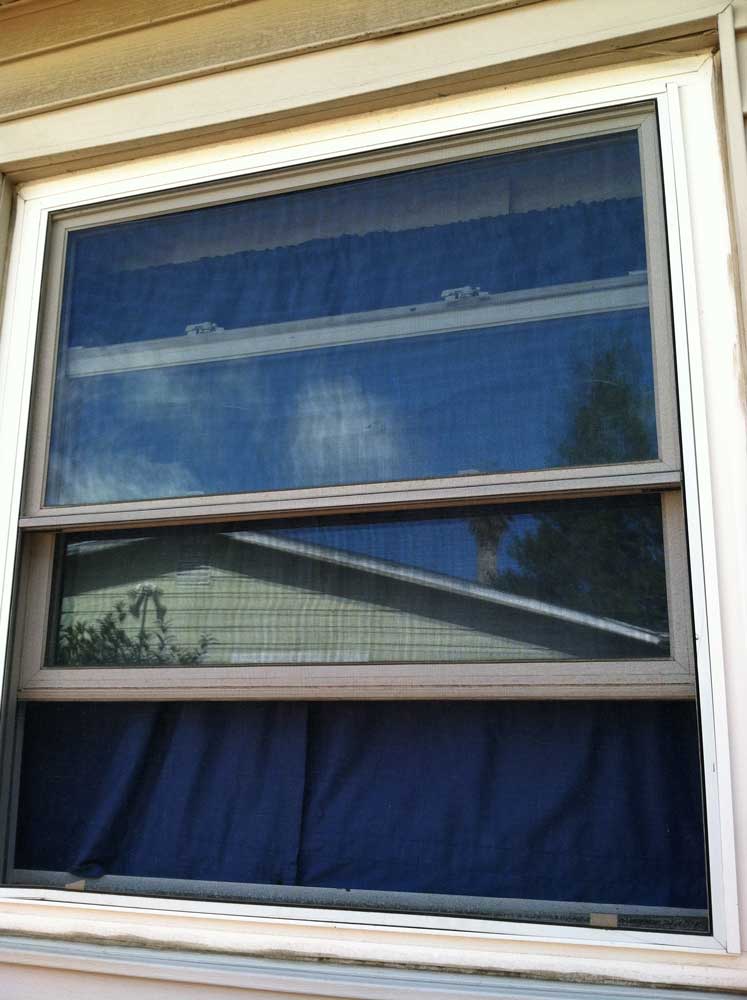
Completely undetectable from the outside. No one would ever give this window a second glance.
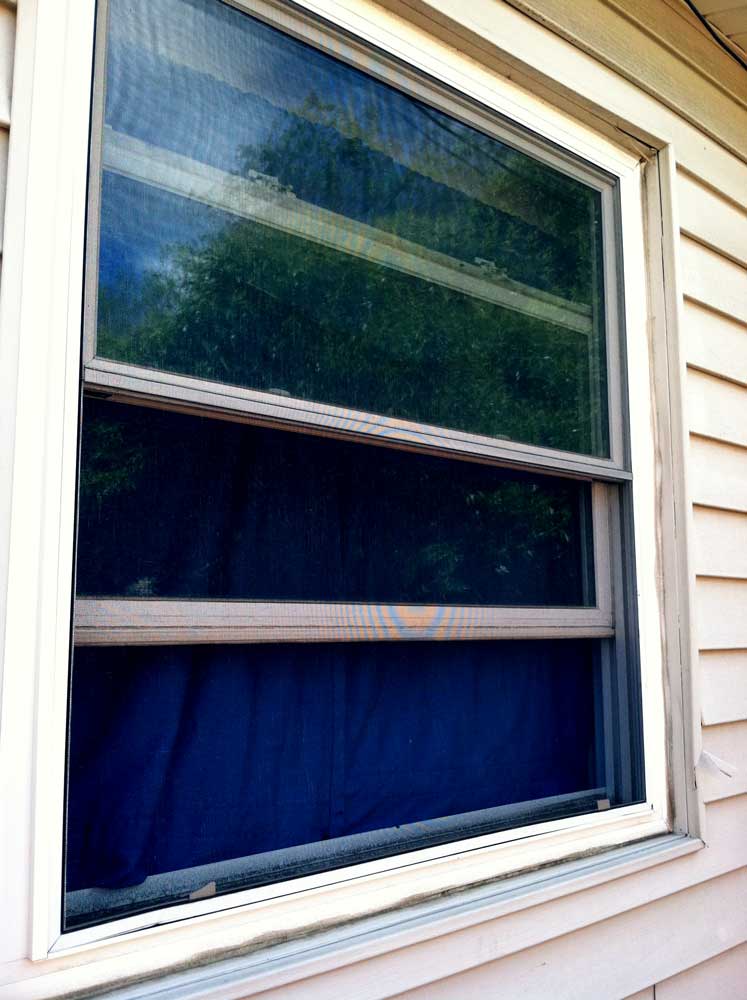
From the grower: "I prefer to use mini blinds, but these curtains were all I had at the time."
Jump to...